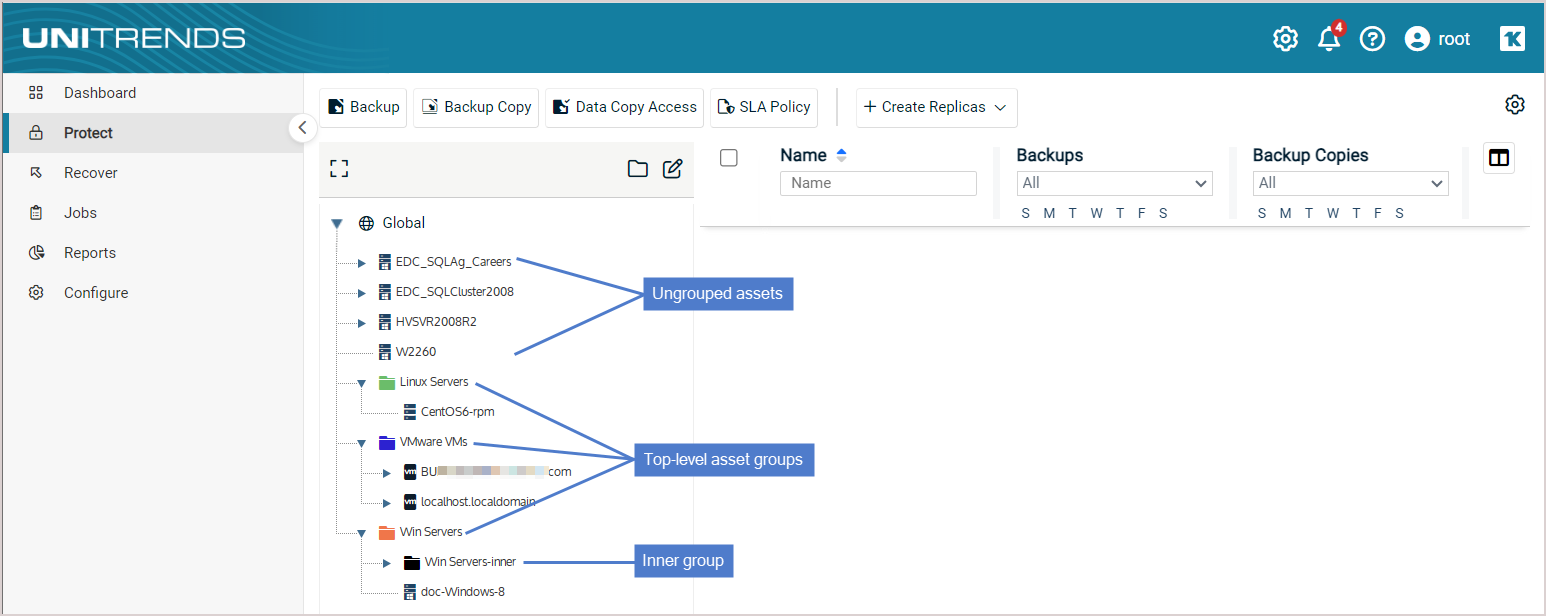
Grouping assets in custom folders
On the Protect page, you can create folders in the inventory tree to customize how protected assets are grouped and displayed in the UI. You can then assign users to groups so they can quickly locate the assets they need to work with. Once folders are created and the Show Groups option is selected on the Protect page, assets are presented in folder groups in these areas:
|
•
|
In the Create Backup Jobs dialog |
|
•
|
In the Create Backup Copy Jobs dialog |
You can opt to view folder groups or hide them by clicking the Show Groups or Hide Groups icon on the Protect page. The selected view determines how the inventory tree displays on the page and dialogs listed above. When users hide groups, they can then see all assets on the appliance, even ones in groups to which they have not been assigned.
Note: Folder groups do not display in the Backup Catalog or on reports.
The asset grouping feature is supported on appliances running version 9.0.0-13 or higher. Groups can be created or edited by Unitrends users that have administrator or superuser privileges only. The following assets can be grouped:
|
•
|
Agent-based assets, such as Windows or Linux servers |
See the following topics for details:
 Unitrends users and asset groups
For usability, you can use asset groups to customize which assets a user can see in Show Groups view. A user's privilege level determines which groups the user can see and whether the user can add, edit, or delete groups:
|
•
|
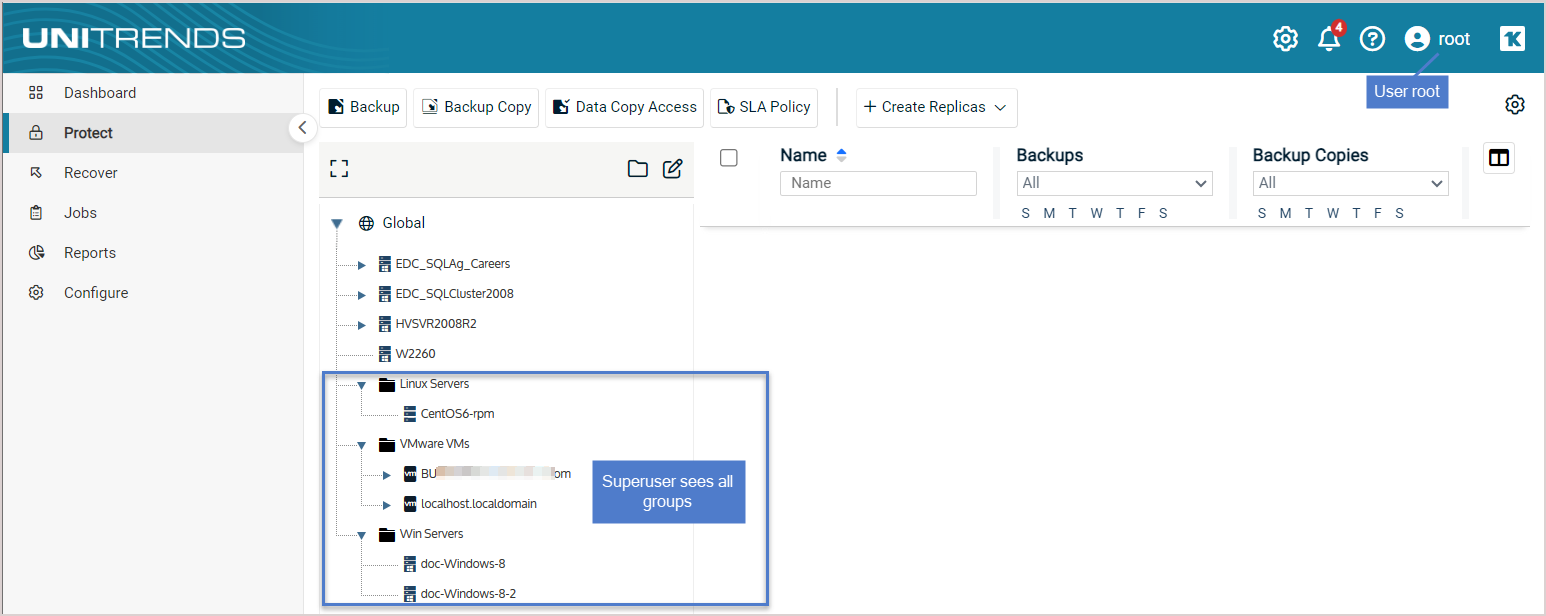
Users that have administrator or superuser privileges can see all assets and groups. |
|
•
|
Users that have administrator or superuser privileges cannot be removed from any group. |
|
•
|
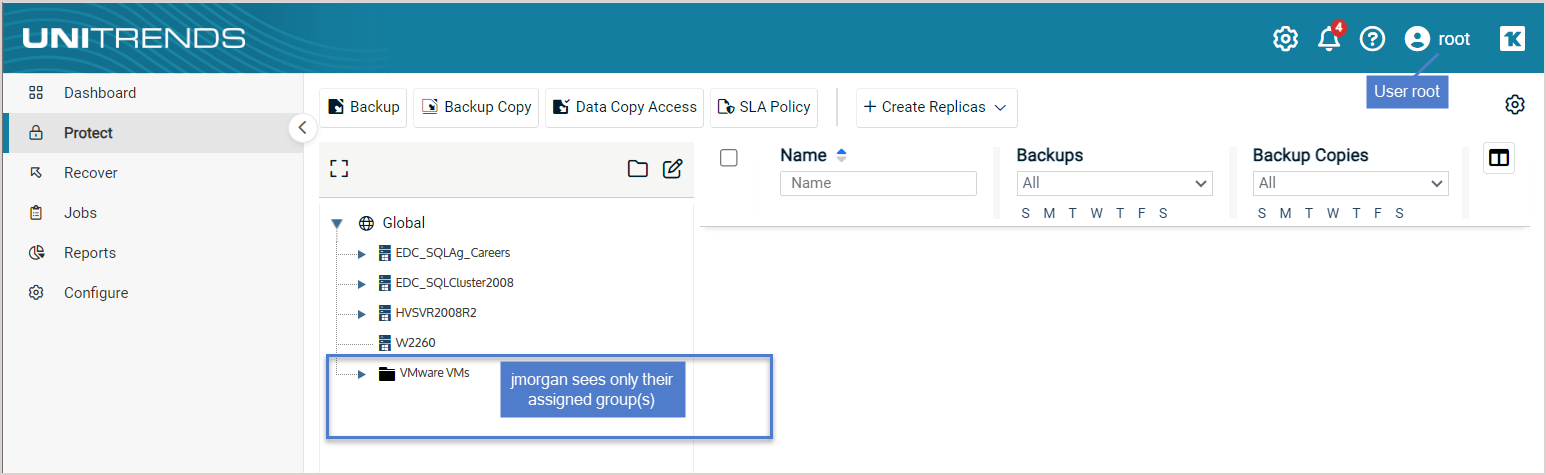
While in Show Groups view, users that have manage or monitor privileges can see ungrouped assets and assets in their assigned groups only. These users cannot see assets in groups to which they have not been assigned. To see all assets, the user must switch to Hide Groups view. |
|
•
|
Only users with administrator or superuser privileges can add, edit, or delete asset groups. |
|
•
|
You can assign users when creating a new group or by editing a group. A Unitrends user account must be created before the user can be assigned to a group. For details on creating users, see Appliance settings. |
In this example the root superuser sees all asset groups:
User jmorgan sees only their assigned group(s):
Working with asset groups
Consider the following when working with asset groups:
|
•
|
You can create, edit, and delete asset groups without impacting the original inventory tree. Simply click Hide Groups on the Protect page to return to the original inventory tree view. Click Show Groups to return to group view. |
|
•
|
You can create groups at different levels in the inventory tree. For example, you can create a top-level group that contains assets and inner groups. |
|
•
|
An inner group can be assigned one or more assets from its parent group. |
|
•
|
Assets can be assigned to one group only. Assigning an asset to an inner group moves the asset from its parent group to the child inner group. |
|
•
|
When an asset is removed from a top-level group, or a top-level group is deleted, the assets are moved to their original place in the inventory tree. |
|
•
|
When an asset is removed from an inner group, or an inner group is deleted, the assets are moved to the parent group. |
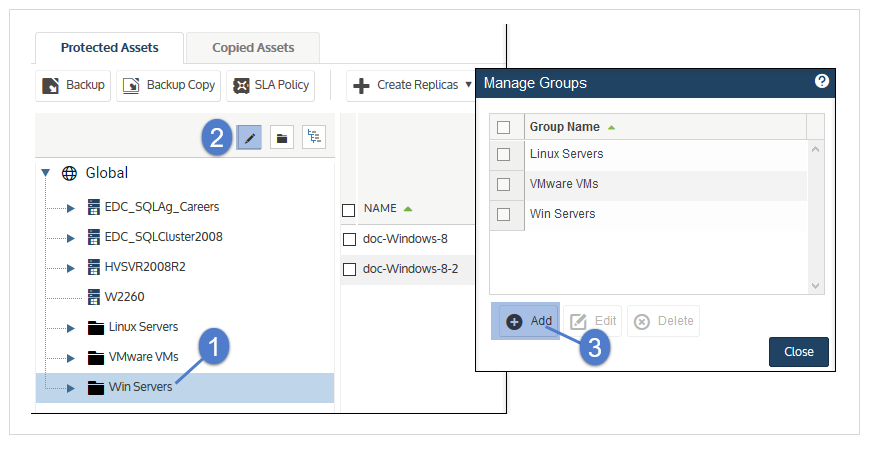
To create a top-level asset group
|
1
|
Log in to the UI as a user with administrator or superuser privileges. |
|
2
|
Select Protect or Protect > Protected Assets. |
|
3
|
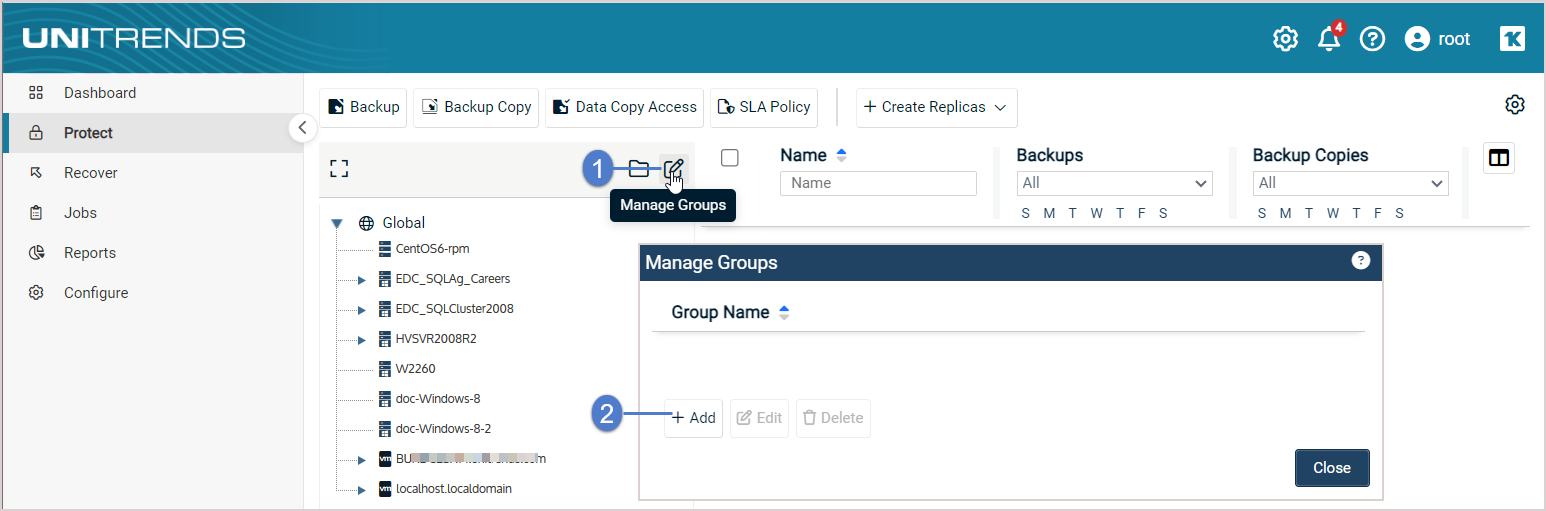
Click the Show Groups icon located above the inventory tree. |
|
4
|
Click the Manage Groups pencil icon. |
|
6
|
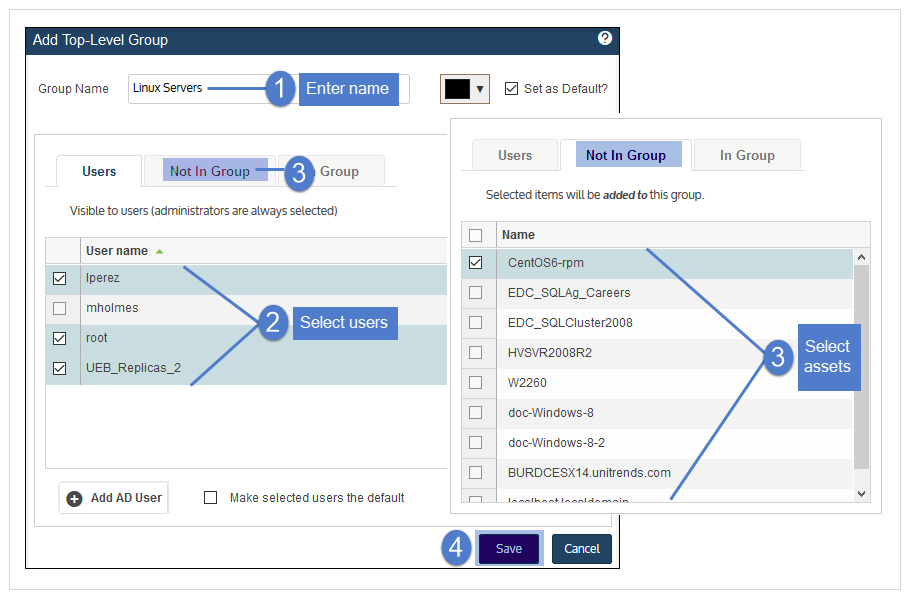
Enter a unique Group Name. |
|
7
|
(Optional) Click the color drop-down to select a display color for this group's folder. |
|
8
|
On the Users tab, click to select users to add to the group. |
Note: You cannot create users here. You can add existing Unitrends users to the group. For details on creating users, see Appliance settings.
|
•
|
Unitrends users display in the list. |
|
•
|
If you have created Unitrends Active Directory (AD) users, these do not display. To add an existing Unitrends AD user, click Add AD User, enter the AD username (without @domain), and click Save. |
|
•
|
Users with administrator or superuser privileges are automatically added to every group. You cannot remove these users from the group. |
|
9
|
On the Not in Group tab, click to select assets to add to the group. |
|
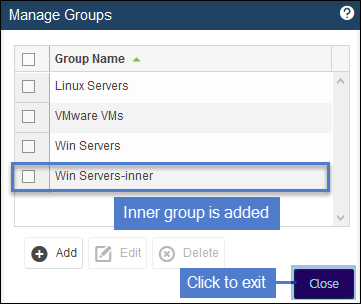
11
|
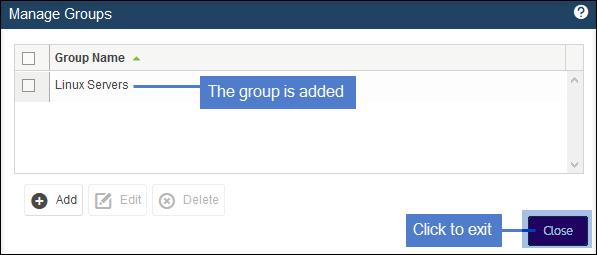
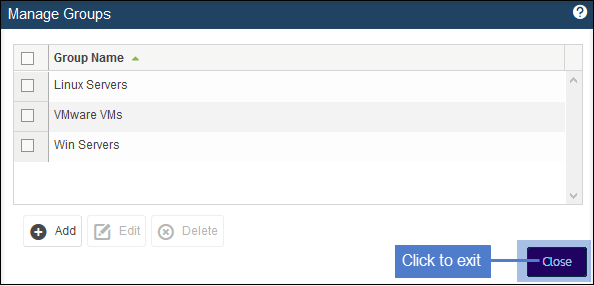
The group is added. Click Close to exit. |
|
12
|
The new group displays in the inventory tree on the Protect page. Expand the folder to view the assigned assets. |
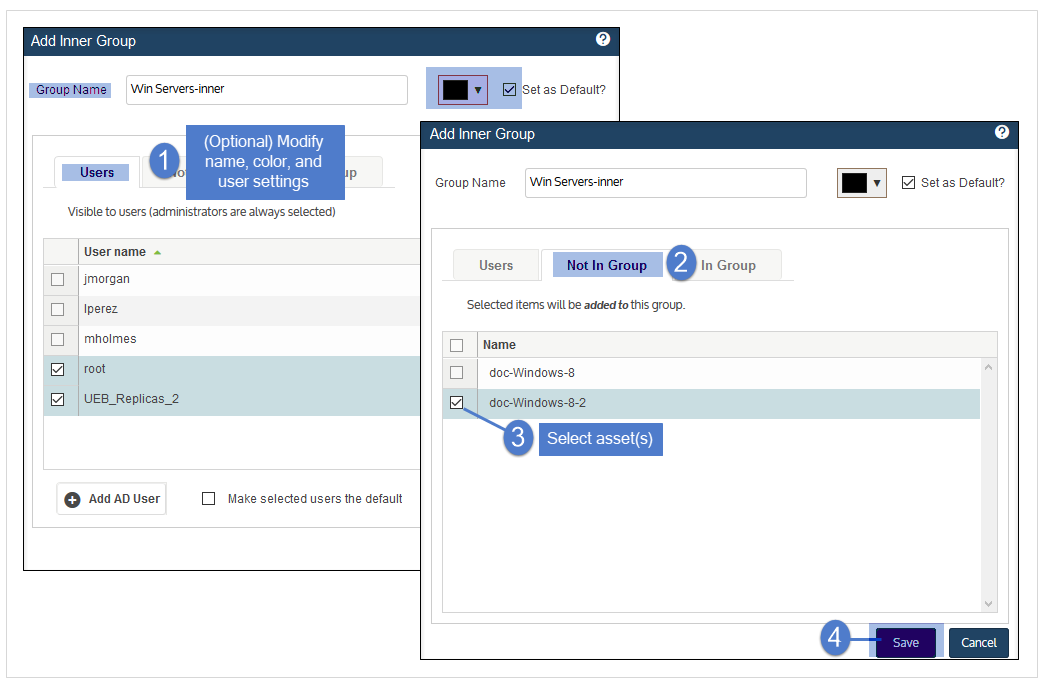
To create an inner group
|
1
|
Log in to the UI as a user with administrator or superuser privileges. |
|
2
|
Select Protect or Protect > Protected Assets. |
|
3
|
Click the Show Groups icon located above the inventory tree. |
|
4
|
In the inventory tree, select the top-level group that will contain the new inner group. |
|
5
|
Click the Manage Groups pencil icon. |
|
7
|
(Optional) Modify the Group Name. This name must be unique. |
|
8
|
(Optional) Click the color drop-down to select a display color for this group's folder. |
|
9
|
(Optional) On the Users tab, click to select users to add to the group. |
Note: You cannot create users here. You can add existing Unitrends users to the group. To create users, see Appliance settings.
|
•
|
Unitrends users display in the list. |
|
•
|
If you have created Unitrends Active Directory (AD) users, these do not display. To add an existing Unitrends AD user, click Add AD User, enter the AD username (without @domain), and click Save. |
|
•
|
Users with administrator or superuser privileges are automatically added to every group. You cannot remove these users from the group. |
|
10
|
On the Not in Group tab, click to select assets to add to the group. |
These assets are moved from the parent group to this inner group.
Note: If you do not see any assets, verify that you selected the outer group in the inventory tree on the Protected Assets tab. You cannot create an inner group by selecting the outer group in the Manage Groups dialog
The new group displays in the inventory tree on the Protect page. Expand the folder to view the assigned assets.

To edit an asset group
|
1
|
Log in to the UI as a user with administrator or superuser privileges. |
|
2
|
Select Protect or Protect > Protected Assets. |
|
3
|
Click the Show Groups icon located above the inventory tree. |
|
4
|
Click the Manage Groups pencil icon. |
|
5
|
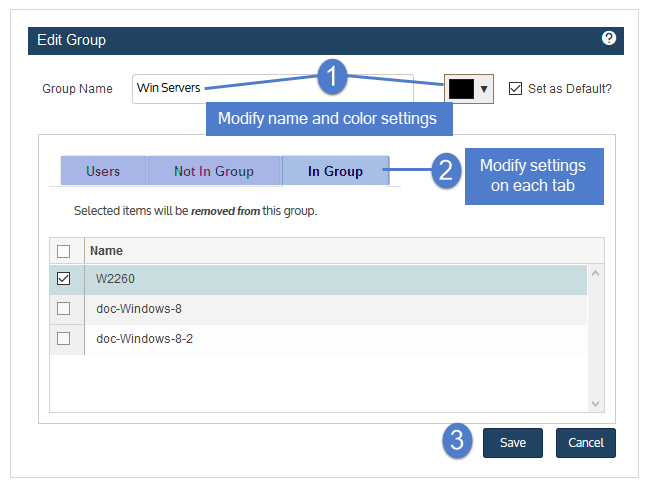
In the Group Name list, select the group to edit. |
|
7
|
Modify options as needed: |
|
•
|
The Group Name must be unique. |
|
•
|
Click the color drop-down to modify the display color for this group's folder. |
|
•
|
On the Users tab, click to select users to add or remove. |
Users with administrator or superuser privileges are automatically added to every group. You cannot remove these users from the group.
|
•
|
On the Not in Group tab, click to select assets to add to the group. |
|
•
|
On the In Group tab, click to select assets to remove from the group. |
Assets removed from a top-level group are moved to their original place in the inventory tree.
Assets removed from an inner group are moved to the parent group.
To view or hide asset groups
You can toggle the UI display to view or hide asset groups. In Show Groups view, any asset that is assigned to a group displays under its group folder. In Hide Groups view, any asset that is assigned to a group returns to its original location in the inventory tree (and no asset group folders display).
To view asset groups
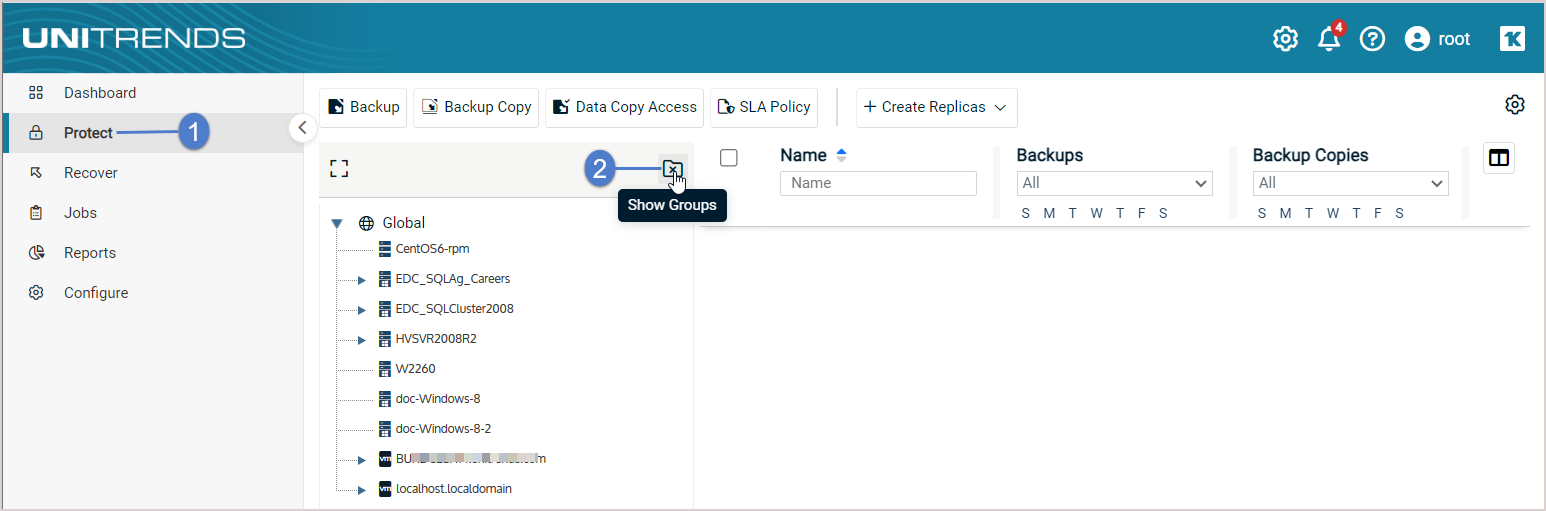
Go to Protect or Protect > Protected Assets and click the Show Groups icon located above the inventory tree:
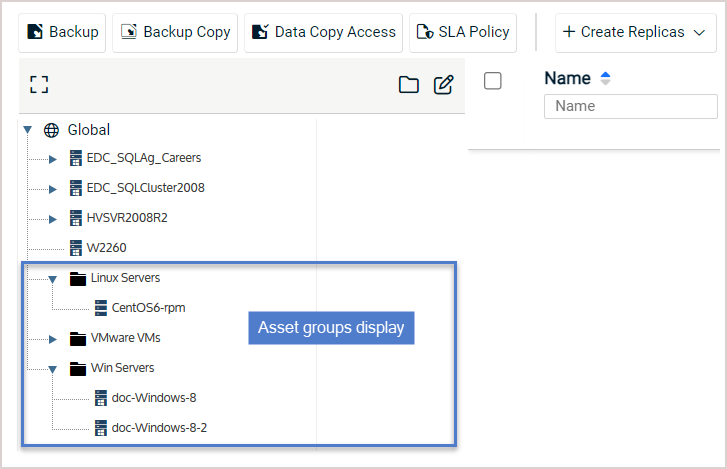
Grouped assets now display under their asset group folders:
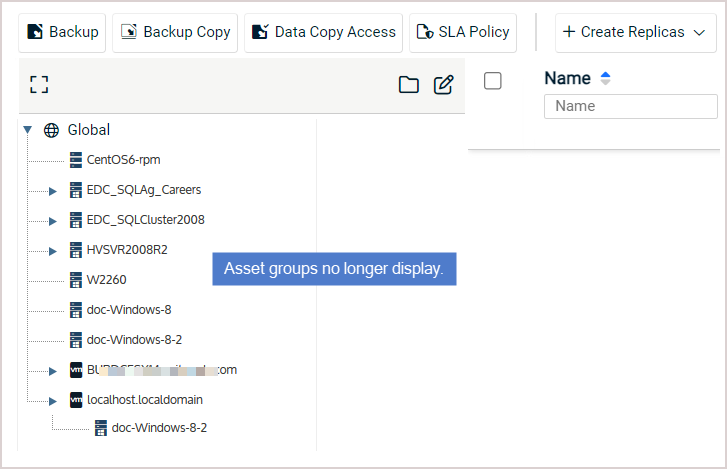
To hide asset groups
Go to Protect or Protect > Protected Assets and click the Hide Groups icon located above the inventory tree:
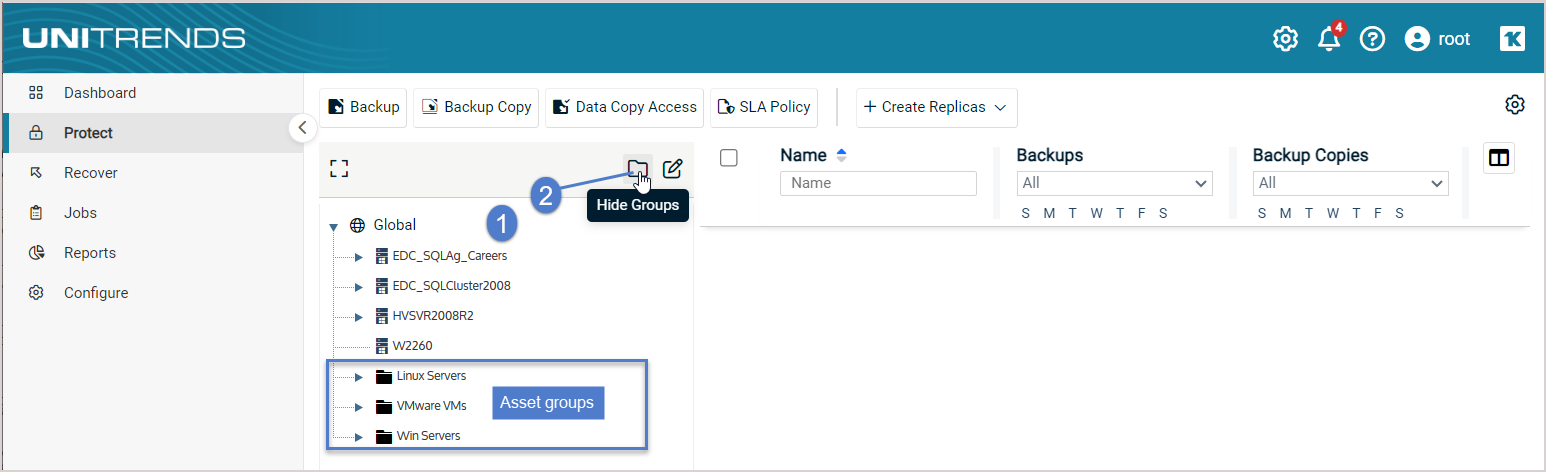
Asset groups no longer display. Assets from the groups now display individually in the main inventory tree.
To delete an asset group
|
1
|
Log in to the UI as a user with administrator or superuser privileges. |
|
2
|
On the Protect page, click the Show Groups icon located above the inventory tree. |
|
3
|
Click the Manage Groups pencil icon. |
|
4
|
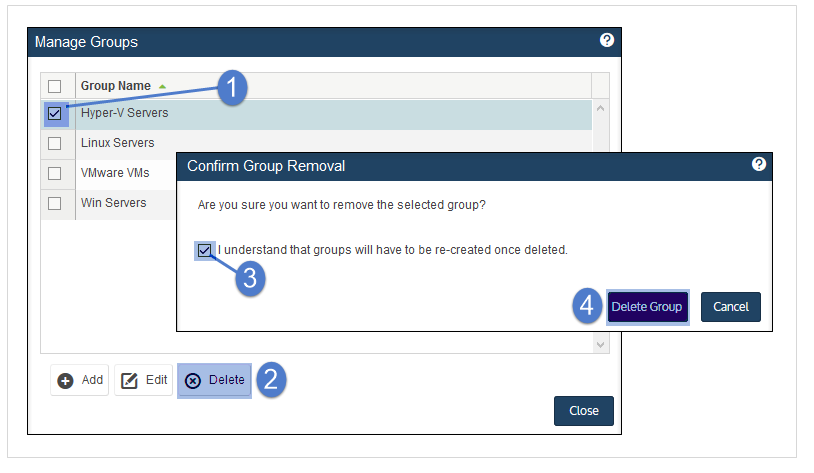
In the Group Name list, select the group to delete. |
|
6
|
Check the I understand... box to confirm, then click Delete Group. |
|
7
|
Assets in the group you deleted are moved to: |
|
•
|
Their original place in the inventory tree if you deleted a top-level group. |
|
•
|
To the parent group if you deleted an inner group. |