Recovering SQL backups
Unitrends supports recovery of full, differential, and transaction log backups of SQL databases. See the following topics for details:
Requirements vary depending on what type of database and backup are being recovered. Review the following table to determine which requirements are applicable to your environment. Ensure these requirements have been met before you perform the SQL recovery procedures.
|
Recovery type |
Requirements and considerations |
|||||||||||||||
|---|---|---|---|---|---|---|---|---|---|---|---|---|---|---|---|---|
|
All recovery operations |
The following apply to all SQL recovery operations. See the remainder of this table for additional requirements by backup mode and database type.
|
|||||||||||||||
|
Full backup of a user database |
The following apply to recovering full backups of SQL user databases:
|
|||||||||||||||
|
Differential or transaction log backup of a user database |
The following apply to recovering SQL differential or transaction log backups:
Note: Clustered instances and availability groups can move between cluster nodes. To ensure that the original location is available, it is best to verify that the cluster and all nodes have been added to the appliance before you run the recovery. (See Start protecting SQL clusters and availability groups for details.)
|
|||||||||||||||
|
System databases |
The following apply to recovering system databases:
|
|||||||||||||||
|
In a SQL cluster, a SQL Server failover cluster instance is installed into a Windows Server Failover Cluster (WSFC). The cluster's databases reside on shared storage that is accessible to each server node. When recovering a SQL backup to a clustered instance, you must recover to a clustered storage resource that is accessible to all nodes in the cluster, and is a dependency of the SQL clustered instance you are restoring to. As long as you leave the Specify Path field empty (on the Create Recover Job dialog), the backup is recovered to the original clustered storage resource. If you enter a path, be sure to specify a clustered storage resource that is a dependency of the SQL clustered instance you are restoring to. (If you specify a local volume, the recovery fails with a SQL VSS Writer error.) Note: Because it is the instance that is clustered, and not the hosted database, a backup taken on a clustered instance is no different than one taken on a non-clustered instance. As with all user database backups, a full can be recovered to any eligible instance (which can be clustered or non-clustered), and a differential or log backup must be recovered to the original location. |
||||||||||||||||
|
These additional requirements apply to recovering availability group databases. Before you recover, ensure that these SQL prerequisites have been met:
After recovery, you must manually reconfigure the mirrors and add the recovered database to the availability group. See Microsoft's documentation for details. |
||||||||||||||||
|
A stretch database can only be recovered to its original SQL instance and name. The recovery job overwrites the existing database (even if you specify a different path). Only local SQL data is included in the backups. After recovering the local SQL data, you must reconnect the local recovered database to the remote Azure database to reconcile the recovered data. See To recover a Stretch database backup by using the Backup Catalog for details. |
||||||||||||||||
|
The SQL Column Master Keys (CMKs) must be available on the recovery target so you can access the recovered data. The keys are stored in a certificate on the SQL server. If the keys are not available on the recovery target, you must install them after you recover the backup. In most environments:
|
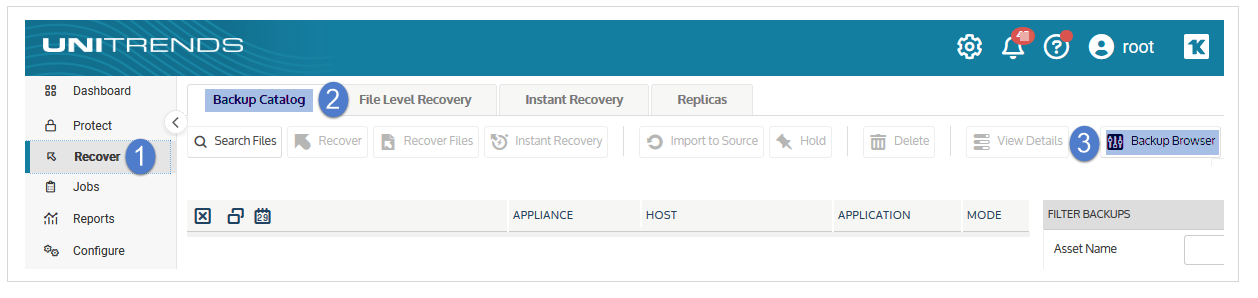
You can recover from a backup by using the Backup Catalog or the Backup Browser. To recover from an imported backup or hot backup copy, you must use the Backup Catalog. After you have reviewed the Requirements for recovering SQL backups, use the following procedures to recover a SQL backup or imported backup copy:
To import a backup copy, see To import a cold backup copy or To import a hot backup copy.
Use this procedure to recover one backup to the original location or to an alternate location. Run this procedure from the backup appliance to recover an entire backup or imported backup copy. Run this procedure from the backup copy target appliance to recover an entire hot backup copy.
| 1 | Log in to the backup appliance or target appliance (if recovering from a hot backup copy). |
| 2 | Select Recover, then click the Backup Catalog tab. |
(Optional) Use Filter Backups to the right to customize the backups that display. For details, see Working with custom filters.

| 3 | Expand the SQL database asset and select one of the following to use for the recovery: |
| • | A SQL backup. |
| • | An imported SQL backup copy. (To import a backup copy, see To import a cold backup copy or To import a hot backup copy.) |
| • | A hot backup copy (supported if performing the recovery on the target appliance where the hot copy resides). |
| 4 | Click Recover. |

| 5 | Enter Recovery Options and Advanced Options |
|
Recovery Options |
Description |
|||||||||||||||||||||
|---|---|---|---|---|---|---|---|---|---|---|---|---|---|---|---|---|---|---|---|---|---|---|
|
Recovery Target |
Select the asset where the database will be recovered. Notes:
|
|||||||||||||||||||||
|
Recovery Instance |
Select the SQL instance where the database will be recovered. |
|||||||||||||||||||||
|
Database |
Enter a name for the recovered database.
Note: For system databases, the database name cannot be changed. The existing database is overwritten during recovery. |
|||||||||||||||||||||
|
Specify Path |
Use this field to specify a path on the recovery target. You can enter a path manually or by browsing the target. (Check Specify Path to enable the Browse button.) A path is required in some cases and optional in others:
|
|||||||||||||||||||||
|
Point-in-time Recovery |
(Optional) This option is available for transaction log backups only. For additional recovery points, check the Point-in-time Recovery box and select the desired recovery point by moving the Earliest/Latest slider. |
|||||||||||||||||||||
|
Commands to run pre-restore |
(Optional) Enter commands to be run before the recovery. |
|||||||||||||||||||||
|
Commands to run post-restore |
(Optional) Enter commands to be run after the recovery. |
| 6 | Click Next. |

| 7 | Read the I understand... message, then check the box to indicate that you understand any database of the same name will be overwritten by the recovery. Click Save to start the recovery. |
Note: If you recovered an availability group database, you must manually reconfigure the mirrors and add the recovered database to the availability group. See Microsoft's documentation for details.

The recovery job is queued immediately. To view the running job, select Jobs > Active Job.
Use this procedure to recover one backup to the original location or to an alternate location.
Note: This procedure is not supported for imported backups and backup copies. To recover an imported backup or hot backup copy, use the Backup Catalog procedure above.
| 1 | Log in to the backup appliance. |
| 2 | Select Recover > Backup Catalog and click Backup Browser. |
| 3 | Select the Appliance and Date Range of backups to search. Backups that ran during the date range display. |
| 4 | (Optional) Refine the search: |
| • | Enter text in any column field to filter the display. |
| • | Click an arrow to sort by column. |
| • | Click the accordion icon to add or remove columns from the display. (Not all columns display by default.) |
| • | For a description of each column, see Backup Browser column descriptions. |
| 5 | Select the SQL backup and click Recover. |

| 6 | Enter Recovery Options and Advanced Options |
|
Recovery Options |
Description |
|||||||||||||||||||||
|---|---|---|---|---|---|---|---|---|---|---|---|---|---|---|---|---|---|---|---|---|---|---|
|
Recovery Target |
Select the asset where the database will be recovered. Notes:
|
|||||||||||||||||||||
|
Recovery Instance |
Select the SQL instance where the database will be recovered. |
|||||||||||||||||||||
|
Database |
Enter a name for the recovered database.
Note: For system databases, the database name cannot be changed. The existing database is overwritten during recovery. |
|||||||||||||||||||||
|
Specify Path |
Use this field to specify a path on the recovery target. You can enter a path manually or by browsing the target. (Check Specify Path to enable the Browse button.) A path is required in some cases and optional in others:
|
|||||||||||||||||||||
|
Point-in-time Recovery |
(Optional) This option is available for transaction log backups only. For additional recovery points, check the Point-in-time Recovery box and select the desired recovery point by moving the Earliest/Latest slider. |
|||||||||||||||||||||
|
Commands to run pre-restore |
(Optional) Enter commands to be run before the recovery. |
|||||||||||||||||||||
|
Commands to run post-restore |
(Optional) Enter commands to be run after the recovery. |
| 7 | Click Next. |
| 8 | Read the I understand... message, then check the box to indicate that you understand any database of the same name will be overwritten by the recovery. Click Save to start the recovery. |
Note: If you recovered an availability group database, you must manually reconfigure the mirrors and add the recovered database to the availability group. See Microsoft's documentation for details.
The recovery job is queued immediately. To view the running job, select Jobs > Active Job.
Use this procedure to recover multiple user databases to their original locations with their original names. Any existing data will be overwritten. (To recover to a different location, or to recover a system or availability group database, see To recover one SQL full, differential, or transaction log backup by using the Backup Catalog or To recover one SQL full, differential, or transaction log backup by using the Backup Browser.)
Run this procedure from the backup appliance to recover backups and/or imported backup copies. Run this procedure from the backup copy target appliance to recover hot backup copies.
| 1 | Log in to the backup appliance or target appliance (if recovering from a hot backup copy). |
| 2 | Select Recover, then click the Backup Catalog tab. |
(Optional) Use Filter Backups to the right to customize the backups that display. For details, see Working with custom filters.
| 3 | Expand the SQL database asset, then select the backup, imported backup, or hot backup copy to recover. |
| 4 | Repeat step 3 to select additional backups. |
| 5 | Click Recover. |

| 6 | Click Save to start the recovery. |
| • | Each backup you select is recovered as a separate job. |
| • | Databases are recovered to their original locations with their original names. Any existing data is overwritten. |

The recovery job is queued immediately. To view the running job, select Jobs > Active Job.
A stretch database can only be recovered to its original SQL instance and name. The recovery job overwrites the existing database.
Because only local SQL data is included in the backup, you must reconnect the local recovered database to the remote Azure database to reconcile the recovered local data with data that has been migrated to Azure.
Run this procedure from the backup appliance to recover a backup or imported backup copy. Run this procedure from the backup copy target appliance to recover a hot backup copy.
| 1 | Log in to the backup appliance or target appliance (if recovering from a hot backup copy). |
| 2 | Select Recover, then click the Backup Catalog tab. |
(Optional) Use Filter Backups to the right to customize the backups that display. For details, see Working with custom filters.
| 3 | Expand the SQL database asset and select the backup, imported backup, or hot backup copy to recover. |
| 4 | Click Recover. |

| 5 | Select these Recovery Options and Advanced Options: |
|
Recovery Options |
Description |
|---|---|
|
Recovery Target |
Select the original SQL server asset (where the backup was taken). |
|
Recovery Instance |
Select the original SQL instance (where the backup was taken). |
|
Database |
Enter the name of the original database. Note that existing database files are overwritten during the recovery. |
|
Specify Path |
Leave this field empty. Files will be recovered to their original locations. |
|
Commands to run pre-restore |
(Optional) Enter commands to be run before the recovery runs. |
|
Commands to run post-restore |
(Optional) Enter commands to be run after the recovery runs. |
| 6 | Click Next. |
| 7 | Read the I understand... message, then check the box to indicate that you understand any database of the same name will be overwritten by the recovery. Click Save to start the recovery. |
| • | The recovery job is queued immediately. To view the running job, select Jobs > Active Job. |
| • | The backup is recovered to the original location, creating a new SQL server database. |

| 8 | Follow the instructions in Microsoft's Backup and restore Stretch-enabled databases article to connect the newly recovered database to Azure and reconcile the local recovered data with the Azure database. Note the following: |
| • | For credentials, you will need to supply the Azure SQL database FQDN credentials that were created when the original SQL database was stretched. (Do not use the Azure SQL Server administrator credentials.) |
| • | Stretch database credentials are stored on the SQL server and are encrypted with a SQL Master Key. If credentials have been lost, you must recreate them manually using the master key before you can connect the recovered database to the remote Azure instance. |
| • | Connecting the newly recovered database causes a new copy of the remote Azure database to be created. |
A stretch database can only be recovered to its original SQL instance and name. The recovery job overwrites the existing database.
Because only local SQL data is included in the backup, you must reconnect the local recovered database to the remote Azure database to reconcile the recovered local data with data that has been migrated to Azure.
Note: This procedure is not supported for imported backups and backup copies. To recover an imported backup or hot backup copy, use the Backup Catalog procedure above.
| 1 | Log in to the backup appliance. |
| 2 | Select Recover > Backup Catalog and click Backup Browser. |
| 3 | Select the Appliance and Date Range of backups to search. Backups that ran during the date range display. |
| 4 | (Optional) Refine the search: |
| • | Enter text in any column field to filter the display. |
| • | Click an arrow to sort by column. |
| • | Click the accordion icon to add or remove columns from the display. (Not all columns display by default.) |
| • | For a description of each column, see Backup Browser column descriptions. |
| 5 | Select the SQL backup and click Recover. |
| 6 | Select these Recovery Options and Advanced Options: |
|
Recovery Options |
Description |
|---|---|
|
Recovery Target |
Select the original SQL server asset (where the backup was taken). |
|
Recovery Instance |
Select the original SQL instance (where the backup was taken). |
|
Database |
Enter the name of the original database. Note that existing database files are overwritten during the recovery. |
|
Specify Path |
Leave this field empty. Files will be recovered to their original locations. |
|
Commands to run pre-restore |
(Optional) Enter commands to be run before the recovery runs. |
|
Commands to run post-restore |
(Optional) Enter commands to be run after the recovery runs. |
| 7 | Click Next. |
| 8 | Read the I understand... message, then check the box to indicate that you understand any database of the same name will be overwritten by the recovery. Click Save to start the recovery. |
| • | The recovery job is queued immediately. To view the running job, select Jobs > Active Job. |
| • | The backup is recovered to the original location, creating a new SQL server database. |
| 9 | Follow the instructions in Microsoft's Backup and restore Stretch-enabled databases article to connect the newly recovered database to Azure and reconcile the local recovered data with the Azure database. Note the following: |
| • | For credentials, you will need to supply the Azure SQL database FQDN credentials that were created when the original SQL database was stretched. (Do not use the Azure SQL Server administrator credentials.) |
| • | Stretch database credentials are stored on the SQL server and are encrypted with a SQL Master Key. If credentials have been lost, you must recreate them manually using the master key before you can connect the recovered database to the remote Azure instance. |
| • | Connecting the newly recovered database causes a new copy of the remote Azure database to be created. |