Creating backup copy jobs
Backup copies are duplicates of your backups and are stored on a secondary target.
See the following topics to create backup copy jobs:
Note: For Windows, Linux, VMware, Hyper-V, and AHV assets, you can create SLA policies instead of creating individual jobs. For details on how SLA policies work, see Methods for scheduling jobs.
Use these procedures to manually create backup copy jobs. Before creating jobs, you must first add the target to your backup appliance (see Backup copy targets). For an overview of the types of targets you can use, see Backup copies. Unitrends also recommends that you review the following information to develop the best protection strategy for your environment: Preparing for backups and About creating backup and backup copy jobs.
The following considerations apply to backup copies:
| • | Backups that complete successfully (green) or with warnings (yellow) are eligible for backup copy jobs. Failed (red) backups are not copied. |
| • | Your backup copy storage can contain only one copy of a given backup. If you attempt to create a copy of a backup that has already been written to the target, it is not written, but other backups in the job are copied. The original backup copy remains intact with the original backup copy date. |
| • | Backup copies stored on external media are known as cold backup copies. Cold backup copies reside on cloud storage managed by third-party vendors or on other media, such as eSATA, tape, and NAS devices. |
| • | Backup copies stored in the Unitrends Cloud or on a second Unitrends appliance are known as hot backup copies. |
| • | After creating a cold backup copy job, backups for the selected assets are copied to the target when the backup copy job runs. You can choose to copy the last backups or backups within a specified date range. |
| • | After creating a hot backup copy job, subsequent backups for the selected assets are copied to the target as backups complete. |
| • | For cold backup copies, incrementals are not copied directly. Instead, incremental backups are synthesized into differential backups for all assets included in a scheduled backup copy job. These differentials are then copied to the cold backup copy media. |
| • | To ensure successful backup copies, make sure the following reserved directory is available on the backup appliance: /mnt/archive/tmp. |
When creating a backup copy job, you first select the assets whose backups you want to copy. Any physical machine, virtual machine, or application is an asset. The Create Backup Copy Job dialog displays assets in an inventory tree where:
| • | Each physical (agent-based) asset and virtual host displays as a top-level node under its backup appliance. |
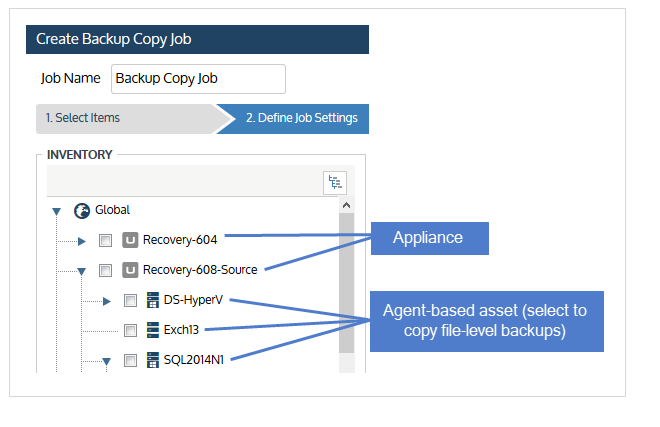

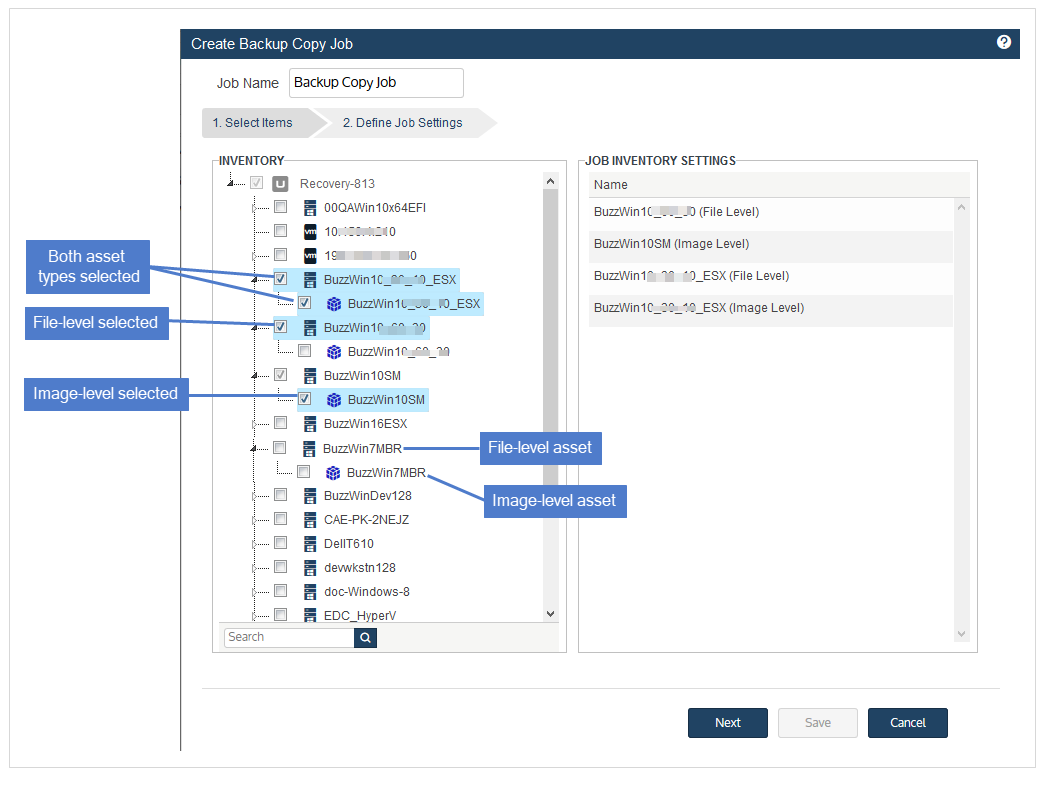
For Windows assets that are eligible for image-level backups, an image-level sub-node displays. Select the primary node to copy file-level backups. Select the image-level sub-node to copy image-level backups.
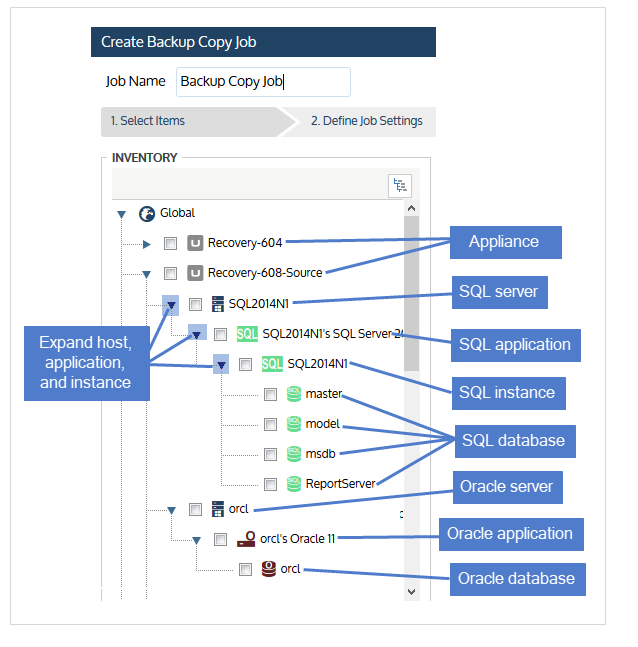
| • | Each application displays as a sub-node under its physical host asset. |
| • | Each VM displays as a sub-node under its virtual host asset. |
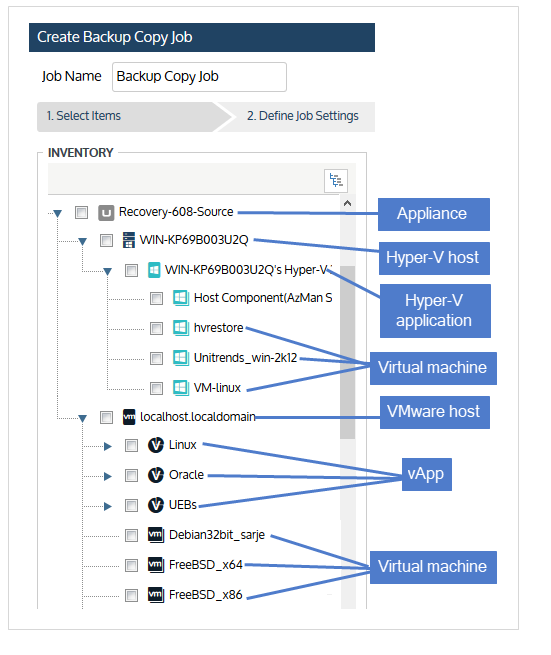
Click to select one or more assets in the inventory tree. The assets you select display in Job Inventory Settings.
Backup copy job procedures
Use this procedure to copy backups to another Unitrends appliance.
| 1 | Log in to the source backup appliance. |
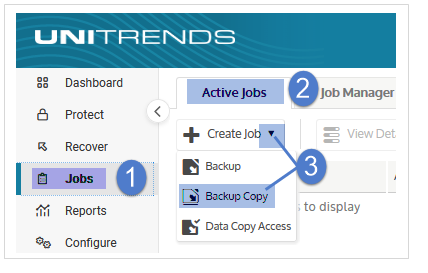
| 2 | Click Jobs > Active Jobs > Create job > Backup Copy. |
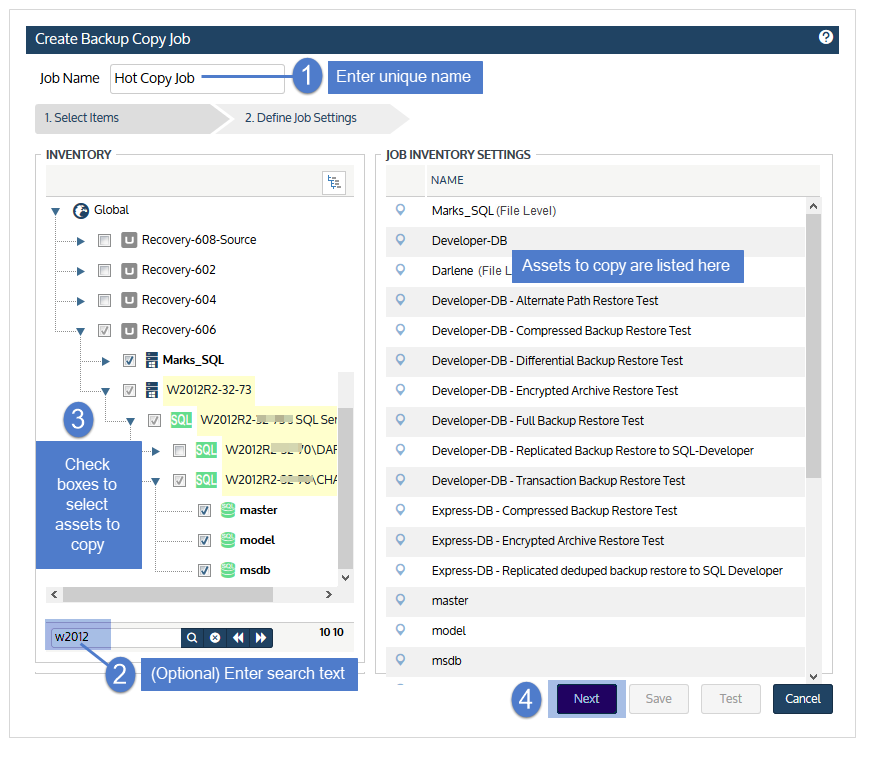
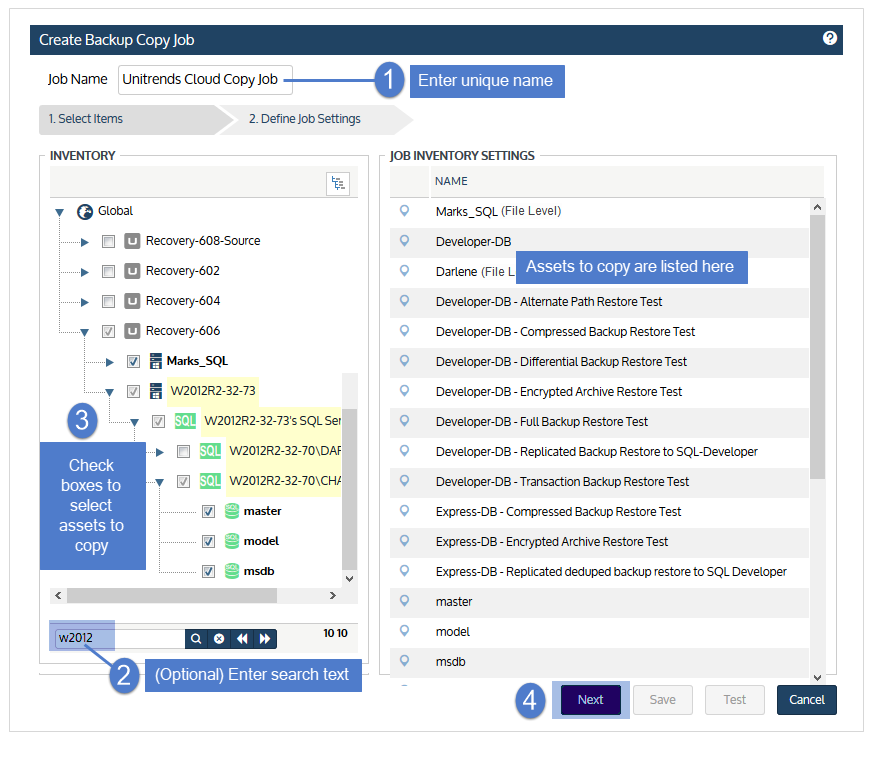
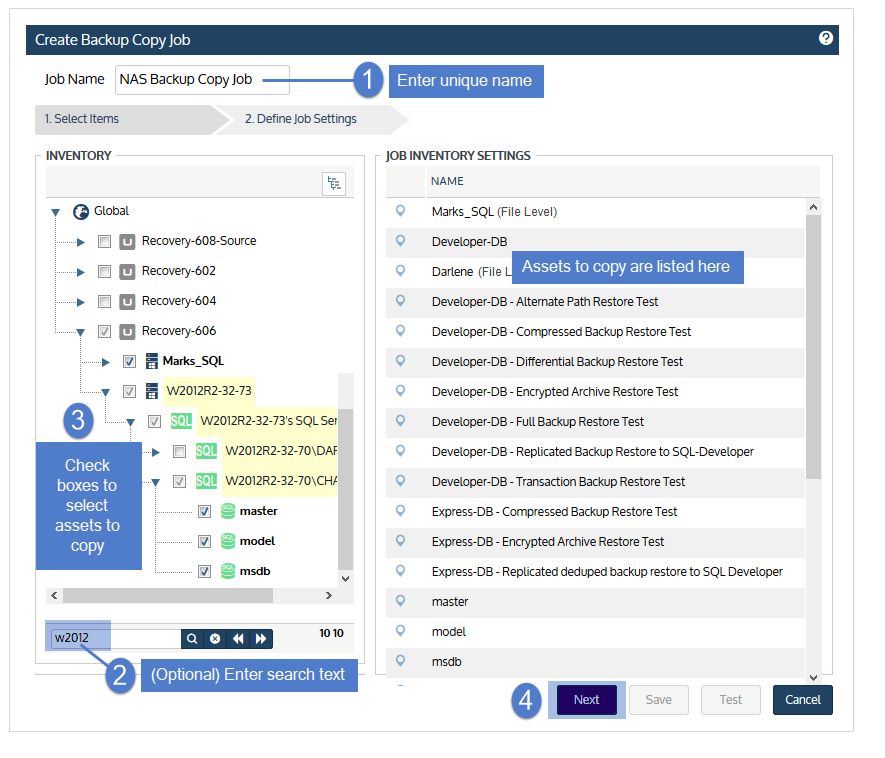
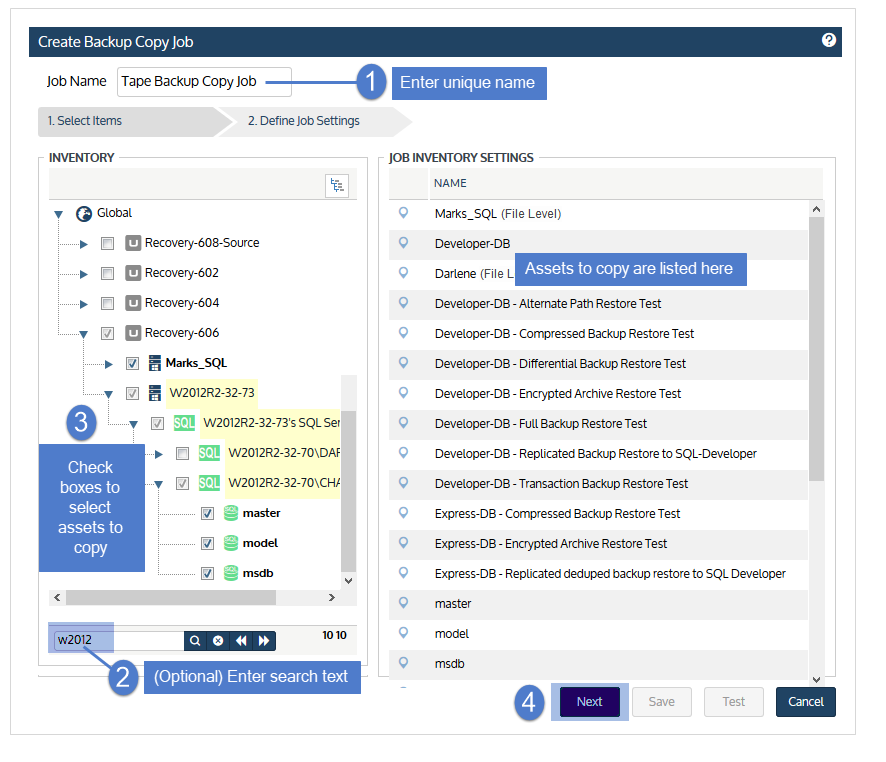
| 3 | Enter a unique Job Name. |
| 4 | In the Inventory tree, check boxes to select assets whose backups will be copied. |
| • | To locate an asset by name, use the Search field below. |
| • | Expand the tree as necessary to select VMs and applications. |
| • | Select a virtual host to select all of its VM assets. |
| • | Select an application instance to select all of its databases or storage groups. |
| 5 | Click Next. |
| 6 | In the Backup Copy Type list, select Backup Copy (Hot). |
| 7 | In the Backup Copy Target list, select one or more target appliances. (Press Ctrl or Shift to select more than one appliance.) |
Note: A given asset can be included in only one job per backup copy target. If you attempt to add an asset to a second job for the same backup copy target, this message displays: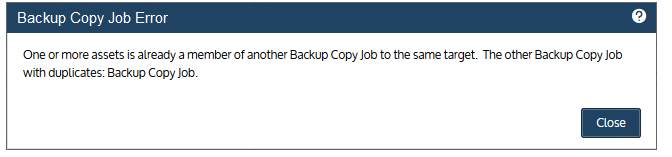

The job is created and backups are copied according to the queue scheme that was configured for the source backup appliance (see To tune connection options for a Unitrends Cloud or Unitrends appliance target).
Use this procedure to manually copy a successful full backup to the Unitrends Cloud or to a Unitrends appliance target. This procedure adds the backup copy job to the Active Jobs queue if these conditions are met:
| • | A hot backup copy target has been added to the backup appliance. |
| • | The backup has not been copied to the target. |
| • | The backup copy job is not in the Active Jobs queue. |
| • | The source backup appliance is copying to only one hot backup copy target. If the appliance has been configured with multiple hot backup copy targets, the Add to Hot Backup Copy Queue button does not display in the backup log and this procedure is not supported. |
| 1 | Click Jobs > Recent Jobs. |
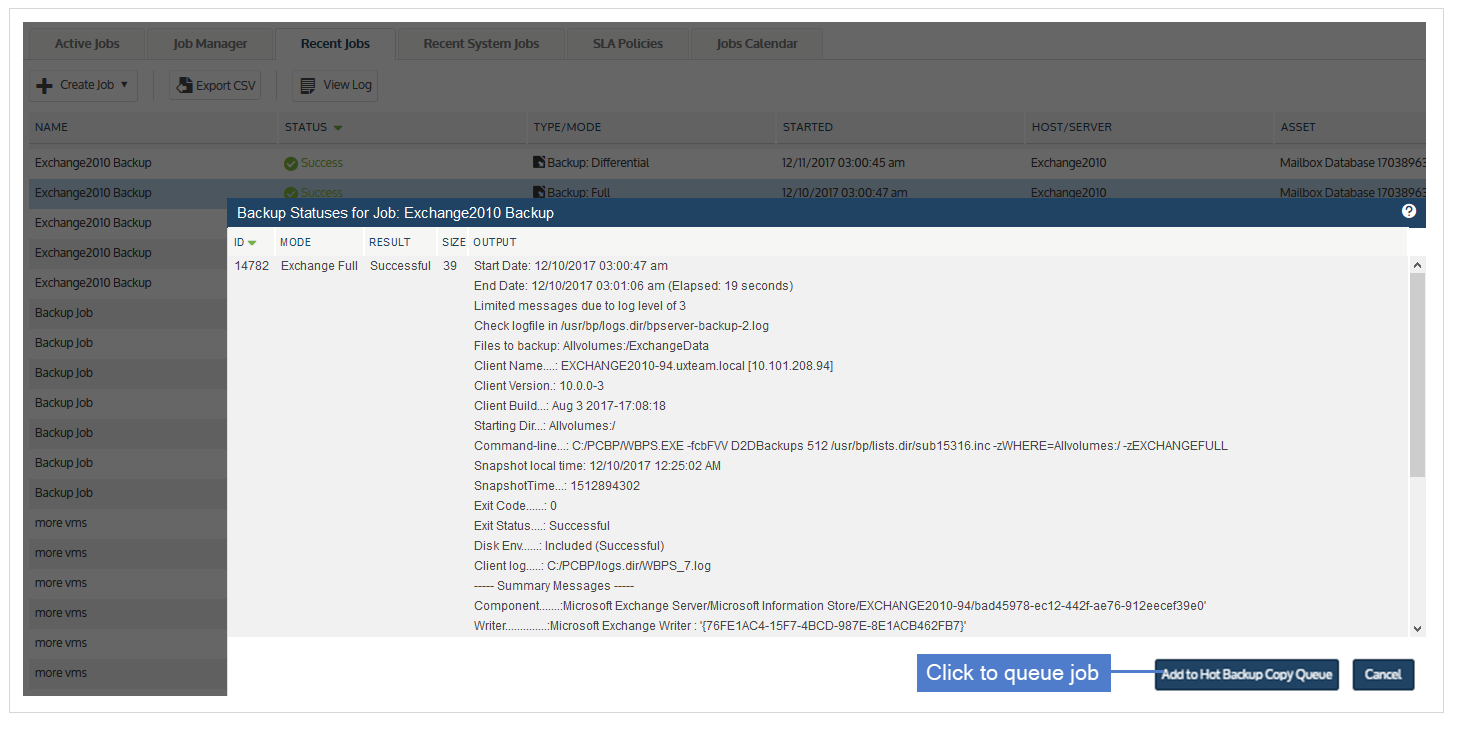
| 2 | Select the full backup and click View Log. |
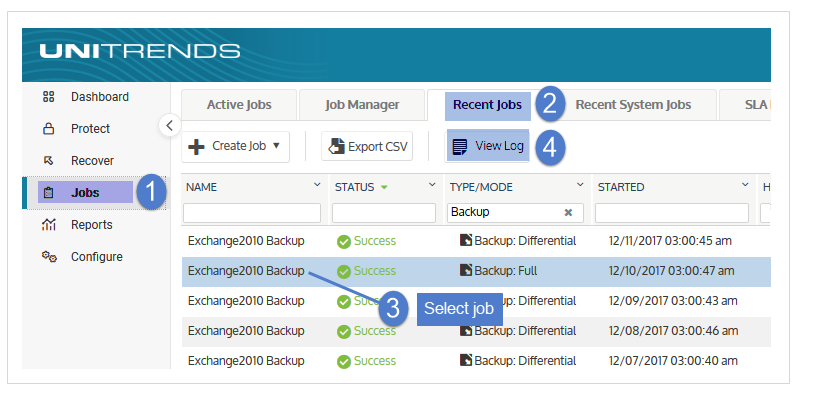
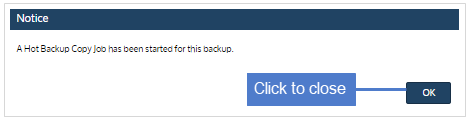
| 3 | Click Add to Hot Backup Copy Queue. The backup copy job is added to the queue. |
Note: The Add to Hot Backup Copy Queue button does not display if hot backup copy is not supported for the backup or if the source appliance is configured with multiple hot backup copy targets.
Use this procedure to copy backups to the Unitrends Cloud.
Note: A given asset can be included in only one job per backup copy target.
| 1 | Log in to the source backup appliance. |
| 2 | Click Jobs > Active Jobs > Create job > Backup Copy. |
| 3 | Enter a unique Job Name. |
| 4 | In the Inventory tree, check boxes to select assets whose backups will be copied. |
| • | To locate an asset by name, use the Search field below. |
| • | Expand the tree as necessary to select VMs and applications. |
| • | Select a virtual host to select all of its VM assets. |
| • | Select an application instance to select all of its databases or storage groups. |
| 5 | Click Next. |
| 6 | Select Unitrends Cloud in the Backup Copy Target list. |
| 7 | Click Save. |
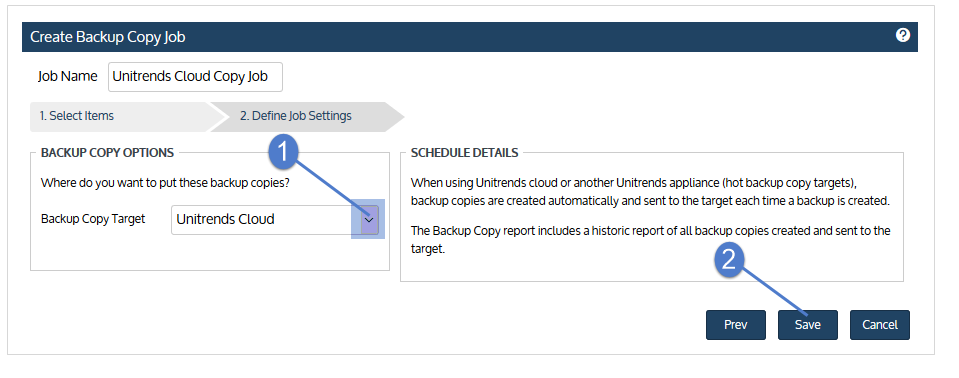
The job is created and backups are copied according to the queue scheme that was configured for the source backup appliance (see To tune connection options for a Unitrends Cloud or Unitrends appliance target).
Use this procedure to copy backups to a Google, Amazon, Rackspace, or Azure Blob cloud target.
Important! If you do not have a storage threshold defined for the target, there is no limit to the amount of data the job will copy to the cloud (regardless of the storage threshold setting you define in the job). To define a threshold for the target, see To view or edit a backup copy target.
| 1 | Click Jobs > Active Jobs > Create job > Backup Copy. |
| 2 | Enter a unique Job Name. |
| 3 | In the Inventory tree, check boxes to select assets whose backups will be copied. |
| • | To locate an asset by name, use the Search field below. |
| • | Expand the tree as necessary to select VMs and applications. |
| • | Select a virtual host to select all of its VM assets. |
| • | Select an application instance to select all of its databases or storage groups. |
| 4 | Click Next. |

| 5 | Select the cloud target in the Backup Copy Target list. |
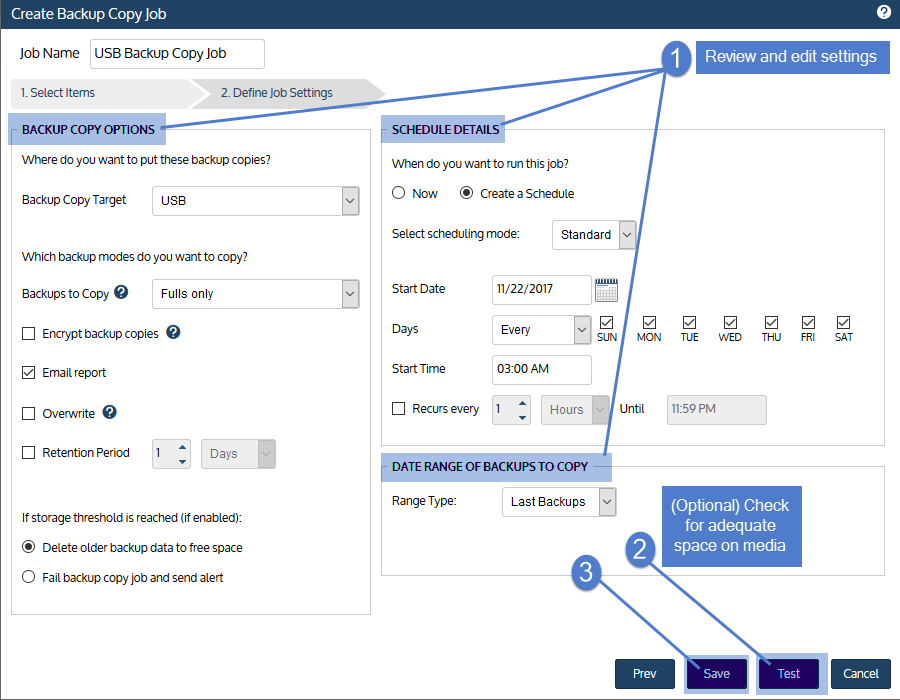
| 6 | Set remaining Backup Copy Options, Schedule Details, and Date Range. |
For descriptions of each setting, see Backup copy job settings.
| 7 | (Optional) Click Test to see the estimated size of the job and whether the target has enough space available for the new copies. Click OK to close the test results Notice. |
| 8 | Click Save. |
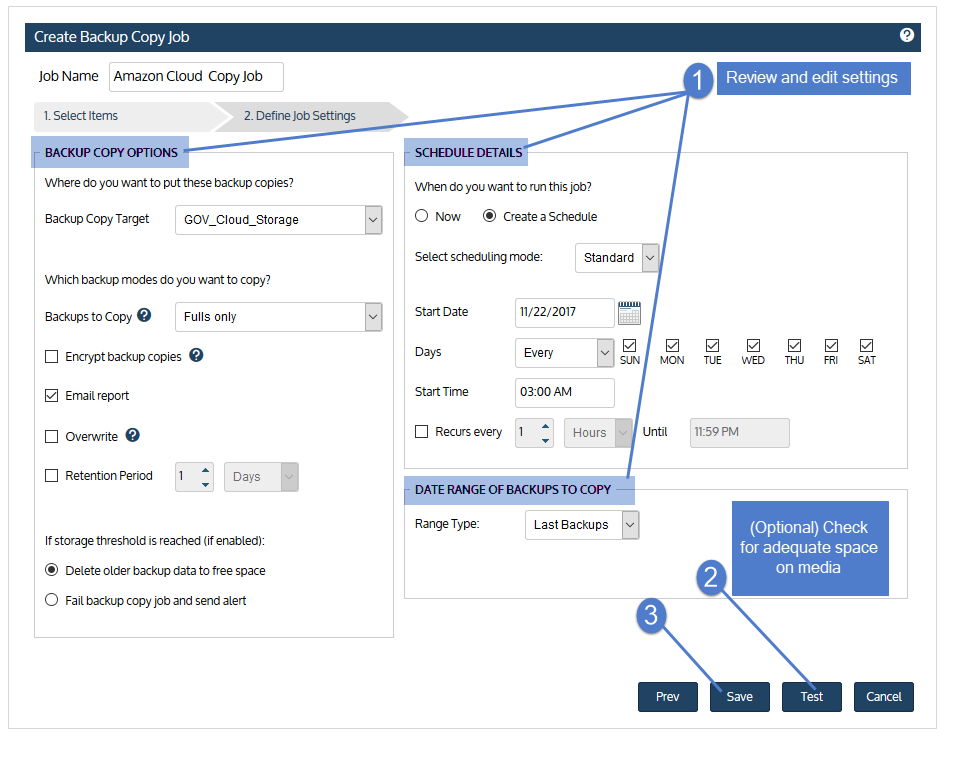
The job is created and will run at the date and times specified.
|
Item |
Description |
||||||||||||||||||
|---|---|---|---|---|---|---|---|---|---|---|---|---|---|---|---|---|---|---|---|
|
Job Name |
Name of the backup copy job. If creating a schedule, you must enter a unique name. |
||||||||||||||||||
|
Backup Copy Target |
Select the target where backups will be copied. The list contains all backup targets that have been added to the appliance. For details on adding a target, see Backup copy targets. |
||||||||||||||||||
|
Backups to Copy |
Select Fulls only to copy only full backups or All Modes to copy backups of any mode. Backups that complete successfully (green) or with warnings (yellow) are eligible for backup copy jobs. Failed (red) backups are not copied. |
||||||||||||||||||
|
Encrypt backup copies |
Check this box to encrypt cold backup copies. (Encryption must also be configured on the appliance. For details, see Encryption.) If the backup copy target device is configured for encryption, copies are encrypted regardless of this setting. |
||||||||||||||||||
|
Email report |
Check this box to email a report when this job completes. |
||||||||||||||||||
|
Overwrite |
Use with the Retention Period option. Check the Overwrite box to overwrite backup copies that are older than the specified Retention Period. If you do not use the Overwrite and Retention Period options, copy jobs fail if there is insufficient space available on the backup copy target. Overwrite does the following:
|
||||||||||||||||||
|
Retention Period |
Use with the Overwrite or Delete older backup data to free space option. Check the Retention Period box to specify the length of time a copy is retained before it can be deleted or overwritten. To define the retention period, enter a number and select Days, Weeks, Months, or Years. Example: enter 2 and select Weeks to retain copies for at least 2 weeks. If you do not use the Retention Period option, copy jobs fail if there is insufficient space available on the backup copy target. Modifying the retention period does not change the retention period of existing cold copies. The new setting is applied to subsequent backup copies only. |
||||||||||||||||||
|
If storage threshold is reached |
Determines whether to delete copies or fail the job if the target does not have sufficient space. Important! For Google, Amazon, Rackspace, or Azure Blob cloud targets, you must set a storage threshold to limit the amount of data that can be copied. If no threshold is set, the target will always have sufficient space for the copy job and these options do not apply. For details on setting a threshold, see To view or edit a backup copy target. |
||||||||||||||||||
|
Delete older backup data to free space |
Select this option to remove older copies to make room for new ones.
|
||||||||||||||||||
|
Fail backup copy job and send alert |
Select this option to fail the backup copy job if there is insufficient free space on the target. |
||||||||||||||||||
|
Schedule Details |
Select Now to run the job immediately or select Create a Schedule and define additional settings. |
||||||||||||||||||
|
Select scheduling mode |
In most cases, the Standard scheduling mode can be used to create the schedule. If you need more granularity, choose the Custom mode to create a custom calendar. For details, see Using the Custom scheduling mode in the Create Backup Copy Job dialog. |
||||||||||||||||||
|
Start Date |
Date when the schedule will run for the first time. |
||||||||||||||||||
|
Days |
Days when the schedule will run. |
||||||||||||||||||
|
Start Time |
Time of day when the schedule will run. (This is also the Start Time used by the Recurs every option.) |
||||||||||||||||||
|
Recurs every / Until |
Use to run the schedule every N hours until the specified time. Check the Recurs every box, select a frequency (number of hours), and specify an end time. |
||||||||||||||||||
|
Date Range |
Choose to copy the most recent backups or specify a date range of backups to copy. |
| 1 | Click Jobs > Active Jobs > Create job > Backup Copy. |
| 2 | Enter a unique Job Name. |
| 3 | In the Inventory tree, check boxes to select assets whose backups will be copied. |
| • | To locate an asset by name, use the Search field below. |
| • | Expand the tree as necessary to select VMs and applications. |
| • | Select a virtual host to select all of its VM assets. |
| • | Select an application instance to select all of its databases or storage groups. |
| 4 | Click Next. |

| 5 | Select the disk target in the Backup Copy Target list. |
| 6 | Set remaining Backup Copy Options, Schedule Details, and Date Range. |
For descriptions of each setting, see Backup copy job settings.
| 7 | (Optional) Click Test to see the estimated size of the job and whether the target has enough space available for the new copies. Click OK to close the test results Notice. |
| 8 | Click Save. |
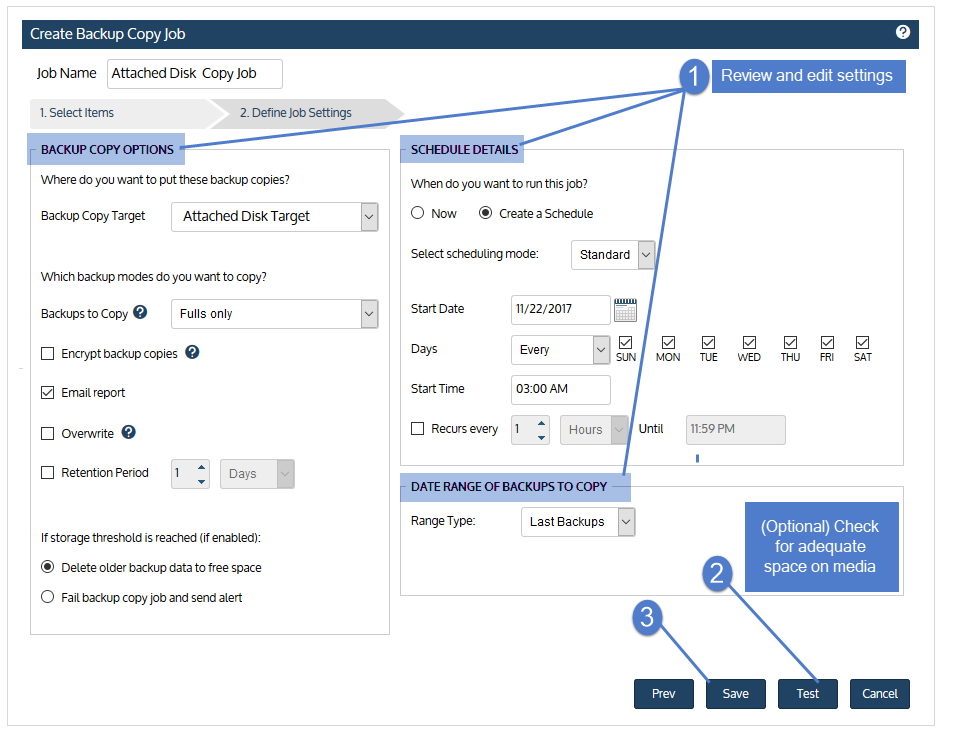
The job is created and will run at the date and times specified.
|
Item |
Description |
||||||||||||||||||
|---|---|---|---|---|---|---|---|---|---|---|---|---|---|---|---|---|---|---|---|
|
Job Name |
Name of the backup copy job. If creating a schedule, you must enter a unique name. |
||||||||||||||||||
|
Backup Copy Target |
Select the target where backups will be copied. The list contains all backup targets that have been added to the appliance. For details on adding a target, see Backup copy targets. |
||||||||||||||||||
|
Backups to Copy |
Select Fulls only to copy only full backups or All Modes to copy backups of any mode. Backups that complete successfully (green) or with warnings (yellow) are eligible for backup copy jobs. Failed (red) backups are not copied. |
||||||||||||||||||
|
Encrypt backup copies |
Check this box to encrypt cold backup copies. (Encryption must also be configured on the appliance. For details, see Encryption.) If the backup copy target device is configured for encryption, copies are encrypted regardless of this setting. |
||||||||||||||||||
|
Email report |
Check this box to email a report when this job completes. |
||||||||||||||||||
|
Overwrite |
Use with the Retention Period option. Check the Overwrite box to overwrite backup copies that are older than the specified Retention Period. If you do not use the Overwrite and Retention Period options, copy jobs fail if there is insufficient space available on the backup copy target. Overwrite does the following:
|
||||||||||||||||||
|
Retention Period |
Use with the Overwrite or Delete older backup data to free space option. Check the Retention Period box to specify the length of time a copy is retained before it can be deleted or overwritten. To define the retention period, enter a number and select Days, Weeks, Months, or Years. Example: enter 2 and select Weeks to retain copies for at least 2 weeks. If you do not use the Retention Period option, copy jobs fail if there is insufficient space available on the backup copy target. Modifying the retention period does not change the retention period of existing cold copies. The new setting is applied to subsequent backup copies only. |
||||||||||||||||||
|
If storage threshold is reached |
Determines whether to delete copies or fail the job if the target does not have sufficient space. Important! For Google, Amazon, Rackspace, or Azure Blob cloud targets, you must set a storage threshold to limit the amount of data that can be copied. If no threshold is set, the target will always have sufficient space for the copy job and these options do not apply. For details on setting a threshold, see To view or edit a backup copy target. |
||||||||||||||||||
|
Delete older backup data to free space |
Select this option to remove older copies to make room for new ones.
|
||||||||||||||||||
|
Fail backup copy job and send alert |
Select this option to fail the backup copy job if there is insufficient free space on the target. |
||||||||||||||||||
|
Schedule Details |
Select Now to run the job immediately or select Create a Schedule and define additional settings. |
||||||||||||||||||
|
Select scheduling mode |
In most cases, the Standard scheduling mode can be used to create the schedule. If you need more granularity, choose the Custom mode to create a custom calendar. For details, see Using the Custom scheduling mode in the Create Backup Copy Job dialog. |
||||||||||||||||||
|
Start Date |
Date when the schedule will run for the first time. |
||||||||||||||||||
|
Days |
Days when the schedule will run. |
||||||||||||||||||
|
Start Time |
Time of day when the schedule will run. (This is also the Start Time used by the Recurs every option.) |
||||||||||||||||||
|
Recurs every / Until |
Use to run the schedule every N hours until the specified time. Check the Recurs every box, select a frequency (number of hours), and specify an end time. |
||||||||||||||||||
|
Date Range |
Choose to copy the most recent backups or specify a date range of backups to copy. |
| 1 | Click Jobs > Active Jobs > Create job > Backup Copy. |
| 2 | Enter a unique Job Name. |
| 3 | In the Inventory tree, check boxes to select assets whose backups will be copied. |
| • | To locate an asset by name, use the Search field below. |
| • | Expand the tree as necessary to select VMs and applications. |
| • | Select a virtual host to select all of its VM assets. |
| • | Select an application instance to select all of its databases or storage groups. |
| 4 | Click Next. |
| 5 | Select the NAS target in the Backup Copy Target list. |
| 6 | Set remaining Backup Copy Options, Schedule Details, and Date Range. |
For descriptions of each setting, see Backup copy job settings.
| 7 | (Optional) Click Test to see the estimated size of the job and whether the target has enough space available for the new copies. Click OK to close the test results Notice. |
| 8 | Click Save. |
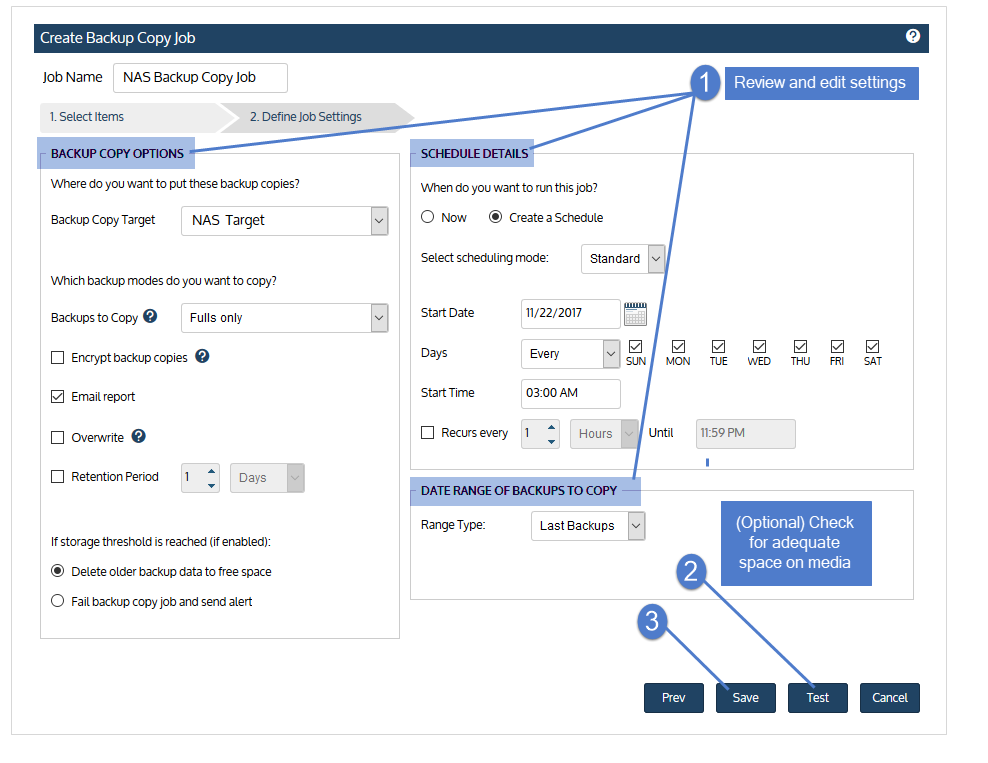
The job is created and will run at the date and times specified.
|
Item |
Description |
||||||||||||||||||
|---|---|---|---|---|---|---|---|---|---|---|---|---|---|---|---|---|---|---|---|
|
Job Name |
Name of the backup copy job. If creating a schedule, you must enter a unique name. |
||||||||||||||||||
|
Backup Copy Target |
Select the target where backups will be copied. The list contains all backup targets that have been added to the appliance. For details on adding a target, see Backup copy targets. |
||||||||||||||||||
|
Backups to Copy |
Select Fulls only to copy only full backups or All Modes to copy backups of any mode. Backups that complete successfully (green) or with warnings (yellow) are eligible for backup copy jobs. Failed (red) backups are not copied. |
||||||||||||||||||
|
Encrypt backup copies |
Check this box to encrypt cold backup copies. (Encryption must also be configured on the appliance. For details, see Encryption.) If the backup copy target device is configured for encryption, copies are encrypted regardless of this setting. |
||||||||||||||||||
|
Email report |
Check this box to email a report when this job completes. |
||||||||||||||||||
|
Overwrite |
Use with the Retention Period option. Check the Overwrite box to overwrite backup copies that are older than the specified Retention Period. If you do not use the Overwrite and Retention Period options, copy jobs fail if there is insufficient space available on the backup copy target. Overwrite does the following:
|
||||||||||||||||||
|
Retention Period |
Use with the Overwrite or Delete older backup data to free space option. Check the Retention Period box to specify the length of time a copy is retained before it can be deleted or overwritten. To define the retention period, enter a number and select Days, Weeks, Months, or Years. Example: enter 2 and select Weeks to retain copies for at least 2 weeks. If you do not use the Retention Period option, copy jobs fail if there is insufficient space available on the backup copy target. Modifying the retention period does not change the retention period of existing cold copies. The new setting is applied to subsequent backup copies only. |
||||||||||||||||||
|
If storage threshold is reached |
Determines whether to delete copies or fail the job if the target does not have sufficient space. Important! For Google, Amazon, Rackspace, or Azure Blob cloud targets, you must set a storage threshold to limit the amount of data that can be copied. If no threshold is set, the target will always have sufficient space for the copy job and these options do not apply. For details on setting a threshold, see To view or edit a backup copy target. |
||||||||||||||||||
|
Delete older backup data to free space |
Select this option to remove older copies to make room for new ones.
|
||||||||||||||||||
|
Fail backup copy job and send alert |
Select this option to fail the backup copy job if there is insufficient free space on the target. |
||||||||||||||||||
|
Schedule Details |
Select Now to run the job immediately or select Create a Schedule and define additional settings. |
||||||||||||||||||
|
Select scheduling mode |
In most cases, the Standard scheduling mode can be used to create the schedule. If you need more granularity, choose the Custom mode to create a custom calendar. For details, see Using the Custom scheduling mode in the Create Backup Copy Job dialog. |
||||||||||||||||||
|
Start Date |
Date when the schedule will run for the first time. |
||||||||||||||||||
|
Days |
Days when the schedule will run. |
||||||||||||||||||
|
Start Time |
Time of day when the schedule will run. (This is also the Start Time used by the Recurs every option.) |
||||||||||||||||||
|
Recurs every / Until |
Use to run the schedule every N hours until the specified time. Check the Recurs every box, select a frequency (number of hours), and specify an end time. |
||||||||||||||||||
|
Date Range |
Choose to copy the most recent backups or specify a date range of backups to copy. |
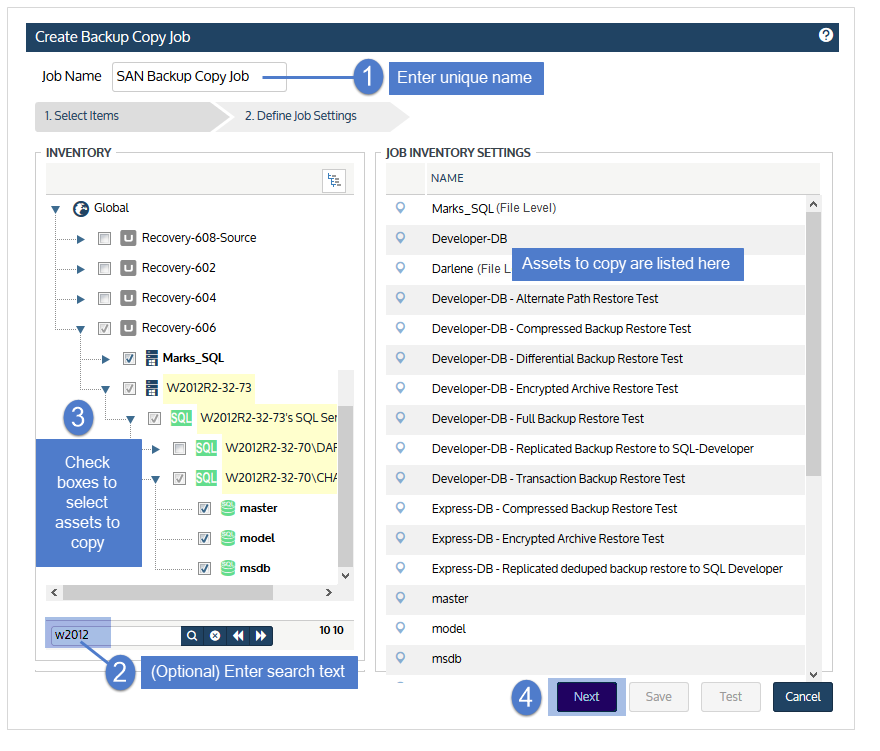
| 1 | Click Jobs > Active Jobs > Create job > Backup Copy. |
| 2 | Enter a unique Job Name. |
| 3 | In the Inventory tree, check boxes to select assets whose backups will be copied. |
| • | To locate an asset by name, use the Search field below. |
| • | Expand the tree as necessary to select VMs and applications. |
| • | Select a virtual host to select all of its VM assets. |
| • | Select an application instance to select all of its databases or storage groups. |
| 4 | Click Next. |
| 5 | Select the SAN target in the Backup Copy Target list. |
| 6 | Set remaining Backup Copy Options, Schedule Details, and Date Range. |
For descriptions of each setting, see Backup copy job settings.
| 7 | (Optional) Click Test to see the estimated size of the job and whether the target has enough space available for the new copies. Click OK to close the test results Notice. |
| 8 | Click Save. |
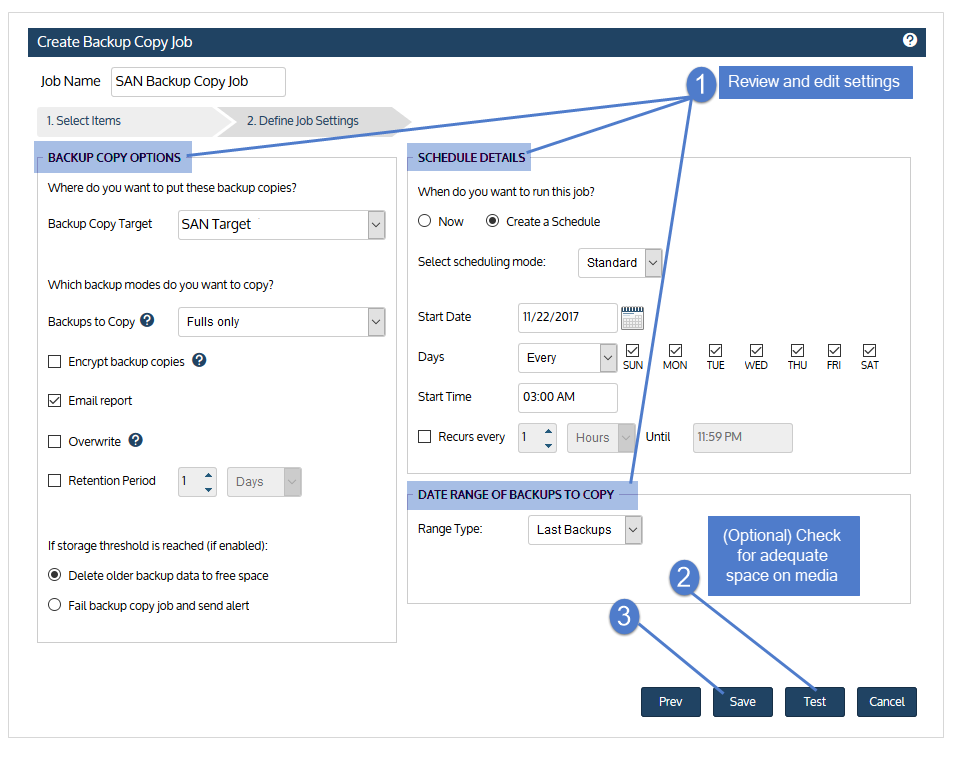
The job is created and will run at the date and times specified.
|
Item |
Description |
||||||||||||||||||
|---|---|---|---|---|---|---|---|---|---|---|---|---|---|---|---|---|---|---|---|
|
Job Name |
Name of the backup copy job. If creating a schedule, you must enter a unique name. |
||||||||||||||||||
|
Backup Copy Target |
Select the target where backups will be copied. The list contains all backup targets that have been added to the appliance. For details on adding a target, see Backup copy targets. |
||||||||||||||||||
|
Backups to Copy |
Select Fulls only to copy only full backups or All Modes to copy backups of any mode. Backups that complete successfully (green) or with warnings (yellow) are eligible for backup copy jobs. Failed (red) backups are not copied. |
||||||||||||||||||
|
Encrypt backup copies |
Check this box to encrypt cold backup copies. (Encryption must also be configured on the appliance. For details, see Encryption.) If the backup copy target device is configured for encryption, copies are encrypted regardless of this setting. |
||||||||||||||||||
|
Email report |
Check this box to email a report when this job completes. |
||||||||||||||||||
|
Overwrite |
Use with the Retention Period option. Check the Overwrite box to overwrite backup copies that are older than the specified Retention Period. If you do not use the Overwrite and Retention Period options, copy jobs fail if there is insufficient space available on the backup copy target. Overwrite does the following:
|
||||||||||||||||||
|
Retention Period |
Use with the Overwrite or Delete older backup data to free space option. Check the Retention Period box to specify the length of time a copy is retained before it can be deleted or overwritten. To define the retention period, enter a number and select Days, Weeks, Months, or Years. Example: enter 2 and select Weeks to retain copies for at least 2 weeks. If you do not use the Retention Period option, copy jobs fail if there is insufficient space available on the backup copy target. Modifying the retention period does not change the retention period of existing cold copies. The new setting is applied to subsequent backup copies only. |
||||||||||||||||||
|
If storage threshold is reached |
Determines whether to delete copies or fail the job if the target does not have sufficient space. Important! For Google, Amazon, Rackspace, or Azure Blob cloud targets, you must set a storage threshold to limit the amount of data that can be copied. If no threshold is set, the target will always have sufficient space for the copy job and these options do not apply. For details on setting a threshold, see To view or edit a backup copy target. |
||||||||||||||||||
|
Delete older backup data to free space |
Select this option to remove older copies to make room for new ones.
|
||||||||||||||||||
|
Fail backup copy job and send alert |
Select this option to fail the backup copy job if there is insufficient free space on the target. |
||||||||||||||||||
|
Schedule Details |
Select Now to run the job immediately or select Create a Schedule and define additional settings. |
||||||||||||||||||
|
Select scheduling mode |
In most cases, the Standard scheduling mode can be used to create the schedule. If you need more granularity, choose the Custom mode to create a custom calendar. For details, see Using the Custom scheduling mode in the Create Backup Copy Job dialog. |
||||||||||||||||||
|
Start Date |
Date when the schedule will run for the first time. |
||||||||||||||||||
|
Days |
Days when the schedule will run. |
||||||||||||||||||
|
Start Time |
Time of day when the schedule will run. (This is also the Start Time used by the Recurs every option.) |
||||||||||||||||||
|
Recurs every / Until |
Use to run the schedule every N hours until the specified time. Check the Recurs every box, select a frequency (number of hours), and specify an end time. |
||||||||||||||||||
|
Date Range |
Choose to copy the most recent backups or specify a date range of backups to copy. |
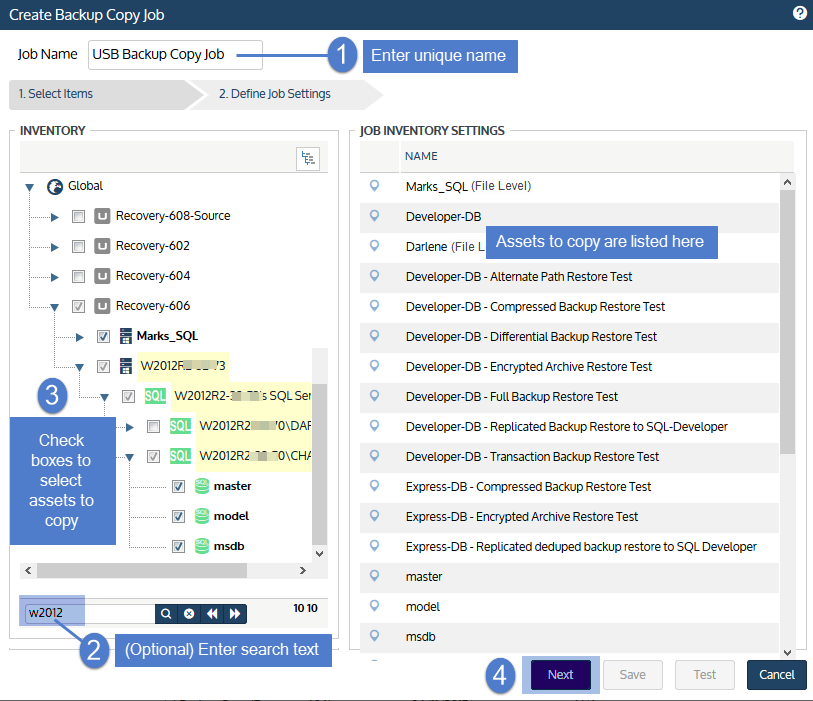
| 1 | Click Jobs > Active Jobs > Create job > Backup Copy. |
| 2 | Enter a unique Job Name. |
| 3 | In the Inventory tree, check boxes to select assets whose backups will be copied. |
| • | To locate an asset by name, use the Search field below. |
| • | Expand the tree as necessary to select VMs and applications. |
| • | Select a virtual host to select all of its VM assets. |
| • | Select an application instance to select all of its databases or storage groups. |
| 4 | Click Next. |
| 5 | Select the disk target in the Backup Copy Target list. |
| 6 | Set remaining Backup Copy Options, Schedule Details, and Date Range. |
For descriptions of each setting, see Backup copy job settings.
| 7 | (Optional) Click Test to see the estimated size of the job and whether the target has enough space available for the new copies. Click OK to close the test results Notice. |
| 8 | Click Save. |
The job is created and will run at the date and times specified.
|
Item |
Description |
||||||||||||||||||
|---|---|---|---|---|---|---|---|---|---|---|---|---|---|---|---|---|---|---|---|
|
Job Name |
Name of the backup copy job. If creating a schedule, you must enter a unique name. |
||||||||||||||||||
|
Backup Copy Target |
Select the target where backups will be copied. The list contains all backup targets that have been added to the appliance. For details on adding a target, see Backup copy targets. |
||||||||||||||||||
|
Backups to Copy |
Select Fulls only to copy only full backups or All Modes to copy backups of any mode. Backups that complete successfully (green) or with warnings (yellow) are eligible for backup copy jobs. Failed (red) backups are not copied. |
||||||||||||||||||
|
Encrypt backup copies |
Check this box to encrypt cold backup copies. (Encryption must also be configured on the appliance. For details, see Encryption.) If the backup copy target device is configured for encryption, copies are encrypted regardless of this setting. |
||||||||||||||||||
|
Email report |
Check this box to email a report when this job completes. |
||||||||||||||||||
|
Overwrite |
Use with the Retention Period option. Check the Overwrite box to overwrite backup copies that are older than the specified Retention Period. If you do not use the Overwrite and Retention Period options, copy jobs fail if there is insufficient space available on the backup copy target. Overwrite does the following:
|
||||||||||||||||||
|
Retention Period |
Use with the Overwrite or Delete older backup data to free space option. Check the Retention Period box to specify the length of time a copy is retained before it can be deleted or overwritten. To define the retention period, enter a number and select Days, Weeks, Months, or Years. Example: enter 2 and select Weeks to retain copies for at least 2 weeks. If you do not use the Retention Period option, copy jobs fail if there is insufficient space available on the backup copy target. Modifying the retention period does not change the retention period of existing cold copies. The new setting is applied to subsequent backup copies only. |
||||||||||||||||||
|
If storage threshold is reached |
Determines whether to delete copies or fail the job if the target does not have sufficient space. Important! For Google, Amazon, Rackspace, or Azure Blob cloud targets, you must set a storage threshold to limit the amount of data that can be copied. If no threshold is set, the target will always have sufficient space for the copy job and these options do not apply. For details on setting a threshold, see To view or edit a backup copy target. |
||||||||||||||||||
|
Delete older backup data to free space |
Select this option to remove older copies to make room for new ones.
|
||||||||||||||||||
|
Fail backup copy job and send alert |
Select this option to fail the backup copy job if there is insufficient free space on the target. |
||||||||||||||||||
|
Schedule Details |
Select Now to run the job immediately or select Create a Schedule and define additional settings. |
||||||||||||||||||
|
Select scheduling mode |
In most cases, the Standard scheduling mode can be used to create the schedule. If you need more granularity, choose the Custom mode to create a custom calendar. For details, see Using the Custom scheduling mode in the Create Backup Copy Job dialog. |
||||||||||||||||||
|
Start Date |
Date when the schedule will run for the first time. |
||||||||||||||||||
|
Days |
Days when the schedule will run. |
||||||||||||||||||
|
Start Time |
Time of day when the schedule will run. (This is also the Start Time used by the Recurs every option.) |
||||||||||||||||||
|
Recurs every / Until |
Use to run the schedule every N hours until the specified time. Check the Recurs every box, select a frequency (number of hours), and specify an end time. |
||||||||||||||||||
|
Date Range |
Choose to copy the most recent backups or specify a date range of backups to copy. |
| 1 | Click Jobs > Active Jobs > Create job > Backup Copy. |
| 2 | Enter a unique Job Name. |
| 3 | In the Inventory tree, check boxes to select assets whose backups will be copied. |
| • | To locate an asset by name, use the Search field below. |
| • | Expand the tree as necessary to select VMs and applications. |
| • | Select a virtual host to select all of its VM assets. |
| • | Select an application instance to select all of its databases or storage groups. |
| 4 | Click Next. |
| 5 | Select the tape drive or changer in the Backup Copy Target list. |
| 6 | Set remaining Backup Copy Options, Schedule Details, and Date Range. |
For descriptions of each setting, see Tape backup copy job settings.
| 7 | Click Save. |
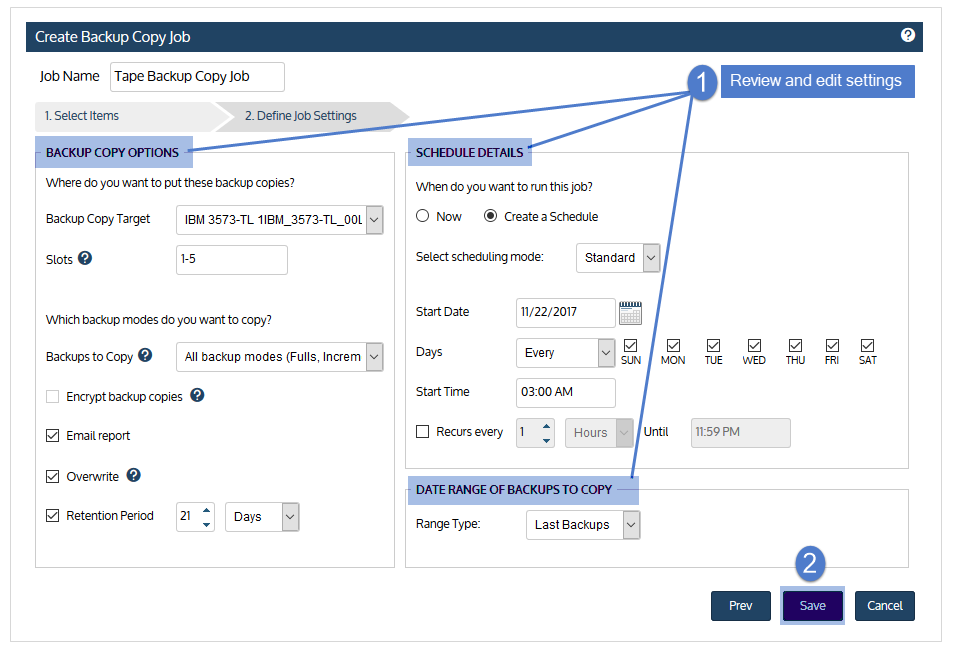
The job is created and will run at the date and times specified.
|
Option |
Description |
|||||||||||||||
|---|---|---|---|---|---|---|---|---|---|---|---|---|---|---|---|---|
|
Job Name |
Name of the backup copy job. If creating a schedule, you must enter a unique name. |
|||||||||||||||
|
Backup Copy Target |
Select the target where backups will be copied. The list contains all backup targets that have been added to the appliance. For details on adding a target, see Backup copy targets. |
|||||||||||||||
|
Slots |
Applies to autochangers only. Leave this field empty if your tape device does not have an autochanger. Enter the slots to use when writing backups to tape:
|
|||||||||||||||
|
Backups to Copy |
Select Fulls only to copy only full backups or All Modes to copy backups of any mode. Backups that complete successfully (green) or with warnings (yellow) are eligible for backup copy jobs. Failed (red) backups are not copied. |
|||||||||||||||
|
Encrypt backup copies |
Not used for tape devices. If the tape device is configured for encryption, copies are encrypted regardless of this setting. |
|||||||||||||||
|
Email report |
Check this box to email a report when this job completes. |
|||||||||||||||
|
Overwrite |
Use with the Retention Period option. Check the Overwrite box to overwrite backup copies that are older than the specified Retention Period. If you do not use the Overwrite and Retention Period options, copy jobs fail if there is insufficient space available on the tape(s). Overwrite does the following:
|
|||||||||||||||
|
Retention Period |
Use with the Overwrite option. Check the Retention Period box to specify the length of time a copy is retained before it can be deleted or overwritten. To define the retention period, enter a number and select Days, Weeks, Months, or Years. Example: enter 2 and select Weeks to retain copies for at least 2 weeks. If you do not use the Retention Period option, copy jobs fail if there is insufficient space available on the tape(s). Modifying the retention period does not change the retention period of existing cold copies. The new setting is applied to subsequent backup copies only. |
|||||||||||||||
|
Schedule Details |
Select Now to run the job immediately or select Create a Schedule and define additional settings. |
|||||||||||||||
|
Select scheduling mode |
In most cases, the Standard scheduling mode can be used to create the schedule. If you need more granularity, choose the Custom mode to create a custom calendar. For details, see Using the Custom scheduling mode in the Create Backup Copy Job dialog. |
|||||||||||||||
|
Start Date |
Date when the schedule will run for the first time. |
|||||||||||||||
|
Days |
Days when the schedule will run. |
|||||||||||||||
|
Start Time |
Time of day when the schedule will run. (This is also the Start Time used by the Recurs every option.) |
|||||||||||||||
|
Recurs every / Until |
Use to run the schedule every N hours until the specified time. Check the Recurs every box, select a frequency (number of hours), and specify an end time. |
|||||||||||||||
|
Date Range |
Choose to copy the most recent backups or specify a date range of backups to copy. |
In most cases, the standard scheduling mode can be used to create backup copy schedules. If you need more granularity, you can opt to use the Custom mode for cold backup copy job schedules.
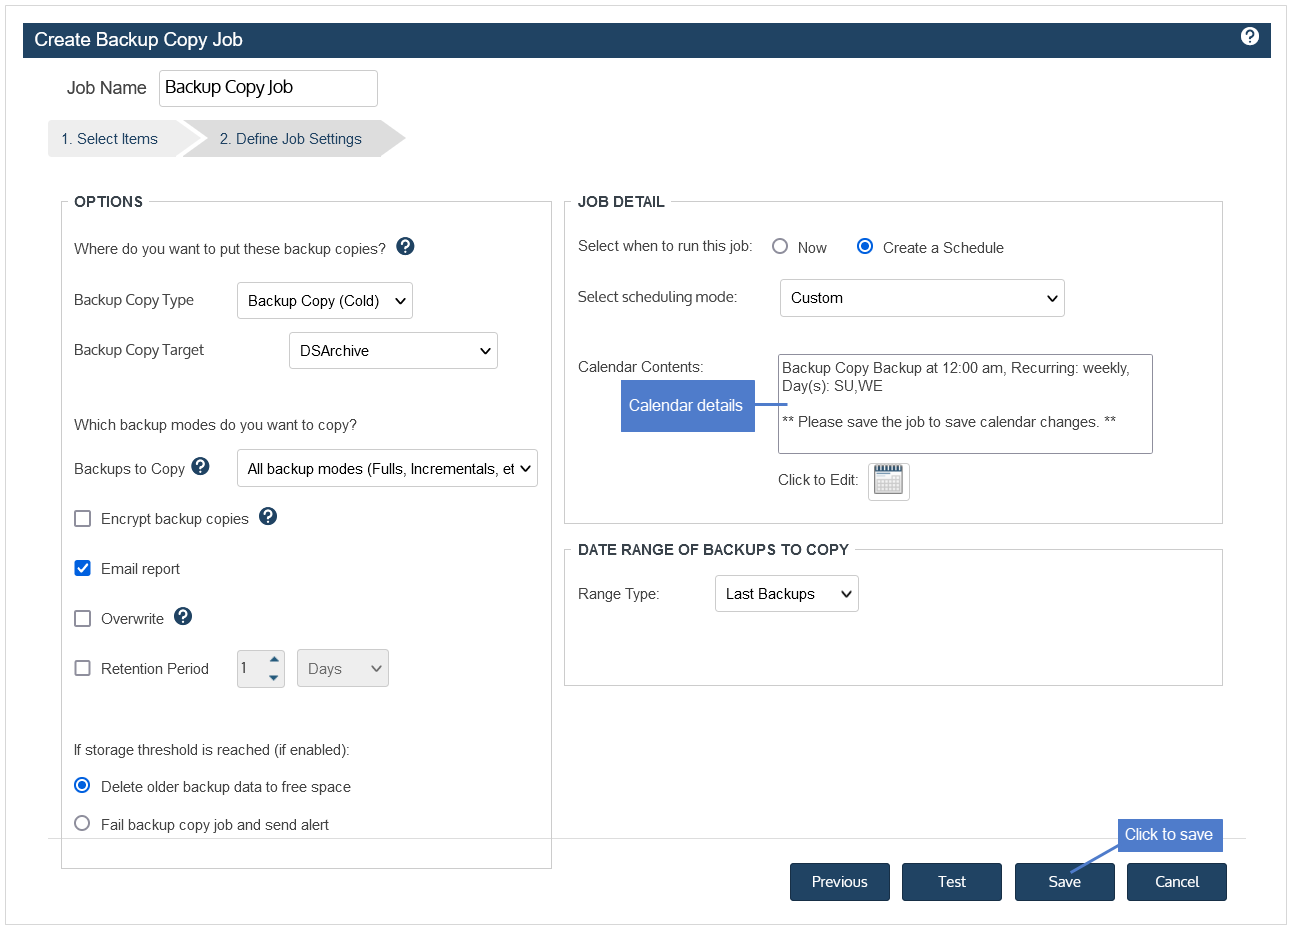
After adding assets to the cold backup copy job, the Define Job Settings step displays. To use the Custom backup mode:
Note: There are many configuration options in the Define Job Settings step. This procedure describes settings that are required to use the Custom scheduling mode. For a complete description of these settings, see one of the following: Backup copy job settings or Tape backup copy job settings.
| 1 | In the Options area: |
| • | Select Backup Copy (Cold) in the Backup Copy Type list. |
| • | Select your target from the Backup Copy Target list. |
| 2 | Select Custom in the Select scheduling mode list. |
| 3 | Click the calendar icon. |
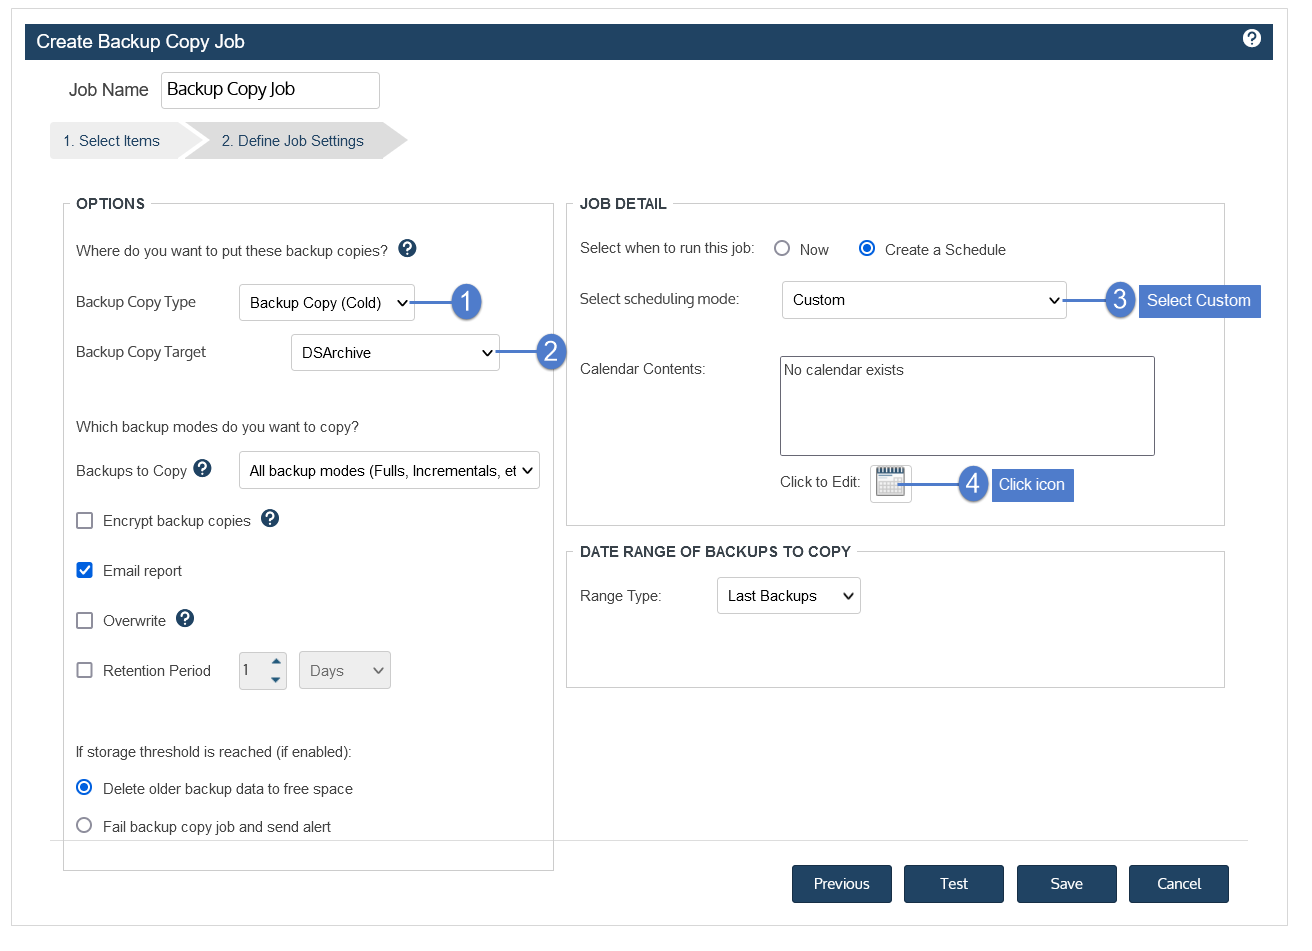
| 4 | In the Calendar dialog, select Backup Copy and drag it to a day on the calendar. (You cannot drag to a day in the past.) |
| 5 | In the Add Backup Copy dialog, modify settings and click Save. |

| 6 | Click Save to save the settings and close the Calendar dialog. |
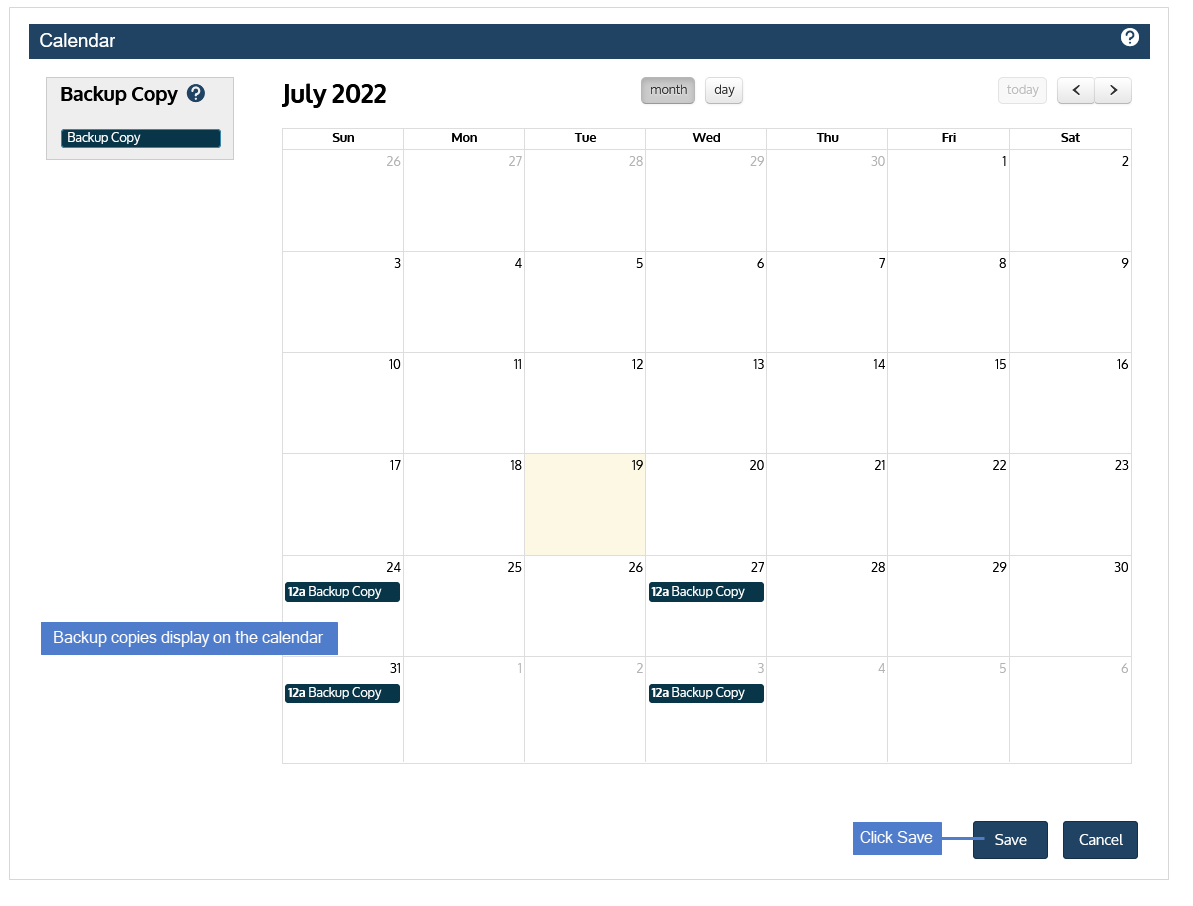
| 7 | Click Save to save the schedule. |