Managing backup copy targets
Once a backup copy target has been added to the appliance, you can monitor its status, such as amount of space used, from the Storage tile on the dashboard or from the Configure > Appliance > Backup Copy Targets page.
To view or modify a backup copy target, use the following procedures:
Note: Options vary by backup copy target type. Options not supported for your target type are disabled in the UI.
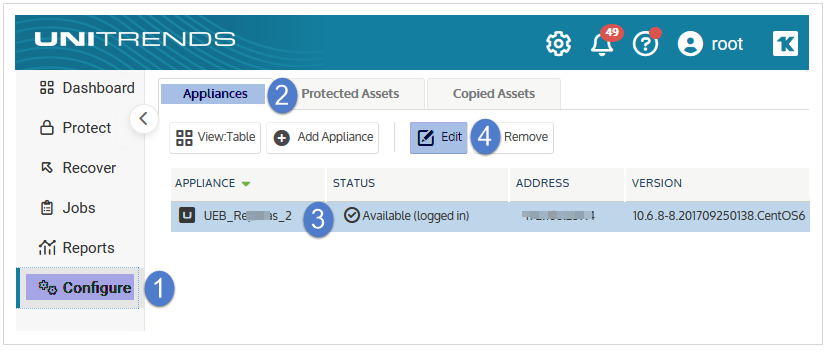
| 1 | On the Configure > Appliances page, select your appliance. |
| 2 | Click the Backup Copy Targets tab, and select a backup copy target. |
| 3 | Click Edit. |
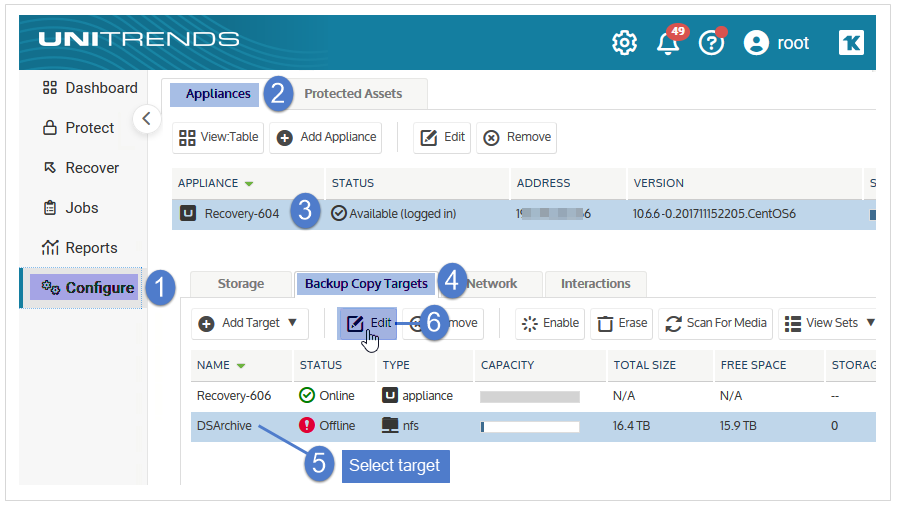
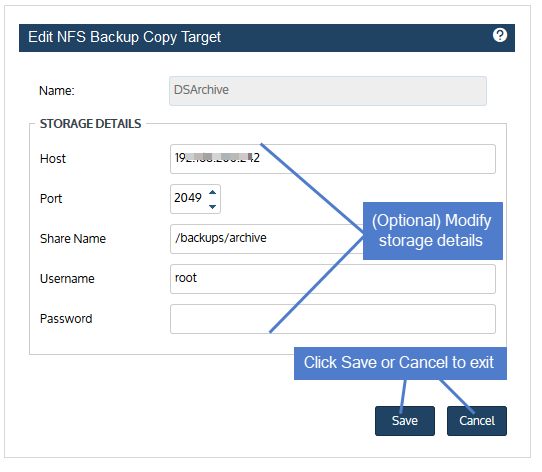
| 4 | (Optional) Modify information. |
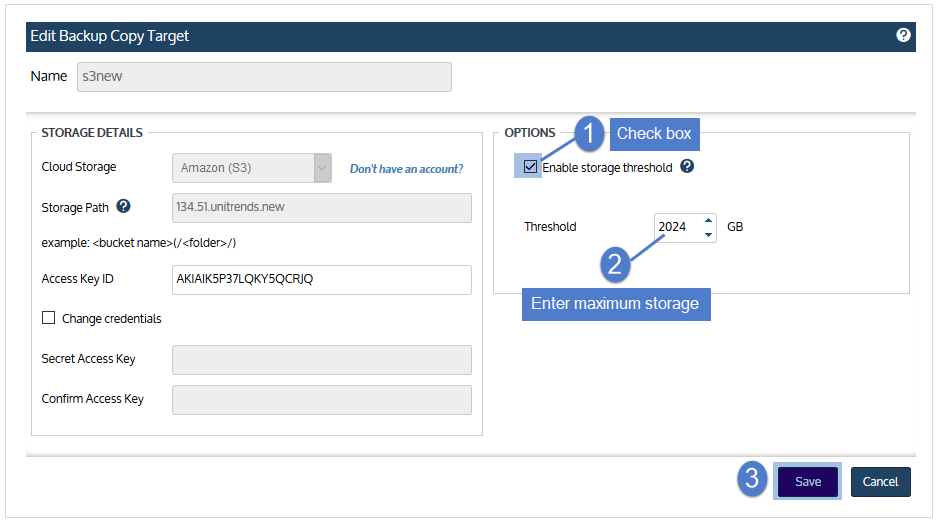
Note: For Google, Amazon, AWS, and Rackspace cloud targets, you can increase or decrease the storage threshold from this dialog. These changes are applied to all subsequent backup copy jobs that write to the bucket. For more information about the storage threshold, see Managing the amount of data copied to a third-party cloud target.
| 5 | Click Save to retain changes or Cancel to exit without saving. |
Use this procedure to remove older backup copies and to reduce the amount of data that can be written to a Google, Amazon, AWS, or Rackspace cloud backup copy target. The new threshold does not result in immediate data reduction on the backup copy target. Instead, the next time the backup copy job runs, the appliance purges older backup copies to meet the new storage threshold and to make space for the new backup copy.
| 1 | On the Configure > Appliances page, select your appliance. |
| 2 | Click the Backup Copy Targets tab, select the cloud target on which you want to reduce the space used, and click Edit. |
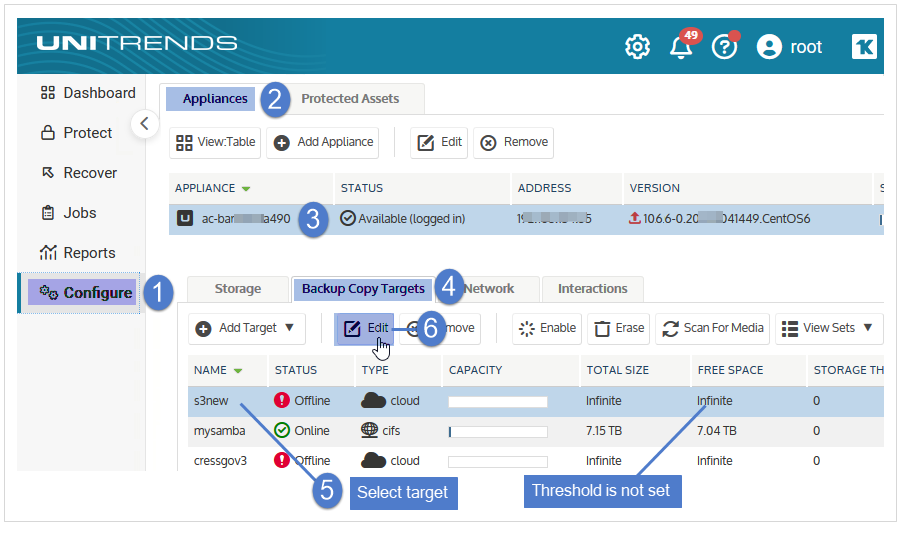
| 3 | Adjust the storage threshold as desired and click Save. |
| • | If you do not have a threshold, check the Enable storage threshold box, and adjust the Threshold value as desired. The threshold functions as a maximum amount of data the appliance can store on the backup copy target. |
| • | If you need to adjust your existing threshold, decrease the Threshold value to the new maximum amount of data you want the appliance to store on the backup copy target. |
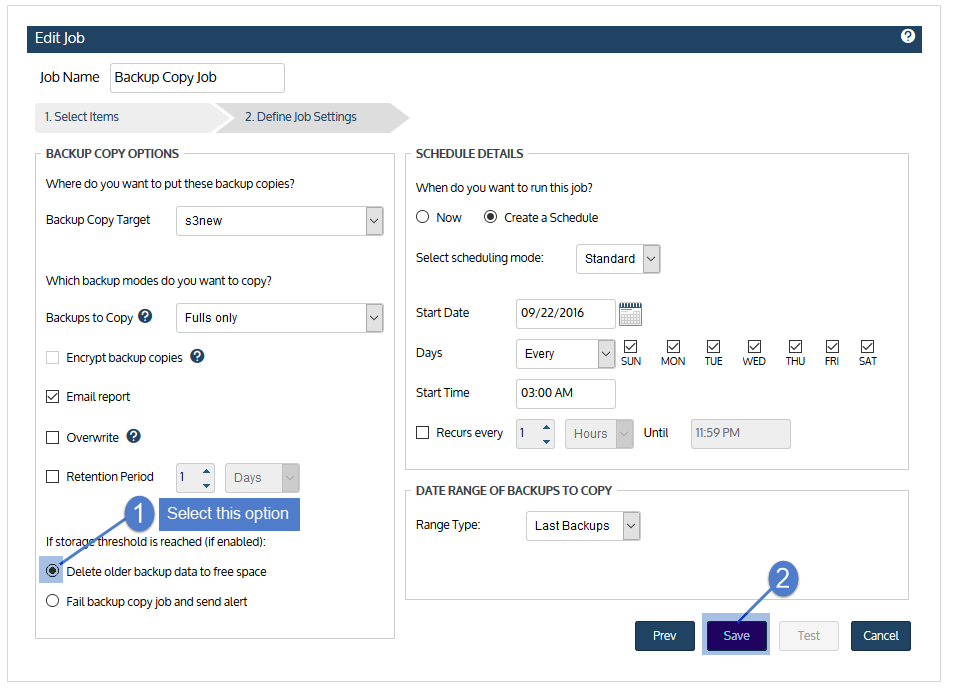
| 4 | On the Jobs > Job Manager page, select the job that writes to the backup copy target and click Edit. |
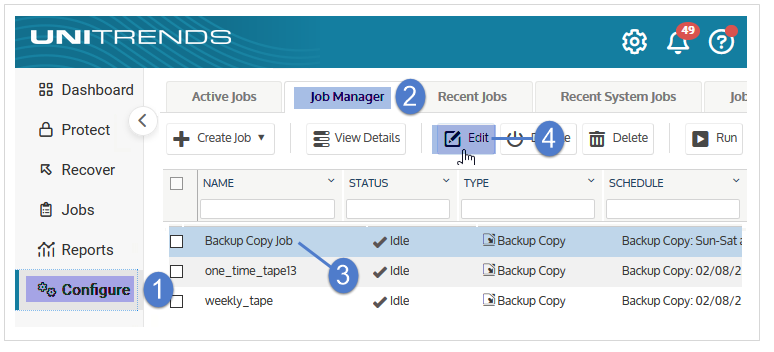
| 5 | Click Next. |
| 6 | Select Delete older backup data to free space if the storage threshold is reached and click Save. |
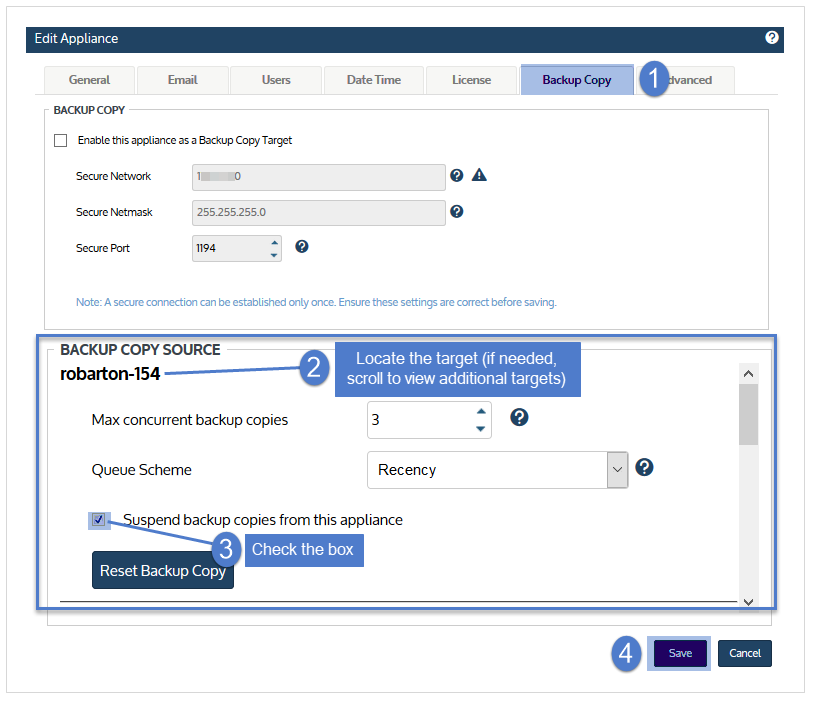
For Unitrends Cloud and Unitrends appliance hot backup copy targets, you can adjust the following settings for optimal performance in your environment:
| Setting | Description | Procedure | |||||||||
|---|---|---|---|---|---|---|---|---|---|---|---|
|
Max concurrent backup copies |
Determines how many backups can be copied concurrently. While the default setting of two is adequate for most deployments, you may wish to increase the concurrency when you have enough WAN bandwidth to support more concurrent copies. |
||||||||||
|
Queue scheme |
Determines the order in which the source appliance copies backups to the target:
|
||||||||||
|
Suspend backup copies from this appliance |
Check this box to stop sending backup copies from the source appliance. This option may become necessary when either your target appliance or the connection to your target becomes unavailable for an extended period of time. |
||||||||||
|
Reset Backup Copy |
Use to stop active copy jobs, reset the backup copy processes, then restart active jobs that were stopped. Use only when working with Support or following troubleshooting instructions in a Unitrends KB article. |
||||||||||
|
Backup copy bandwidth throttling |
If the WAN connection to your backup copy target is shared with general purpose Internet use during normal business hours, you may wish to throttle the amount of bandwidth that backup copies can use during these hours. Note: The bandwidth throttling setting limits the maximum amount of bandwidth that backup copy jobs can use. The amount of bandwidth available for the jobs is also effected by environmental factors, such as actual network throughput (which may be constrained by intermediate nodes between the source and target) and other backup copy job tasks, such as encryption and compression. |
Run this procedure to stop sending backup copies to a Unitrends appliance target or to the Unitrends Cloud. After suspending hot copies, you can resume copies at any time by using the To resume hot backup copies procedure.
| 1 | Log in to the source backup appliance. |
| 2 | Select Configure > Appliances. |
| 3 | Select the source backup appliance and click Edit. |
| 4 | On the Backup Copy tab, locate the source appliance in the Backup Copy Source area and check its Suspend backup copies from this appliance box. |
Note: If the appliance has multiple hot backup copy targets, a scroll bar displays. If needed, scroll to locate the target whose copies will be suspended.
| 5 | Click Save. |
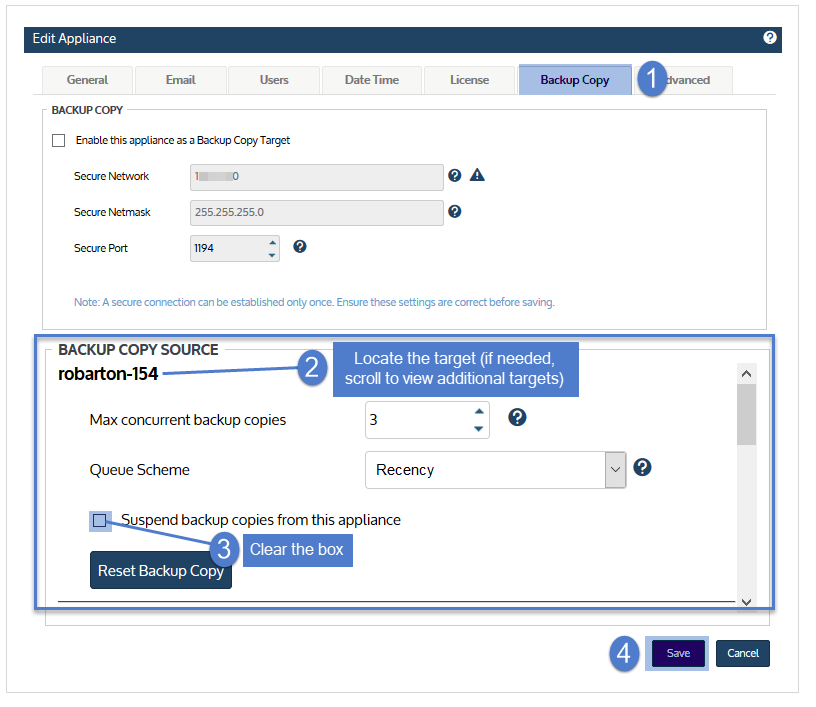
After suspending hot copies, you can resume copies at any time by using this procedure.
| 1 | Log in to the source backup appliance. |
| 2 | Select Configure > Appliances. |
| 3 | Select the source backup appliance and click Edit. |
| 4 | On the Backup Copy tab, locate the source appliance in the Backup Copy Source area and clear its Suspend backup copies from this appliance box. |
Note: If the appliance has multiple hot backup copy targets, a scroll bar displays. If needed, scroll to locate the target whose copies will be resumed.
| 5 | Click Save. |
Do not cancel an active hot backup copy job. Instead, suspend hot backup copies.
Each successful backup of the original asset is copied to the hot backup copy target as soon as the backup completes. (The target can be the Unitrends Cloud or another Unitrends appliance.) To copy a backup, the appliance runs a hot backup copy job, which displays on the Active Jobs tab as shown here:
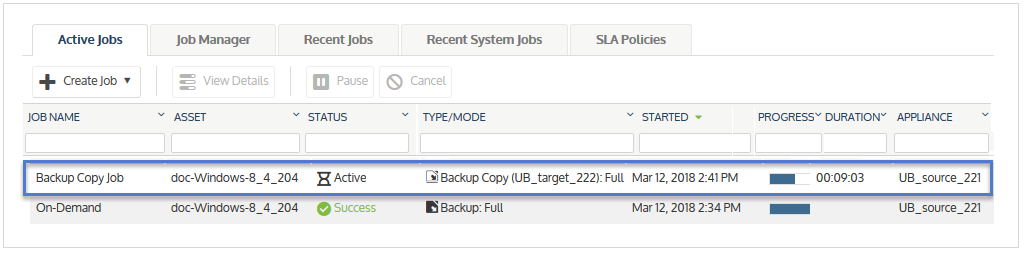
If you cancel a hot copy job by using the Cancel button on the Active Jobs page, the appliance automatically creates a new copy job to replace the one you canceled. To temporarily stop copying backups, suspend backup copies instead (as described in To suspend hot backup copies). Use the procedure To resume hot backup copies to start sending hot copies again. Note that copies of all backups that ran while copies were suspended will be sent to the hot backup copy target once you resume. You cannot skip copying a specific backup.
For tape drive, USB, and eSATA devices, you must initialize new tapes or drives before they can be used for the first time. This removes any existing data and formats the media. After you have written data to the media, you can also use this procedure to erase all backup copies.
Notes:
| • | Use this procedures only if you wish to remove all backup data from the media. |
| • | This procedure is not used for tape devices with autochangers. If your tape device has an autochanger, see To prepare tapes for use with an autochanger device. |
To initialize and erase cold backup copy media:
| 1 | Load the tape or drive(s) you want to initialize and erase. |
Notes:
If you need to remove a drive from an eSATA or USB dock, be sure to:
| • | Power down the dock. |
| • | Swap the drive. |
| • | Power on the dock. |
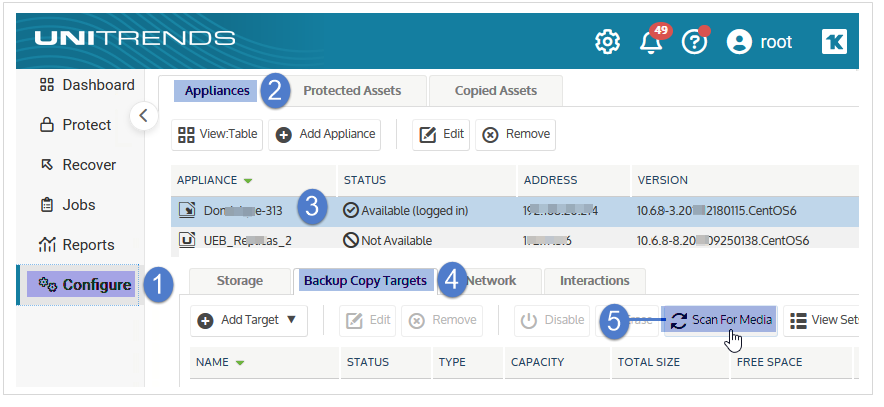
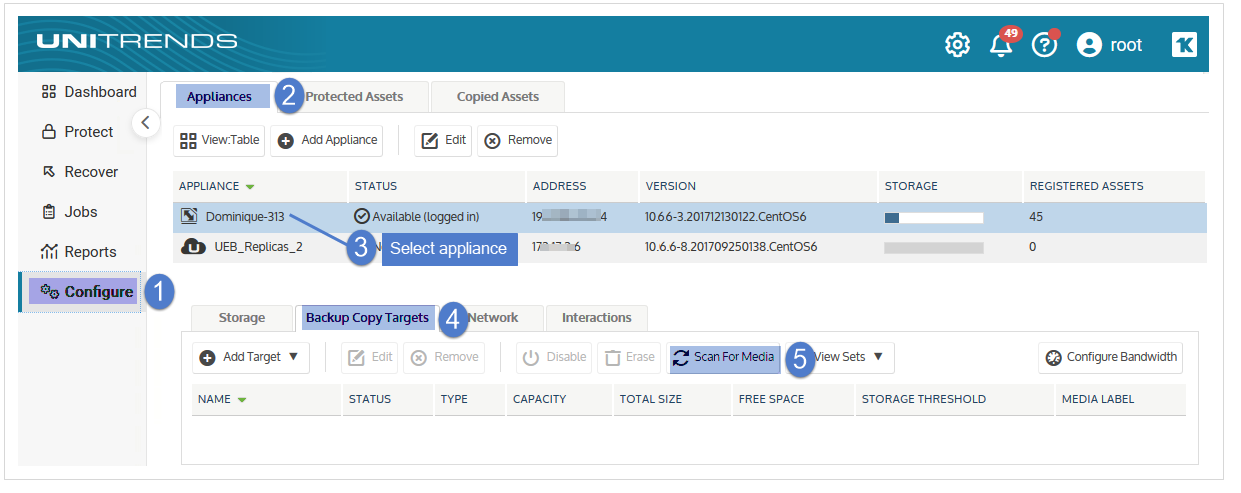
| 2 | On the Configure > Appliances page, select your appliance. |
| 3 | Click the Backup Copy Targets tab below. |
| 4 | Click Scan for Media. |
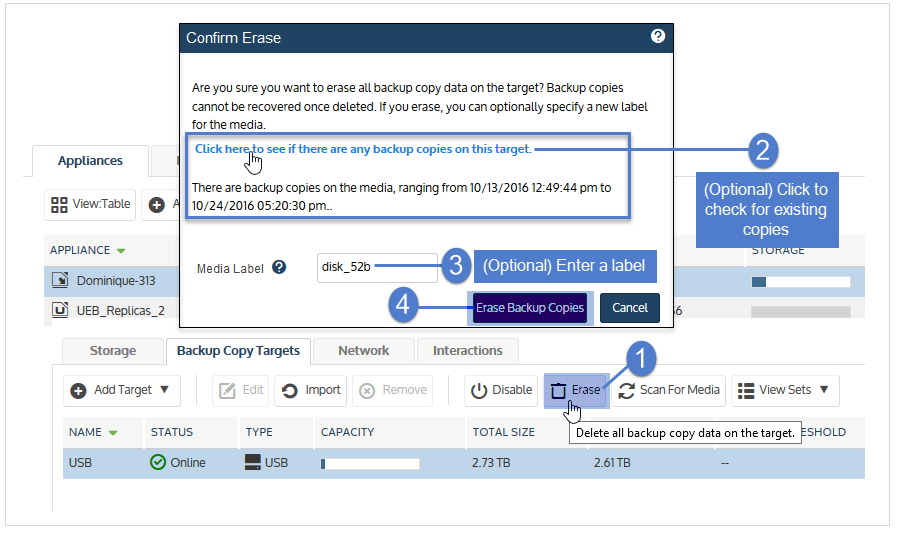
| 5 | Select the target you wish to erase. |
| 6 | (Optional) If you want to check whether there are copies on the media, mount the media by clicking Enable. The target's status changes to Online. |
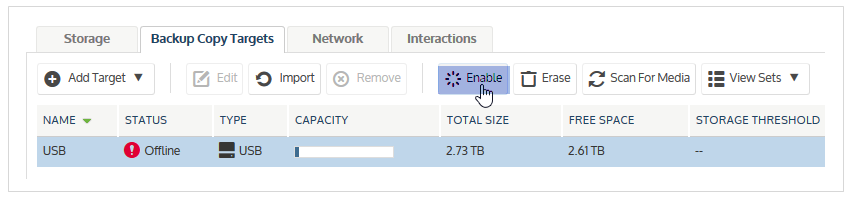
| 7 | Click Erase. |
| 8 | (Optional) Check for existing backup copies. |
| 9 | (Optional) Enter a Media Label. |
| • | The label can contain up to 12 alphanumeric characters or underscores. |
| • | If you do not enter a label, the appliances generates one for you. |
| 10 | Click Erase Backup Copies. The appliance permanently deletes any existing data and formats the media with the Unitrends file system. |
For tape autochangers, you must prepare new tapes before they can be used for the first time. The prepare option removes any existing data and formats the media. After you have written data to the media, you can also use this procedure to erase all backup copies.
Warning! Use this option with caution. Any existing data is permanently deleted from the media.
To prepare tape media:
| 1 | Load the tape(s) you want to prepare. |
| 2 | On the Configure > Appliances page, select your appliance. |
| 3 | Click the Backup Copy Targets tab below. |
| 4 | Click Scan for Media |
| 5 | Select the autochanger in the list. |
| 6 | Click Prepare. |
| 7 | (Optional) Enter a Media Label. |
| • | The label can contain up to 12 alphanumeric characters or underscores. |
| • | If you do not enter a label, the appliance generates one for you. |
| 8 | Enter the Slots whose tapes will be prepared. Enter slot numbers using a comma-separated list and/or ranges. Example: 1,2,3,5-8 |
| 9 | Click Prepare. The appliance permanently deletes any existing data and formats the media with the Unitrends file system. |
If you have run cold backup copies on one appliance, you can import reference information about those copies to a second appliance. Once reference data has been imported, you are able to recover those copies by using the second appliance.
Use this procedure to view the cold copy sets that reside on media that is currently connected to the backup copy target and to import a set's reference information to the cold copy catalog on the appliance.
Notes:
| • | Backup copy jobs mount and unmount the target automatically. The target remains offline unless a copy job is running. To view sets, you must enable the target, which also imports reference information for any backup copies that were not found on the appliance. |
| • | A new cold copy format was introduced beginning in Unitrends release 10.1. If you attempt to import a cold copy and receive the message Failed to read archive file, verify that the appliance is running version 10.1 or higher. If not, install appliance updates, then try the import again. |
| • | To view additional cold copy job details, use the Managing backup copy targets procedure instead. |
| 1 | Connect the media containing the cold copies to the target appliance that will import the reference information. |
Notes:
If you need to remove a drive from an eSATA or USB dock, be sure to:
| • | Power down the dock. |
| • | Swap the drive. |
| • | Power on the dock. |
| 2 | Log in to the target appliance. |
| 3 | On the Configure > Appliances page, select the appliance. |
| 4 | Click the Backup Copy Targets tab below. |
| 5 | Click Scan for Media. |
| 6 | Select the cold backup copy target. |
| 7 | (If needed) Click Enable to bring the target online. (If the target is already enabled, you see a Disable button instead and you can skip this step.) |
Notes:
If you receive a message that the media has not been initialized, you must erase or prepare the media before you can enable the target. Erasing or preparing the media removes all backup copies stored on the media. For details, see one of the following:
| • | To prepare tapes for use with an autochanger device for tape autochanger targets. |
| • | To initialize and erase cold backup copy media for all other cold backup copy targets, including single tape drive devices. |
| 8 | Select On Media from the View Sets list: |

| 9 | Sets that are stored on the media display in a list. The following is given for each set: |
| • | Description – Name of the backup copy job that created the set. |
| • | Date – Date and time that the set was copied to the media. |
| • | Imported – Indicates whether the set's reference information has been imported to the cold target's catalog on this backup appliance. (Reference information must be imported so the set can be discovered in the Backup Catalog, where you can then opt to import the set's backup copies to the appliance. For details, see To import a cold backup copy.) |
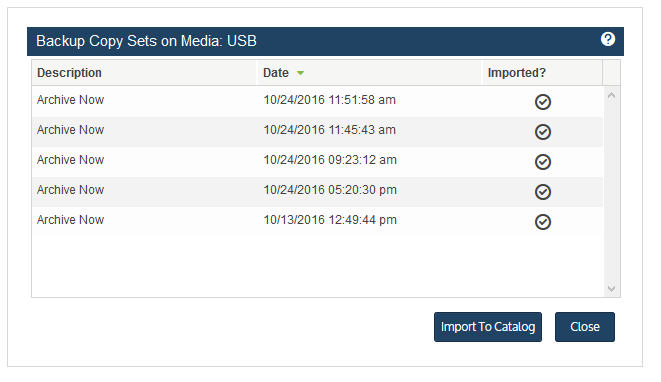
| 10 | Do one of the following: |
| • | To import a set's reference information, select it in the list and click Import to Catalog. |
| • | To exit, click Close. |
Reference information is imported. You can now import the cold copies to the appliance. See To import a cold backup copy for details.
Use this procedure to mount the backup copy target.
Notes:
| • | Backup copy jobs mount and unmount the target automatically. The target remains offline unless a copy job is running, but you can use this procedure as needed to mount the target manually. |
| • | This procedure also imports reference information for any backup copies that were not found on the appliance. |
| 1 | On the Configure > Appliances page, select your appliance. |
| 2 | Click the Backup Copy Targets tab below. |
| 3 | Click Scan for Media. |
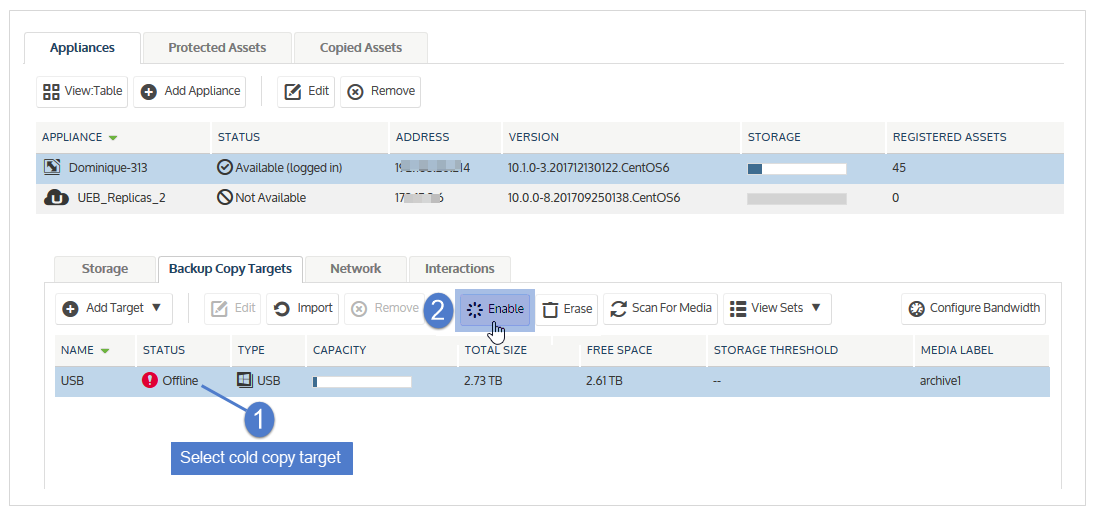
| 4 | Select the offline target. |
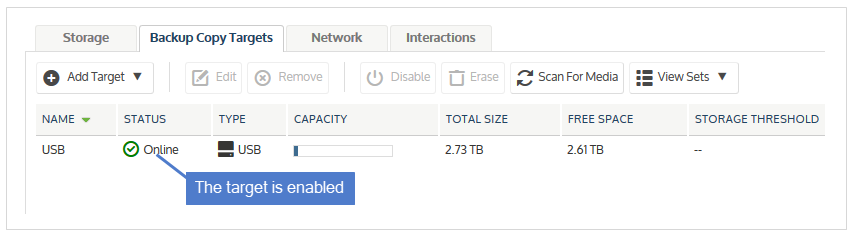
| 5 | Click Enable to bring the target online. |
Notes:
If you receive a message that the media has not been initialized, you must erase or prepare the media before you can enable the target. Erasing or preparing the media removes all backup copies stored on the media. For details, see one of the following:
| • | To prepare tapes for use with an autochanger device for tape autochanger targets. |
| • | To initialize and erase cold backup copy media for all other cold backup copy targets, including single tape drive devices. |
The target is enabled.
You can swap out drives as needed, without powering down your Recovery Archive unit. Before swapping drives, note these considerations for using a device with multiple drives:
| • | All drives attached to a single appliance must have equal capacity. Drives may be of varying capacity if they are attached to different appliances. |
| • | Within the backup copy target, all drives attached to a single appliance are treated as one logical device. When you add a multi-drive device and initialize the drives, the appliance formats them as a single unit. Data is then written across all drives as if they are one larger drive. Once you copy backups to the device, these drives must be treated as a single entity. You must remove them as a set and, to recover data, you must insert all drives in the set back into the eSATA or USB device so the appliance can read and import backup data. If you separate a drive from the set, all data is lost. |
| 1 | Power down the dock. |
| 2 | Swap the drive. |
| 3 | Power on the dock. |
Use this procedure to remove a target that is not directly connected physically to the appliance. Applies to these backup copy target types: Unitrends Cloud, Unitrends appliance, third-party cloud, NAS, and SAN.
Notes:
| • | To remove an iSCSI LUN from the Unitrends appliance, you must go to the SAN manager and indicate that the SAN should no longer use the LUN. |
| • | For targets that are directly connected to the appliance, such as eSATA, USB, and tape devices, you do not remove the target from the UI. Instead, physically disconnect the target. |
| 1 | On the Configure > Appliances page, select your appliance. |
| 2 | Click the Backup Copy Targets tab, and select the target you wish to remove. |
| 3 | Click Remove. |
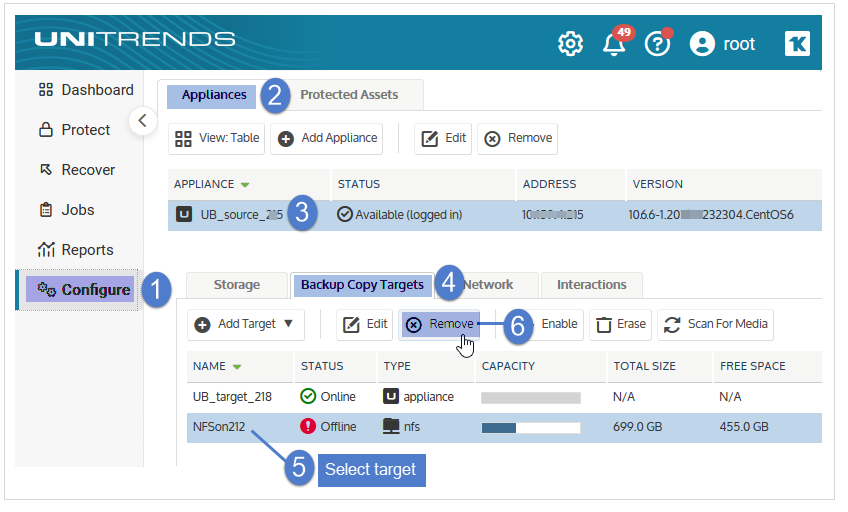
| 4 | Click Confirm. |
