Installing and updating the Linux agent
Unitrends protects most Linux distributions, including CentOS, Debian, Red Hat, SUSE, and Ubuntu. Before adding a Linux asset to the Unitrends appliance, you must install an agent.
Once the agent is installed, you can update to a newer agent version using these same installation procedures. It is not necessary to remove the old agent. If an agent is already installed, you have the option to save any custom agent settings during installation.
Use the procedures in this section to install or update the Linux agent:
Unitrends provides several Linux agent installers. Unitrends recommends using the RPM-based or dpkg-based installers when possible, so that needed dependencies are automatically installed with the agent. If these installers are not supported for your Linux distribution, use the GZEXE installers. With the GZEXE installers, you might need to install dependencies before installing the agent.
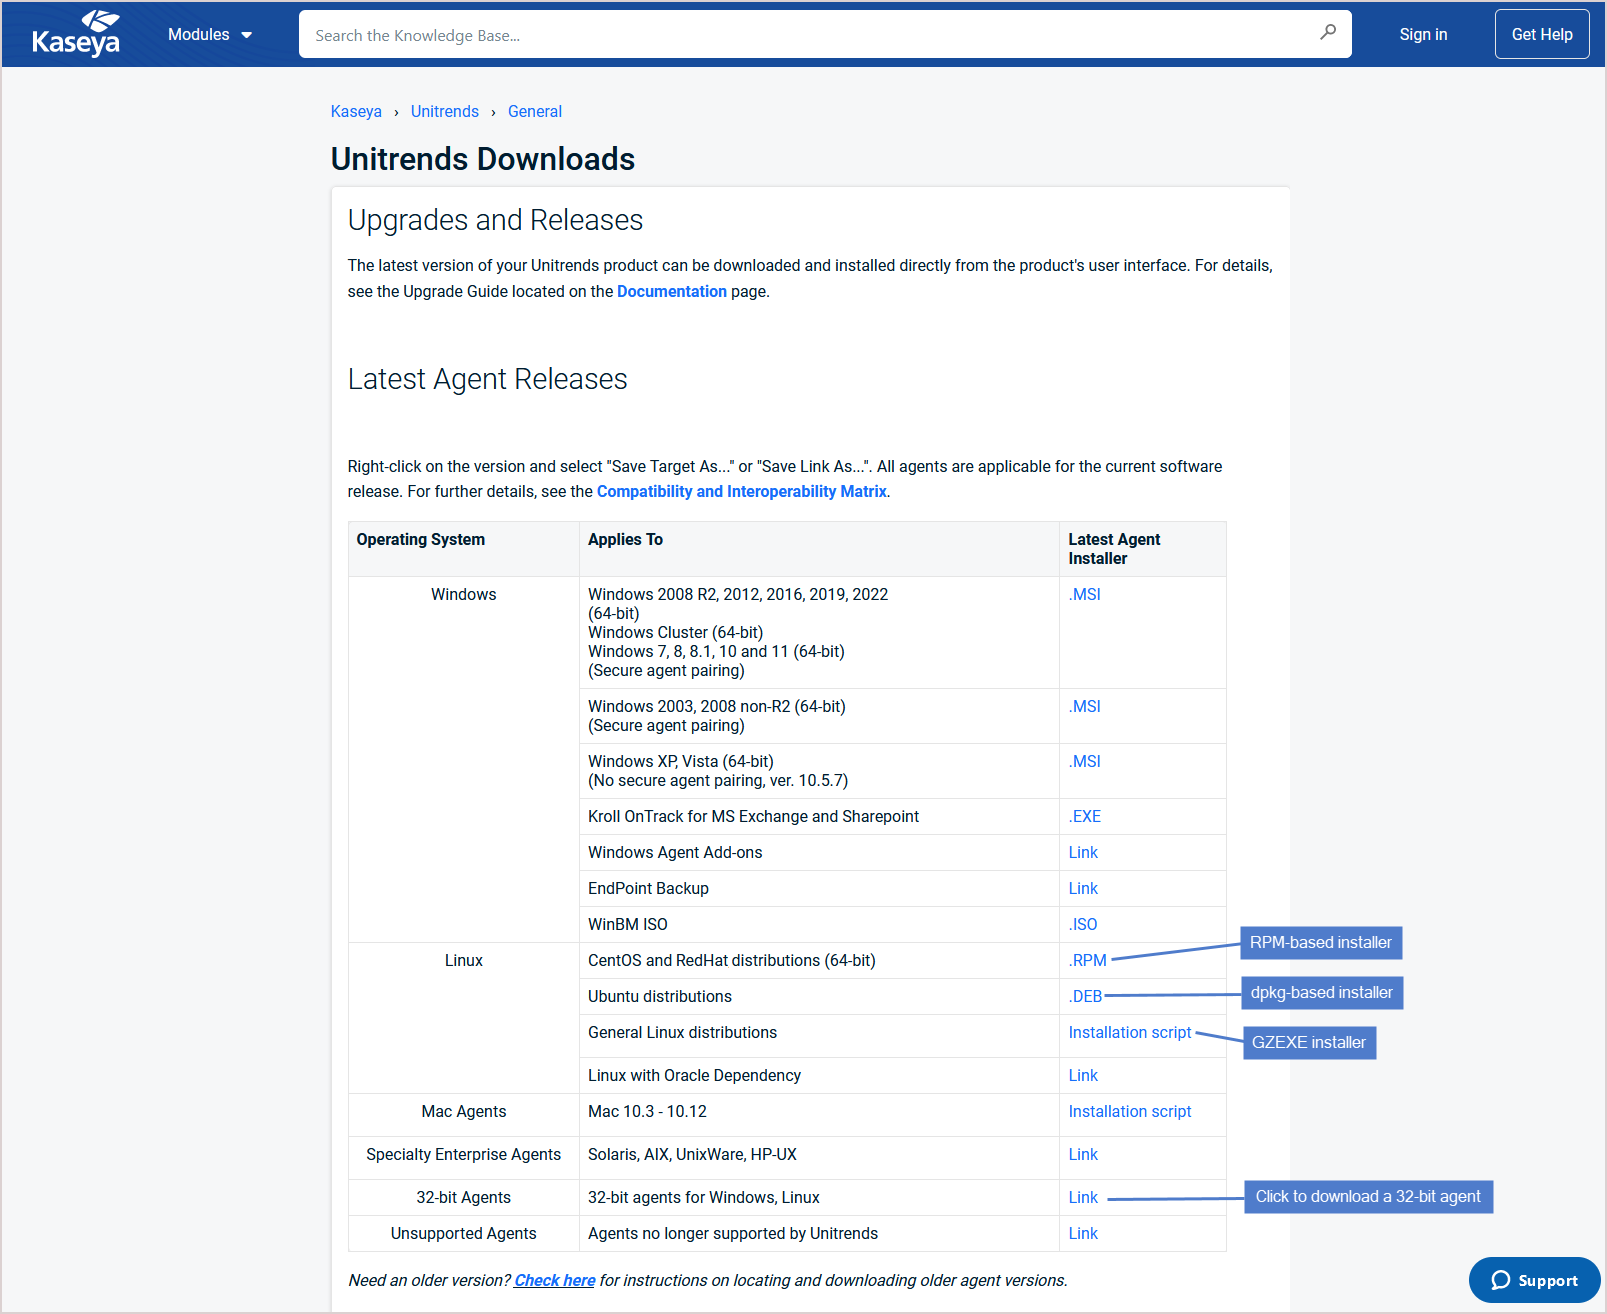
See Linux distributions and agent installers to determine which installer to use for your Linux asset. You can download the agent installers from the Latest Agent Releases on the Unitrends Downloads page. You might not see an agent for the particular Linux distribution that you are using, but if it is a supported distribution listed in the Unitrends Compatibility and Interoperability Matrix, the standard Linux agent will work with your machine. For Oracle Linux assets, use the CentOS or Red Hat agent.
|
Linux distributions |
Agent installers |
|||||||||
|---|---|---|---|---|---|---|---|---|---|---|
|
RPM-based installers. Automatically installs dependencies. For details, see To install the Linux agent on CentOS, Oracle Linux, and Red Hat. |
|||||||||
|
GZEXE installers. For details, see To install the Linux agent using GZEXE. |
|||||||||
|
dpkg-based installers. Automatically installs dependencies. For details, see Installing the Linux agent on Ubuntu. |
|||||||||
|
Download the applicable agent from the 32-bit Agents page. |
Where to access your agent on the Unitrends Downloads page:
When using GZEXE installers, you might need to install additional libraries. If this is the case, the installer stops the installation and lists the required dependencies. The dependencies it lists are the resources needed and not the name of the package you must install. The table below identifies the packages containing the commonly needed dependencies.
The following dependencies are required to protect Linux environments. Red Hat dependencies replace XINETD, which was a dependency for earlier versions.
|
Operating System |
Dependencies |
||||||||||||||||||||||||
|---|---|---|---|---|---|---|---|---|---|---|---|---|---|---|---|---|---|---|---|---|---|---|---|---|---|
|
Red Hat 6 i386 |
Packages are located on the installation media. |
||||||||||||||||||||||||
|
Red Hat 6 x86_64 |
The following packages might need to be updated to match the version of a new dependency.
Packages are located on the installation media. |
||||||||||||||||||||||||
|
Red Hat 8 x86_64 and |
Packages are located on the installation media. |
||||||||||||||||||||||||
|
SUSE 15 SP1 |
Packages are located on the installation media. |
||||||||||||||||||||||||
|
Oracle on Linux (for application backups only) |
Samba is only used to protect Oracle with application backups. The Samba packages listed below only need to be installed if you wish to protect Oracle data with Unitrends application backups. For assistance with these packages, you can download the Oracle Dependency plug-in from the Agent Add-ons page. You must install the Linux agent before you can install this plug-in. Depending on your Linux distribution, use the Oracle Dependency for CentOS or Red Hat. Dependencies for Oracle application backups:
|
Beginning in Linux agent release 10.7.5, a secure pairing is automatically established between the appliance and the Linux agent on each of its protected assets. This pairing enables Transport Layer Security (TLS) to encrypt data and authenticate connections between appliances and agents. Communication between appliances and agents is only allowed if there is a matching (paired) certificate.
This feature blocks any communication with Unitrends agent software that doesn't originate from a paired appliance (think of a Bluetooth headset, if it's not paired or in pairing mode, no one else can communicate with it). This eliminates the threat of a rogue appliance running backups or code against an agent.
To use the secure pairing feature, these requirements must be met:
| • | The Unitrends appliance must be running release 10.7.5 or higher. |
| • | The Linux asset must be running agent release 10.7.5 or higher. |
| • | The Unitrends appliance version must be equal to or higher than the Linux agent version. |
Important! Be sure to upgrade your Unitrends appliance before upgrading your Linux agents.
| • | Jobs will fail if you attempt to protect a 10.7.5 or higher agent with an appliance that is running an older release. |
| • | You cannot add an asset that is running a 10.7.5 or higher agent to an appliance that is running an older release. If you attempt this, you receive an error similar to: Failed to save client: Registration for client assetName failed. The Unitrends System could not connect to the Unitrends Agent on assetName. Please ensure that the Agent software is installed on assetName, the Agent service is running (if applicable), and no firewall settings are preventing access. |
| • | The Linux agent listens for pairing requests on port 888. Ensure that port 888 is accessible on the Linux asset. |
| • | The Linux asset must be running one of these versions: |
Important! Do NOT install the 10.7.5 agent on other Linux versions that are not listed below. Instead, locate your Linux version on the Unitrends Downloads page and install the latest supported agent.
| – | Alma Linux 9, 64-bit |
| – | CentOS 7, 64-bit |
| – | CentOS 9, 64-bit |
| – | Debian 10, 64-bit |
| – | OpenSUSE 42, 64-bit |
| – | Oracle Linux 8.1, 64-bit |
| – | RHEL 7, 64-bit |
| – | RHEL 8.4, 64-bit |
| – | RHEL 9, 64-bit |
| – | Rocky Linux 9, 64-bit |
| – | SLES 11 SP3, 64-bit |
| – | SUSE 15, 64-bit |
| – | Ubuntu 22.04, 64-bit |
See Secure agent pairing for Windows and Linux agents for details on working with this feature.
Installation procedures for the Linux agent vary by Linux distribution. See the following topics for instructions:
This section explains how to install the agent using GZEXE installers, which are available for all supported Linux distributions. If the agent requires dependencies, the installer stops the installation and lists the required dependencies.
| 1 | Save the applicable agent installer on the Linux machine that you want to add to the Unitrends appliance. You can download the installer from the Latest Agent Releases on the Unitrends Downloads page. |
| 2 | Open a terminal, and log in as root user. |
| 3 | Change directories to the location where you have saved the agent installer, and run the command ls -l to view the installer file and determine whether you have execute permission. If necessary, add execute permission using the command: |
# chmod +x <file_name>
| 4 | Perform one of the following depending on whether you are using a 32-bit or 64-bit installer: |
| • | For a 32-bit installer, run the command: |
# ./lnx32_cnt
| • | For a 64-bit installer, run the command: |
# ./lnx64_cnt
| 5 | If necessary, install any required dependencies. The installer notifies you of any dependencies the agent needs. The dependencies listed are the resources needed and not the name of the package that you must install. For more about locating and installing dependencies, see About Linux agent dependencies. |
Run the applicable command from step 4 above after installing the dependencies.
| 6 | (Optional) To protect Oracle databases, install the Oracle Dependency from the Agent Add-ons page. |
| 7 | Enter the hostname for the backup appliance that will protect the asset. |
| 8 | If you are using a firewall, configure it to allow the Unitrends appliance to communicate with the Linux machine. For details, see Configuring a Linux firewall to communicate with the Unitrends appliance. |
| 9 | Add the Linux asset to your Unitrends backup appliance to begin protecting it. For instructions, see To add an agent-based asset. |
For CentOS, Oracle Linux, and Red Hat assets, you can use RPM-based installers that often automatically install the necessary dependencies if connected to a remote repository.
| 1 | Save the applicable agent installer on the Linux machine that you want to add to the Unitrends appliance. You can download the installer from the Latest Agent Releases on the Unitrends Downloads page. |
Note: For Oracle Linux assets, download the CentOS or Red Hat agent installer.
| 2 | Open a terminal, and log in as root user. |
| 3 | Change directories to the location where you have saved the agent installer. |
| 4 | Perform one of the following depending on whether you are using a 32-bit or 64-bit installer: |
| • | For a 32-bit asset, run the command: |
# yum localinstall --nogpgcheck unitrends-linux-agent-<release>.<build_date>.i386.rpm
| • | For a 64-bit asset, run the command: |
# yum localinstall --nogpgcheck unitrends-linux-agent-<release>.<build_date>.x86_64.rpm
| 5 | Install any required dependencies. The installer notifies you of any dependencies the agent needs. The dependencies listed are the resources needed and not the name of the package that you must install. For more about locating and installing dependencies, see About Linux agent dependencies. |
| 6 | (Optional) To protect Oracle databases, iinstall the Oracle Dependency from the Agent Add-ons page. |
| 7 | If you are using a firewall, configure it to allow the Unitrends appliance to communicate with the Linux machine. For details, see Configuring a Linux firewall to communicate with the Unitrends appliance. |
| 8 | Add the Linux asset to your Unitrends backup appliance to begin protecting it. For instructions, see To add an agent-based asset. |
For Ubuntu assets, you can use dpkg-based installers that often automatically install all necessary dependencies if connected to a remote repository. You can choose to install the agent using core utilities or the GDebi tool. If you install using core utilities, you must run two commands if the necessary dependencies have not been installed on your Ubuntu machine. If you use the GDebi tool, one command installs the agent and all necessary dependencies.
For instructions, see the following topics:
For Ubuntu assets, you can use dpkg-based installers that install all necessary dependencies.
Note: This procedure might require you to run two commands. The first command installs the agent if the necessary dependencies are already installed on the asset. If the agent requires dependencies, the second command in this procedure installs them and then installs the agent. If you have installed the GDebi tool on the asset, you can use it to install the agent using only one command. For details, see To install the Linux agent on Ubuntu using GDebi.
| 1 | Save the applicable agent installer on the Linux machine that you want to add to the Unitrends appliance. You can download the installer from the Latest Agent Releases on the Unitrends Downloads page. |
| 2 | Open a terminal and change directories to the location where you saved the agent installer. |
| 3 | Perform one of the following: |
| • | For the 32-bit installer, run the command: |
# sudo dpkg -i unitrends-linux-agent-<release>-<build_date>.i386.deb
| • | For the 64-bit installer, run the command: |
# sudo dpkg -i unitrends-linux-agent-<release>-<build_date>.amd64.deb
| 4 | If the installer stopped because the agent requires dependencies, run the following command to install them: |
# sudo apt-get install -f
| 5 | If you are using a firewall, configure it to allow the Unitrends appliance to communicate with the Linux machine. For details, see Configuring a Linux firewall to communicate with the Unitrends appliance. |
| 6 | Add the Linux asset to your Unitrends backup appliance to begin protecting it. For instructions, see To add an agent-based asset. |
To install the agent with this procedure, you must have installed the GDebi package on your Ubuntu assets. Installation of the agent using GDebi requires only one command. To install the agent using core utilities, see To install the Linux agent on Ubuntu using core utilities.
| 1 | Save the applicable agent installer on the Linux machine that you want to add to the Unitrends appliance. You can download the installer from the Latest Agent Releases on the Unitrends Downloads page. |
| 2 | Open a terminal and change directories to the location where you saved the agent installer. |
| 3 | Perform one of the following depending on whether you are using a 32-bit or 64-bit installer: |
| • | To install the 32-bit agent, run the following command: |
# sudo gdebi unitrends-linux-agent-<release>-<build_date>.i386.deb
| • | To install the 64-bit agent, run the following command: |
# sudo gdebi unitrends-linux-agent-<release>-<build_date>.amd64.deb
| 4 | If you are using a firewall, configure it to allow the Unitrends appliance to communicate with the Linux machine. For details, see Configuring a Linux firewall to communicate with the Unitrends appliance. |
| 5 | Add the Linux asset to your Unitrends backup appliance to begin protecting it. For instructions, see To add an agent-based asset. |
If you are protecting a Linux machine with a firewall, you must configure the firewall to allow communication with the Unitrends appliance before you can add the Linux machine as an asset.
To configure the Linux firewall
| 1 | Modify the Linux machine’s firewall settings to allow port 1743 and ports 1745 through 1845. |
Note: If you have altered the general configuration variable dataport_count from its default value of 100, this new value is added to 1745 to produce your required port range (e.g., If dataport_count is set to 75, your firewall must allow port 1743 and ports 1745 through 1820).
| 2 | Open a terminal or text editor with root access and log in as user root. |
| 3 | Run the following command: |
# /usr/bp/bin/bputil -p “Configuration Options” data 1745 /usr/bp/bpinit/master.ini
| 4 | (If needed) If the Linux asset will be running agent version 10.7.5 or higher, you must also modify the Linux machine’s firewall settings to allow port 888. (Beginning in Linux agent release 10.7.5, a secure pairing between the agent and appliance is required. This pairing is established over port 888.) |