Recovering NAS Backups
Recovery procedures vary depending on the NAS protocol used to create the backup. See these topics for details:
NAS CIFS and NFS backups have the following recovery options:
| • | Search Files – Search for specific files in all backups of this NAS that are currently stored on the appliance. Choose files to recover from the search results. |
| • | Recover – Select a specific backup to recover all files in the backup group up to the point in time when the backup ran. |
| • | Recover Files – Search a backup and choose specific directories and/or files to recover. |
You can recover from a backup by using the Backup Catalog or the Backup Browser. To recover from an imported backup, from a backup copy, or to search for files across multiple backups, you must use the Backup Catalog. See these topics for details:
For all recovery procedures, you must specify the target recovery location by selecting an asset and entering the full directory path where you want to recover the files. This location can be the original NAS share, an alternate location on the original share, or another asset that has been added to the Unitrends appliance.
For example, to recover to an alternate location on the original NAS share:
The original backup was of this directory:
/mnt/NAS/folder/subFolder1
and you wish to restore to:
/mnt/NAS/folder/subFolder2
enter the full path in the Directory field:
/mnt/NAS/folder/subFolder2
Note: If you enter /subFolder2 only, the files are recovered to the root mount point on the backup appliance (/mnt in our example). This could fill the root mount point and crash the appliance.
| 1 | Log in to the backup appliance. |
| 2 | Click Recover > Backup Catalog > Search Files. |
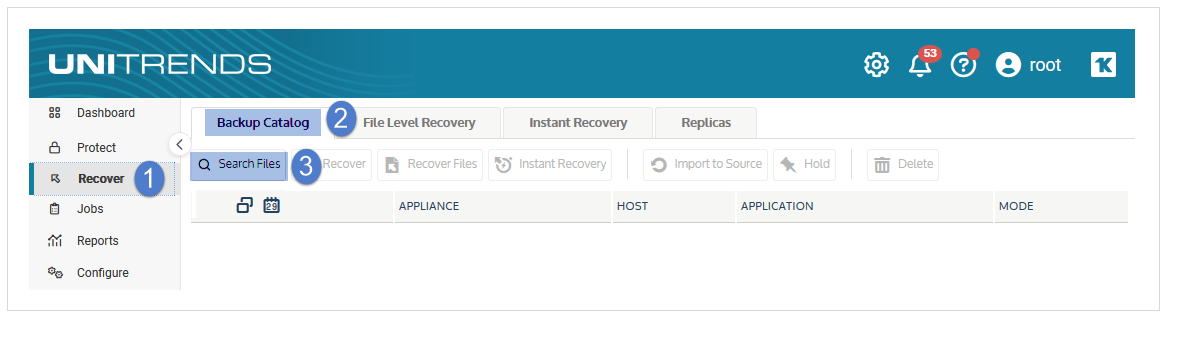
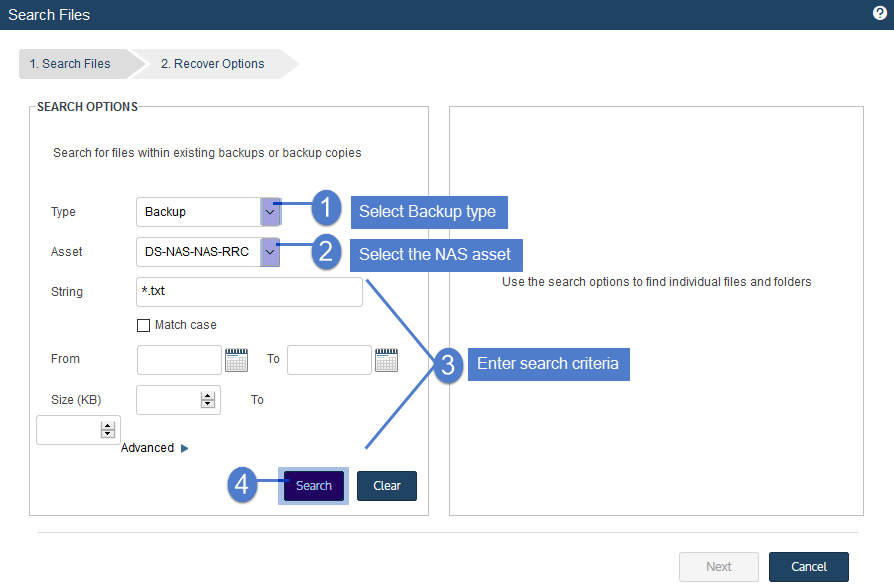
| 3 | For Type, select Backup. |
| 4 | For Asset, select the NAS whose files you want to recover. |
| 5 | Enter additional criteria and click Search. |
All backups of this NAS stored on the appliance are searched for matching files.
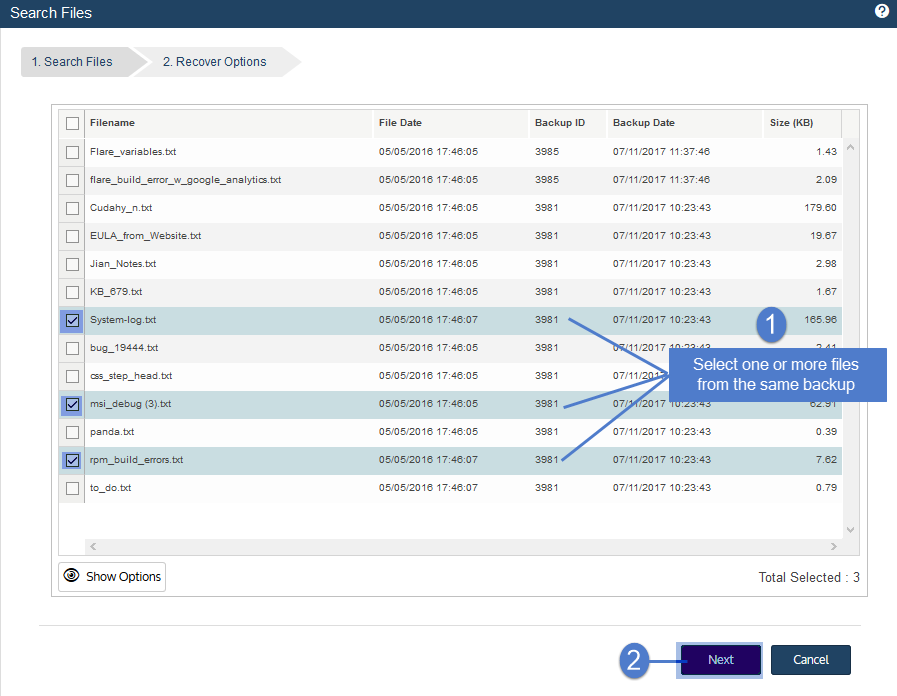
| 6 | In the results list, click to select files to recover. |
Note: All files you select must be from a single backup. Check the Backup ID to determine a file's backup. If you select files from multiple backups, the Save button becomes disabled.
| 7 | Click Next. |
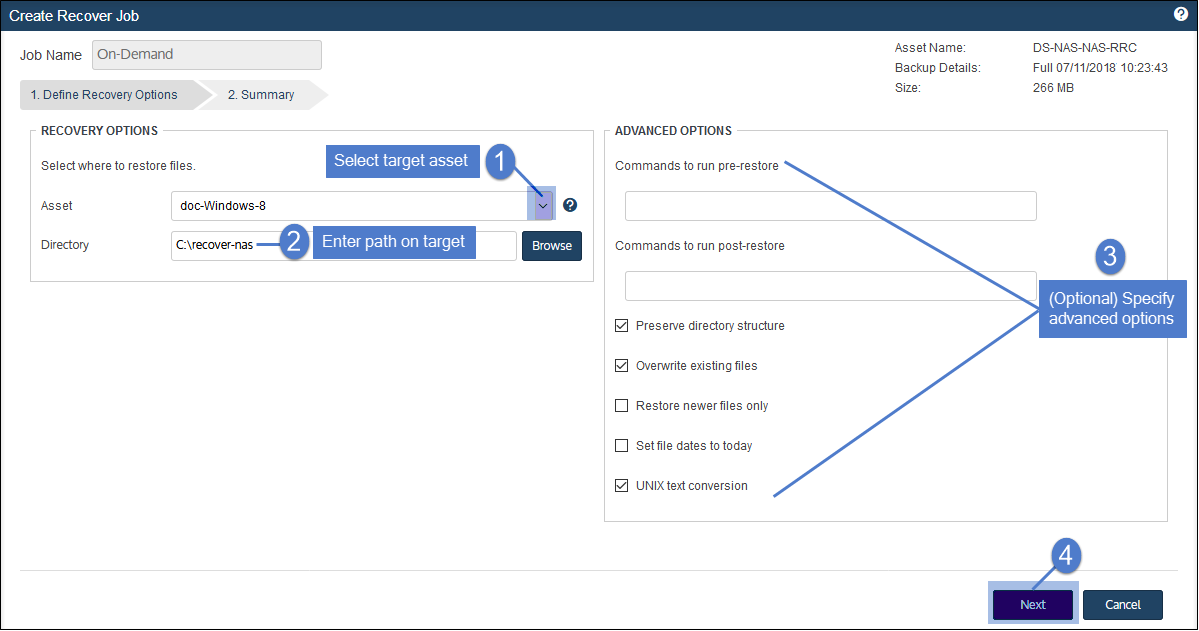
| 8 | Select the asset where the files will be recovered. |
| 9 | In the Directory field, enter the full path where the files will be recovered. |
For details, see Specifying the target recovery location.
| 10 | (Optional) Specify Exclusions. |
| 11 | (Optional) Specify Advanced Options. |
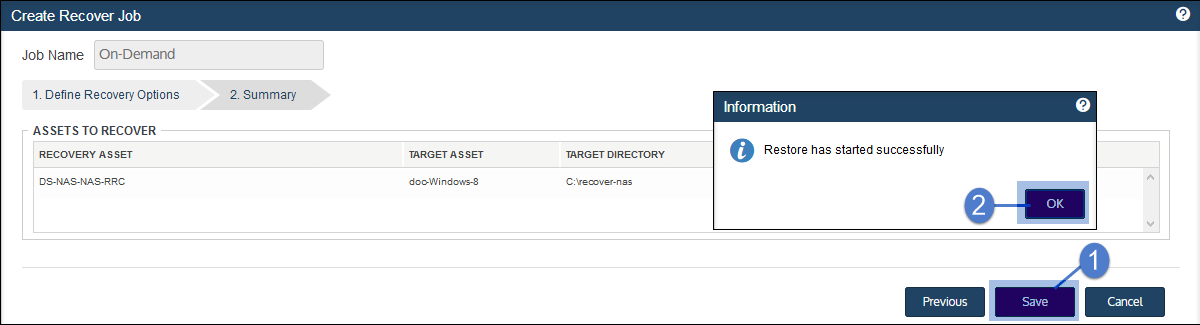
| 12 | Click Save. |
| 13 | Click OK to close the Notice message. |

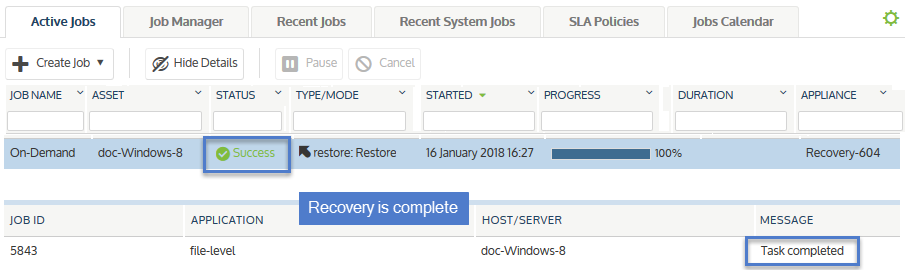
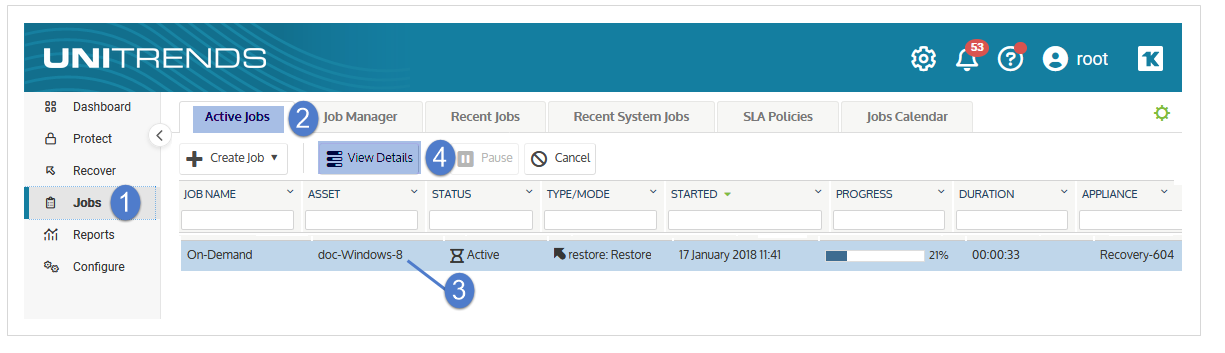
| 14 | To monitor the recovery job: |
| • | Select Jobs > Active Jobs. |
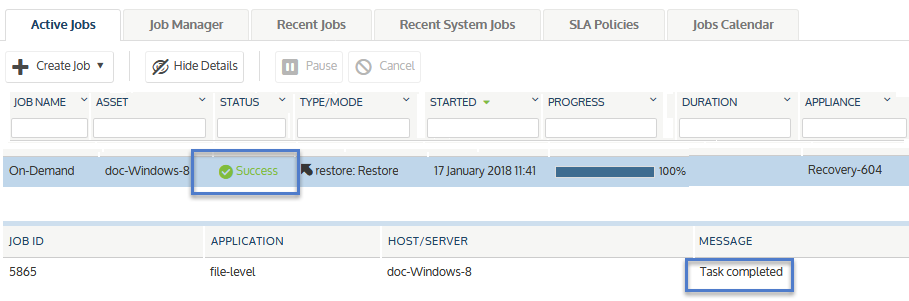
| • | Select the job in the list and click View Details. |
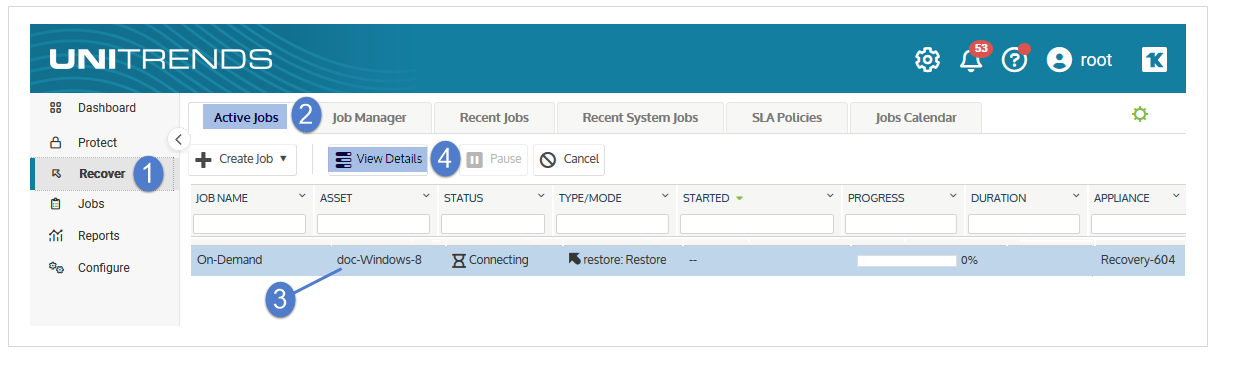
| • | The recovery is complete when the job's status changes to Success. |
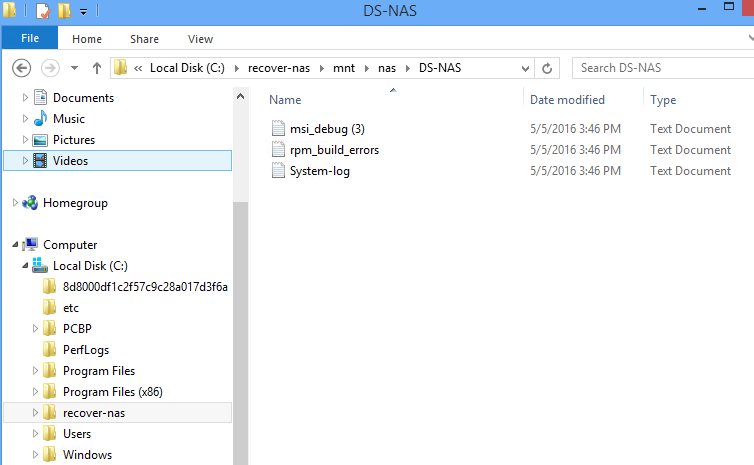
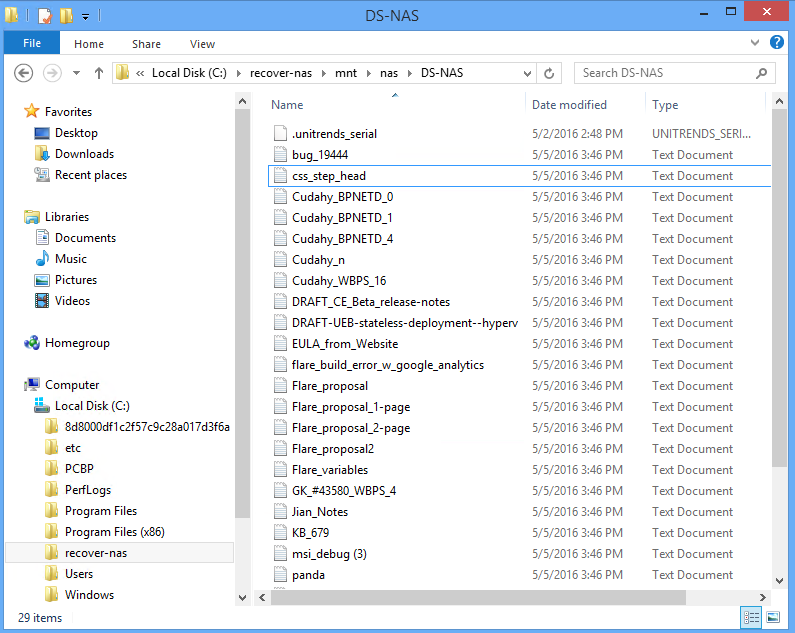
| 15 | Access the recovered files on the recovery target. |
Run this procedure from the backup appliance to recover a backup or imported backup copy. Run this procedure from the backup copy target appliance to recover a hot backup copy.
Note: The file browser contains the backup you select plus all dependent data in the backup group. For example, selecting an incremental enables you to browse the incremental plus its parent full and any other dependent incrementals in the chain. (For details, see Backup groups.)
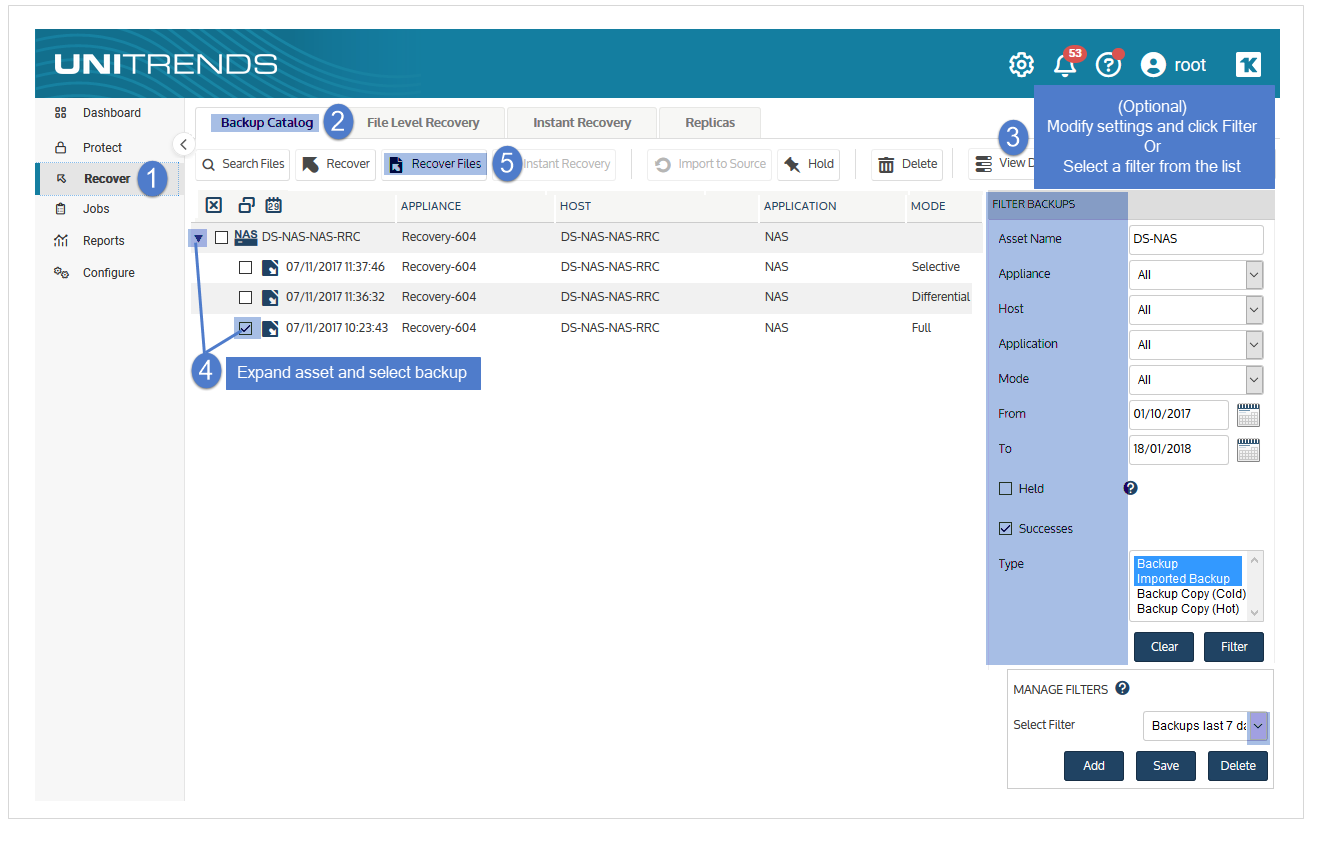
| 1 | Log in to the backup appliance or target appliance (if recovering a hot backup copy). |
| 2 | Select Recover > Backup Catalog. |
(Optional) Use Filter Backups to the right to customize the backups that display. For details, see Working with custom filters.
| 3 | Expand the NAS asset and select one of the following: |
| • | A NAS backup. |
| • | An imported NAS backup copy. (To import a backup copy, see To import a cold backup copy or To import a hot backup copy.) |
| • | A hot backup copy (supported if performing the recovery on the target appliance where the hot copy resides). |
| 4 | Click Recover. |

| 5 | Select the Asset where the files will be recovered. |
| 6 | In the Directory field, enter the full path where the files will be recovered. |
For details, see Specifying the target recovery location.
| 7 | (Optional) Specify Advanced Options. |
| 8 | Click Next. |
| 9 | Review settings and click Save. |
| 10 | Click OK to close the Notice message. |
| 11 | To monitor the recovery job: |
| • | Select Jobs > Active Jobs. |
| • | Select the job in the list and click View Details. |
| • | The recovery is complete when the job's status changes to Success. |
| 12 | Access the recovered files on the recovery target. |
Use this procedure to recover the entire backup.
Notes:
| • | This procedure is not supported for imported backups and backup copies. To recover an imported backup or hot backup copy, use the Backup Catalog procedure above. |
| • | The file browser contains the backup you select plus all dependent data in the backup group. For example, selecting an incremental enables you to browse the incremental plus its parent full and any other dependent incrementals in the chain. (For details, see Backup groups.) |
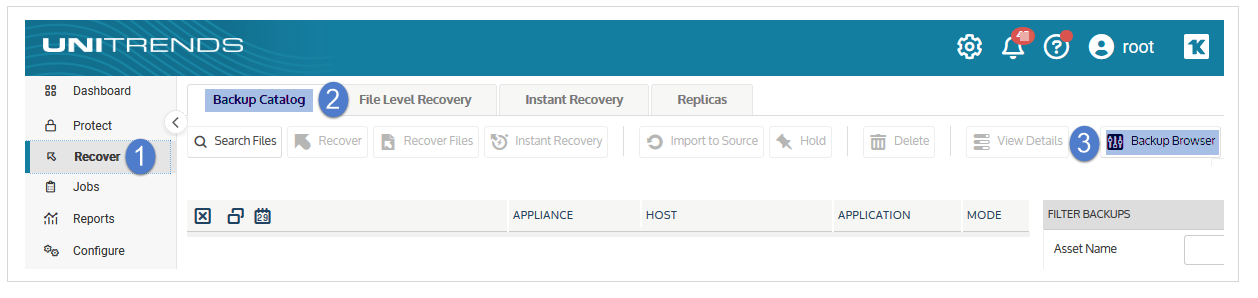
| 1 | Log in to the backup appliance. |
| 2 | Select Recover > Backup Catalog and click Backup Browser. |
| 3 | Select the Appliance and Date Range of backups to search. Backups that ran during the date range display: |
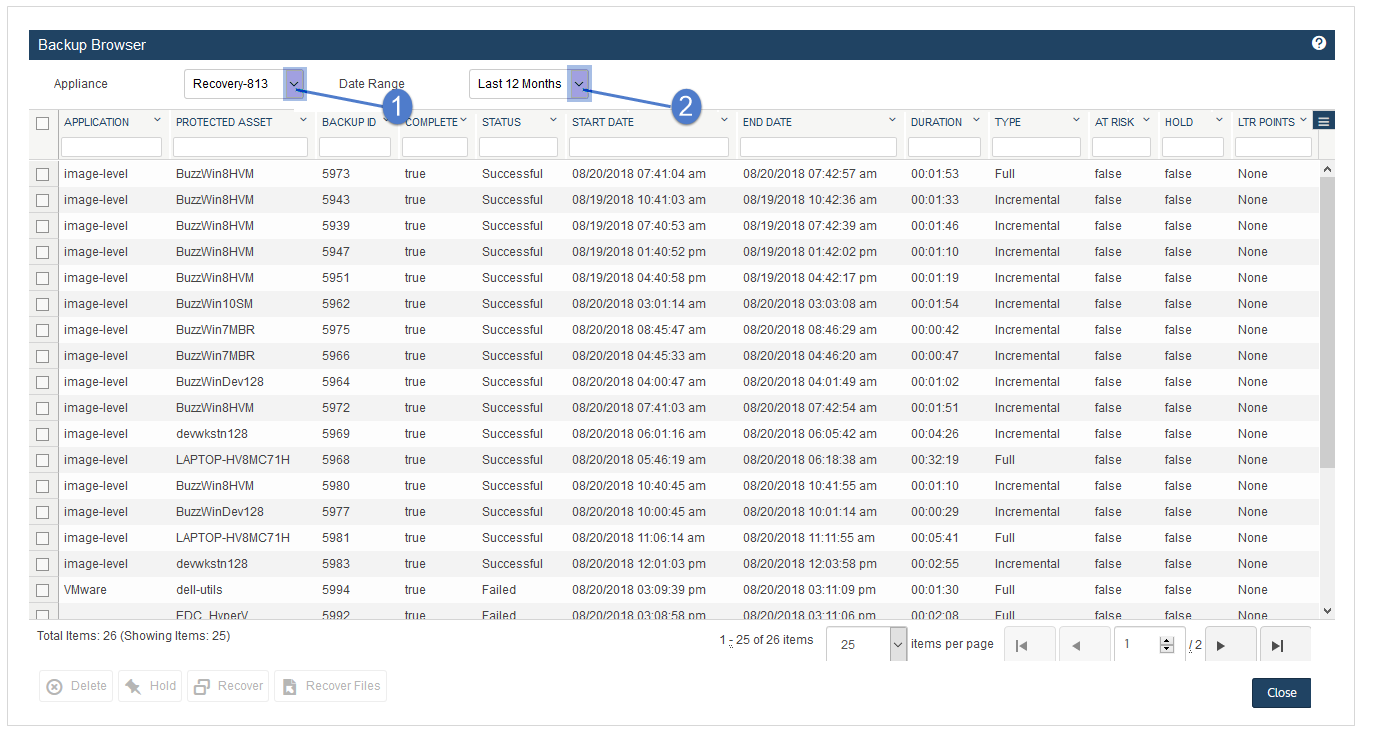
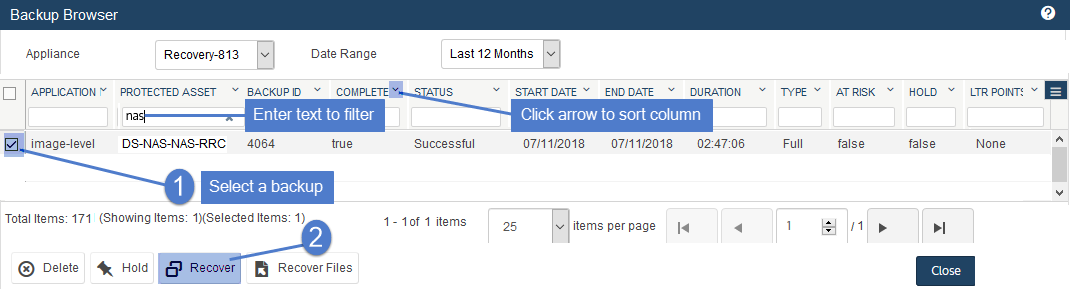
| 4 | (Optional) Refine the search: |
| • | Enter text in any column field to filter the display. |
| • | Click an arrow to sort by column. |
| • | Click the accordion icon to add or remove columns from the display. (Not all columns display by default.) |
| • | For a description of each column, see Backup Browser column descriptions. |
| 5 | Select the NAS backup and click Recover. |
| 6 | Select the Asset where the files will be recovered. |
| 7 | In the Directory field, enter the full path where the files will be recovered. |
For details, see Specifying the target recovery location.
| 8 | (Optional) Specify Advanced Options. |
| 9 | Click Next. |
| 10 | Review settings and click Save. |
| 11 | Click OK to close the Notice message. |
| 12 | To monitor the recovery job: |
| • | Select Jobs > Active Jobs. |
| • | Select the job in the list and click View Details. |
| • | The recovery is complete when the job's status changes to Success. |
| 13 | Access the recovered files on the recovery target. |
Run this procedure from the backup appliance to recover from a backup or imported backup copy. Run this procedure from the backup copy target appliance to recover from a hot backup copy.
Note: The file browser contains the backup you select plus all dependent data in the backup group. For example, selecting an incremental enables you to browse the incremental plus its parent full and any other dependent incrementals in the chain. (For details, see Backup groups.)
| 1 | Log in to the backup appliance or target appliance (if recovering from a hot backup copy). |
| 2 | Select Recover > Backup Catalog. |
(Optional) Use Filter Backups to the right to customize the backups that display. For details, see Working with custom filters.
| 3 | Expand the NAS asset and select one of the following: |
| • | A NAS backup. |
| • | An imported NAS backup copy. (To import a backup copy, see To import a cold backup copy or To import a hot backup copy.) |
| • | A hot backup copy (supported if performing the recovery on the target appliance where the hot copy resides). |
| 4 | Click Recover Files. |
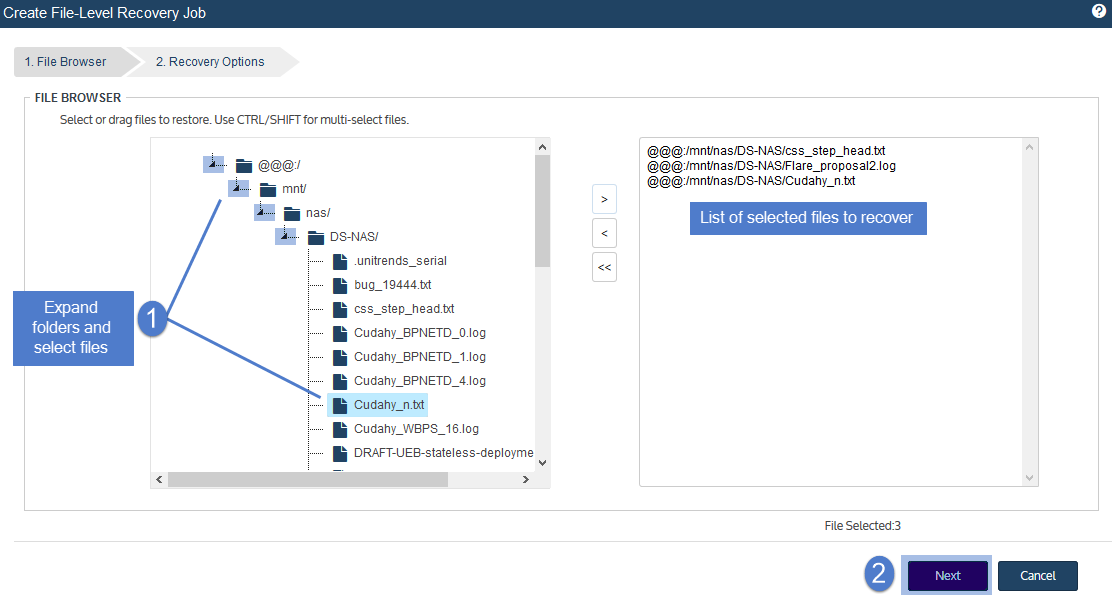
| 5 | In the File Browser, expand folders to view items in the backup. |
| 6 | Select or drag files and/or folders to recover. |
| 7 | Click Next. |
| 8 | Select the asset where the files will be recovered. |
| 9 | In the Directory field, enter the full path where the files will be recovered. |
For details, see Specifying the target recovery location.
| 10 | (Optional) Specify Exclusions. |
| 11 | (Optional) Specify Advanced Options. |
| 12 | Click Save. |
| 13 | Click OK to close the Notice message. |
| 14 | To monitor the recovery job: |
| • | Select Jobs > Active Jobs. |
| • | Select the job in the list and click View Details. |
| • | The recovery is complete when the job's status changes to Success. |
| 15 | Access the recovered files on the recovery target. |
Use this procedure to browse a NAS backup and recover selected files.
Notes:
| • | This procedure is not supported for imported backups and backup copies. To recover from an imported backup or hot backup copy, use the Backup Catalog procedure above. |
| • | The file browser contains the backup you select plus all dependent data in the backup group. For example, selecting an incremental enables you to browse the incremental plus its parent full and any other dependent incrementals in the chain. (For details, see Backup groups.) |
| 1 | Log in to the backup appliance. |
| 2 | Select Recover > Backup Catalog and click Backup Browser. |
| 3 | Select the Appliance and Date Range of backups to search. Backups that ran during the date range display: |
| 4 | (Optional) Refine the search: |
| • | Enter text in any column field to filter the display. |
| • | Click an arrow to sort by column. |
| • | Click the accordion icon to add or remove columns from the display. (Not all columns display by default.) |
| • | For a description of each column, see Backup Browser column descriptions. |
| 5 | Select the NAS backup and click Recover Files. |

| 6 | In the File Browser, expand folders to view items in the backup. |
| 7 | Select or drag files and/or folders to recover. |
| 8 | Click Next. |
| 9 | Select the asset where the files will be recovered. |
| 10 | In the Directory field, enter the full path where the files will be recovered. |
For details, see Specifying the target recovery location.
| 11 | (Optional) Specify Exclusions. |
| 12 | (Optional) Specify Advanced Options. |
| 13 | Click Save. |
| 14 | Click OK to close the Notice message. |
| 15 | To monitor the recovery job: |
| • | Select Jobs > Active Jobs. |
| • | Select the job in the list and click View Details. |
| • | The recovery is complete when the job's status changes to Success. |
| 16 | Access the recovered files on the recovery target. |
The following limitations apply to NAS NDMP recovery:
| • | NDMP backups can only be recovered to NDMP devices of the same vendor. |
| • | Supported recovery targets vary by vendor. |
Recovery to the original location is supported for all vendors. See the vendor documentation to determine whether you can recover to another location on the original NDMP device, or to another NDMP device that has been added to the appliance as an asset.
| • | Point-in-time recovery of the entire backup group is supported. |
| • | Recovery of selected files is supported for some NDMP devices from the certified vendors. See the vendor documentation for compatibility limitations. |
| • | When performing point-in-time recovery of an NDMP volume, you cannot specify files to include or exclude. The volume is recovered exactly as it was at the selected recovery point. |
| • | Recovery of selected files that contain non-UTF-8 compatible characters is not supported. Instead you must recover the entire backup. |
You can recover from a backup by using the Backup Catalog or the Backup Browser. For imported backups and backup copies, you must use the Backup Catalog. See these topics for details:
Run this procedure from the backup appliance to recover a backup or imported backup copy. Run this procedure from the backup copy target appliance to recover a hot backup copy.
| 1 | Log in to the backup appliance or target appliance (if recovering a hot backup copy). |
| 2 | Select Recover and click the Backup Catalog tab. |
(Optional) Use Filter Backups to the right to customize the backups that display. For details, see Working with custom filters.
| 3 | Expand the NDMP asset and select one of the following: |
| • | An NDMP backup. |
| • | An imported NDMP backup copy. (To import a backup copy, see To import a cold backup copy or To import a hot backup copy.) |
| • | A hot backup copy (supported if performing the recovery on the target appliance where the hot copy resides). |
| 4 | Click Recover. |
| 5 | Specify a recovery target: |
Note: Some filers only support recovery to the original location on the original NDMP device. See the vendor documentation to determine which options are supported for your filer.
| • | Select an NDMP device in the Asset list. |
Only devices of the same vendor display. Additional vendor compatibility limitations apply.
| • | Select a target Volume. |
Only directories on the selected device that are online and have enough space for the recovery display.
| • | (Optional) Enter the target Directory to which the backup will be recovered. |
| – | The target directory cannot exceed 255 characters. |
| – | If the directory entered does not exist, it is created within the selected volume. |
| – | If this field is left blank, the backup is recovered to the target volume. |
| 6 | Click Next. |
| 7 | Review the job details, then click Save. |
The recovery job is queued immediately.
| 8 | Click OK to close the Information message. |
To view the running job, select Jobs > Active Job.
If you encounter a permissions error when attempting to access an NDMP backup that was recovered to an environment with different permissions, unmount the target volume and remount it with the appropriate permissions.
Use this procedure to recover the entire backup.
Notes:
| • | This procedure is not supported for imported backups and backup copies. To recover an imported backup or hot backup copy, use the Backup Catalog procedure above. |
| • | The file browser contains the backup you select plus all dependent data in the backup group. For example, selecting an incremental enables you to browse the incremental plus its parent full and any other dependent incrementals in the chain. (For details, see Backup groups.) |
| 1 | Log in to the backup appliance. |
| 2 | Select Recover > Backup Catalog and click Backup Browser. |
| 3 | Select the Appliance and Date Range of backups to search. Backups that ran during the date range display: |
| 4 | (Optional) Refine the search: |
| • | Enter text in any column field to filter the display. |
| • | Click an arrow to sort by column. |
| • | Click the accordion icon to add or remove columns from the display. (Not all columns display by default.) |
| • | For a description of each column, see Backup Browser column descriptions. |
| 5 | Select the NDMP backup and click Recover. |
| 6 | Specify a recovery target: |
Note: Some filers only support recovery to the original location on the original NDMP device. See the vendor documentation to determine which options are supported for your filer.
| • | Select an NDMP device in the Asset list. |
Only devices of the same vendor display. Additional vendor compatibility limitations apply.
| • | Select a target Volume. |
Only directories on the selected device that are online and have enough space for the recovery display.
| • | (Optional) Enter the target Directory to which the backup will be recovered. |
| – | The target directory cannot exceed 255 characters. |
| – | If the directory entered does not exist, it is created within the selected volume. |
| – | If this field is left blank, the backup is recovered to the target volume. |
| 7 | Click Next. |
| 8 | Review the job details, then click Save. |
The recovery job is queued immediately.
| 9 | Click OK to close the Information message. |
To view the running job, select Jobs > Active Job.
If you encounter a permissions error when attempting to access an NDMP backup that was recovered to an environment with different permissions, unmount the target volume and remount it with the appropriate permissions.
Run this procedure from the backup appliance to recover selected files from a backup or imported backup copy. Run this procedure from the backup copy target appliance to recover files from a hot backup copy.
Notes:
| • | Recovering files is not supported for all NDMP filers. See the vendor documentation to determine whether recovering files is supported. |
| • | Recovery of files that contain non-UTF-8 compatible characters is not supported. |
| • | The file browser contains the backup you select plus all dependent data in the backup group. For example, selecting an incremental enables you to browse the incremental plus its parent full and any other dependent incrementals in the chain. (For details, see Backup groups.) |
| 1 | Log in to the backup appliance or target appliance (if recovering a hot backup copy). |
| 2 | Select Recover and click the Backup Catalog tab. |
(Optional) Use Filter Backups to the right to customize the backups that display. For details, see Working with custom filters.
| 3 | Expand the NDMP asset and select one of the following: |
| • | An NDMP backup. |
| • | An imported NDMP backup copy. (To import a backup copy, see To import a cold backup copy or To import a hot backup copy.) |
| • | A hot backup copy (supported if performing the recovery on the target appliance where the hot copy resides). |
| 4 | Click Recover Files. |
| 5 | In the File Browser, expand folders to view items in the backup. |
| 6 | Select or drag files and/or folders to recover. |
| 7 | Click Next. |
| 8 | Specify a recovery target: |
Note: Some filers only support recovery to the original location on the original NDMP device. See the vendor documentation to determine which options are supported for your filer.
| • | Select an NDMP device in the Asset list. |
Only devices of the same vendor display. Additional vendor compatibility limitations apply.
| • | Select a target Volume. |
Only directories on the selected device that are online and have enough space for the recovery display.
| • | (Optional) Enter the target Directory to which the backup will be recovered. |
| – | The target directory cannot exceed 255 characters. |
| – | If the directory entered does not exist, it is created within the selected volume. |
| – | If this field is left blank, the backup is recovered to the target volume. |
| 9 | Click Save. |
The recovery job is queued immediately.
| 10 | Click OK to close the Information message. |
To view the running job, select Jobs > Active Job.
If you encounter a permissions error when attempting to access files that were recovered to an environment with different permissions, unmount the target volume and remount it with the appropriate permissions.
Use this procedure to recover selected files from an NDMP backup.
Notes:
| • | This procedure is not supported for imported backups and backup copies. To recover from an imported backup or hot backup copy, use the Backup Catalog procedure above. |
| • | Recovering files is not supported for all NDMP filers. See the vendor documentation to determine whether recovering files is supported. |
| • | Recovery of files that contain non-UTF-8 compatible characters is not supported. |
| • | The file browser contains the backup you select plus all dependent data in the backup group. For example, selecting an incremental enables you to browse the incremental plus its parent full and any other dependent incrementals in the chain. (For details, see Backup groups.) |
| 1 | Log in to the backup appliance. |
| 2 | Select Recover > Backup Catalog and click Backup Browser. |
| 3 | Select the Appliance and Date Range of backups to search. Backups that ran during the date range display. |
| 4 | (Optional) Refine the search: |
| • | Enter text in any column field to filter the display. |
| • | Click an arrow to sort by column. |
| • | Click the accordion icon to add or remove columns from the display. (Not all columns display by default.) |
| • | For a description of each column, see Backup Browser column descriptions. |
| 5 | Select the NDMP backup and click Recover Files. |
| 6 | Select or drag files and/or folders to recover. |
| 7 | Click Next. |
| 8 | Specify a recovery target: |
Note: Some filers only support recovery to the original location on the original NDMP device. See the vendor documentation to determine which options are supported for your filer.
| • | Select an NDMP device in the Asset list. |
Only devices of the same vendor display. Additional vendor compatibility limitations apply.
| • | Select a target Volume. |
Only directories on the selected device that are online and have enough space for the recovery display.
| • | (Optional) Enter the target Directory to which the backup will be recovered. |
| – | The target directory cannot exceed 255 characters. |
| – | If the directory entered does not exist, it is created within the selected volume. |
| – | If this field is left blank, the backup is recovered to the target volume. |
| 9 | Click Save. |
The recovery job is queued immediately.
| 10 | Click OK to close the Information message. |
To view the running job, select Jobs > Active Job.
If you encounter a permissions error when attempting to access files that were recovered to an environment with different permissions, unmount the target volume and remount it with the appropriate permissions.