Recovering Backup Copies
If a local backup is not available, you can recover from a backup copy. In most cases, the same recovery operations that are used for local backups are supported for backup copies, but recovering from a backup copy requires additional steps. These steps vary depending on the backup copy target. See the following table for procedures by backup copy target:
|
Backup copy target |
Recovery procedure |
|---|---|
|
Unitrends Cloud |
See Recovering hot copies by using the source backup appliance. |
|
Managed service provider |
Contact the service provider. |
|
Unitrends appliance |
See the following: ● Recovering hot copies by using the source backup appliance. |
|
Third-party cloud (Amazon, AWS, Google, or Rackspace) |
|
|
NAS |
|
|
FC |
|
|
iSCSI |
|
|
Attached disk |
|
|
Tape |
You can run procedures from your source backup appliance to recover files or entire backup copies that reside in the Unitrends Cloud or on your target appliance. After reviewing the considerations and requirements, proceed to one of the recovery procedures to recover the hot backup copy.
To recover hot copies, you either import the backup copy to the source appliance or recover files directly from the hot copy in the Unitrends Cloud or on the appliance target. Recovery procedures vary by backup type and whether the copy has been imported to the source backup appliance. See the following for details:
|
Hot backup copy type and location |
Recovery options |
|---|---|
|
All types, imported to source backup appliance |
Import the backup copy from the Cloud or appliance target to the source appliance, as described in To import a hot backup copy. In most cases, once the backup copy has been imported, you can recover from it just like you would from any other local backup. See the applicable recovery chapter in this guide for recovery procedures. |
|
File-level hot backup copy that resides on an appliance target or in the Unitrends Cloud |
Use the following options to recover files directly from the backup copy. Before you start, review the Requirements and limitations for recovering hot copies by using the source backup appliance. ● Browse a backup copy and download selected file(s) in a .zip file. For details, see To recover files from a file-level backup copy by using the File Browser. ● Search the backup copy for files and download selected file(s) in a .zip file. For details, see To recover files from a file-level backup copy by using Search Files. |
|
Image-level hot backup copy that resides on an appliance target or in the Unitrends Cloud |
Browse a backup copy and download selected file(s) in a .zip file. Before you start, review the Requirements and limitations for recovering hot copies by using the source backup appliance. For details, see Recovering files from Windows image-level backups. |
|
Host-level hot backup copy that resides on an appliance target or in the Unitrends Cloud |
For host-level backups of Windows or Linux VMs, recover files directly from the backup copy by downloading selected file(s) in a .zip file. Before you start, review the Requirements and limitations for recovering hot copies by using the source backup appliance. For details, see Recovering files from virtual machine backups. |
The following requirements and limitations apply:
● To recover files from a file-level backup copy by using the File Browser
● To recover files from a file-level backup copy by using Search Files
● Recovering files from virtual machine backups
● Recovering files by browsing a Windows image-level backup
1. Log in to the source appliance.
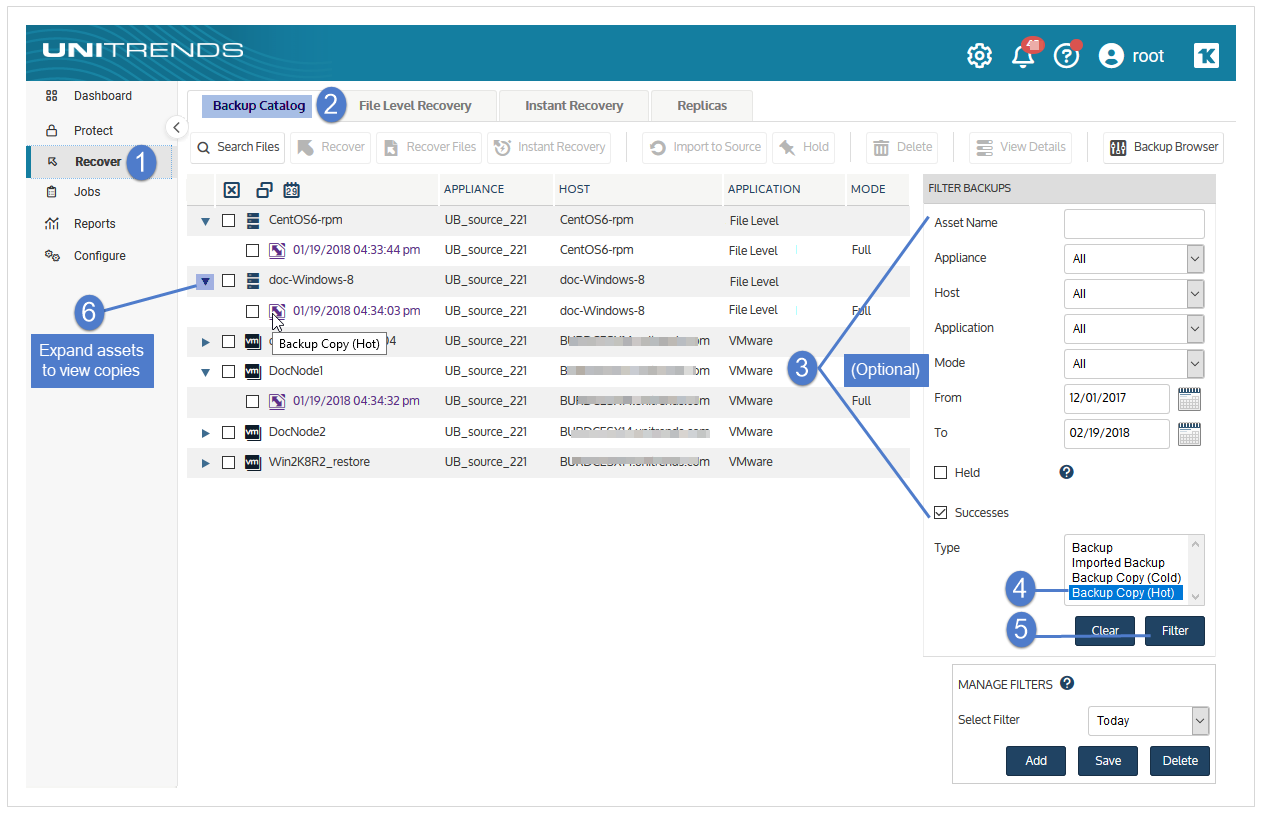
2. Click Recover > Backup Catalog.
3. In the Filter Backups area to the right, select Backup Copy (Hot) in the Type list.
You must select this Type to view backup copies in the Unitrends Cloud or on a target appliance.
4. (Optional) Enter other filter options. For details, see Working with custom filters.
5. Click Filter.
● Assets with backup copies meeting the filter options you specified display in the Backup Catalog list.
● Expand an asset to view its backup copies.
● Backup copies that reside in the Unitrends Cloud or on a target appliance are purple and the description Backup Copy (Hot) on Target displays when you hover over the backup copy icon.
● If your source appliance is also being used as a backup copy target appliance, the catalog lists both the copies of local backups that are stored on the remote Unitrends Cloud or appliance target and the hot backup copies that are stored on this appliance (that were received from another appliance). Hover over the backup copy icon to determine whether this backup copy resides on the remote target or on this appliance. Backup Copy (Hot) indicates that the backup copy is stored on this appliance. Backup Copy (Hot) on Target indicates that the backup copy resides in the Cloud or on the remote appliance target.
6. Select the Backup Copy (Hot) on Target copy to import.
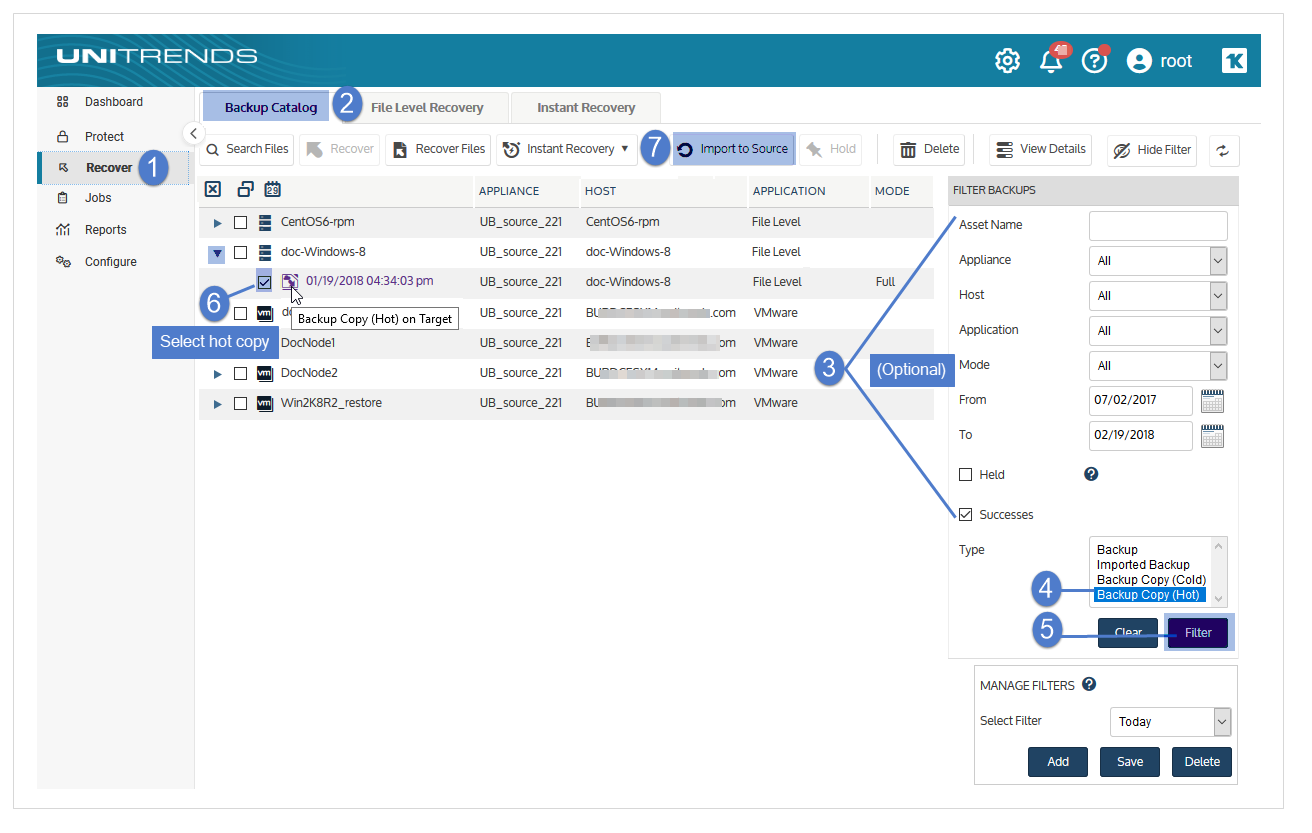
7. Click Import to Source.
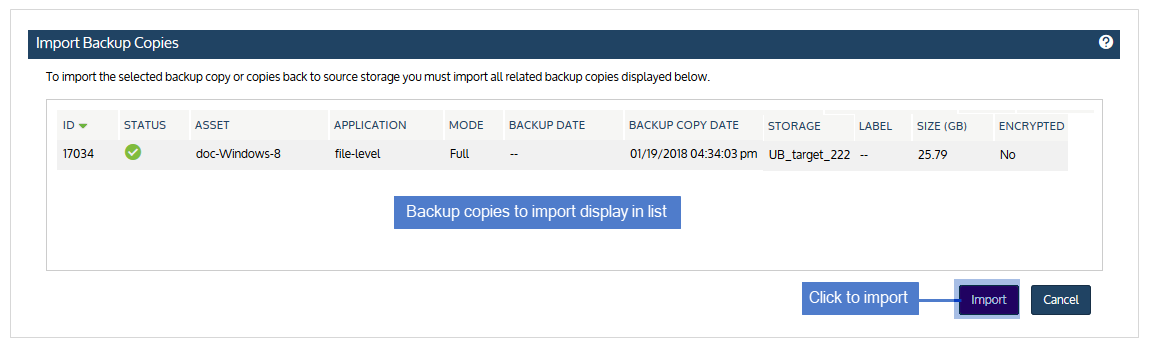
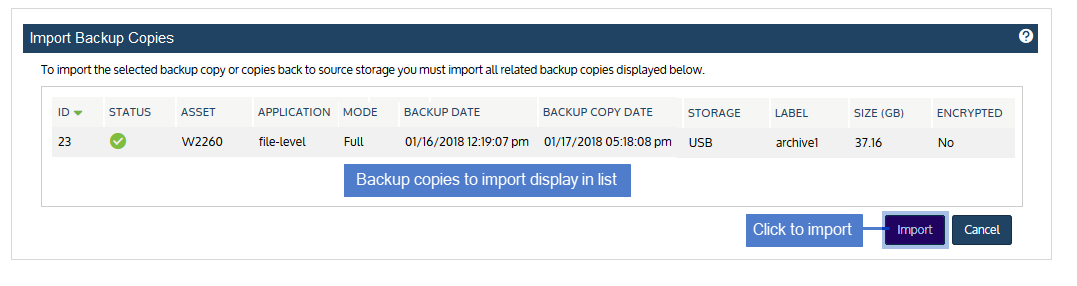
The Import Backup Copies dialog lists the backup copies to import.
NOTES
● Selecting a copy of a full backup imports only the full backup.
● Selecting a copy of an incremental backup imports the full backup and the incrementals up to and including the selected backup.
● Selecting a copy of a differential backup imports the differential and the associated full backup.
● For more information about backup groups, see Backup groups.
8. Click Import.
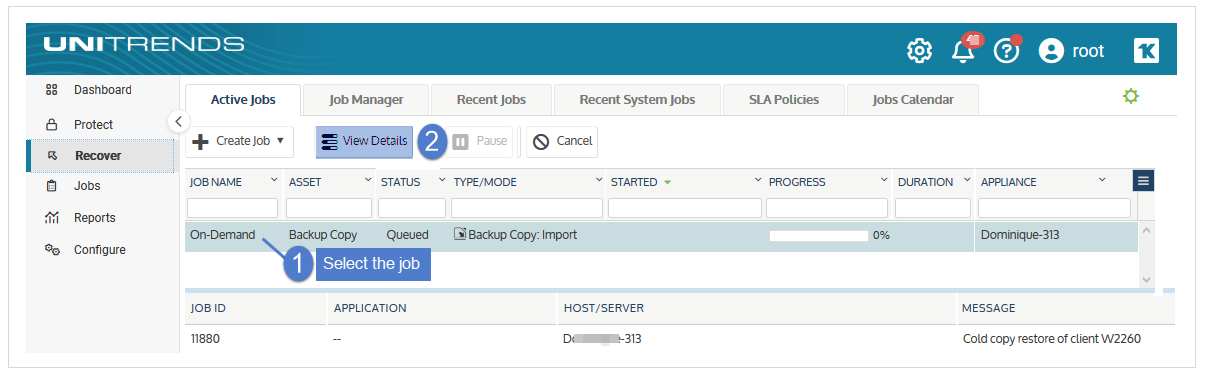
9. Selected backup copies are imported to the appliance. Click View Jobs to monitor the status of the import.
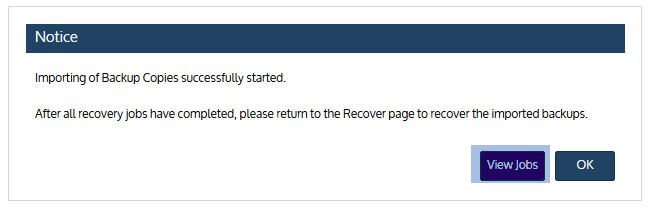
10. Select the job and click View Details.
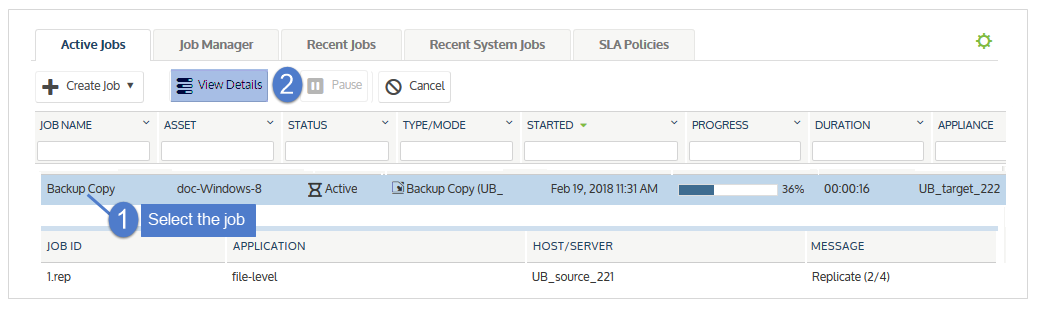
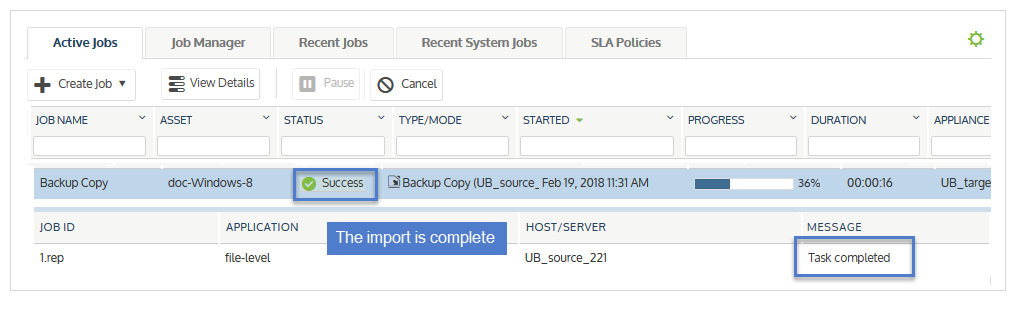
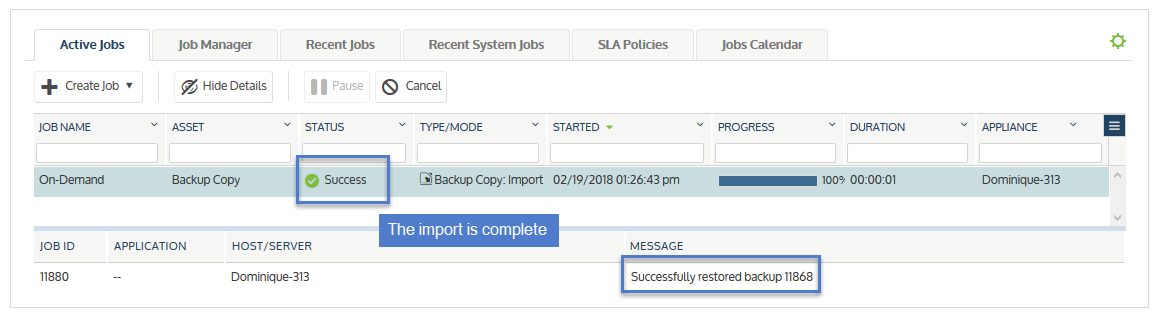
The import is complete when the job status changes to Success:
11. (Optional) Recover from the imported backup copy as you would from any regular backup.
NOTES
● The appliance purges the oldest backups when space is needed. Because imported backup copies are often older than others on the appliance, they are retained for 72 hours before becoming eligible for purging. Be sure to recover from imported backups within the first 72 hours.
● Imported SQL transaction log and differential backups must be recovered as the original name and to the original location.
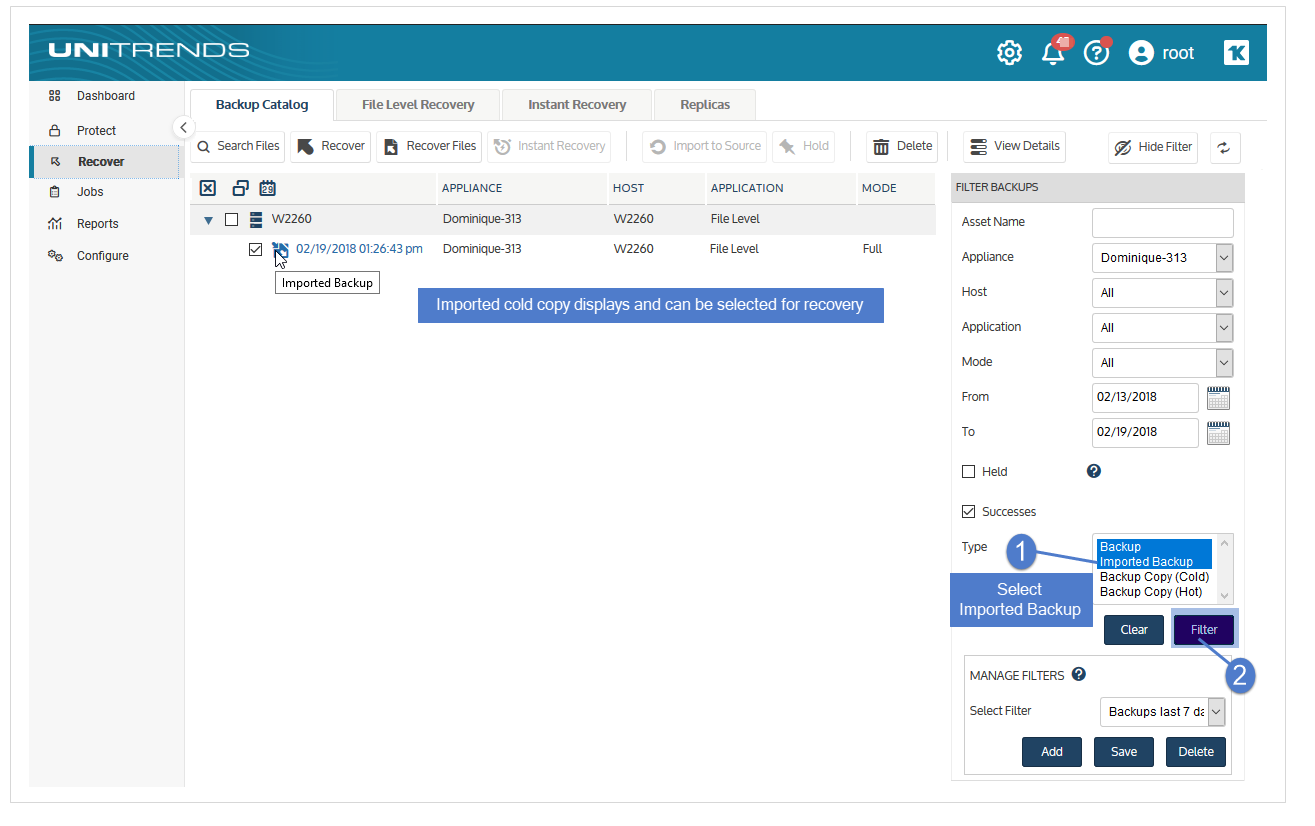
● Filter the display to view imported backups (Type = Imported Backup).
● Imported hot backup copies are purple and the description Imported Backup from Target displays when you hover over the backup copy icon.

You can recover from hot backup copies that are stored on a Unitrends target appliance by running the standard recovery procedures on the target appliance. Use the applicable recovery procedures, but run them from the target appliance and select a hot backup copy (instead of a regular backup or imported backup). For details on viewing hot backup copies, see To view the hot backup copies stored on the target appliance below.
Recovery procedures require that you select a target asset where the backup copy will be recovered. Only assets that have been added to the target appliance can be used as recovery targets. Be sure to add the desired target asset before running the recovery procedure. (See the adding assets procedures in Managing protected assets for details.)
Once you've added the target asset, proceed to one of these topics for detailed recovery procedures:
● Recovering Host-level Backups
● Recovering File-level Backups
● Recovering Windows Image-level Backups
● Recovering Application Backups
NOTE For iSeries, you cannot recover directly from a hot backup copy. Instead, you must import the backup copy to the source appliance. See To import a hot backup copy for details.
1. Log in to the target appliance and select Recover > Backup Catalog.
2. In the Filter Backups area to the right, select Backup Copy (Hot) in the Type list.
3. (Optional) Enter other filter options. For details, see Working with custom filters.
4. Click Filter.
● Assets with backup copies meeting the filter options you specified display in the Backup Catalog list. The source appliance where the backup originated displays in the Appliance column.
● Expand an asset to view its backup copies.
● Hot backup copies are purple and the description Backup Copy (Hot) displays when you hover over the backup copy icon,
● If your target appliance is also being used as a backup appliance and its local backups are being copied to a hot backup copy target, the catalog lists both the hot backup copies stored on this appliance and any backups that were copied from this appliance to the hot backup copy target. (The hot backup copy target could be another appliance or the Unitrends Cloud).
● You can recover the backup copies that are stored on this appliance as you would any other local backup.
● To determine whether the backup copy is stored on this appliance, hover over the backup copy icon to display more information. If the backup copy is labeled Backup Copy (Hot), it can be recovered using the standard backup recovery procedures. If the backup copy is labeled Backup Copy (Hot) on Target, you must recover it using the procedures in Recovering hot copies by using the source backup appliance.
Backup copies stored on external media are known as cold backup copies. Cold backup copies reside on cloud storage managed by third-party vendors or on other off-site targets, such as eSATA, tape, and NAS devices.
Before you can recover from a cold backup copy, you must import the data from the backup copy target to the source backup appliance. You can either import the entire backup copy or import selected files (supported for file-level backup copies only):
● To import the entire backup copy, see To import a cold backup copy. Once you have imported the backup copy, it displays in the Backup Catalog with the label Imported Backup. You can then select this backup and follow the same recovery steps you would use for recovering from a local backup.
● To import selected files from a file-level backup copy, see the following procedures. With these procedures, the appliance creates and imports a selective backup containing the files you picked:
● Recover files from a cold backup copy by using Search Files
● Recover files from one cold backup copy by using the File Browser
Use this procedure to import a backup copy that currently resides on the cold backup copy target.
1. Verify the following:
● The backup copy target is connected and accessible. To check this:
● On the Configure > Appliances page, select the source backup appliance.
● Click the Backup Copy Targets tab below.
● Click Scan For Media. The target displays on the Backup Copy Targets tab.
● For NAS devices, the target must be in Online status to import the copy. If necessary, select the target and click Enable to bring the target online.
● For removable media, such as USB, eSTATA and tape devices, the target can be in Offline or Online status to import the copy.
● If you are using removable media, the tape(s) or disk(s) where the backup copy is stored must be loaded in the target.
● If the job copied to multiple drives or tapes, be sure to load all drives or tapes that were loaded when the backup copy job ran. The appliance writes across all drives or tapes and all must be present to perform the import.
● If you are using tapes that are not labeled with barcodes, each tape must be inserted into the slot where it resided during the backup copy job.
2. Log in to the backup appliance.
3. Click Recover > Backup Catalog.
4. In the Filter Backups area to the right, select Backup Copy (Cold) in the Type list.
5. (Optional) Enter other filter options. For details, see Working with custom filters.
6. Click Filter.
● Assets with backup copies meeting the filter options you specified display in the Backup Catalog list.
● Expand an asset to view its backup copies.
7. Click to select the backup copy.
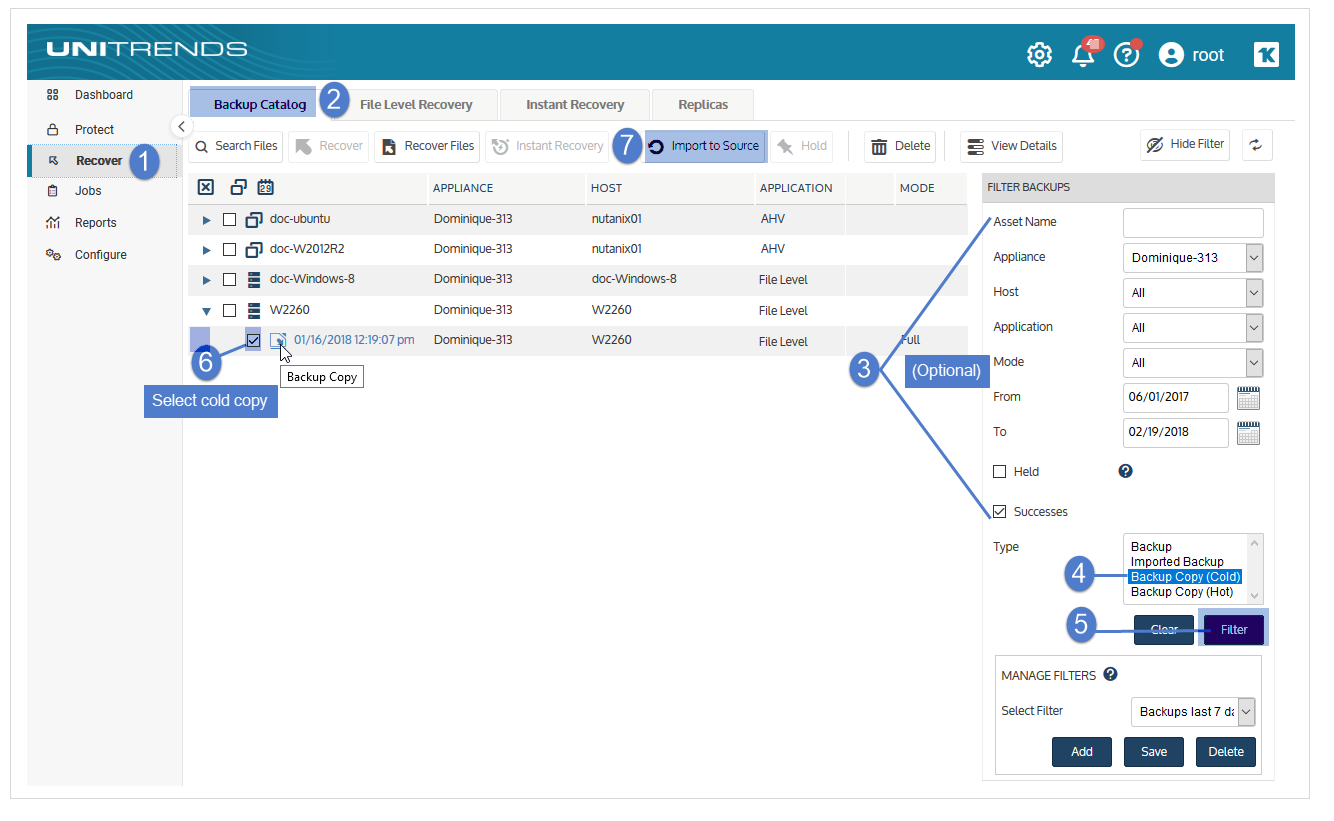
8. Click Import to Source.
The Import Backup Copies dialog lists the backup copies to import.
NOTES
● Selecting a copy of a full backup imports only the full backup.
● Selecting a copy of an incremental backup imports the full backup and the incrementals up to and including the selected backup.
● Selecting a copy of a differential backup imports the differential and the associated full backup.
● For more information about backup groups, see Backup groups.
9. Click Import.
10. Selected backup copies are imported to the appliance. Click View Jobs to monitor the status of the import.
11. Select the job and click View Details.
The import is complete when the job status changes to Success:
12. (Optional) Recover from the imported backup copy as you would from any regular backup.
NOTES
● The appliance purges the oldest backups when space is needed. Because imported backup copies are often older than others on the appliance, they are retained for 72 hours before becoming eligible for purging. Be sure to recover from imported backups within the first 72 hours.
● Imported SQL transaction log and differential backups must be recovered as the original name and to the original location.
● Filter the display to view imported backups (Type = Imported Backup).
● Imported cold backup copies are light blue and the description Imported Backup displays when you hover over the backup copy icon, as shown here: