Working with VM replicas
After creating VM replicas, use the following procedures as needed:
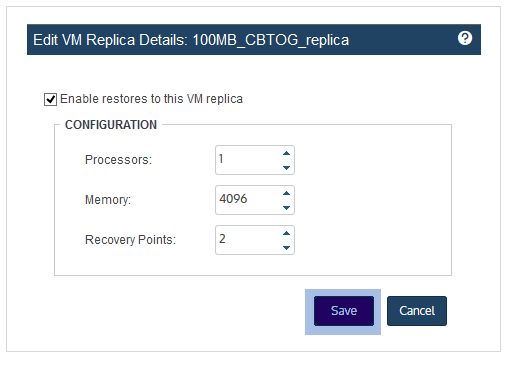
After creating a replica, you can modify the following settings at any time:
| • | The number of processors connected to the replica. |
| • | The amount of memory attached to the replica. |
| • | The number of recovery points to store with the replica. |
| • | Whether to apply new backups to the replica (Enable restores checkbox). |
To edit a VM replica
| 1 | Log in to the backup appliance. |
| 2 | Select Recover, then click the Replicas tab. |
| 3 | Select the replica, then click Edit. |
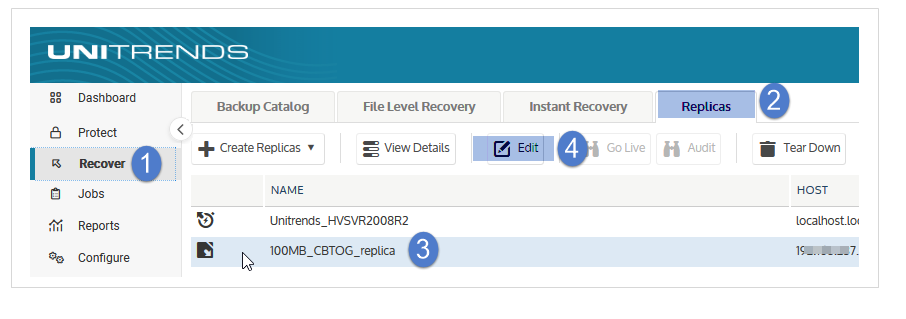
| 4 | Modify settings as desired. |
| 5 | Click Save. |
Audit mode enables you to run the replica while the original VM is still operating in production. A replica running in audit mode boots with no network interface. Auditing the replica with the original VM still online does not result in network conflicts or impact the original VM in any way. However, applications on the replica that require network access do not function fully in audit mode.
It is recommended that you audit each newly created replica to ensure it functions as expected, and that you perform additional audits at regular intervals to check subsequent recovery points.
A newly created replica cannot be audited until at least one backup has been applied. During the audit, no subsequent backups are applied. Upon exiting audit mode, the appliance applies any backups that completed during the audit to bring the replica up to date.
Auditing the replica is a two-part process where you bring the replica into audit mode and then access the replica to verify that it is functioning as expected. During the audit, you should verify the following:
| • | The replica boots successfully and is operational. |
| • | The replica contains the expected data and applications. |
After you have finished auditing the replica, you must take it out of audit mode so the appliance can resume applying backups. (Note that any changes made to the replica VM during the audit are lost upon exiting audit mode.)
Use these procedures to audit the VM replica:
Note: In audit mode, the replica uses hypervisor resources. By default, the replica's compute resources (processors and memory) match those of the original VM. If needed, you can view and modify these settings before entering audit mode by using the Working with VM replicas procedure.
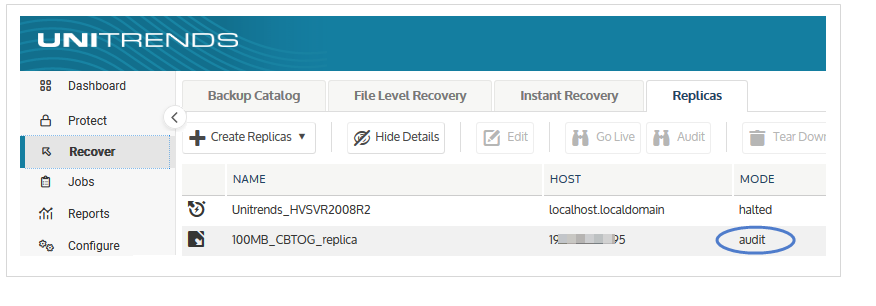
| 1 | Log in to the backup appliance. |
| 2 | Select Recover, then click the Replicas tab. |
| 3 | Select the replica, then click View Details. |
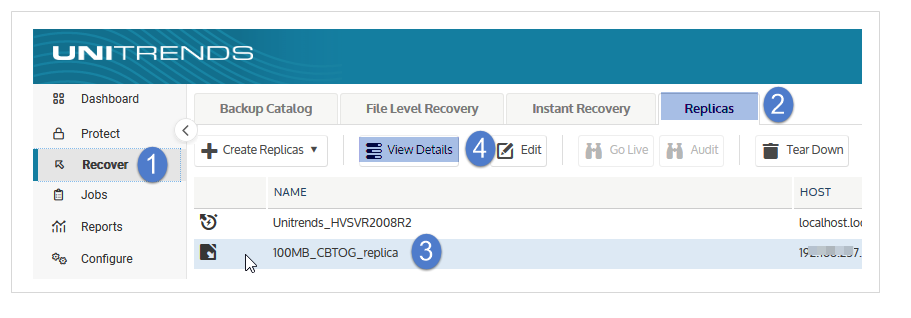
| 4 | Select a recovery point, then click Audit. |
| 5 | Click Confirm. |
The replica's mode changes to idle (pending audit), then to audit.
Note: If a restore is in progress - Beginning in release 10.1.2, the VM boots into audit mode immediately and the running replica restore job is canceled. Note that the next restore may take extra time. If you have performed an audit while a restore was running, do not interrupt the next restore. Repeatedly interrupting restore jobs significantly degrades performance. (For details, see Entering audit mode while a restore is in progress.)
| 6 | After the replica is in audit mode, you can connect to the replica to verify that it is functioning as expected. See To access a VM replica in audit mode for details. |
After a VM replica has entered audit mode, use this procedure to access the replica:
| 1 | Connect to your hypervisor manager. |
| 2 | Locate the replica in the list of virtual machines, and access it the same way you access all VMs on the hypervisor. |
| 3 | After verifying that the replica is running with its recovered data, proceed to To exit audit mode. |
| 1 | Log in to the backup appliance. |
| 2 | Select Recover, then click the Replicas tab. |
| 3 | Select the replica, then click End Audit. |
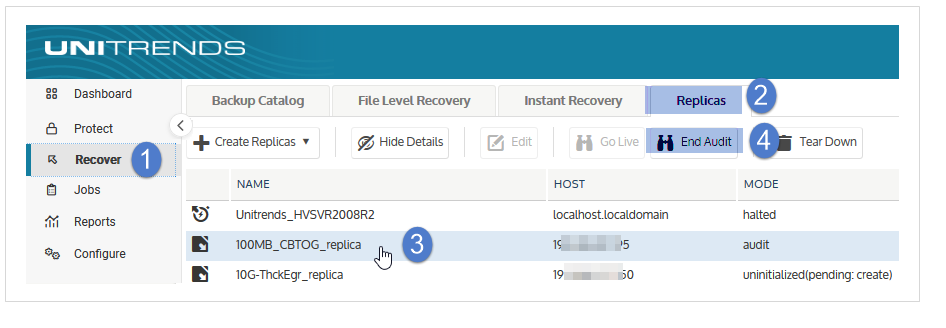
| 4 | The replica exits audit mode. Its mode changes to audit (pending: off), then to one of the following: |
| • | Restore – One or more backups successfully completed during the audit. The appliance is currently applying a backup. |
| • | Idle - The replica is idle (there are no backups to apply or a replica restore job is not yet running). |
If disaster strikes and the original VM fails, you can replace it with the replica by booting into live mode. Because the replica is continually updated with the original VM’s data, it can immediately assume the role of the original VM.
See these topics for details:
Review these recommendations before going into live mode:
| • | The replica can replace the original VM temporarily or be used as a permanent replacement. |
| • | Beginning in release 10.1.2, restore enhancements enable you to quickly enter live mode while a restore is in progress. If a restore is in progress, the VM boots into live mode and cancels the running replica restore job. |
| • | Upon entering live mode, the replica is marked invalid because the replica role no longer applies. After configuring network settings for the live replica VM and verifying that it is functioning as expected in production, you tear down the replica on the Unitrends appliance. You can then opt to create a new replica for the live VM. |
| • | In live mode, the replica uses hypervisor resources. By default, the replica's compute resources (processors and memory) match those of the original VM. If needed, you can view and modify these settings before entering live mode by using the Working with VM replicas procedure. |
| • | Entering live mode enables the replica VM to be discovered by the appliance. Once in live mode, you can protect the replica VM with Unitrends backups. |
| • | Live mode should be used for a short time only. You should exit live mode (as described in Working with VM replicas) as soon as you have verified that the replica is functioning as expected in production. Select the Delete the VM replica from the appliance only option so you can retain the replica VM. This way, you can keep using the replica for as long as needed and capture any changes by running backups of the replica VM. |
This procedure provides instructions for booting a replica in live mode. Be sure to shut down the original VM before running this procedure.
| 1 | Log in to the backup appliance. |
| 2 | Select Recover, then click the Replicas tab. |
| 3 | Select the replica, then click View Details. |
| 4 | On the Recovery Points tab below, select a recovery point. Then click Go Live. |
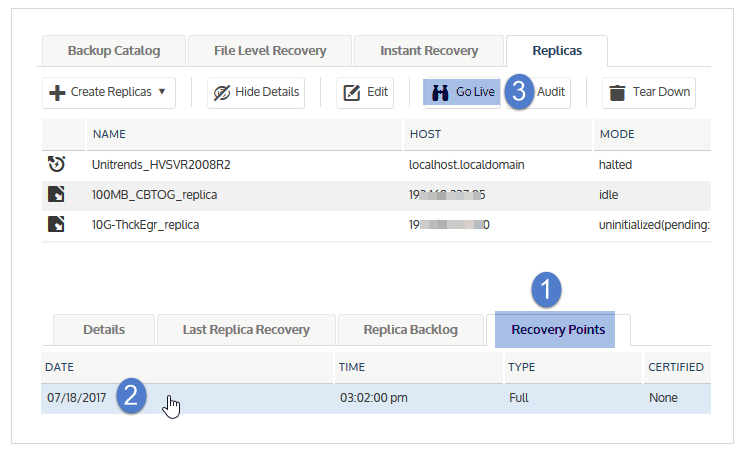
| 5 | Click Confirm. The replica's mode changes to idle(pending: live) and then to live. |
Note: Upon entering live mode, the replica is marked invalid because the replica role no longer applies.

| 6 | Access the replica VM by using the hypervisor manager and verify that the replica is functioning as expected. |
| 7 | Configure the replica VM's network settings to bring it onto the production network. |
| 8 | Verify that the VM is functioning as expected in production. |
At this point, the replica has assumed the identity of the original VM.
| 9 | Delete the replica from the appliance only, by using the Working with VM replicas procedure. Be sure to select the Delete the VM replica from the appliance only option to retain the replica VM on the ESXi host. |
| 10 | Create a backup schedule to protect the replica VM. For details, see Backup Administration and Procedures. |
Notes:
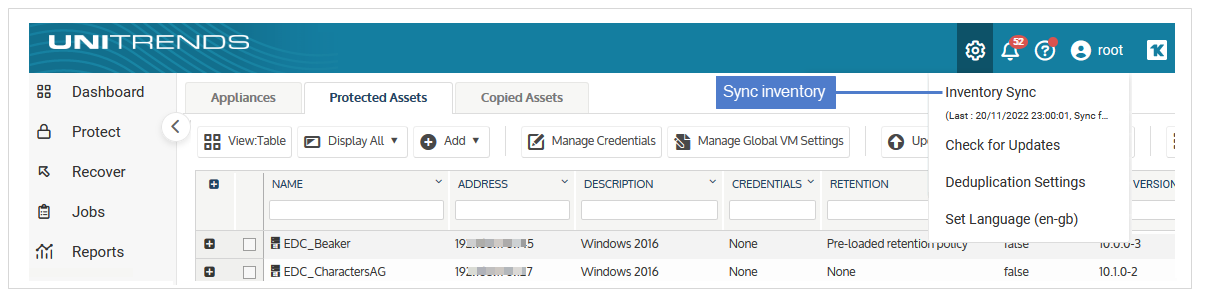
It can take several minutes for the replica VM to show up in the list of VMs to protect with VMware backups. To refresh the list of discovered VMs, click the Gear icon in the upper-right of the UI and select Inventory Sync.
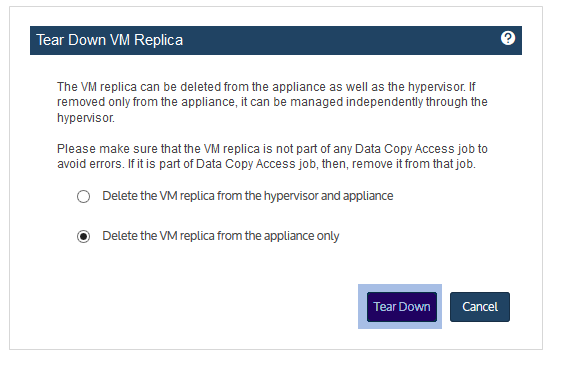
This section provides instructions for deleting a VM replica. You have these options:
|
Tear down option |
Description and considerations |
|---|---|
|
Delete the VM replica from the appliance only |
Select this option to retain the replica VM on the hypervisor. Note: To optimize backups, you must bring the replica into live mode before you do the tear down procedure. (For details, see Bringing the VM replica live in production.) Upon entering live mode, the appliance merges existing snapshots to enable optimized (sparse) backups. Be sure to enter live mode before doing the tear down if you will be retaining the replica VM on the hypervisor. |
|
Delete the VM replica from the hypervisor and appliance |
Select this option if you no longer need to use the replica VM. (For example, you have recovered the original VM to a different virtual host and will not be using the replica VM as a permanent replacement.) |
Important! If you are running a live replica as a replacement for a VM that has failed, do not tear down the replica until you have verified that the replica VM is functioning as expected in production.
| 1 | Log in to the backup appliance. |
| 2 | Select Recover, then click the Replicas tab. |
| 3 | Select the replica, then click Tear Down. |
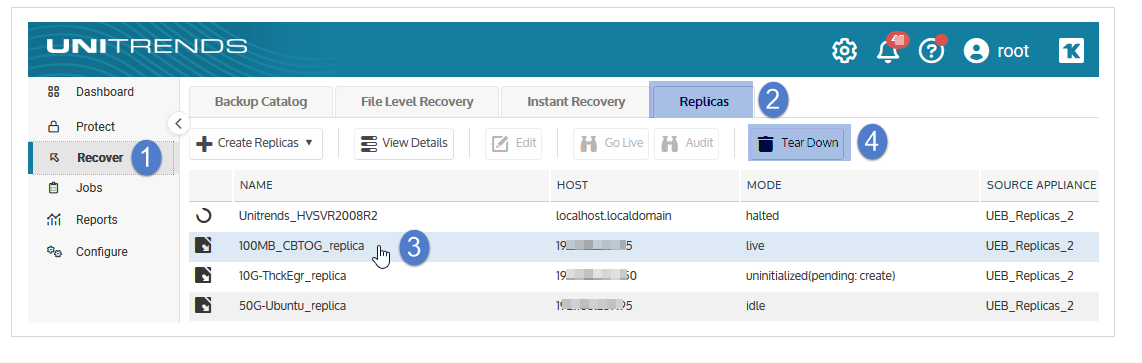
| 4 | Select the desired option and click Tear Down. |
It can take several minutes for the appliance to purge all information about the replica. If you need to create a new replica for the original VM, you must wait for this information to purge. If it has not yet purged, the original VM does not display in the list of discovered VMs in the Create Replica VMs dialog.
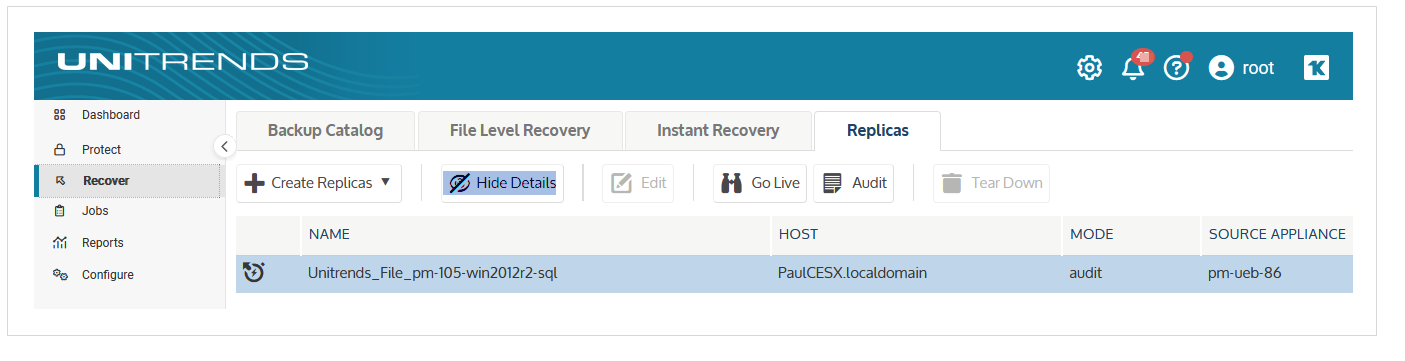
Use these procedures to check the status and details of existing VM replicas:
| 1 | Log in to the backup appliance. |
| 2 | Select Recover, then click the Replicas tab. |
| 3 | All VM replicas and Windows replicas display in a list on the Replicas tab. |
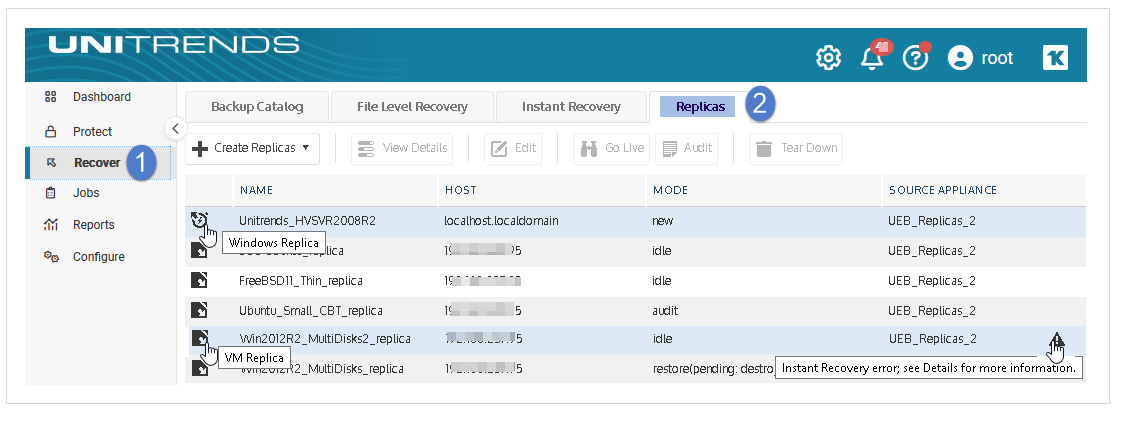
The following information is given for each VM replica:
|
Column |
Description |
|---|---|
|
Replica type icon |
Indicates the replica type: VM (or Windows). |
|
Name |
Replica name. By default, the replica is named <VMName>_replica. |
|
Host |
Virtual host where the VM replica resides. |
|
Mode |
Replica mode. Examples: new, audit, restore, or idle. See VM replica modes for additional details. |
|
Source Appliance |
Appliance where the replica was created. Note: If the replica was created on a backup copy target by using a hot backup copy, this field displays the source appliance where the original backup was taken and the target appliance where the hot backup copy resides, in this format: BackupAppliance --> BackupCopyTargetAppliance. |
|
Alert icon |
Indicates that an alert has been generated for the replica. Hover over the icon for details. |
| 1 | Log in to the backup appliance. |
| 2 | Select Recover, then click the Replicas tab. |
| 3 | Select the replica, then click View Details. |
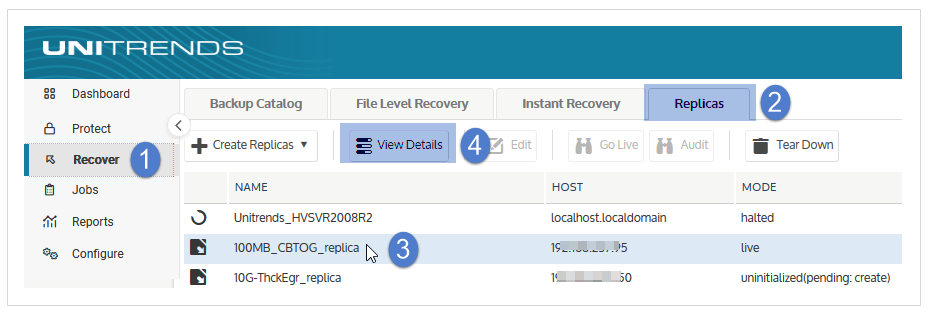
| 4 | Tabs containing replica details display below: |
|
Details tab |
Description |
|---|---|
|
Details |
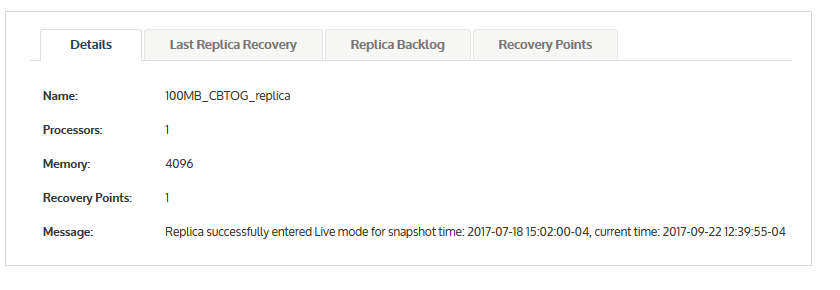
Shows the replica name, number of processors, amount of memory, number of recovery points, and status message. In this example, the replica entered live mode on September 22 by using a recovery point snapshot from July 18:
|
|
Last Replica Recovery |
Each time a backup is taken of the original VM, the appliance applies it to the replica (by running a recovery operation). This tab shows the date and time of the backup that was applied to the replica in the most recent recovery operation. In this example, a backup taken on July 18 is the most recent recovery point that has been applied to the replica:
|
|
Replica Backlog |
List of backups that have not yet been applied to the replica. No backups are listed if the replica is up to date. Example:
|
|
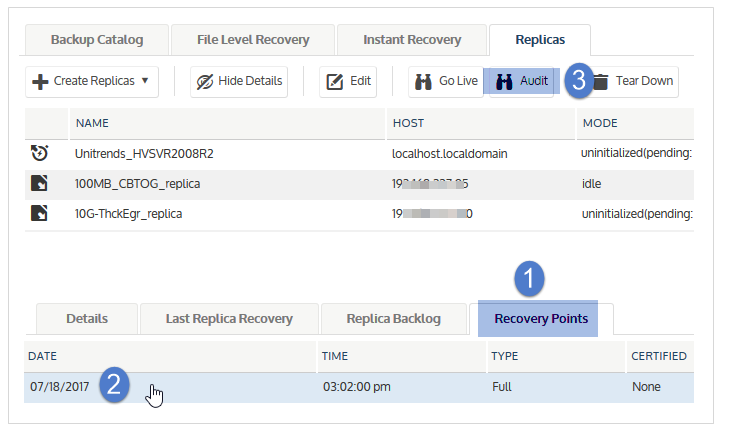
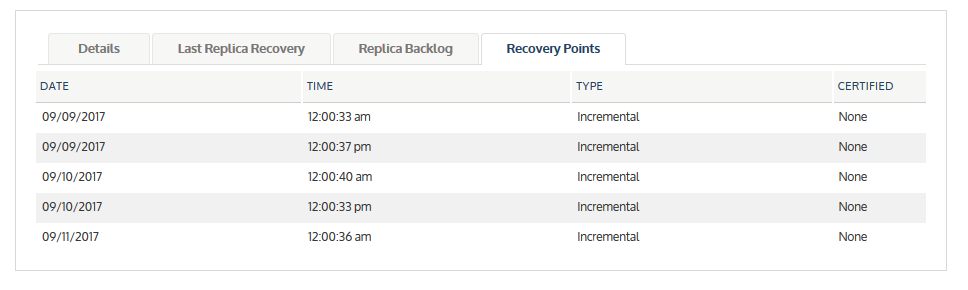
Recovery Points |
Shows the recovery point snapshots that can be used to boot the replica in audit or live mode. (To modify the maximum number of recovery points retained for the replica, see Working with VM replicas.) In this example, the five most recent recovery points are available: Note: Certified indicates whether the recovery point has been certified by Copy Data Management. For details, see Recovery Assurance.
|


| 5 | (Optional) Click Hide Details to stop displaying details for the selected replica. |
You can monitor a replica by checking its mode on the Replicas tab. The mode indicates what is currently happening with the replica (for example, whether it is newly created, whether a backup is being applied, or whether it is in audit mode.)
VM replica modes are described in the following table:
|
Mode |
Description |
|||||||||
|---|---|---|---|---|---|---|---|---|---|---|
|
New |
The replica is new and no backup has been applied. A replica in new mode cannot be audited or booted into live mode. |
|||||||||
|
Restore |
A backup has completed, and the appliance is applying it to the replica. The replica remains in restore mode until the restore completes, or until you enter audit or live mode. Note: Beginning in release 10.1.2, restore enhancements enable you to quickly enter audit or live mode while a restore is in progress. If a restore is in progress, the VM boots into audit or live mode immediately and the running replica restore job is canceled. For details, see Replica restore jobs. |
|||||||||
|
Idle |
At least one backup has been applied to the replica, but currently no action is occurring. |
|||||||||
|
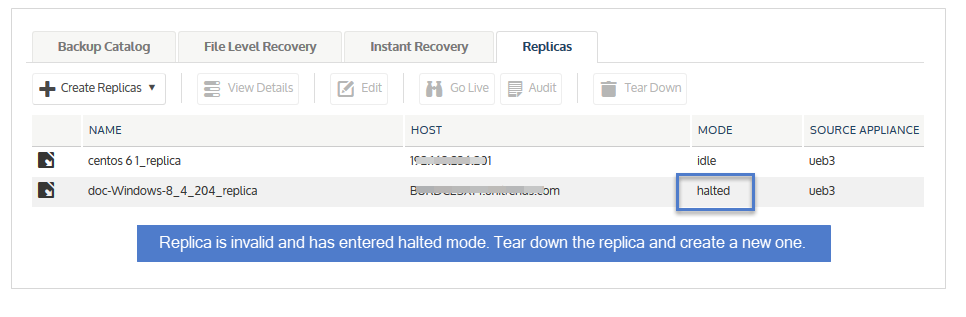
Halted |
The appliance has attempted to apply a backup to the replica but the restore could not be performed. The failed restore job has caused the replica to go into halted mode. The following can occur when a replica is in this mode:
Note: For VM replica restores where at least one backup has been successfully applied to the replica and the appliance is running release 10.1.2 or later, the replica is not invalidated and does not enter halted mode. For details, see Replica restore jobs. Once a replica is invalidated and enters halted mode, you must tear down the replica and create a new one. (For details, see Tearing down a VM replica and Creating VM replicas.)
|
|||||||||
|
Audit |
A user is performing a manual audit and the replica has booted in audit mode. For details, see Auditing a VM replica. |
|||||||||
|
Live |
A user has booted the replica in live mode to replace the original VM. For details, see Working with VM replicas. |
To generate a report of backups that have been applied to replicas, see Replicas History report.