Managing scheduled jobs
Once you have created scheduled jobs, use these procedures to view, edit, enable, disable, and delete schedules or to run them on-demand:
NOTES
● Do not directly edit or delete a job schedule that was created by an SLA policy. Instead, modify the SLA policy itself (see Managing SLA policies). The appliance automatically modifies the policy's schedules based on the changes that you make. On the Job Manager tab, SLA policy schedule names display with the prefix _SLA:, so you can easily distinguish them from manually created schedules.
● Deleted VMs and applications that had been protected in a schedule display as unavailable in the Edit Backup Job and Create Backup Copy Job dialogs. For details, see To remove a deleted VM or application from a backup schedule.
● iSeries schedules are managed by using the dpuconfig console interface. See iSeries Backups Overview and Procedures for details on working with iSeries schedules.
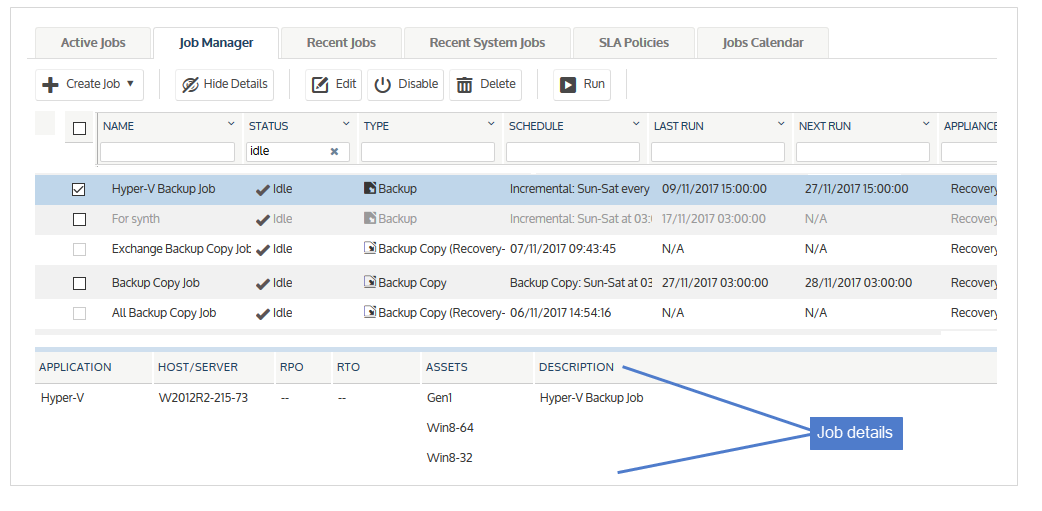
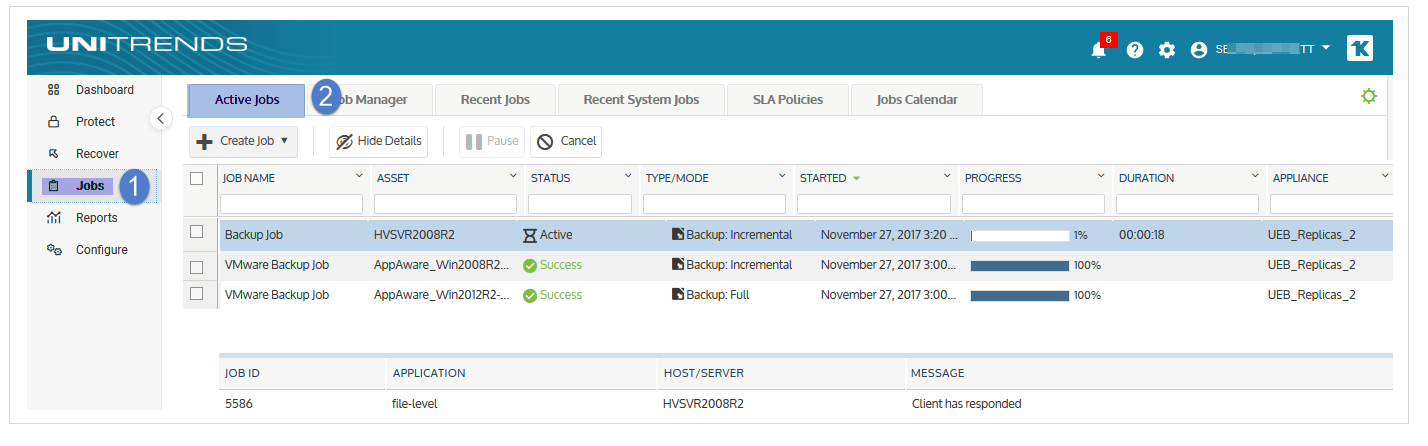
1. Select Jobs > Job Manager.
2. The Job Manager tab lists all scheduled jobs.
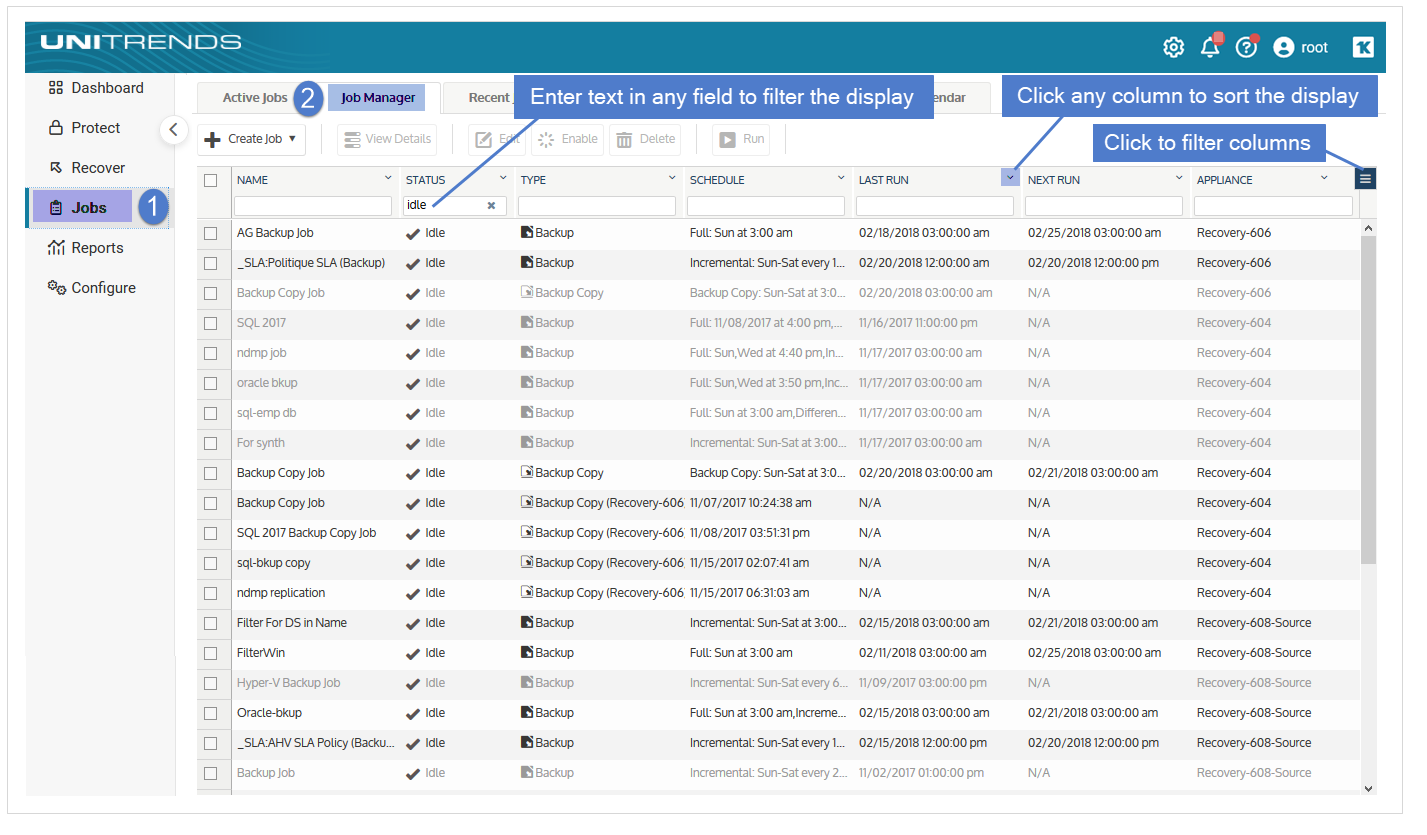
● Click on any column to sort alphabetically (a to z). To reverse the order (z to a), click again.
● Jobs that display in lighter type have been disabled.
● The following information displays for each scheduled job:
|
Column |
Description |
|---|---|
|
Name |
The name of the scheduled job. Schedules that were created by SLA policies adhere to the following naming conventions: ● SLA policy schedule names begin with the prefix _SLA:, so you can easily distinguish them from manually created schedules. ● SLA policy schedule names end with one of the following: ● (Backup) for backup schedules. ● (Hot) for hot backup copy schedules. ● (Cold) for cold backup copy schedules. |
|
Status |
The current status of the job: ● Running - The job is running now. ● Idle - The job is not running. |
|
Type |
Job type: Backup or Backup Copy. |
|
Schedule |
Description of the schedule. |
|
Last Run |
The date and time the job last ran. |
|
Next Run |
The date and time of the next scheduled run. |
|
Appliance |
The appliance running the job. |
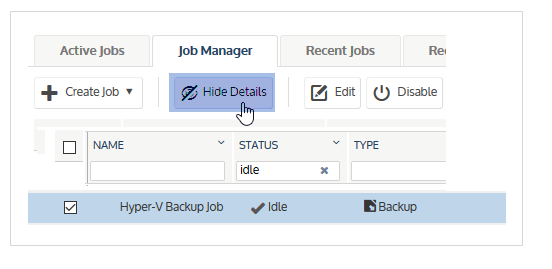
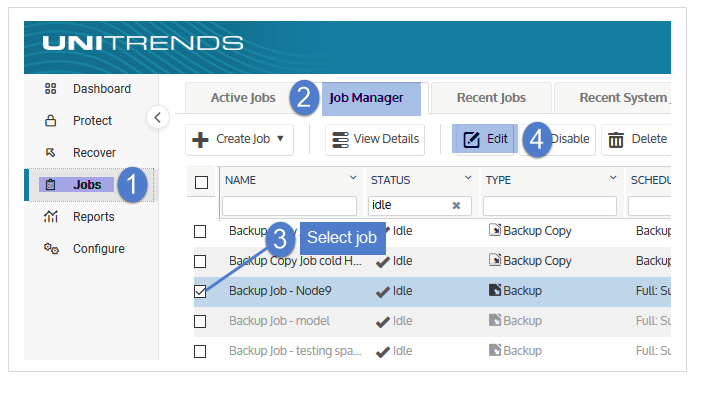
1. Click Jobs > Job Manager.
2. Select the job and click View Details.
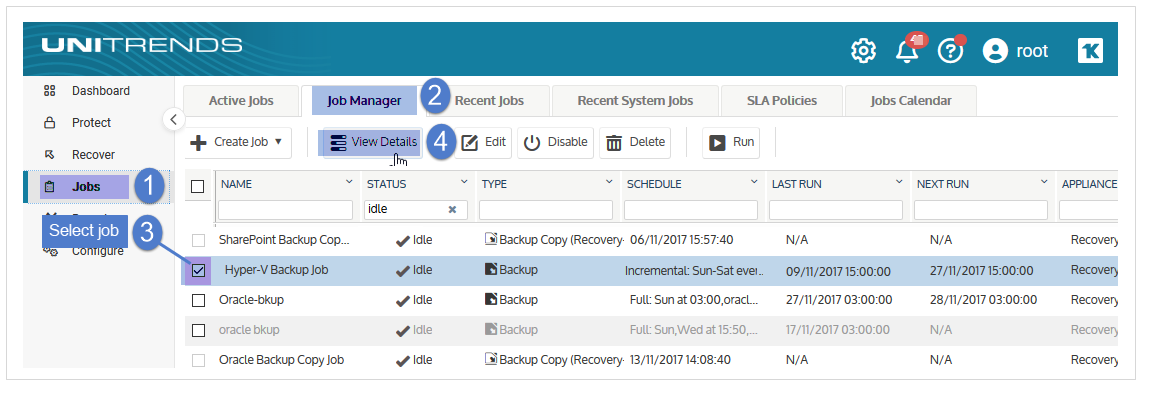
3. Job details display below.
4. Click Hide Details to return to the original page view.
NOTES
● SLA policies – Do not use this procedure to edit a backup schedule that was created by an SLA policy. Instead, modify the SLA policy itself (see To view or edit an SLA policy). The appliance automatically modifies the policy's schedules based on the changes that you make. On the Job Manager tab, SLA policy schedule names display with the prefix _SLA:, so you can easily distinguish them from manually created schedules.
● SQL clusters that use a Distributed Transaction Coordinator (DTC) – There is a known issue where the DTC's IP address is assigned to the SQL instance on the Unitrends appliance. To edit the schedule, change the IP of the SQL instance to the DTC's IP. After editing the schedule, change the IP of the SQL instance back to its original address.
1. Click Jobs > Job Manager.
2. Select the job and click Edit.
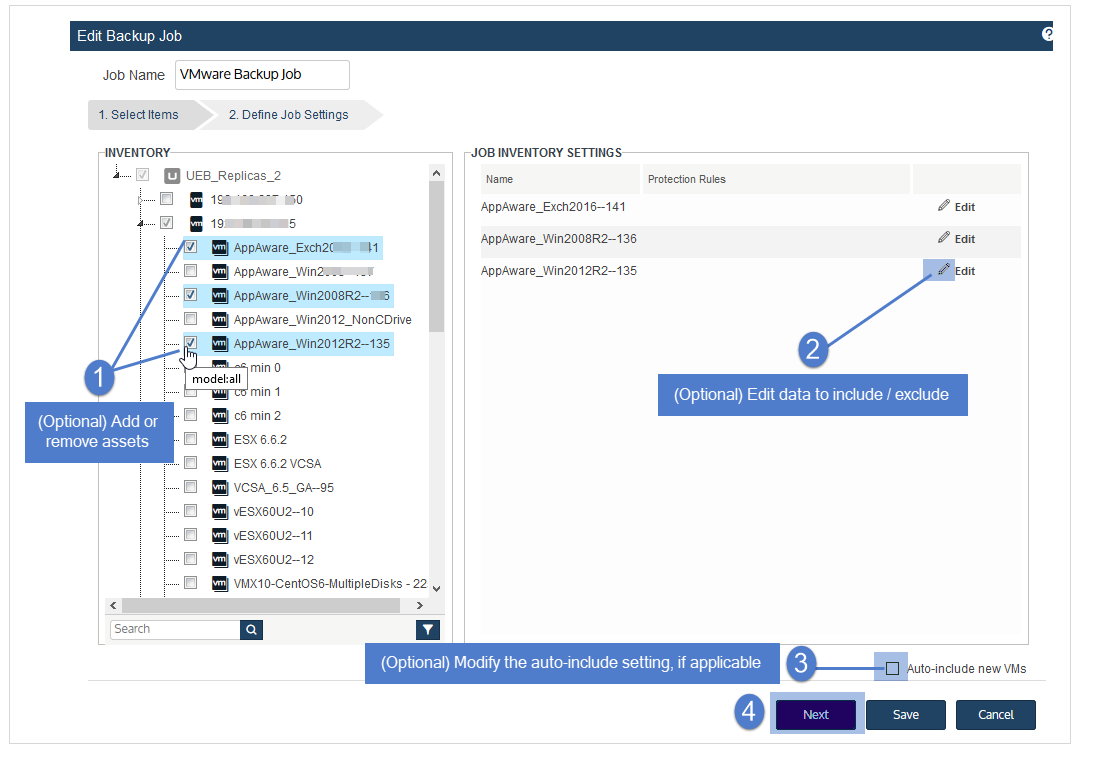
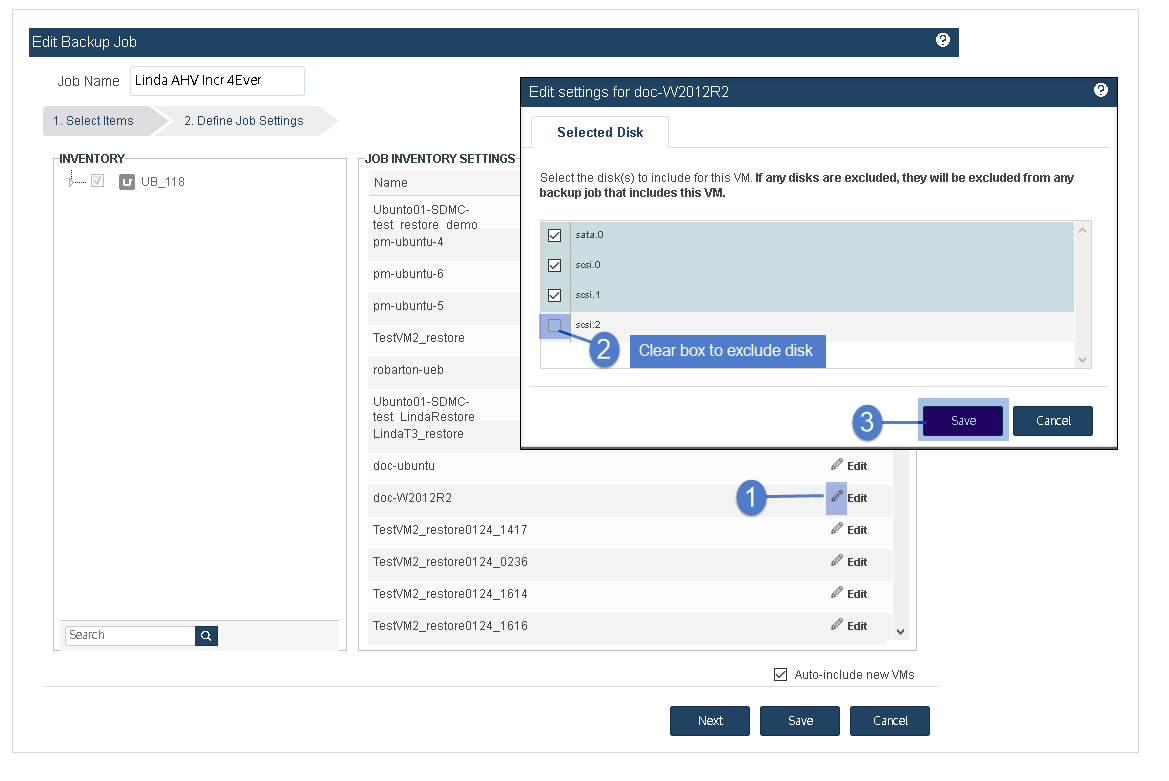
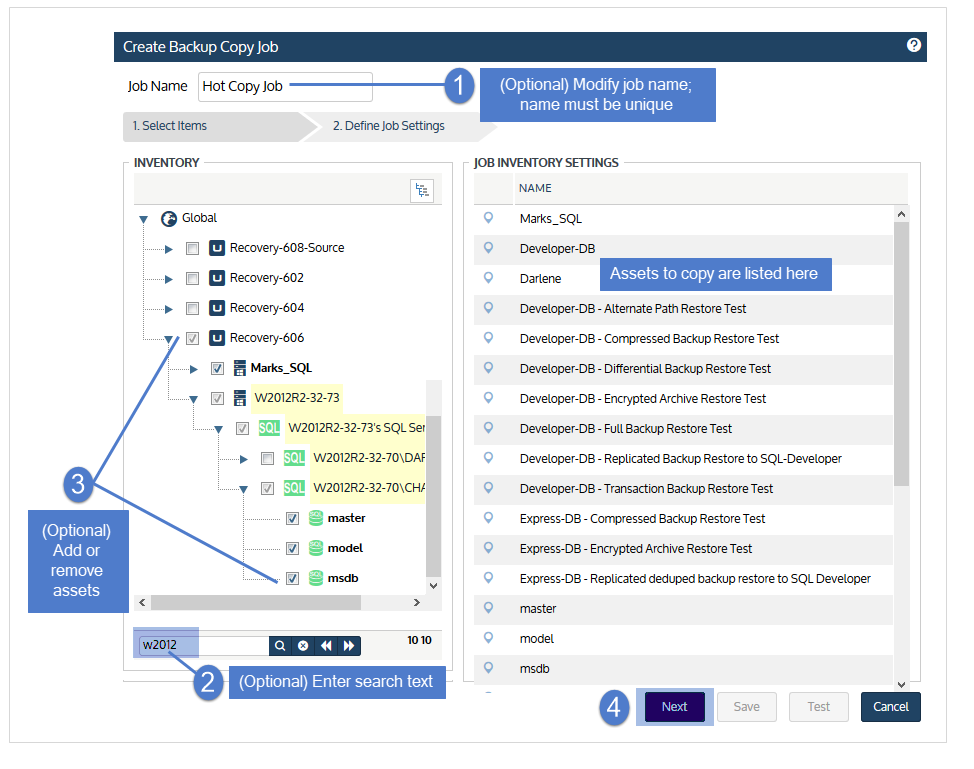
3. (Optional) In the Inventory tree, check boxes to add or remove asset(s) from the list of assets protected by this schedule.
4. (Optional) Modify the auto-include new VMs or databases setting (if applicable).
5. (Optional) Select an asset in the Job Inventory Settings area and click Edit to modify options. Click Save to retain any changes.
NOTES
● A new full backup is required after modifying the data that is included in or excluded from an asset's backups. See these topics below for details: Considerations for VMware, AHV, and XenServer backups, Considerations for file-level backups, and Considerations for Windows image-level backups.
● Editing backup options is not supported for all asset types. If you do not see the Edit option, edits are not supported.
6. Click Next.
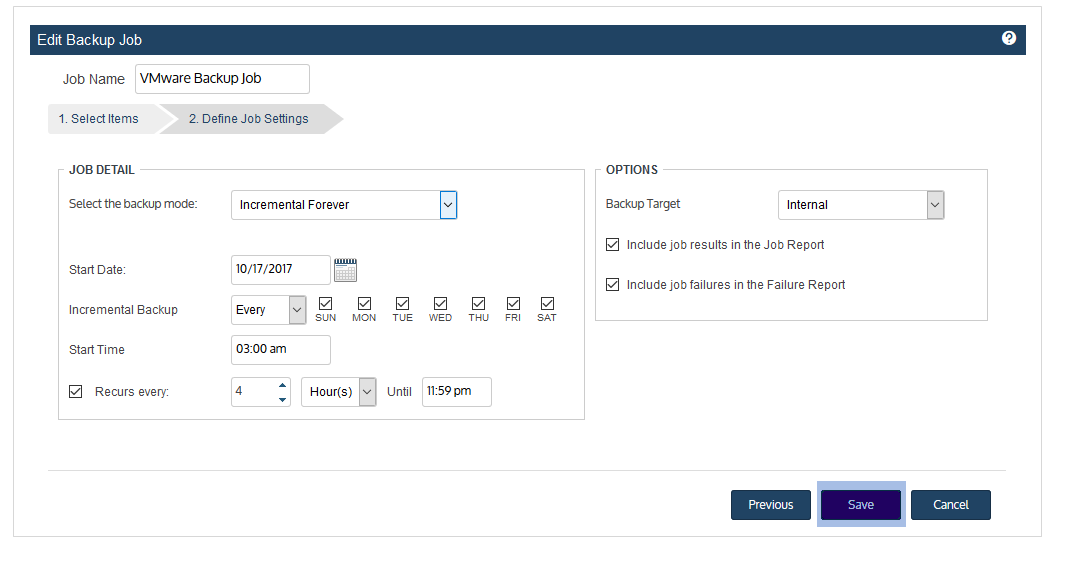
7. (Optional) Modify remaining Job Details and Options.
In most cases, the standard backup modes can be used to create the schedule. If you need more granularity, choose the Custom mode. For details, see Using the Custom backup mode in the Create Backup Job dialog.
8. Click Save. The schedule is updated with your changes.
For VMware, AHV, and XenServer, you can specify disks to exclude from backup. To exclude a disk, click to uncheck its checkbox.
NOTE To recover the entire virtual machine requires critical system volumes. Use care when omitting disks from backup.
|
File-level setting |
Description |
|---|---|
|
General considerations for including or excluding data from an asset's backups |
Review the following before specifying data to include or exclude: ● When creating a schedule, any inclusions or exclusions you add are applied to jobs run by that schedule only. Inclusions and exclusions are not applied automatically in other cases. ● Running an on-demand backup of the asset does not automatically apply any inclusions or exclusions specified in the asset's schedule. To run an on-demand backup, do one of the following: ● Create a one-time job that has the same inclusions and exclusions as in the schedule. ● Manually run the schedule (select the schedule under Jobs > Job Manager and click Run). ● Run a one-time Selective backup (so that a new full is not created). ● If you specify both files to include and files to exclude, the inclusion is applied first. Any exclusions are then applied to the subset of included files. |
|
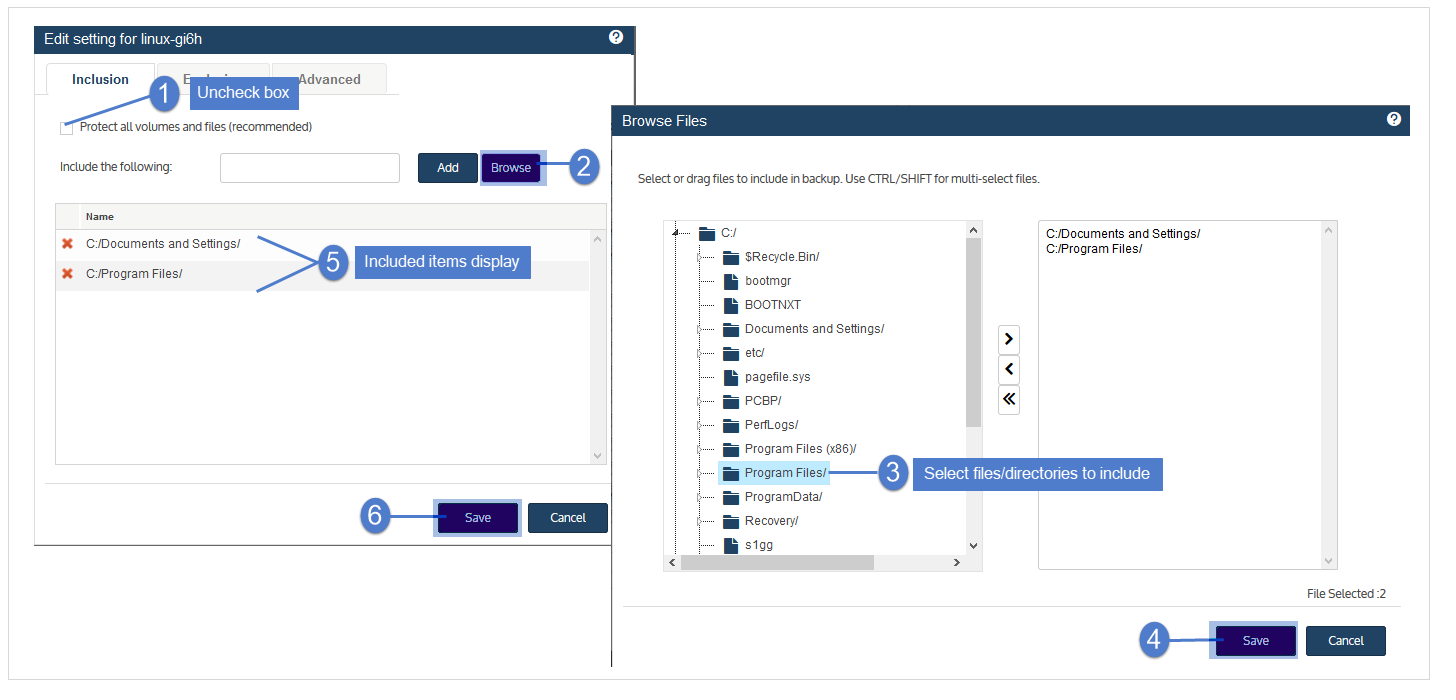
Inclusion tab |
Click to specify files, folders, or volumes to include in backups of this asset. ● Data that does not meet the criteria you specify here is NOT included in the backup. ● Type in the full path (e.g., C:/Documents) or Browse the asset to specify data to include. (Wildcards are not supported.) ● If you are running a full backup and include files or folders in the system drive (typically C:), do not check the System State box on the Advanced tab. Full backups fail if system state is excluded. ● Run a new full backup upon creating or modifying included files. Example:
|
|
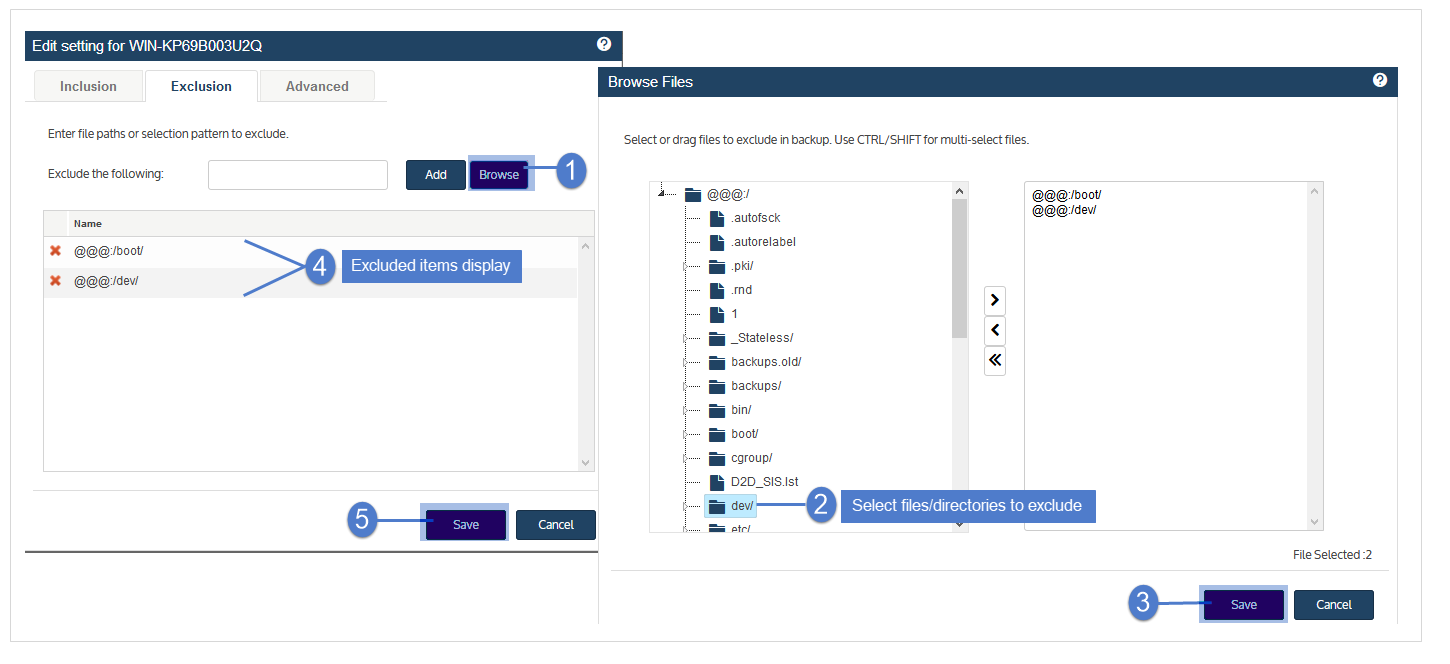
Exclusion tab |
Click to specify files, folders, or volumes to exclude from backups of this asset. ● Data that does not meet the criteria you specify here IS included in the backup. ● To specify files to exclude, do any of the following: ● Type in the full path (e.g., C:/Documents). ● Browse the asset. ● Enter a selection pattern. Wildcards are supported for Windows assets. Wildcards are not supported for these asset types: Linux, Unix, and NAS. See these rows below for usage examples: Wildcard * usage, Wildcard ? usage, and Multiple wildcards. ● Run a new full backup upon creating or modifying excluded files. Example:
|
|
An example of how to exclude all files with zero or more characters that match exclusion pattern: *.txt An example of how to exclude directories with zero or more characters and their contents within a specified path that match the exclusion pattern: C:/windows/sys* Limitations: ● *folder_abc cannot be used to exclude all folders that match folder_abc on the protected asset. The full path must be provided. ● If an entire directory is excluded, the directory name will still appear in the backup; however, its contents will be empty. ● Multiple wildcard matches like the following are not supported: C:\*\*\abc.txt |
|
|
An example of how to exclude all files within specified path that matches a single character within exclusion pattern: C:/PCBP/Lists.dir/pro_client?.spr An example of how to exclude all directories and their contents within specified path that matches a single character within exclusion pattern: C:/Programfiles/Case?/ Limitation: If an entire directory is excluded, the directory name itself will still appear in the backup; however its contents will be empty. |
|
|
An example that uses multiple “?” wildcards and only one * wildcard: C:/?Log?/*.logs Limitation: If an entire directory is excluded, the directory name itself will still appear in the backup; however its contents will be empty. |
|
|
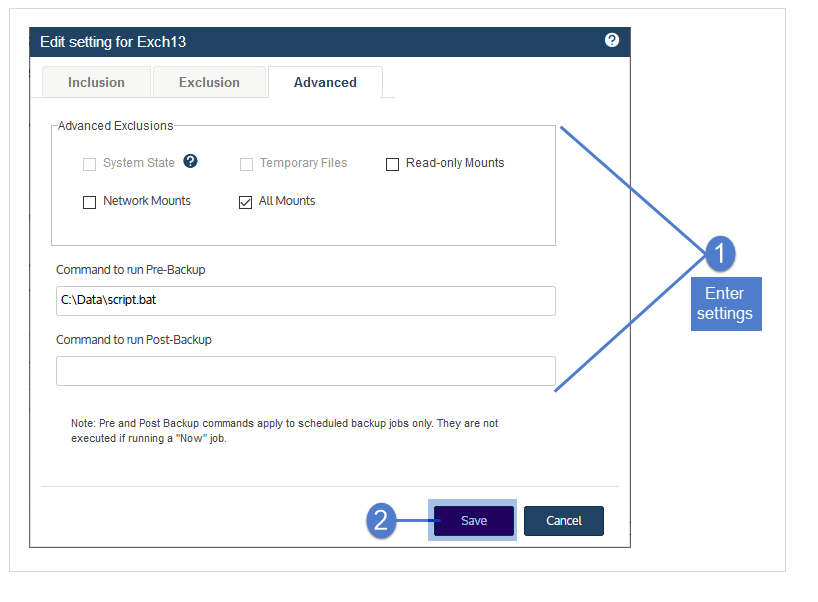
Advanced tab |
Use this tab to specify advanced options. See these rows below for details: Advanced Exclusions, Command to run Pre-Backup, and Command to run Post-Backup. Example:
|
|
Check one or more boxes to exclude any of the following: system state, temporary files, read-only mounts, network mounts, or all mounts. Consider the following before applying advanced exclusions: ● To perform bare metal recovery or use Windows replicas, the following must be included in the backup: system state and all boot and critical system (OS) disks/volumes. If you need these features for the asset, do not specify data to include or exclude unless you are sure these disks/volumes will be included. ● If you are running a full backup and have selected files or folders in the system drive (typically C:) on the Inclusion tab, do not check the System State box on the Advanced tab. Full backups fail if system state is excluded. ● Creating aliases for an asset - Adhere to the following when creating aliases for an asset: ● You must include the system state on the asset whose backups contain the boot and critical OS volumes. ● You must exclude the system state on the other aliased assets. This approach ensures you can perform bare metal recovery of the asset. ● Only one asset can include the system state. Disaster recovery of the asset fails if the system state is not included with the boot and OS volume or if the system state is included on aliased assets that do not include the boot and OS volume. IMPORTANT For Windows assets, the backup must contain the system state, boot disk and any other system critical volumes to use the integrated bare metal recovery and Windows replica features. Be sure one of the aliased assets contains all of these disks to use these features. |
|
|
To run a command or script on the asset before a scheduled backup starts, enter the full path to the command or script in the Command to run Pre-Backup field. For example, C:\Data\script.bat or /usr/jsmith/script.sh. NOTE Pre-backup commands are used for scheduled jobs only. These commands are not applied to on-demand jobs (jobs run by selecting the Now option). |
|
|
To run a command or script on the asset after a scheduled backup completes, enter the full path to the command or script in the Command to run Post-Backup field. For example, C:\Data\script.bat or /usr/jsmith/script.sh. NOTE Post-backup commands are used for scheduled jobs only. These commands are not applied to on-demand jobs (jobs run by selecting the Now option). |
NOTES
● Critical system volumes are required for the image-level replicas feature and to recover the entire asset . Use care when omitting volumes from backup.
● When you recover the entire asset, any existing data on the target is overwritten or deleted. Volumes on the target disk that were excluded from backup may also be overwritten. For details, see Windows unified bare metal recovery.
● To recover a SQL server, the master, model, and msdb system databases must be present in the image-level backup of the Windows asset. (These are included by default. If you want the recovered asset to include a hosted SQL application, use care not to exclude these system databases from the image-level backup.)
● Image-level protection is not supported for read-only disks. You must exclude all volumes on read-only disks from the backup job or run file-level backups. Image-level backups fail if read-only volumes have not been excluded.
● Removable media is automatically excluded from image-level backups. (You do not need to exclude volumes on a read-only disk that resides on removable media.)
See the following for details:
|
Image-level setting |
Description |
|---|---|
|
General considerations |
Review the following before specifying volumes to include or exclude: ● When creating a schedule, any inclusions or exclusions you add are applied to jobs run by that schedule only. Inclusions and exclusions are not applied automatically in other cases. ● Running an on-demand backup of the asset does not automatically apply any inclusions or exclusions specified in the asset's schedule. To run an on-demand backup, do one of the following: ● Create a one-time job that has the same inclusions and exclusions as in the schedule. ● Manually run the schedule (select the schedule under Jobs > Job Manager and click Run). |
|
Inclusion tab |
Click to specify volumes to include in backups of this asset. ● Any volumes that you do not select here are NOT included in the backup. ● Type in the volume (e.g., C:/) or Browse the asset to select volumes to include. ● Run a new full backup upon creating or modifying included volumes. |
|
Inclusion example:
|
|
|
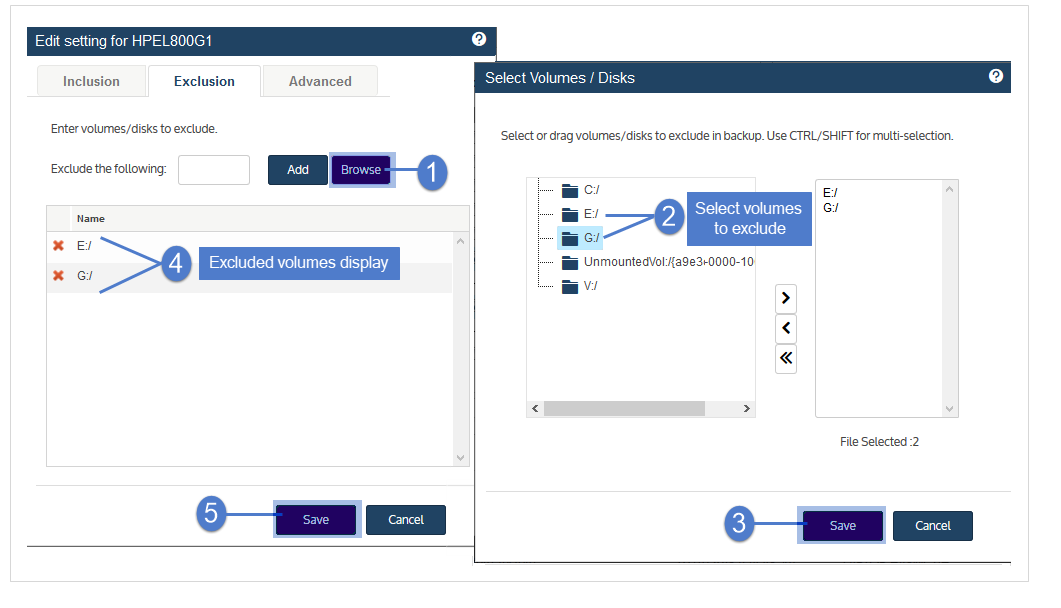
Exclusion tab |
Click to specify volumes to exclude from backups of this asset. ● Any volumes that you do not select here are included in the backup. ● Type in the volume (e.g., C:/) or Browse the asset to select volumes to exclude. ● Run a new full backup upon creating or modifying excluded volumes. |
|
Exclusion example:
|
|
|
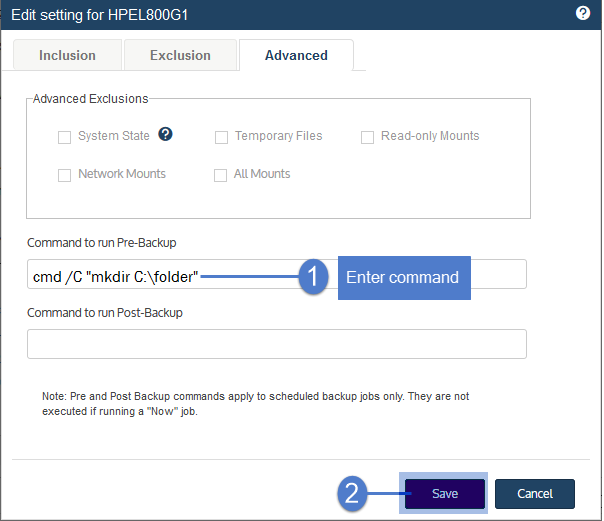
Advanced tab |
Use this tab to specify commands to run before or after the backup job. (Advanced Exclusion options are not supported for image-level backups.) See these rows below for details: Command to run Pre-Backup and Command to run Post-Backup. Example:
|
|
For image-level backup schedules, you cannot enter command syntax as you would inside the Windows Command Prompt. Instead, you must use this format: For example: cmd /C "mkdir C:\folder" To run a command or script on the asset before a scheduled backup starts, enter the command in the Command to run Pre-Backup field. NOTE Pre-backup commands are used for scheduled jobs only. These commands are not applied to on-demand jobs (jobs run by selecting the Now option). |
|
|
For image-level backup schedules, you cannot enter command syntax as you would inside the Windows Command Prompt. Instead, you must use this format: For example: cmd /C "mkdir C:\folder" To run a command or script on the asset after a scheduled backup completes, enter the command in the Command to run Post-Backup field. NOTE Post-backup commands are used for scheduled jobs only. These commands are not applied to on-demand jobs (jobs run by selecting the Now option). |
|

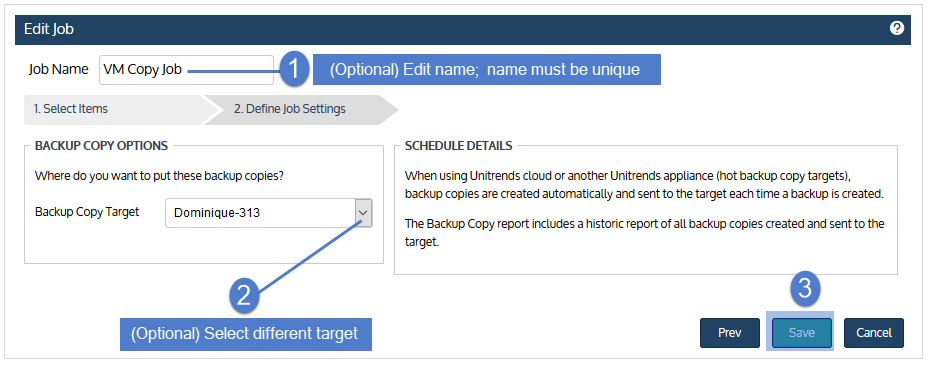
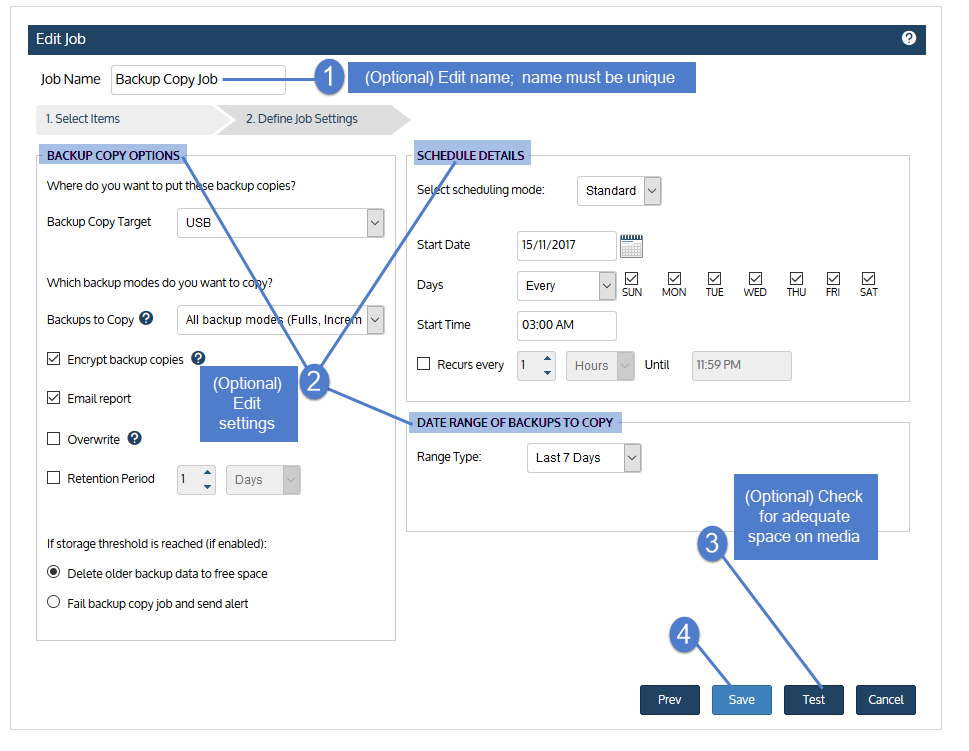
NOTE Do not use this procedure to edit a backup copy schedule that was created by an SLA policy. Instead, modify the SLA policy itself (see To view or edit an SLA policy). The appliance automatically modifies the policy's schedules based on the changes that you make. On the Job Manager tab, SLA policy schedule names display with the prefix _SLA:, so you can easily distinguish them from manually created schedules.
1. Click Jobs > Job Manager.
2. Select the job and click Edit.
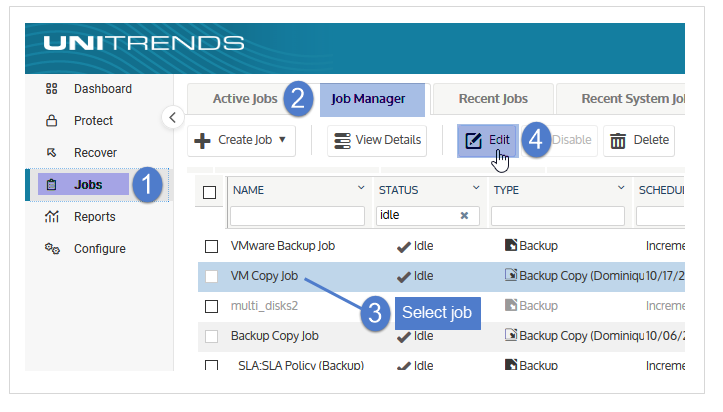
3. (Optional) Modify the job name and/or check boxes to add or remove asset(s) from the list of assets protected by this schedule. Click Next.
4. (Optional) Modify Job Settings. For details, see Edit backup copy schedule examples.
NOTE For Google, Amazon, AWS, and Rackspace cloud targets, reducing the storage threshold to a value less than the amount of space currently used by backup copies results in data being deleted the next time the job runs (reducing the amount of data in the cloud to meet the new threshold setting). For more information, see Managing the amount of data copied to a third-party cloud target.
5. Click Save. The schedule is updated with your changes.
Example settings for hot backup copy schedule:
Example settings for cold backup copy schedule:
NOTES
● Jobs are enabled by default. When a job is disabled, none of its scheduled backups or backup copies run. Be aware that disabling jobs can leave assets unprotected.
● Hot backup copy jobs cannot be disabled. Either delete the job, edit it to remove assets, or suspend backup copies from the source appliance as described in To suspend hot backup copies.
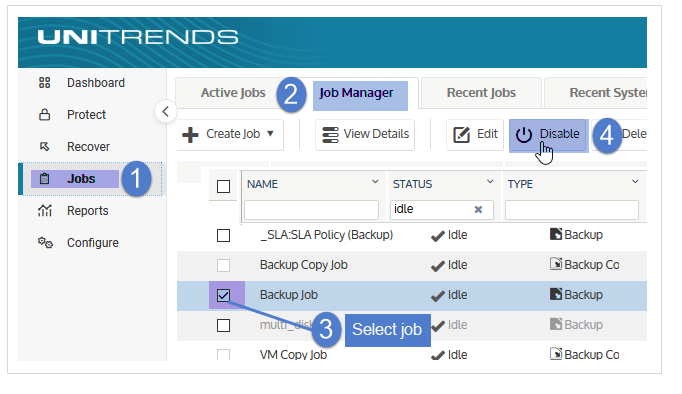
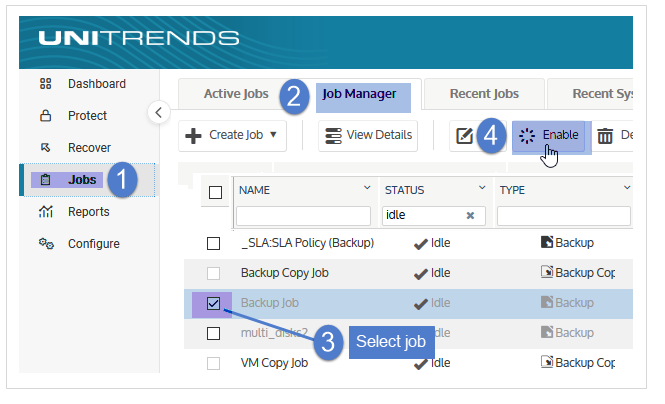
1. Click Jobs > Job Manager.
2. Select the job.
3. Click either Enable / Disable. Disabled jobs display in light gray text.
NOTE Do not use this procedure to delete a job schedule that was created by an SLA policy. Instead, delete the SLA policy itself (see To delete an SLA policy). On the Job Manager tab, SLA policy schedule names display with the prefix _SLA:, so you can easily distinguish them from manually created schedules.
1. Click Jobs > Job Manager.
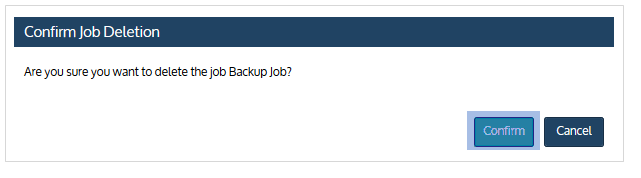
2. Select the job and click Delete.
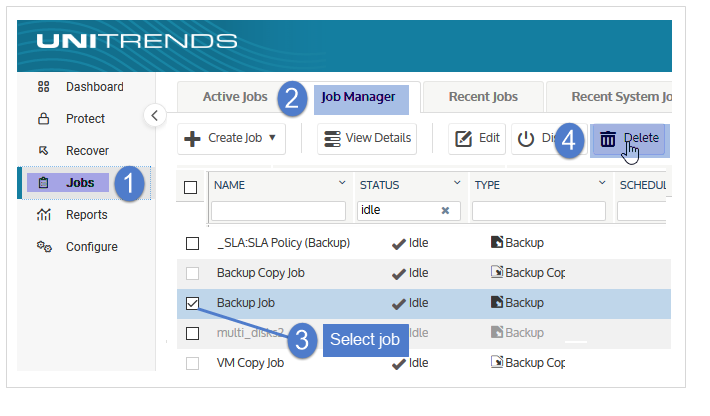
3. Click Confirm to delete the job.
1. Click Jobs > Job Manager.
2. Select the job.
3. Click Run. The job queues immediately.
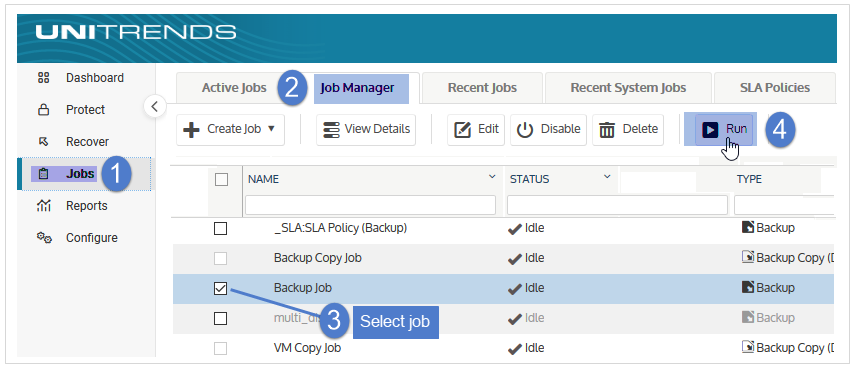
4. To monitor, pause, or cancel the job, go to Jobs > Active Jobs.
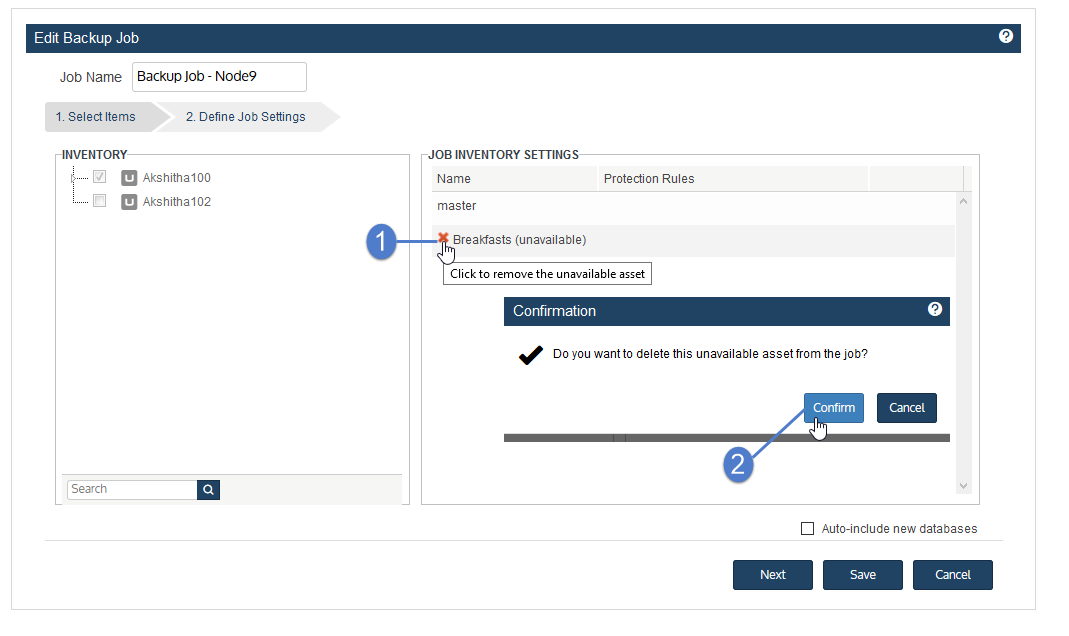
If a VM or application asset is included in a backup schedule but is no longer available in your environment, alert messages and backup failures occur:
● If the VM or application will be back in service, you can ignore these alerts and failures. The issue will resolve itself once the asset is back online.
● If the VM or application will no longer be used in your environment, use this procedure to remove it from any backup schedules. Once the asset has been removed from all schedules, related alerts are automatically dismissed (and no subsequent backup failures occur because the appliance is no longer attempting to protect the decommissioned asset).
Use these steps to remove the asset from each applicable backup schedule:
1. Click Jobs > Job Manager.
2. Select the job and click Edit.
3. Select the unavailable VM or application. Click Confirm to remove it from the schedule.
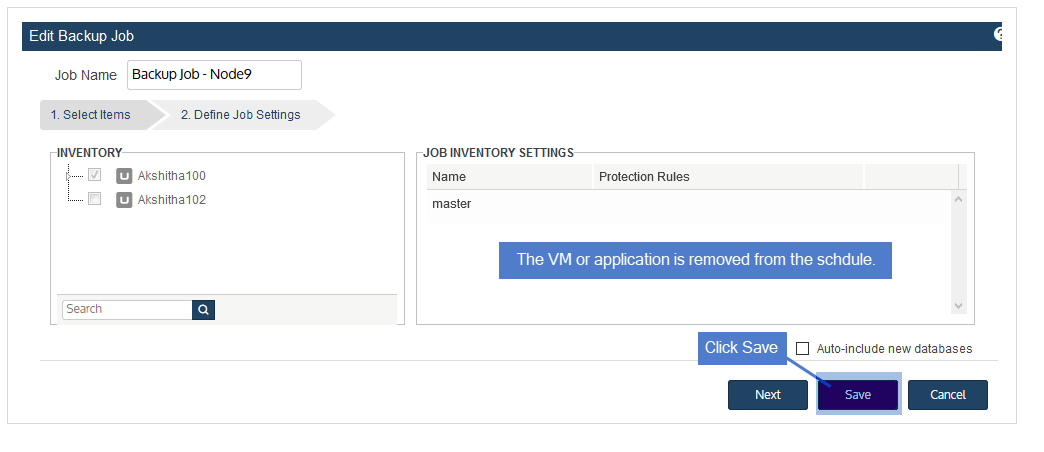
4. Click Save to retain the changes.
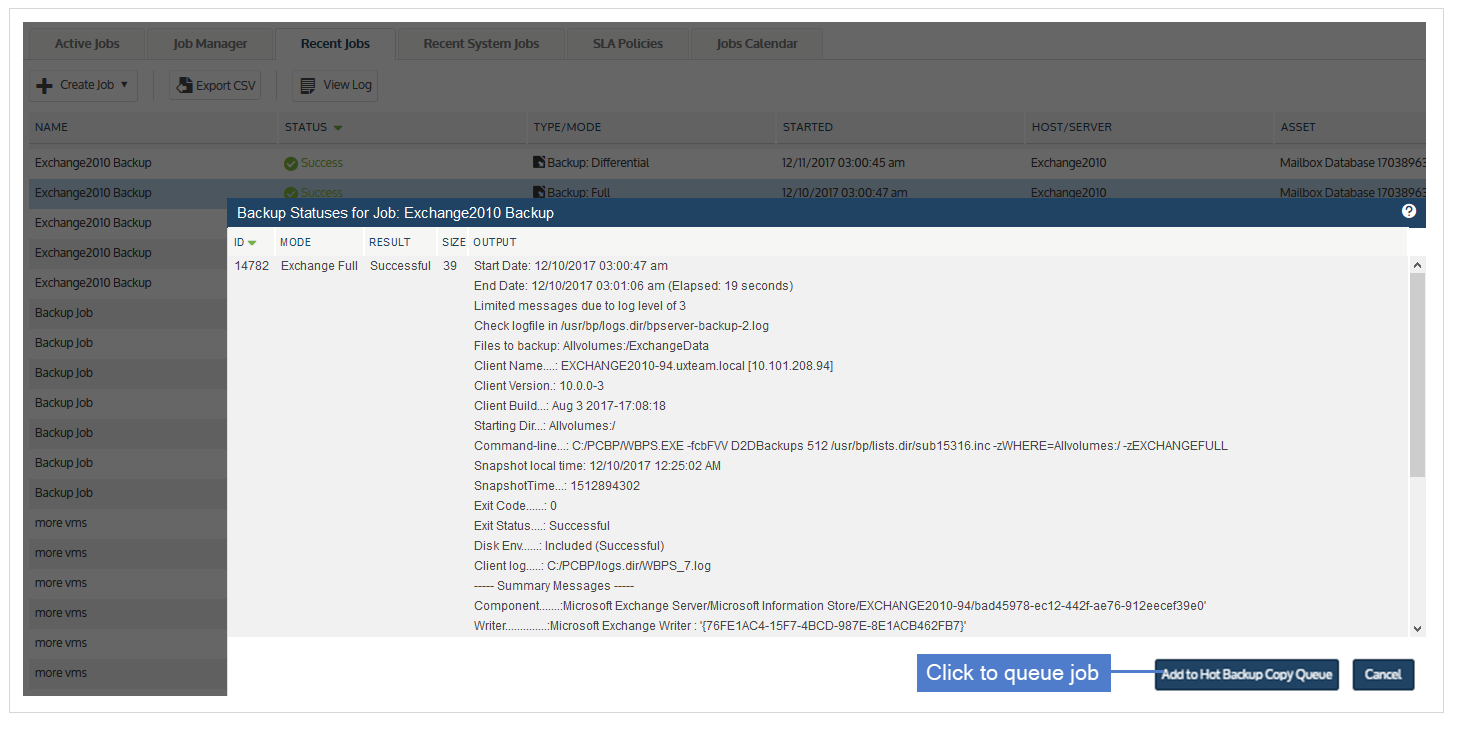
Use this procedure to manually copy a successful full backup to the Unitrends Cloud or to a Unitrends appliance target. This procedure adds the backup copy job to the Active Jobs queue if these conditions are met:
● A hot backup copy target has been added to the backup appliance.
● The backup has not been copied to the target.
● The backup copy job is not in the Active Jobs queue.
● The source backup appliance is copying to only one hot backup copy target. If the appliance has been configured with multiple hot backup copy targets, the Add to Hot Backup Copy Queue button does not display in the backup log and this procedure is not supported.
1. Click Jobs > Recent Jobs.
2. Select the full backup and click View Log.
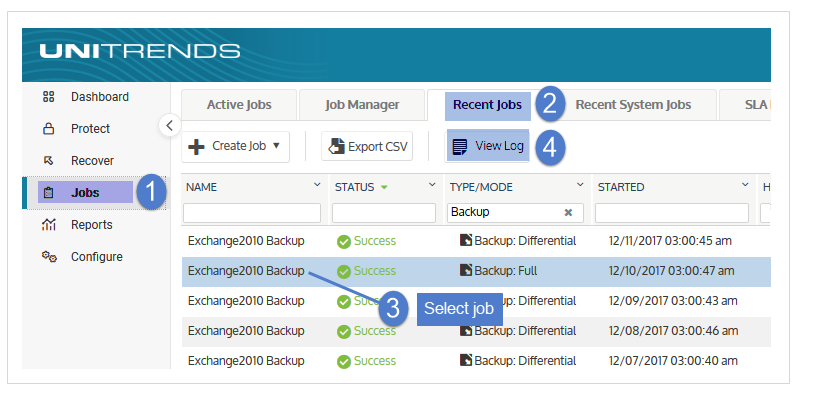
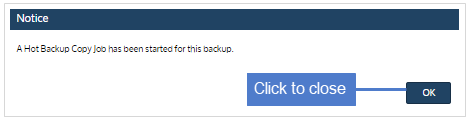
3. Click Add to Hot Backup Copy Queue. The backup copy job is added to the queue.
NOTE The Add to Hot Backup Copy Queue button does not display if hot backup copy is not supported for the backup or if the source appliance is configured with multiple hot backup copy targets.