Backup copy targets
Backup copy targets retain copies of your backups on storage external to the appliance. Backup copies provide another layer of protection for your data and should be used for longer-term retention and disaster recovery. Retention options vary by backup copy target, but all targets enable you to define settings for long-term retention.
Backup copy management and administration procedures vary by target type. Once you have added a backup copy target:
● See the applicable topic in Managing backup copy targets for details on working with the target you added.
● See Creating backup copy jobs to start copying backups to the target.
NOTES
● The types of backup copy targets supported vary by Unitrends appliance model. For example, attached disk is not supported on Recovery Series, Recovery MAX, and ION/ION+ appliances.
● When adding backup copy targets to an appliance, only supported types display in the Configure > Appliances > Backup Copy Targets > Add Target list.
● To determine which backup copy targets are supported for your appliance, see Archiving Adapters in Unitrends Recovery Series and Recovery Series MAX or ION and ION+ Appliance Models, or Local Backup Copies in Unitrends Backup Editions.
Use these procedures to add backup copy targets to your Unitrends appliance:
You can use Unitrends Cloud Backup to store copies of your backups. To purchase this offering, go to http://www.unitrends.com/products/cloud-solutions/unitrends-cloud-backup.
To add a Unitrends Cloud backup copy target
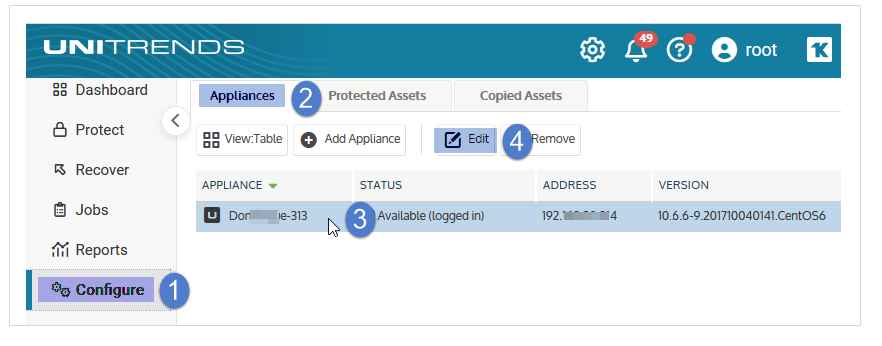
1. On the Configure > Appliances page, select your appliance.
2. Click the Backup Copy Targets tab.
3. Select Add Target > Unitrends > Unitrends Cloud.
4. Enter your Unitrends Cloud license string in the text box and click Submit.
5. Final configuration steps take place in the background and can take up to 15 minutes to complete. When complete:
● A Unitrends Cloud device has been added as a backup copy target.
● The Unitrends appliance name has been modified to include an additional 12 characters, required to uniquely identify this appliance in the Unitrends Cloud.
6. Fine-tune settings as described in Step 4: Return to the source backup appliance and fine-tune settings by adjusting connection options.
7. Create a job to start copying backups to the Unitrends Cloud. For details, see To create a backup copy job for a Unitrends Cloud target.
To add an appliance target, review the requirements in Preparing to add a Unitrends appliance backup copy target, then set up the target as described in To add a Unitrends backup copy target appliance.
Before adding the backup copy target, verify that you have met appliance requirements and seed the target appliance (optional).
For use as a backup copy target, an appliance must meet these requirements:
● Must be a Unitrends Backup appliance, an ION/ION+ appliance, a Recovery MAX appliance, or a Recovery Series model listed in the Recovery Series Appliance Family Datasheet.
NOTES
● Unitrends Backup appliances deployed to the following environments can be used either as a backup appliance or as a backup copy target (performing both roles is not supported):
● VMware
● Hyper-V
● Nutanix AHV
● Citrix XenServer
● Microsoft Azure
● Amazon Web Services
● Recovery Series, Recovery MAX, and ION/ION+ appliances can be used as both a backup appliance and a backup copy target, if desired.
● For Unitrends Backup, you must license and register the appliance.
● The appliance must have a static IP address assigned. An appliance that is configured to use DHCP cannot be used as a backup copy target.
● The appliance must have at least 200GB of available backup storage space.
● You must be able to log into the appliance by entering https://<applianceIPaddress>/ui/ in a browser on the local network. If you enter https://<applianceIPaddress>/ui/ and receive the message Managed by UniView, local network access has been disabled on the target appliance. You must log in to UniView and enable local access before running the To add a Unitrends backup copy target appliance procedure. Once the backup copy target has been added, return to UniView and disable local network access on the target appliance. For details on enabling and disabling local network access, see Disable or enable local network access to an appliance.
● The configuration process creates a secure VPN tunnel. The VPN tunnel must be on a dedicated subnet. Be sure to use a network that is not in use in your environment. The VPN tunnel cannot use the following subnets as these are reserved by Unitrends: 172.17.0.0 through 172.17.10.0.
● If adding multiple appliance targets to one source, a separate secure VPN tunnel is created for each target you configure. Use a separate dedicated subnet for each (for example, 172.17.13.0, 172.17.14.0, and 172.17.15.0). To view the IPs that are already in use by other targets, view the hosts file on the source appliance (Configure > Appliances > Network > Edit Hosts File):

● If one appliance is already managing the other (you are accessing both from one UI), then the manager appliance can be configured as the backup copy target only. To use the manager appliance as the source backup appliance, log in to the managing appliance and remove the managed appliance (as described in To remove a managed appliance) before configuring the backup copy target.
Be aware that the appliance's backup storage is used to store the backup copies, so on-appliance retention of local backups will be impacted if the appliance is also being used to run and store local backups.
For large data sets, Unitrends recommends that you seed the initial data set to the backup copy target by using removable media (disk or NAS). This seeding greatly reduces the time required to copy the first backups. For details, see the RapidSeed for Backup Copy Target Appliances document.
This procedure uses the following terms:
● Backup copy target is the appliance that will be receiving and storing backup copies.
● Source backup appliance is the appliance running the local backups that will be copied to the target appliance.
Step 1: Do these steps on the backup copy target appliance
1. Log in to the backup copy target appliance.
2. On the Configure > Appliances page, select the target appliance and click Edit.
3. On the Backup Copy tab, select Enable this appliance as a Backup Copy Target and enter the following information to configure a secure tunnel connection:
● Secure Network IP – This must be an unused network in your environment. The VPN tunnel cannot use the following subnets as these are reserved by Unitrends: 172.17.0.0 through 172.17.10.0.
● Secure Netmask IP – The netmask associated with the secure network above.
● Secure Port – Port number to use for OpenVPN.
NOTES
● If adding multiple appliance targets to one source, a separate, secure VPN tunnel is created for each target you configure. Use a separate dedicated subnet for each (for example, 172.17.13.0, 172.17.14.0, and 172.17.15.0).
● To view the IPs that are already in use by other targets, view the hosts file on the source appliance (Configure > Appliances > Network > Edit Hosts File):
4. Click Save.

Step 2: Do these steps on the source backup appliance
1. Log in to the source backup appliance.
2. On the Configure > Appliances page, select the source backup appliance.
3. Click the Backup Copy Targets tab.
4. Select Add Target > Unitrends > Unitrends appliance.

5. Enter the Host Name, Host IP address, User Name (optional), and Password (optional) of the backup copy target appliance, and click Save.
NOTE If you receive the message Access to the target is restricted, local network access has been disabled on the target appliance. You must log in to UniView and enable local access before continuing with this procedure. Once the backup copy target has been added, return to UniView and disable local network access on the target appliance. For details on enabling and disabling local network access, see this KB article: Replication setup when a target is only accessible via UniView.

6. You receive a Connection could not be verified warning (unless you have previously installed your own custom security certificates on the target appliance.) As long as you trust your network configuration, you can safely click Continue.
7. After clicking Continue, it takes several minutes to configure the OpenVPN tunnel. Before continuing, wait for the confirmation message that the appliance has been added as a backup copy target.

Step 3: Return to the backup copy target appliance and do these steps
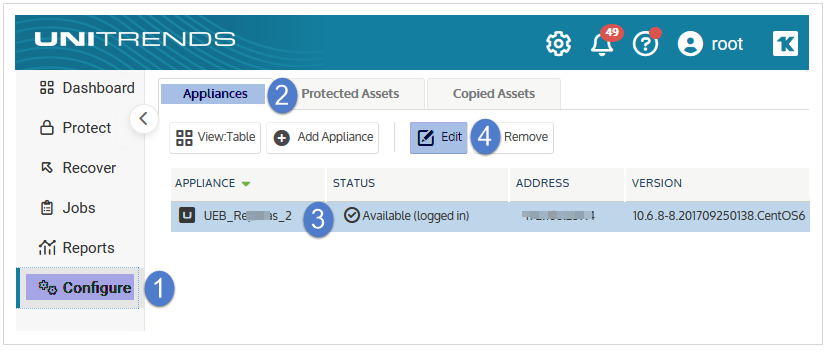
1. Log in to the backup copy target appliance.
2. On the Configure > Appliances page, select the source appliance.
The source has an ! icon and a Pending status. You may need to refresh to page to display the newly added source appliance.
3. Click the ! icon and enter the following:
● Select Allow backup copies to be sent from sourceAppliance.
● Select the storage device where backup copies will be stored on the target appliance.
4. Click Save.

5. Final configuration steps take place in the background and can take up to 20 minutes to complete. Configuration completes when you see the following:
● On the target's Appliances tab, the source appliance status has changed from Pending to Not Available:

● On the source backup appliance Backup Copy Targets tab, the status of the backup copy target has changed to Online:

Once the above statuses have changed, you can use the target.
NOTES
● To check the appliance status, reload the page to refresh the display.
● The Not Available status simply means the target appliance does not have credentials to manage the source beyond receiving its backup copies.
6. (Optional) Add management credentials to the source appliance:
NOTES By default, the backup copy target appliance does not manage backup copy source appliances.
When the source appliance is NOT managed by the target:
● Backup copy jobs do not display on the Jobs > Active Jobs tab or on the Dashboard > Active Jobs tile on the target. To view backup copy jobs from the target appliance, you must add management credentials for the source appliance.
● You cannot edit settings of copied assets. The Edit button does not display on the Copied Assets tab. To enable edits, you must add management credentials for the source appliance. For more on editing these settings, see Copied Assets.
● You can not manage retention policies for copied assets. To manage retention policies, you must add management credentials for the source appliance. For details, see Copied Assets.
● Select the source appliance and click Edit.
● Check Enable Management of this appliance, supply User Name and Password credentials, and click Save. Click OK.

● The source appliance status changes to Available, indicating that the target can now manage the source.

Step 4: Return to the source backup appliance and fine-tune settings by adjusting connection options
For Unitrends Cloud and Unitrends appliance hot backup copy targets, you can adjust the following settings for optimal performance in your environment:
|
Setting |
Description |
Procedure |
|---|---|---|
|
Max concurrent backup copies |
Determines how many backups can be copied concurrently. While the default setting of two is adequate for most deployments, you may wish to increase the concurrency when you have enough WAN bandwidth to support more concurrent copies. |
|
|
Queue scheme |
Determines the order in which the source appliance copies backups to the target: ● Recency – By default, the source backup appliance sends copies to the target using the recency queue scheme, where the most recent backups are copied first. Unitrends recommends this approach because it supports recovering from availability issues with the target appliance (or the WAN connecting to the target appliance) by skipping over older backups when a newer backup arrives. This is particularly important if the connection to the target appliance is unreliable. ● Maximize retention – If it is important to you to ensure that every backup on the source is copied to the target, choose the Maximize retention queue scheme. ● Manual – To copy backups to the target manually, choose the Manual queue scheme. With the Manual scheme, the appliance does not add backups to the queue. Instead, you must copy backups by using the procedure To copy a full backup to a hot backup copy target on-demand. |
|
|
Suspend backup copies from this appliance |
Check this box to stop sending backup copies from the source appliance. This option may become necessary when either your target appliance or the connection to your target becomes unavailable for an extended period of time. |
|
|
Reset Backup Copy |
Use to stop active copy jobs, reset the backup copy processes, then restart active jobs that were stopped. Use only when working with Support or following troubleshooting instructions in a Unitrends KB article. |
|
|
Backup copy bandwidth throttling |
If the WAN connection to your backup copy target is shared with general purpose Internet use during normal business hours, you may wish to throttle the amount of bandwidth that backup copies can use during these hours. NOTE The bandwidth throttling setting limits the maximum amount of bandwidth that backup copy jobs can use. The amount of bandwidth available for the jobs is also effected by environmental factors, such as actual network throughput (which may be constrained by intermediate nodes between the source and target) and other backup copy job tasks, such as encryption and compression. |
NOTE This procedure sets bandwidth throttling for all hot backup copy targets that have been added to the source appliance. Be sure to consider the impact to all hot copy targets when configuring these settings.
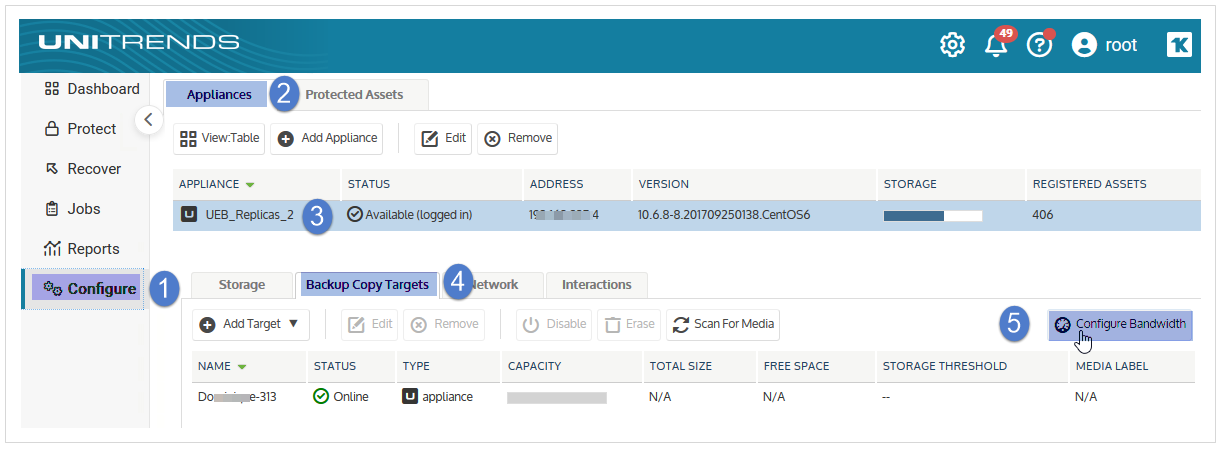
1. Select Configure > Appliances.
2. Select the source backup appliance and click the Backup Copy Targets tab below.
3. Click Configure Bandwidth.
4. Choose the Connection Type that most closely matches your WAN bandwidth.

5. Click Add Schedule.
6. Choose a Throttle percentage and define the days of the week and times when this percentage will be used.
● The maximum bandwidth that backup copy jobs can use during the scheduled times is X percent of the Connection Type you chose in Choose the Connection Type that most closely matches your WAN bandwidth. above.
● For Hours values, From begins at :00 minutes and To ends at :59 minutes. In this example, 50% throttling applies each weekday from 6:00 AM through 6:59 PM:

7. Repeat as necessary to create additional throttling schedules:


8. Click Save, then click OK to close the Information message.
9. (Optional) Review and edit bandwidth schedules as needed.

1. Select Configure > Appliances.
2. Select the source backup appliance and click Edit.
3. On the Backup Copy tab, modify Backup Copy Source settings for this hot backup copy target.
NOTE If the appliance has multiple hot backup copy targets, a scroll bar displays. If needed, scroll to locate the target to modify.
4. Click Save.

Step 5: On the source backup appliance, create a job to start copying your backups.
For details, see To create a backup copy job for a Unitrends appliance target.
Use this procedure to add an eSATA or USB backup copy target. For eSATA and USB devices, you must initialize new drives before using them for the first time. This permanently deletes any existing data and formats the drives.
Additional considerations for using a device with multiple drives:
● All drives attached to a single appliance must have equal capacity. Drives may be of varying capacity if they are attached to different appliances.
● Within the backup copy target, all drives attached to a single appliance are treated as one logical device. When you add a multi-drive device and initialize the drives, the appliance formats them as a single unit. Data is then written across all drives as if they are one larger drive. Once you copy backups to the device, these drives must be treated as a single entity. You must remove them as a set and, to recover data, you must insert all drives in the set back into the eSATA or USB device so the appliance can read and import backup data. If you separate a drive from the set, all data is lost.
1. Connect the eSATA or USB device to the Unitrends appliance and power it on. For details, see the instructions you received with the device.
2. Log in to the appliance UI.
3. On the Configure > Appliances page, select the source backup appliance.
4. Click the Backup Copy Targets tab below.
5. Click Scan For Media.
● The appliance discovers the device and it displays on the Backup Copy Targets tab.
● The device displays as Type eSATA or USB and its status is Offline.

6. Do one of the following:
● If your drive(s) contains backup copies from another Unitrends appliance, select the device on the Backup Copy Targets tab and click Enable. The appliance brings the device online and imports reference information about those backup copies.
NOTE If you receive a message indicating the drive has not been initialized, you must Erase the drive instead (described below).
● If your drive(s) does NOT contain backup copies from another Unitrends appliance, select the device on the Backup Copy Targets tab and click Erase. In the Confirm Erase dialog, enter a Media Label (optional) and click Erase Backup Copies.
The appliance erases any existing data and formats the disk(s). If you did not enter a Media Label, the appliance creates one.

7. The target is ready for use. Create a job to start copying your backups, as described in To create a backup copy job for an eSATA or USB target.
NOTES
● The backup copy job mounts the media, writes the copy, then unmounts the media. On the Backup Copy Targets tab, the device remains Offline when the media is not mounted. The device is automatically brought Online when a copy job runs.
● If using an eSATA or USB dock, be sure to use these steps when swapping the drive:
● Power down the dock.
● Swap the drive.
● Power on the dock.

Following is a summary of the steps required to add a tape backup copy target. The Iinks provide detailed instructions for each procedure.
Step 1: Review the requirements in Preparing to add a tape backup copy target.
Step 2: Connect the tape device as described in To connect the tape device.
Step 3: Add the tape backup copy target to the appliance and configure it as described in Configuring the tape device on the Unitrends appliance.
Before adding the tape backup copy target, review these requirements and considerations.
Unitrends supports copying to tape from Recovery MAX appliances and from select Recovery Series appliance models. Tape is not supported with ION/ION+ and Unitrends Backup virtual appliances. For supported Recovery Series models, see the Recovery Series Appliance Family Data Sheet.
The following requirements must be met before setting up a tape target on a Recovery Series or Recovery MAX appliance:
|
System |
Requirement |
|---|---|
|
Recovery Series or Recovery MAX appliance |
The appliance must be licensed with the advanced archiving (ADX) feature. Check for ADX in the Feature String under Configure > Appliances > Edit > License. |
|
Tape device |
● The tape device must be either SCSI, SAS, or Fibre Channel. ● The tape device must be configured as described in Configuring the tape device on the Unitrends appliance. ● The tape or set of tapes must have adequate space to store the data being copied. If the copy does not fit, the job fails. ● If using tape barcodes, your tape device must have a barcode reader and tapes must have valid barcode labels. |
Before copying to tape, note these additional considerations:
|
Tape feature |
Description |
|---|---|
|
Multi-tape devices |
The following considerations apply to devices with multiple tapes: ● All tapes configured for the backup copy job must be rotated as a set as the job writes across all tapes. ● All tapes must be available to recover data from the backup copy. ● To recover data from tapes that do NOT have barcode labels, the tapes must be loaded into the same slot position as when the backup copy was written. ● For tapes that do NOT have barcode labels, it is strongly recommended that you develop a labeling system to help you manage the tapes. Prior to pulling a tape without a barcode, note its slot number. When you pull a set of tapes, be sure to physically label each tape with the slot number and other identifying information for speedy recovery. ● If your tapes have barcodes, there are no special procedures when recovering from a backup copy. The appliance automatically uses the barcode during the recovery process. If you have moved tapes with barcodes to different slots, the appliance reads the barcodes to determine the location of the tapes. |
|
Multiple tape drives |
The following considerations apply to devices with multiple tape drives: ● Even though you can connect multiple tape drives, the appliance only uses one tape drive for backup copies. ● You can connect an autochanger that has multiple tape drives; however, only one drive can be enabled for use by the appliance. |
|
Tape devices with barcodes |
On tape devices that support barcodes, the appliance recognizes the barcode as soon as you insert the tape into the library. |
1. Connect the tape drive or autochanger to the Unitrends appliance using a SAS or LVD SCSI cable. If using a LVD SCSI cable, ensure that a SCSI bus terminator is installed on the tape device according to the vendor’s documentation.
2. Once connected, power on the tape device.
3. Once the tape device initializes, log in to the Unitrends appliance and reboot by selecting Configure > Appliance > Edit > Shutdown/Restart (on the General tab). This enables the appliance to discover the tape device.

This section discusses how to configure your tape device after it has been connected to the appliance. Tape drives and autochangers must be configured before you can begin copying backups. After configuring the tape drive and autochanger, you must prepare the tape media. The media can be prepared manually or automatically by the Unitrends appliance.
Tape configuration procedures are given below. Use the procedure that applies to your tape device. (Use only one procedure. The autochanger procedure configures both the changer and the tape drive.)
1. Log in to the appliance UI.
2. On the Configure > Appliances page, select the source backup appliance.
3. Click the Backup Copy Targets tab below.
4. Click Scan For Media.

5. You receive a message indicating that you must associate the changer with a tape drive. Select a Drive from the list and click Yes. (If your changer has only one drive, just click Yes.)
NOTE Only one drive can be used by the appliance.
The autochanger and tape drive display on the Backup Copy Targets tab in Offline status.
● The tape drive displays as Type tape.
● The autochanger displays as Type changer.


6. Enable the tape drive and autochanger:
● Select the tape drive and click Enable. Its status changes to Online.

● Select the autochanger and click Enable. Its status changes to Online.

7. If a tape contains Unitrends backup copies, you are asked if you would like to import the data. Selecting Yes imports reference information about the backup copies. You must import this data to be able to recover those copies. Do one of the following:
● Check the Force option and click Yes to import all data, regardless of whether it was written from this Unitrends appliance.
● Leave the Force option unchecked and click Yes to import only the copies that were written from this Unitrends appliance.
● Click No to continue without importing reference information about these copies.
8. (Optional) Configure the appliance to automatically prepare tapes for first use.
IMPORTANT Preparing formats the tapes, permanently deleting any existing data. To preserve data on a tape, do not configure this option. If the tape contains Unitrends backup copies, it has already been formatted and can be used for subsequent backup copy jobs. For tapes that do not contain Unitrends backup copies, you can manually format the tapes later in this procedure.
To configure the appliance to automatically prepare tapes:
● Select the tape drive.
● Click Edit.
● Check the Use Unlabeled Tapes box.
● Click Save.

9. (Optional) Modify slots that can be used when writing backups to tape.
Each slot that contains a tape is automatically enabled for use (but you can copy to a subset of these enabled tapes by entering slot numbers when you create the backup copy job.) If you have tapes that cannot be used for backup copies, you can specify the slots that are enabled for use.
To specify the slots that are enabled for use:
● Select the autochanger.
● Click Edit and enter the Slots that can be used when writing backups to tape:
● Enter slot numbers using a comma-separated list and/or ranges. Example: 1,2,3,5-8
● The slots you enter must contain a tape.
● To see which slots contain tapes, look at the Tape Library Information area below. A green check indicates the slot contains an available tape. A red X indicates the slot does not contain a tape. To refresh this list, click the arrows in the upper-right corner.
● Click Save.

10. Proceed to one of following:
● If you did check the Use Unlabeled Tapes box above, you are ready to start copying to tape. Create a job to start copying your backups, as described in To create a backup copy job for a tape target.
● If you did NOT check the Use Unlabeled Tapes box above, proceed to the next step to prepare the tapes.
11. Select the autochanger and click Prepare.

12. In the Confirm Prepare dialog:
● (Optional) Enter a Media Label. The label can contain up to 12 alphanumeric characters or underscores. If you do not enter a label, the appliance generates one for you.
● Enter the Slots whose tapes will be prepared. Enter slot numbers using a comma-separated list and/or ranges. Example: 1,2,3,5-8
13. Click Prepare to prepare the tapes in the Slots you entered.
WARNING! Clicking Prepare permanently deletes any existing data and formats the tapes.

14. Create a job to start copying your backups, as described in To create a backup copy job for a tape target.
NOTE The backup copy job mounts the media, writes the copy, then unmounts the media. On the Backup Copy Targets tab, the device remains Offline when the media is not mounted. The device is automatically brought Online when a copy job runs.
1. Log in to the appliance UI.
2. On the Configure > Appliances page, select the source backup appliance.
3. Click the Backup Copy Targets tab below.
4. Click Scan For Media.
● The appliance discovers the drive and it displays on the Backup Copy Targets tab.
● The tape drive displays as Type tape and its status is Offline.
5. Do one of the following:
● If your tape contains backup copies from another Unitrends appliance, select the device and click Enable. The appliance brings the device online and imports reference information about those backup copies.


● If your tape does NOT contain backup copies from another Unitrends appliance, select the device and click Prepare. Enter a Media Label (optional) and click Prepare.
The appliance erases any existing data and formats the tape. If you did not enter a Media Label, the appliance creates one.

6. Create a job to start copying your backups, as described in To create a backup copy job for a tape target.
NOTE The backup copy job mounts the media, writes the copy, then unmounts the media. On the Backup Copy Targets tab, the device remains Offline when the media is not mounted. The device is automatically brought Online when a copy job runs.
You can use cloud storage managed by select providers to store copies of your backups. Use this procedure to add cloud storage to your appliance as a backup copy target.
Cloud storage must meet these requirements to be used as a backup copy target:
● You must have an account with one of the following cloud storage providers:
● Google Cloud Storage (Standard or Nearline)
● Amazon S3
● Amazon S3-IA
● Rackspace Cloud Files
● Wasabi (Standard or S3)
● Azure Blob
NOTE Azure Blob storage is not supported for appliances running on CentOS 6.
For details about creating an Amazon, Google, or Azure account and purchasing storage, see How do I create a cloud storage account for Unitrends?.
● For bucket or container names, only the following characters are supported: upper and lowercase letters, numbers, dots, and dashes. Buckets with names containing other characters cannot be added to a Unitrends appliance.
● You can use existing buckets or containers that follow the supported naming conventions identified above. However, we recommend that you create unique folders for your Unitrends data.
● The cloud storage bucket or container must not be configured to use any lock features, WORM modes, or other immutability features that prevent overwrite and deletion of data by the Unitrends appliance. (For example, a Google Cloud Storage bucket must not be configured to use the Cloud Storage Bucket Lock feature.)
● Amazon's Reduced Redundancy Storage (RRS) option is not supported.
You must provide the following account information when adding a cloud backup copy target to the appliance:
● Credentials for the storage bucket or container that you are adding to the appliance.
NOTE These are the credentials you use to access the particular bucket or container that you are adding to the appliance, and not the username and password you use to log in to your storage provider account. If you do not know these credentials, contact your storage provider. Unitrends does not have access to this information.
● Name of the cloud storage type: Google Cloud Storage (Standard or Nearline), Amazon S3, Amazon S3-IA, Rackspace Cloud Files, Wasabi (Standard or S3), or Azure Blob.
● Name of the bucket or container that you are adding to the appliance.
● For Amazon S3 and Amazon S3-IA, you must enter an S3 region. For example, us-east-1. See this Amazon AWS article for a list of valid regions: Regions and Availability Zones.
● For Wasabi S3 , you must enter an S3 region. For example, s3.us-east-1.wasabisys.com. See this article article for a list of valid regions: What are the service URLs for Wasabi's different regions?
Additional considerations:
● Accounting and billing management for your cloud storage occur between you and the storage provider. You cannot manage your cloud storage account from the appliance’s UI, and Unitrends cannot answer questions about this account. You must contact your provider with any questions you have about your cloud storage account.
● It is extremely important that you understand the amount of data you are copying and the related charges from your cloud storage provider. To manage the amount of space you are using in cloud storage, you should specify a storage threshold.
● Sending backup copies to the cloud does not require any special network configurations. Just add a backup copy cloud target to the appliance and create backup copy jobs.
● The speed at which backup copies can be sent to the cloud depends on a number of factors, including memory and network bandwidth. We recommend that you test a small backup copy to determine the speed prior to sending larger backup copies to the cloud.
● When recovering backup copies from the cloud, the cloud backup copy target can be attached to any Unitrends appliance. You do not have to recover to the original appliance.
● If you add a backup copy target and the appliance recognizes backups on it, those backups are added to the Backup Catalog and are available for import.
It is extremely important that you monitor the amount of backup data that your Unitrends appliance is copying to the cloud because cloud storage providers charge based on the amount of storage you use. When adding cloud backup copy target to the appliance, you can specify a storage threshold equal to the maximum amount of space the appliance can use to store backup copies in the cloud storage bucket or container.
You can monitor the amount of data in your cloud storage from the Configure > Appliance > Backup Copy Targets page:

About the storage threshold for cloud backup copy targets
The storage threshold setting for cloud backup copy targets is intended to aid in managing the total amount of data you are copying to the cloud. The user-defined storage threshold functions as a maximum amount of data the appliance can write to the cloud bucket or container.
Note that there are instances when backup copy jobs can use slightly more storage space than the storage threshold you specified. When you initiate a backup copy job, the appliance estimates the amount of space needed for the job, and certain factors can cause it to underestimate. To avoid unexpected charges from your cloud storage provider, it is highly recommended that you develop a policy for managing the amount of backup data that you copy to the cloud in addition to setting a storage threshold.
The storage threshold can be increased or decreased at any time, and changes are applied to all subsequent jobs copying backups to the bucket or container. If you increase the storage threshold, your storage provider will bill you for the additional storage space you are using.
Note that decreasing the threshold to a value that is less than the amount of space currently used to store backup copies can result in the deletion of backup copies. The next time the job runs, the appliance recognizes that the amount of data on the backup copy target is greater than the storage threshold and invokes your selected behavior: either deleting older backups to free space or failing the job. If you select to delete older backup data to free space for the job, backup copies exceeding the new storage threshold are purged the next time the job runs. Backup groups are still recognized in backup copies, and backups are deleted as a group beginning with the oldest backup copies. If you chose to fail the backup copy job and send an alert, your new backup copies are not written to the cloud and an alert notifies you of this failure.
1. On the Configure > Appliances page, select your appliance.
2. Select the Backup Copy Targets tab.
3. Click Add Target > Cloud.

4. Enter a Name for the cloud storage.
5. Select the storage type in the Cloud Storage drop-down.
NOTE If you do not see the Azure Blob storage type in the list, it is not supported for your appliance model.
6. Enter the bucket or container name in the Storage Path field.
To create a sub-folder within the bucket or container, add a forward slash followed by the name of the new folder and another forward slash. For example: If your bucket is named mybackup and you want to create a new sub-folder within that bucket called myfolder, enter: mybackups/myfolder/
7. (S3 only) For Amazon S3, Amazon S3-IA, or Wasabi S3 you must enter an S3 region. For example, us-east-1. (Leave the S3 Region field empty for Wasabi Standard.)
● See this Amazon AWS article for a list of valid Amazon S3 regions: Regions and Availability Zones.
● See this article for a list of valid Wasabi S3 regions: What are the service URLs for Wasabi's different regions?
8. Enter the required credentials. These vary by storage provider:
NOTE Be sure to enter the credentials you use to access the particular bucket or container that you are adding to the appliance. These credentials are not the same as the username and password you use to access your storage provider account.
|
Provider |
Required Credentials |
|---|---|
|
Google Cloud Storage (Nearline or Standard) |
Access Key Secret |
|
Amazon (S3, S3-IA, or Wasabi) |
Access Key ID Secret Access Key |
|
Rackspace |
Username API Key |
|
Azure Blob |
Storage Account Shared Key |
9. (Optional) We recommend enabling and setting a storage threshold. This functions as the maximum amount of data the appliance can copy to the cloud. For more information, see Managing the amount of data copied to a third-party cloud target.

11. The cloud target is added to the appliance.
Cloud storage is mounted only while a backup copy job is running. At other times, cloud storage is unmounted. This is the recommended approach to prevent issues that may occur if the connection to cloud storage is interrupted. If desired, you can configure a persistent connection as described in To disable automatic cloud mount/unmount below.

12. Create a job to start copying your backups, as described in To create a backup copy job for a third-party cloud target.
Various external network events can interrupt the connection to cloud storage. To prevent issues that may occur if this connection is interrupted, cloud storage remains unmounted until a backup copy job runs. The job mounts the cloud storage, copies data to the target, and unmounts the storage. If desired, you can configure the appliance to maintain a persistent connection to the cloud storage target, as described here:
1. On the Configure > Appliances page, select the appliance and click Edit.

2. Click Advanced and select General Configuration.

3. Change the CloudHook UnmountAfter setting to 0 and click Save.

4. Click Close to exit.

Use this procedure to copy backups to attached disk storage. This target type is supported only for Unitrends Backup appliances deployed on Hyper-V, VMware, Nutanix AHV, or XenServer.
Before adding the backup copy target, add an attached disk to the Unitrends Backup VM or to external storage attached to the Unitrends Backup hypervisor. To provide redundancy, Unitrends recommends that backup copy storage be on a different datastore or different type of storage than the backup storage. Choose from the following methods to add a disk:
● For Unitrends Backup on VMware, add a VMDK disk to the Unitrends Backup VM by using the ESXi host. See one of the following VMware documents for instructions:
● vSphere 5.1: Create a Virtual Disk in vSphere Client 5.1
● vSphere 5.5: Create a Virtual Disk in vSphere Client 5.5
● vSphere 6.0: Create a Virtual Disk in vSphere Client 6.0
● vSphere 6.5: Add a Hard Disk to a Virtual Machine
● For Unitrends Backup on Hyper-V, add a virtual disk to the Unitrends Backup VM by using the Hyper-V host. Unitrends recommends that you use a VHD(X) disk and that you add the disk to the SCSI controller. See the following Microsoft documents for instructions:
● To create a virtual hard disk
● To add a hard disk to a virtual machine
● For Unitrends Backup on Nutanix AHV, add a virtual disk to the Unitrends Backup VM by using the Prism Web Console. Edit the appliance VM to add a vDisk to the ISCSI controller (by selecting ISCSI in the Bus Type list). For details, see Managing a VM (AHV) in the Prism Web Console Guide.
● For Unitrends Backup on XenServer, add a VHD disk to the Unitrends Backup VM by using the XenServer host. Unitrends recommends that you add the disk to the SCSI controller.
● Add a LUN to an external SAN and expose it to the Unitrends Backup VM. Then go to the host and add a new virtual disk to the VM using storage on the LUN you added.
● Connect a NAS share to the Unitrends Backup VM using the NFS or CIFS protocol. Then go to the host and add a new virtual disk to the VM using storage on the share you added.
1. Attach a disk to your Unitrends Backup VM as described above in Preparing to add an attached disk backup copy target.
2. Log in to the Unitrends Backup UI.
3. On the Configure > Appliances page, select your appliance.
4. Select the Backup Copy Targets tab.
5. Click Add Target > Attached.

6. Enter a Name for the storage.
7. In the Manage Attached Disks area, select the disk from the list of available attached disks and click Add.

8. Click Save.


9. Create a job to start copying your backups, as described in To create a backup copy job for an attached disk target.
Use these procedures to store backup copies on a NAS share:
1. Allocate a share on the NAS.
2. Log in to the appliance UI.
3. On the Configure > Appliances page, select your appliance.
4. Select the Backup Copy Targets tab.
5. Click Add Target > NAS > CIFS.

6. Enter the required CIFS share information and click Save. For a description of each field, see the table below.

|
Field |
Description |
|---|---|
|
Name |
Name of the storage. Cannot contain spaces. |
|
Host |
IP address or hostname of the NAS share. |
|
Port |
Contains the default CIFS port. To use a custom port, enter that port number. |
|
Share Name |
Enter the full directory pathname of the NAS share. |
|
Username (optional) |
If the share is configured for authentication, enter the domain username as user@domain.com. |
|
Password (optional) |
If the share is configured for authentication, enter the password. |
7. The appliance adds the target and imports any existing cold backup copies. Click OK.


The target is ready for use. Create a job to start copying your backups, as described in To create a backup copy job for a NAS target.
1. Allocate a share on the NAS.
2. Log in to the appliance UI.
3. On the Configure > Appliances page, select your appliance.
4. Select the Backup Copy Targets tab.
5. Click Add Target > NAS > NFS.

6. Enter the required NFS share information and click Save. For a description of each field, see the table below.

|
Field |
Description |
|---|---|
|
Name |
Name of the storage. Cannot contain spaces. |
|
Host |
IP address or hostname of the NAS share. |
|
Port |
Contains the default NFS port. To use a custom port, enter that port number. |
|
Share Name |
Enter the full directory pathname of the NAS share. |
|
Username (optional) |
If the share is configured for authentication, enter the domain username as user@domain.com. |
|
Password (optional) |
If the share is configured for authentication, enter the password. |
7. The appliance adds the target and imports any existing cold backup copies. Click OK.


The target is ready for use. Create a job to start copying your backups, as described in To create a backup copy job for a NAS target.
Use these procedures to store backup copies on a SAN LUN:
1. Allocate a LUN on the SAN.
2. Log in to the appliance UI.
3. On the Configure > Appliances page, select your appliance.
4. Select the Backup Copy Targets tab.
5. Click Add Target > iSCSI.
6. Enter a unique Name for the storage device. This name cannot contain spaces.
7. Enter the IP address of the SAN storage array in the Host field.
8. The default port used for iSCSI communication is 3260. If the LUN is configured to use a different port, enter it in the Port field.
9. Click Scan for targets to retrieve a list of targets on the remote storage array, then choose one from the list.
NOTES If you do not see the LUN in the list, go to your SAN manager and check the following:
● Verify that you can see the Unitrends appliance in your SAN manager.
● Verify that you have a LUN assigned to the Unitrends appliance with the correct permissions.
● Check with your Storage Administrator for more information.
10. Click Scan for LUNs and select one from the list.
NOTE If you receive an error indicating CHAP authentication has failed, CHAP has been configured on the target and either CHAP has not been enabled on the Unitrends appliance, or the Unitrends CHAP credentials do not match those of the target. To configure the appliance to use CHAP, see To configure iSCSI CHAP authentication.
11. Click Save.
12. The appliance adds the target and checks for any existing cold backup copies. Do one of the following:
● If no copies were found, click OK. The target is ready for use. Create a job to start copying your backups, as described in To create a backup copy job for a SAN target.
● If existing copies were found, you are asked if you would like to import the data. Selecting Yes imports reference information about the backup copies. You must import this data to be able to recover the copies. Do one of the following:
● Check the Force option and click Yes to import all data, regardless of whether it was written from this Unitrends appliance.
● Leave the Force option unchecked and click Yes to import only the copies that were written from this Unitrends appliance.
● Click No to continue without importing reference information about these copies.
Once copies have been imported, the target is ready for use. Create a job to start copying your backups, as described in To create a backup copy job for a SAN target.
1. Allocate a LUN on the SAN.
2. Log in to the appliance UI.
3. On the Configure > Appliances page, select your appliance.
4. Select the Backup Copy Targets tab.
5. Click Add Target > FC.
6. Enter a unique Name for the storage device. This name cannot contain spaces.
7. Enter the IP address of the SAN storage array in the Host field.
8. Click Scan for targets to retrieve a list of targets on the remote storage array, then select one in the list.
9. Click Scan for LUNs and select one in the list.
NOTES If you do not see the LUN in the list, go to your SAN manager and check the following:
● Verify that you can see the Unitrends appliance in your SAN manager.
● Verify that you have a LUN assigned to the Unitrends appliance with the correct permissions.
● You may need to reboot the Unitrends appliance to enable it to discover the storage device.
● Check with your Storage Administrator for more information.
10. Click Save.
11. The appliance adds the target and checks for any existing cold backup copies. Do one of the following:
● If no copies were found, click OK. The target is ready for use. Create a job to start copying your backups, as described in To create a backup copy job for a SAN target.
● If existing copies were found, you are asked if you would like to import the data. Selecting Yes imports reference information about the backup copies. You must import this data to be able to recover the copies. Do one of the following:
● Check the Force option and click Yes to import all data, regardless of whether it was written from this Unitrends appliance.
● Leave the Force option unchecked and click Yes to import only the copies that were written from this Unitrends appliance.
● Click No to continue without importing reference information about these copies.
Once copies have been imported, the target is ready for use. Create a job to start copying your backups, as described in To create a backup copy job for a SAN target.


