Recovering File-level Backups
This chapter describes recovery procedures for file-level backups (backups that were run using a Unitrends agent). Assets must have an eligible backup or backup copy before running these procedures.
NOTES
● The procedures in this chapter are used to recover file-level backups for all operating systems. In some cases, additional limitations and steps apply. For example, recovering Windows Active Directory requires additional steps. For additional considerations, see File-level Backups Overview.
● The Windows agent is used for file-level and image-level protection. If you are using image-level protection, see the recovery procedures in Recovering Windows Image-level Backups.
Each backup creates a recovery point of the entire asset. It contains the data captured during the backup job, plus all dependent data in the backup group. You can recover entire backups or pick a subset of files. Recovering an entire backup recovers all dependent data in the group. For example, recovering an incremental also recovers its parent full and any other dependent incrementals in the chain. (For details, see Backup groups.)
You can recover from backups or imported backup copies that reside on a Unitrends backup appliance, from hot backup copies that reside on a Unitrends backup copy target appliance, or from hot backup copies that reside in the Unitrends Cloud.
To perform the recovery, you will start by selecting a backup or backup copy. For backups, you can do this in the Backup Catalog or in the Backup Browser. For backup copies and imported backups, you must use the Backup Catalog.
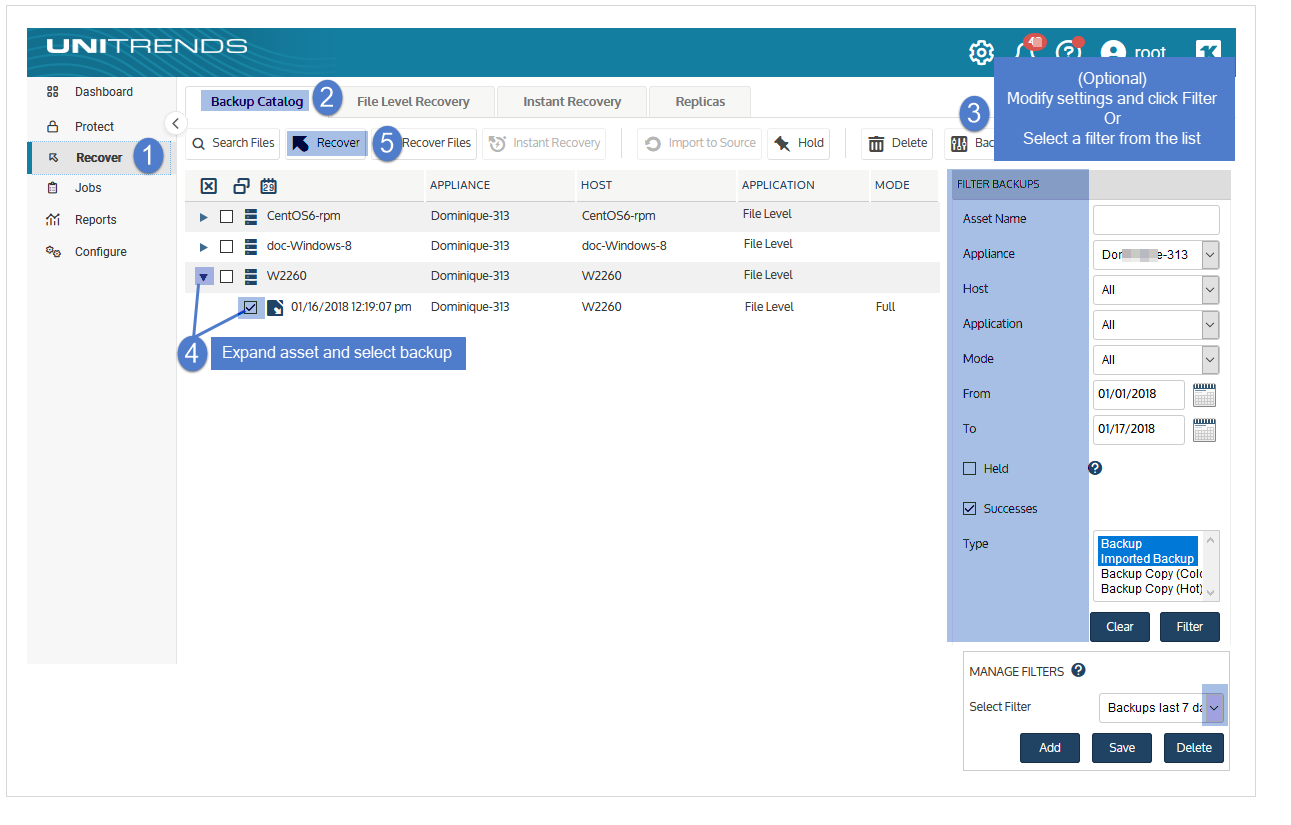
In the Backup Catalog, backups and backup copies display under the protected asset. You can modify the display by entering filter criteria. Expand an asset to view its backups and backup copies:

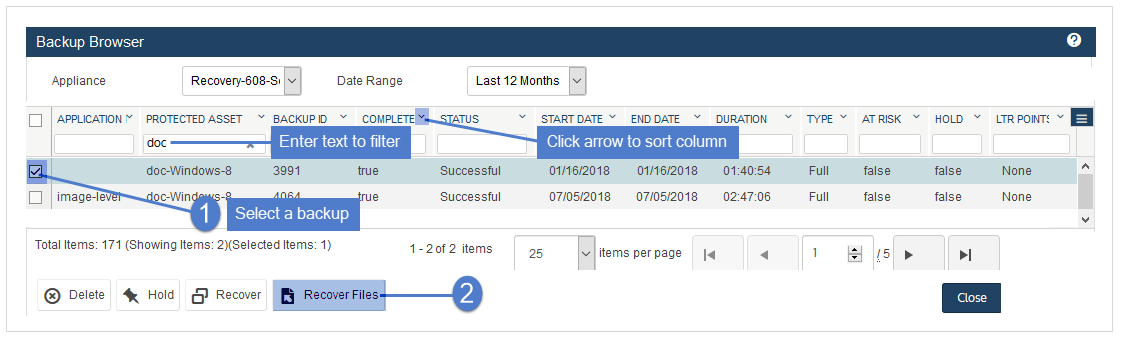
The Backup Browser provides advanced search and filter options. Backups are not grouped under the protected asset. Search for backups by selecting an appliance and date range. Filter the display by entering text in the column fields. Click an arrow to sort by column:

For more on working with these features, see Backup Catalog tab.
Supported procedures vary by whether you are running them from the source or target appliance. See the following topics for details:
Before you start, be sure the following prerequisites have been met:
● Recovery target is available – You must recover to an agent-based asset that has been added to the backup appliance. (The asset must have a Unitrends agent installed and must display on the appliance's Protected Assets tab.) If necessary, add the asset as described in To add an agent-based asset.
● Backup copy has been imported – To recover from a backup copy, you must first import the backup copy before running these recovery procedures. For details, see To import a hot backup copy or To import a cold backup copy.
NOTE For hot backup copies (copies that reside in the Unitrends Cloud or on another Unitrends appliance), you can recover files directly (without first importing the backup copy). For details, see Recovering File-level Backups.
Run these procedures from the backup appliance to recover from backups or imported backup copies:
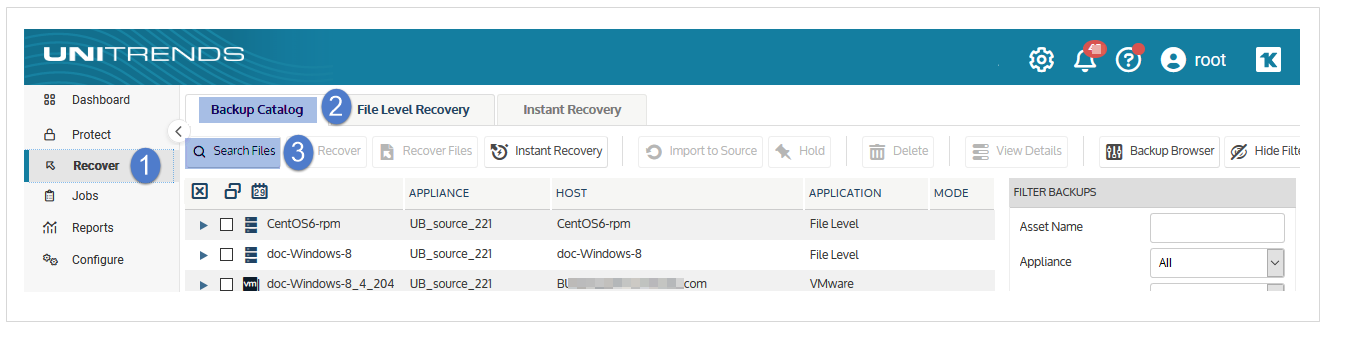
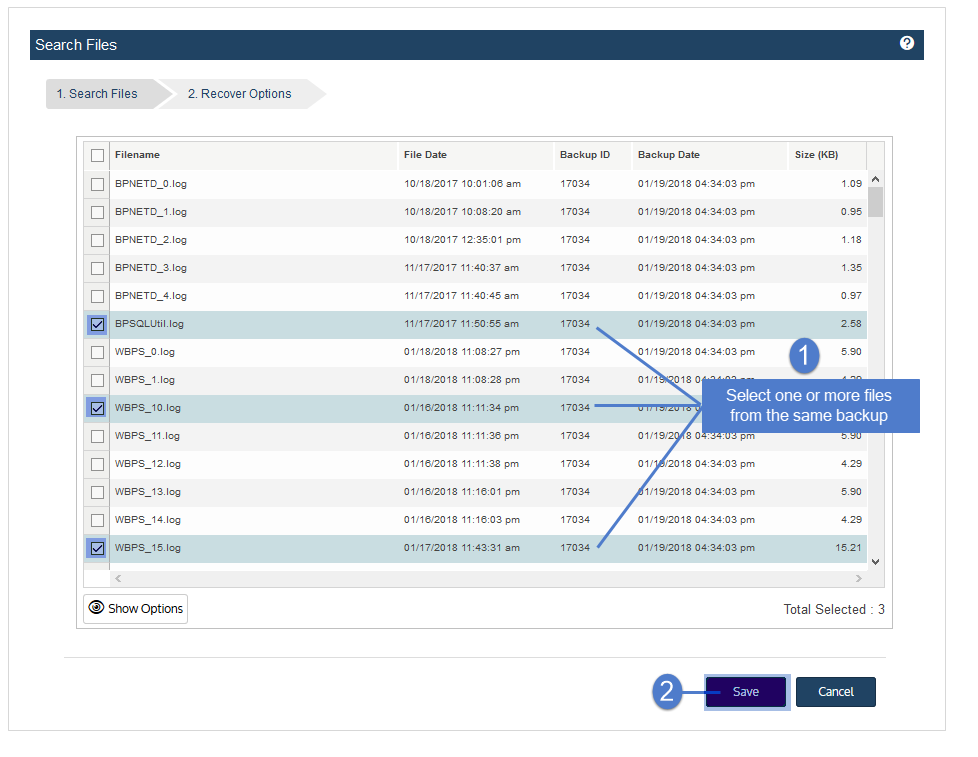
Use this procedure to search an asset's backups and imported backup copies for files that meet specified criteria and recover selected files from the search results.
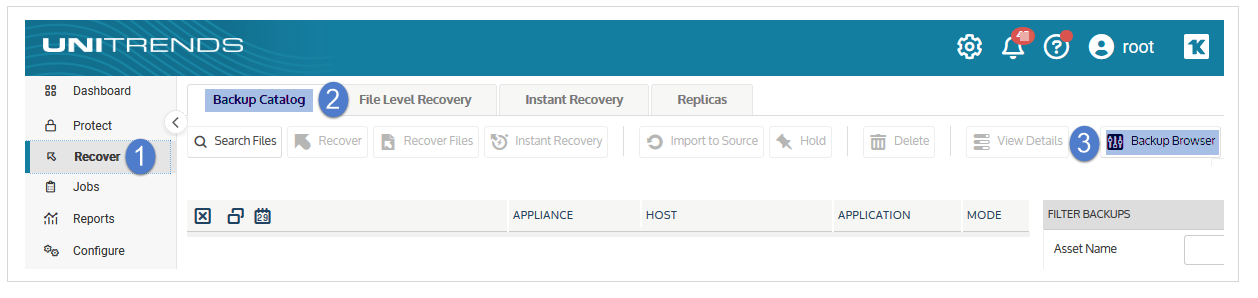
1. Log in to the backup appliance.
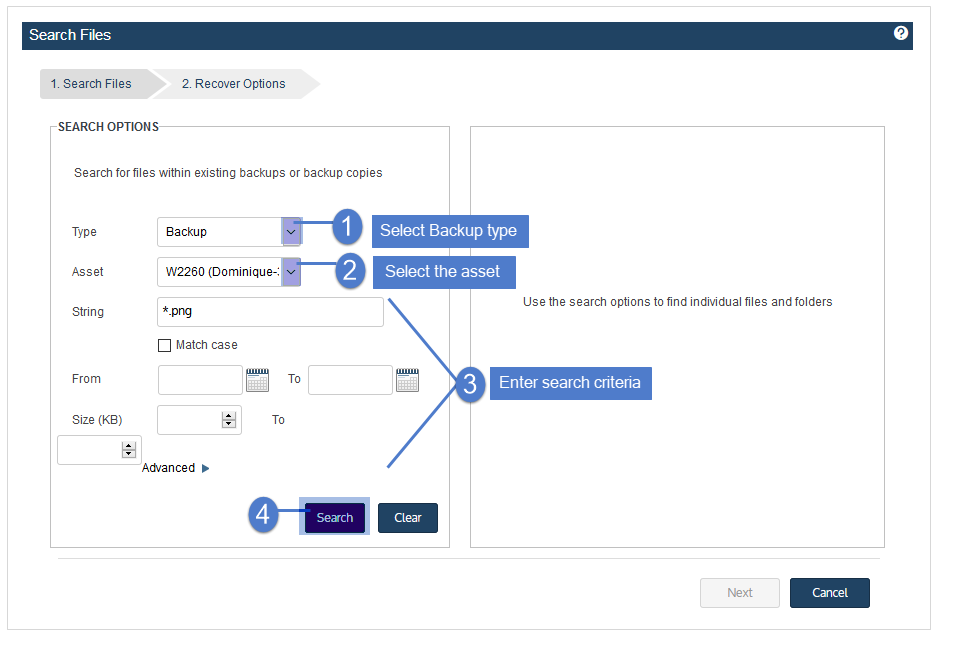
2. Click Recover > Backup Catalog > Search Files.

3. In the Type list, select Backup.
4. Select the Asset whose backups and imported backup copies will be searched.
5. Enter one or more search options:
|
Search Options |
Description |
|---|---|
|
String |
Enter text to search. The wildcard character * is supported. |
|
Match Case |
Select to match the letter case of the entered string. |
|
From/To |
Use to search for files that were last modified within the specified date range. Results do not include files modified on the From or To date. |
|
Size |
Use to search for files that meet this size criteria. |
|
Advanced |
Click to search using a regular expression. |
6. Click Search.
All backups of this asset stored on the appliance are searched for matching files.
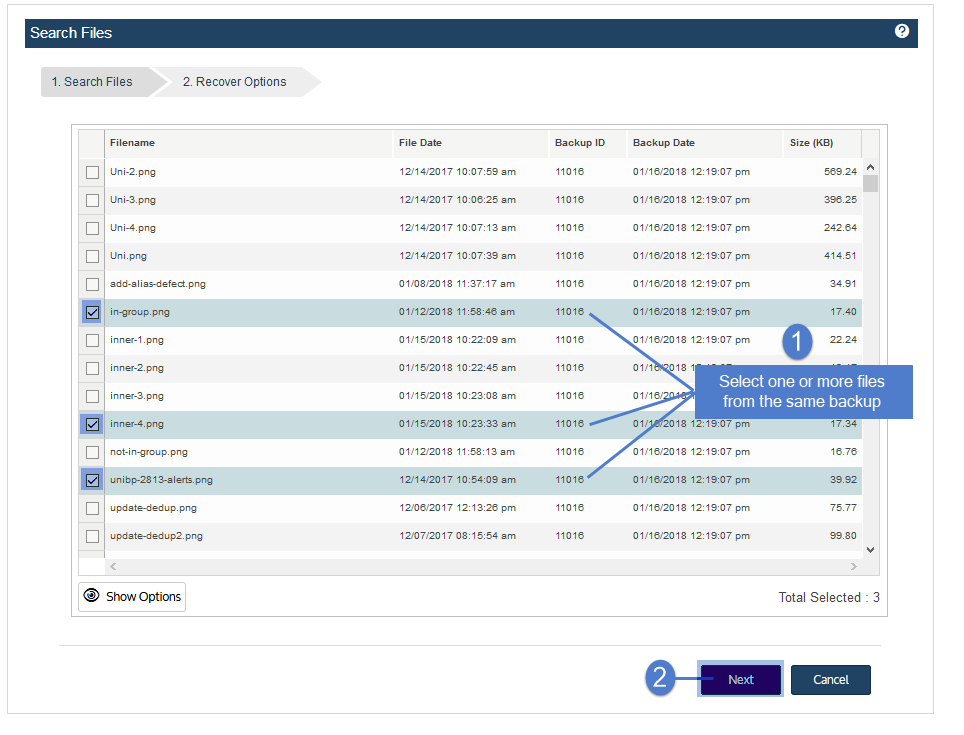
7. In the results list, click to select files to recover.
NOTES
● All files you select must be from a single backup. Check the Backup ID to determine a file's backup. If you select files from multiple backups, the Save button becomes disabled.
● Softlinks cannot be downloaded and are not included in the search results.
8. Click Next.
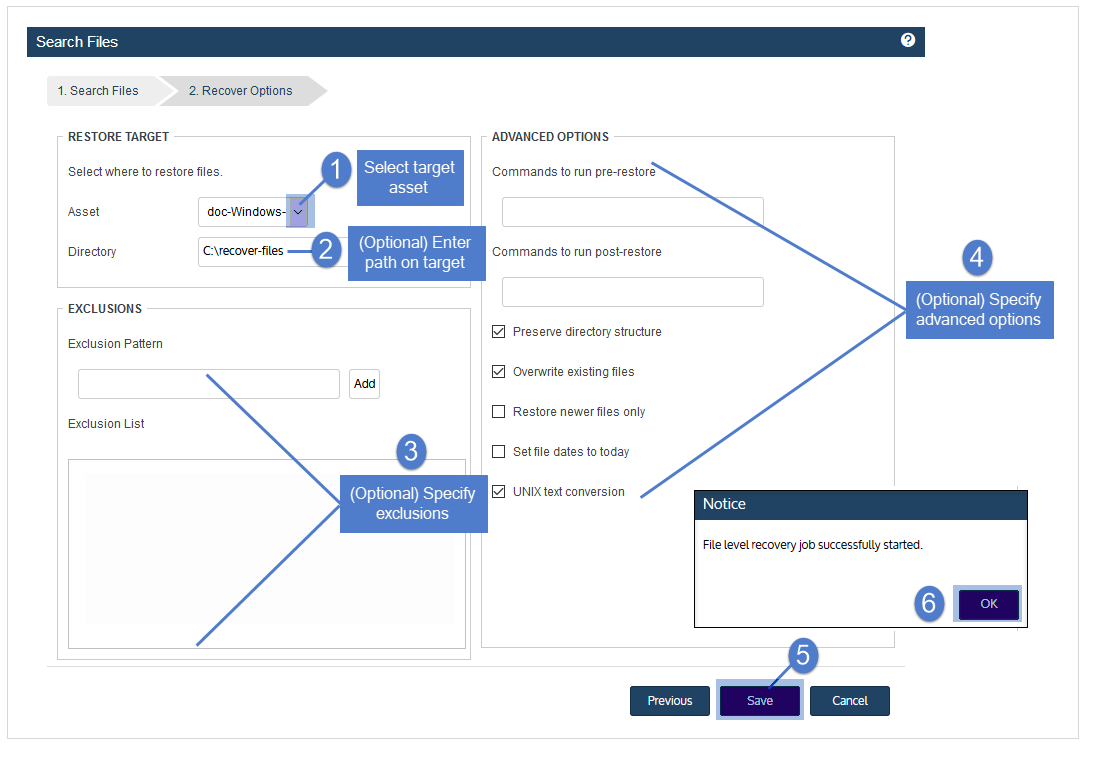
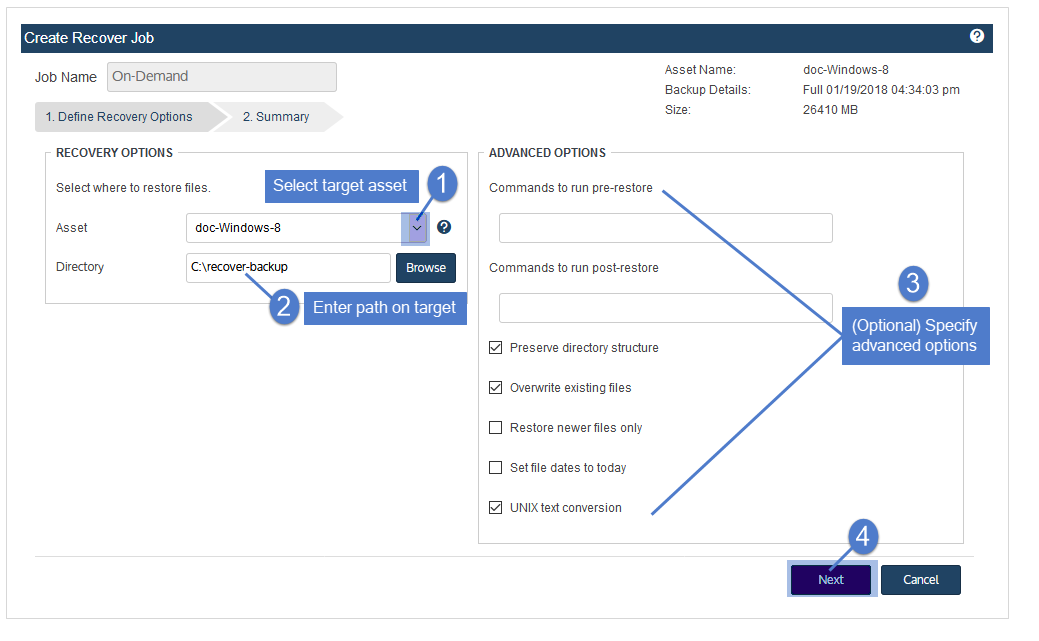
9. Select the Asset where the files will be recovered.
10. (Optional) Enter a Directory path or click Browse and select a Directory path from the drop-down list.
● If the directory does not exist, the job creates it on the target asset.
● Leave the Directory field empty to recover files to their original location.
11. (Optional) Specify Exclusions.
12. (Optional) Specify Advanced Options.
|
Option |
Description |
|---|---|
|
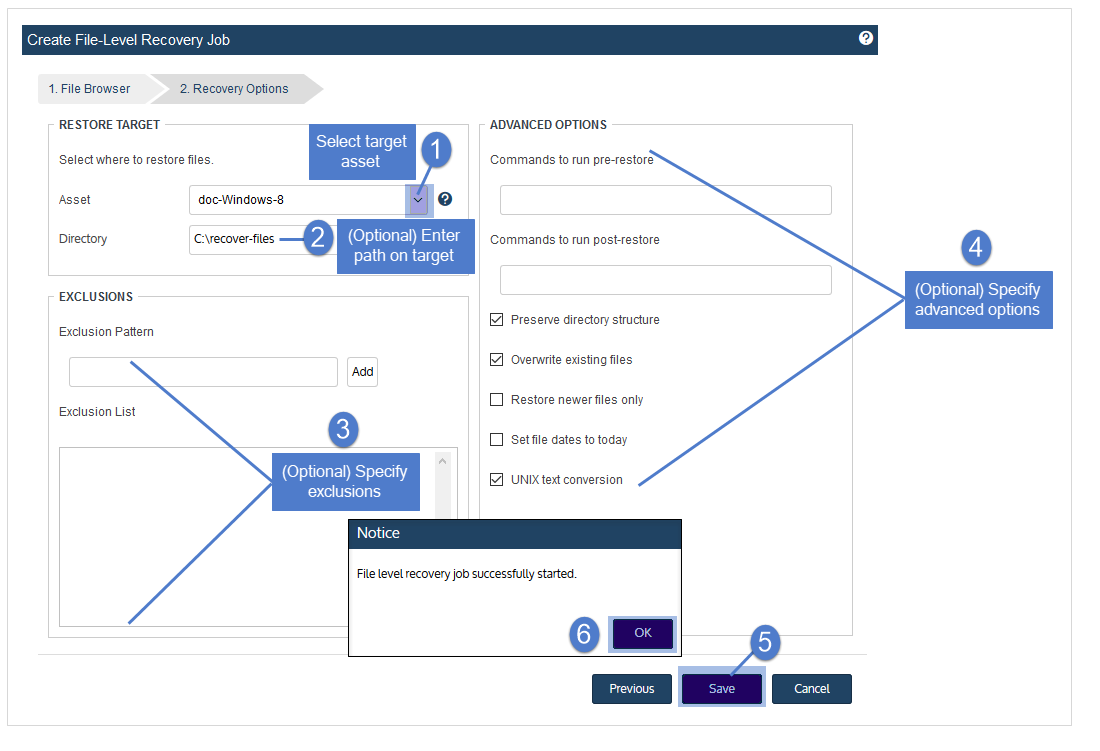
Commands to run pre-restore |
To run a command or script on the asset before the recovery, enter the full path to the command or script in the Commands to run pre-restore field. For example, C:\Data\script.bat or /usr/jsmith/script.sh. |
|
Commands to run post-restore |
To run a command or script on the asset after the recovery, enter the full path to the command or script in the Commands to run post-restore field. For example, C:\Data\script.bat or /usr/jsmith/script.sh. |
|
Preserve directory structure |
Check this box to preserve the existing file structure within the target directory. NOTE To recover the file(s) to the original location, Preserve Directory Structure must be selected. If you attempt to recover to the original location and uncheck this box, the recovery fails. |
|
Overwrite existing files |
If this box is checked, files in the Target Directory may be overwritten. (See Overwrite existing files and Restore newer files only options for details.) This is useful if you are recovering an updated version of a document and only want the most up to date version. |
|
Restore newer files only |
Check this box to recover a file only if its date is newer than the existing version in the Target Directory. (See Overwrite existing files and Restore newer files only options for details.) If the file does not exist in the Target Directory, the file is recovered. |
|
Set file dates to today |
Check this box to update the recovered files with the recover date and time. If not checked, file dates are not updated during the recovery. |
|
UNIX text conversion |
When recovering UNIX Text files to MS-DOS systems, checking this option prevents new lines from being converted to CR-LF. |
This table describes how Overwrite existing files and Restore newer files only work if the file exists in the Target Directory.
|
Option selected? |
Recovery behavior |
|
|---|---|---|
|
Windows backup |
Non-Windows backup |
|
|
Overwrite existing files = Yes |
Recovers the file and overwrites the existing file. |
● If the file to recover is newer than the one in the Target Directory, recovers the file and overwrites the existing file. ● If the file to recover is older than the one in the Target Directory, does not recover the file. |
|
Overwrite existing files = Yes |
Recovers the file and overwrites the existing file. |
Recovers the file and overwrites the existing file. |
|
Overwrite existing files = No |
Does not recover the file. |
Does not recover the file. |
13. Click Save.
14. Click OK to close the Notice message.
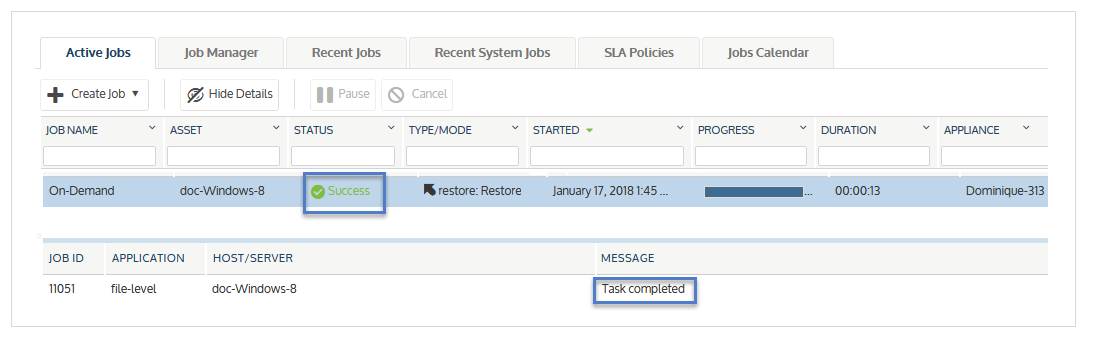
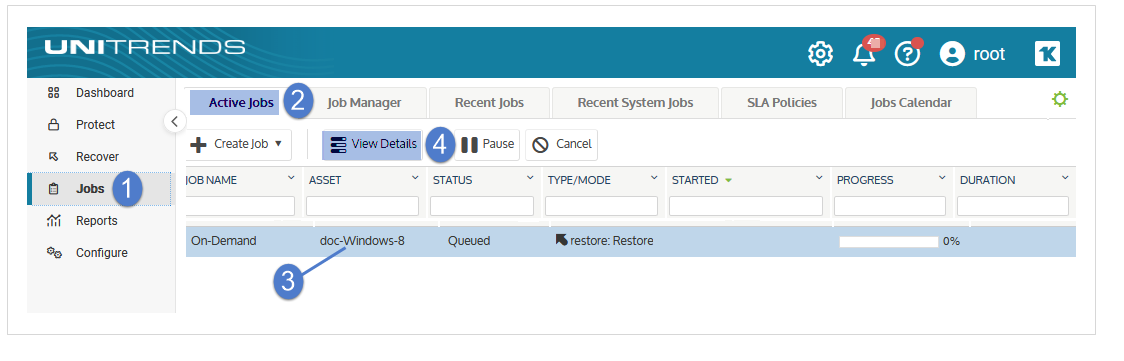
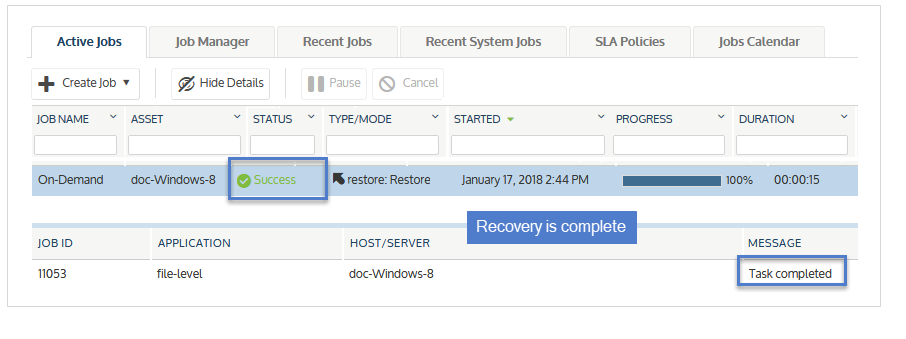
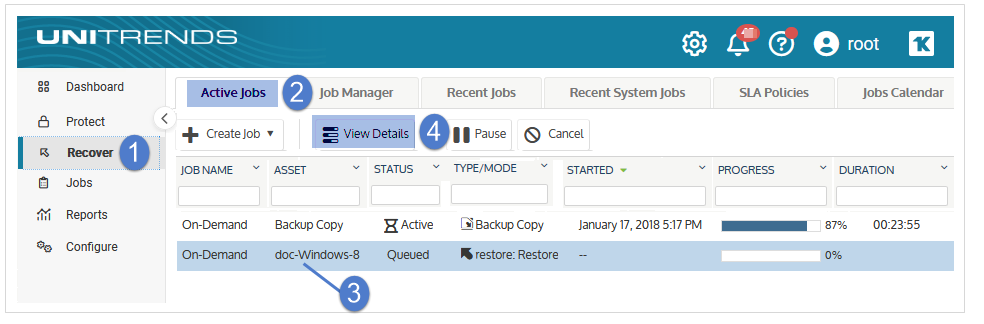
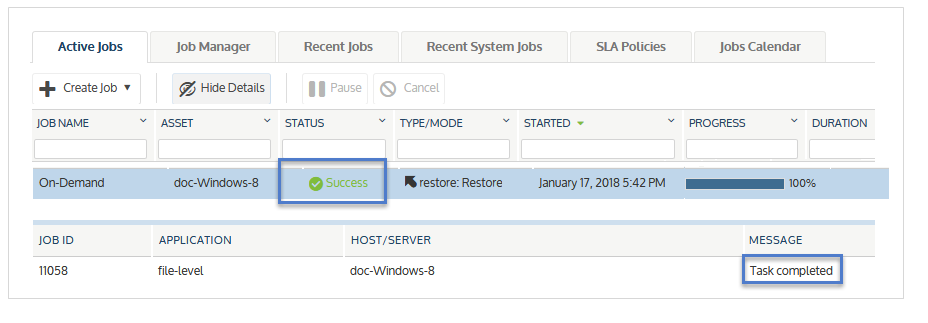
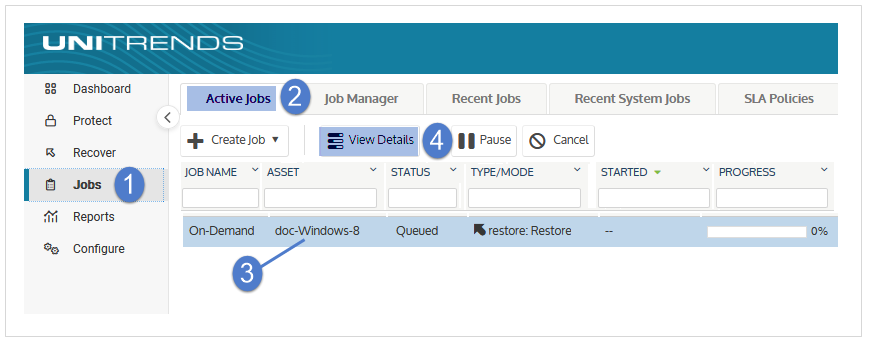
15. To monitor the recovery job:
● Select Jobs > Active Jobs.
● Select the job in the list and click View Details.
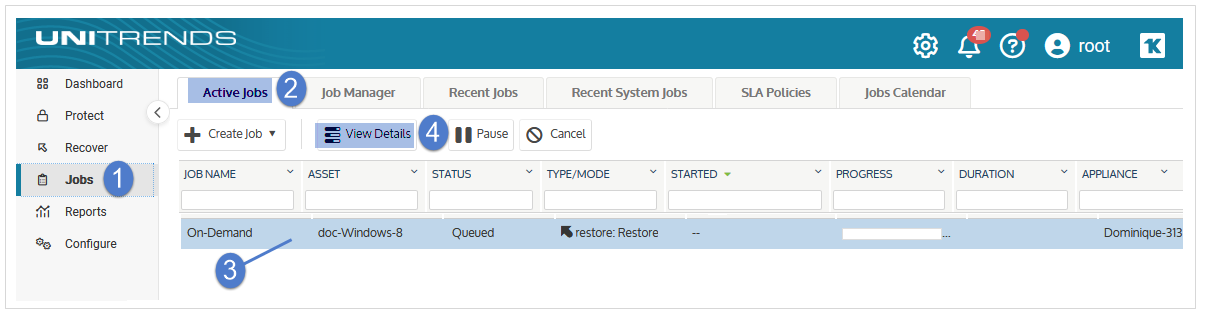
● The recovery is complete when the job's status changes to Success.
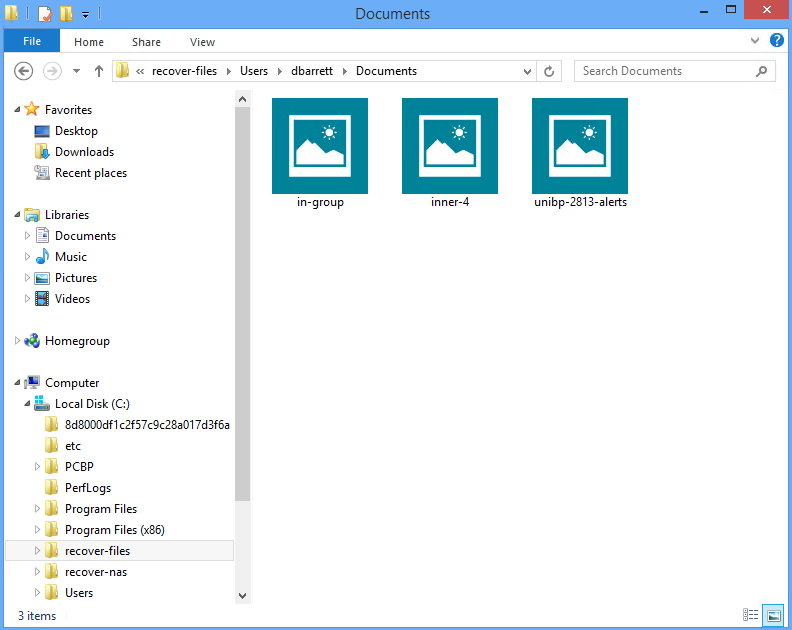
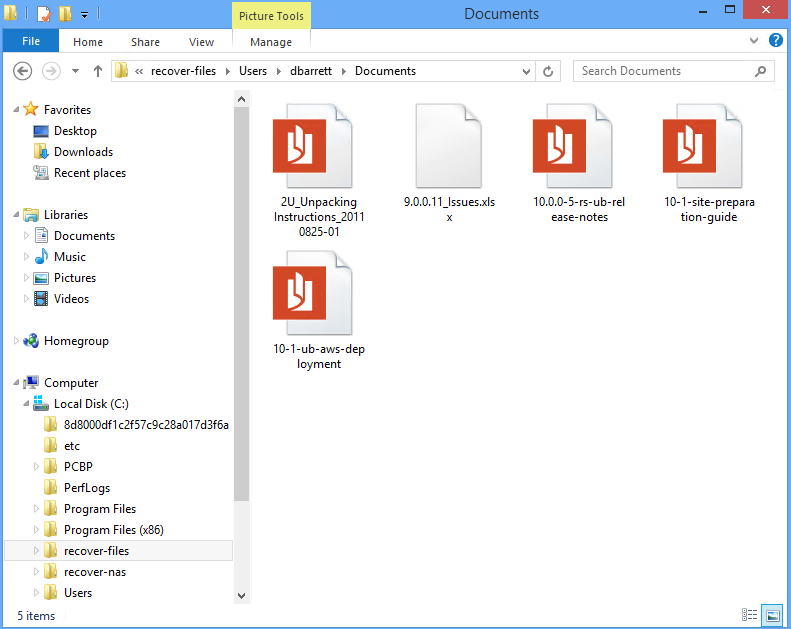
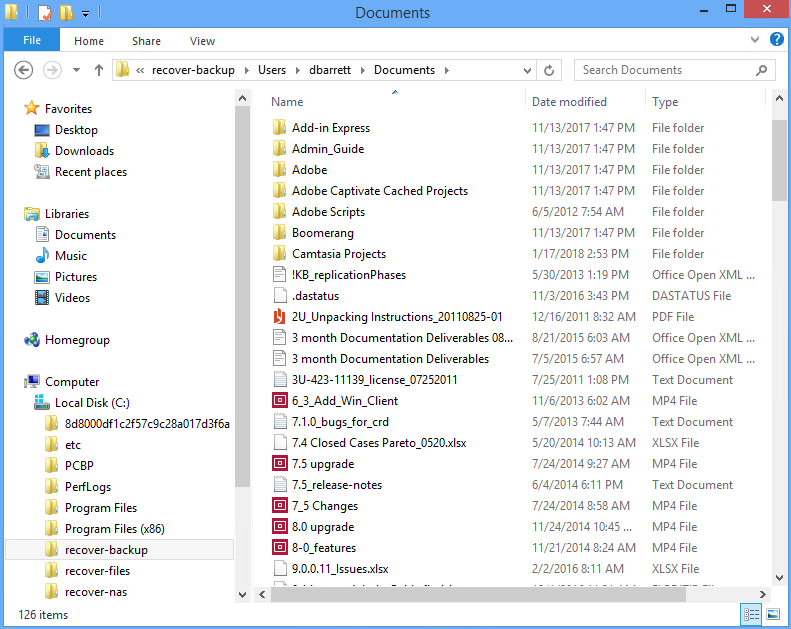
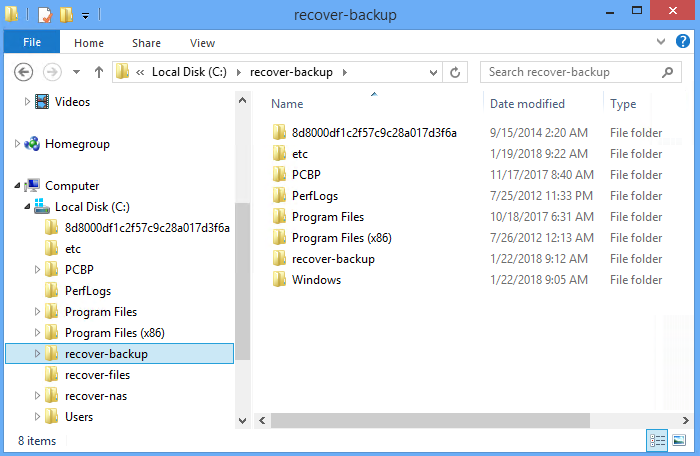
16. Access the recovered files on the recovery target.
NOTE Windows assets – Files that are locked because they are in use in the location where you are performing the restore (system files, database files, etc.) cannot be restored while the system is live. During recovery, these files are moved to a temporary location and an entry is added into the registry telling Windows to restore the files to their actual final location on the next boot.
Use this procedure to browse the contents of one backup or imported backup copy and recover selected files.
NOTE The file browser contains the backup you select plus all dependent data in the backup group. For example, selecting an incremental enables you to browse the incremental plus its parent full and any other dependent incrementals in the chain. (For details, see Backup groups.)
1. Log in to the backup appliance.
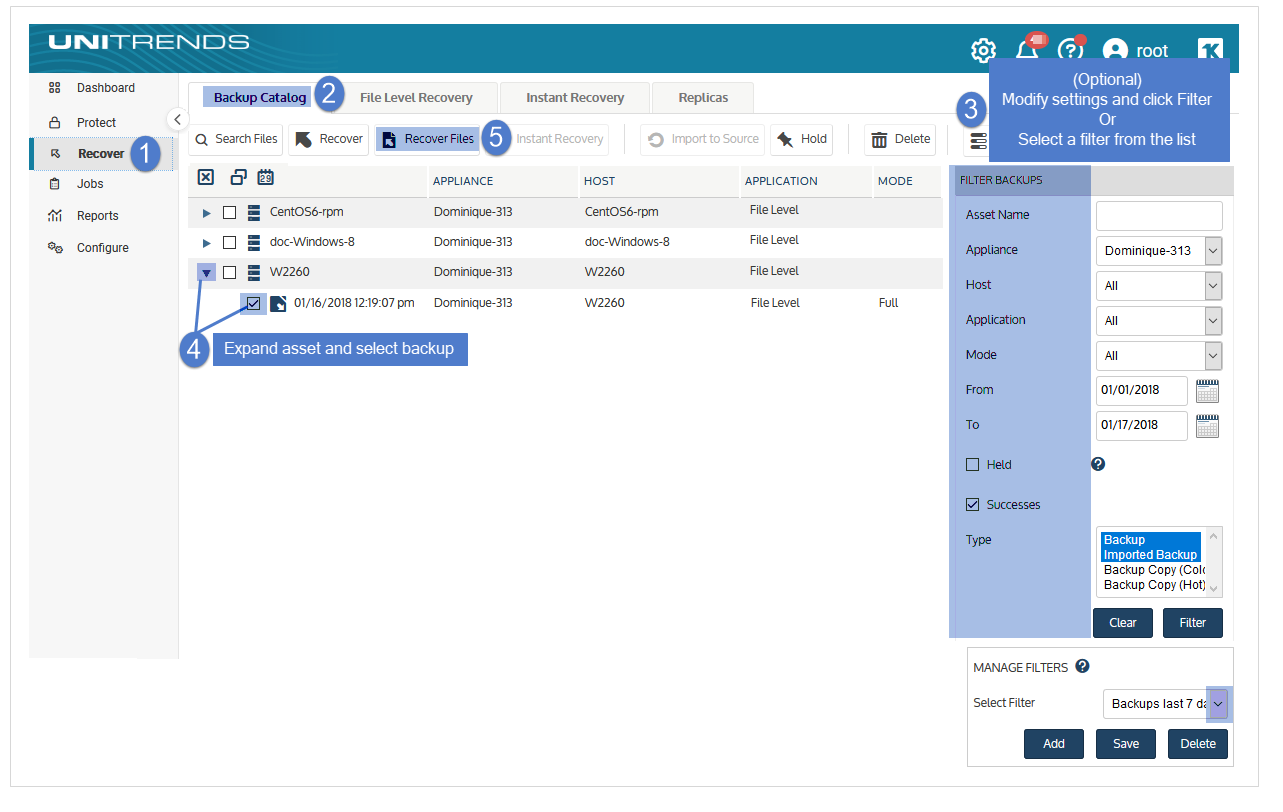
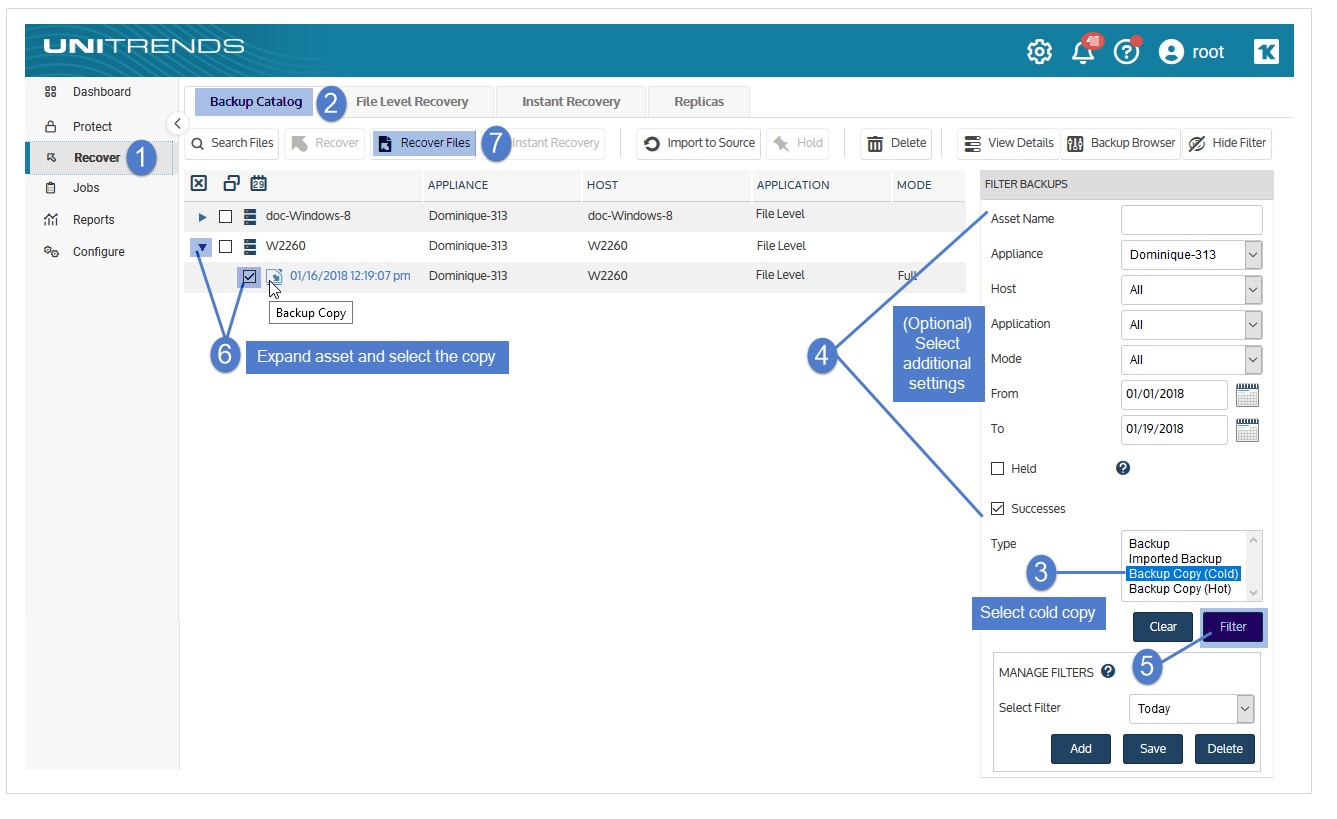
2. Select Recover > Backup Catalog.
(Optional) Use Filter Backups to the right to customize the backups that display. For details, see Working with custom filters.
3. Expand the asset and select a backup or imported backup copy.
(To import a backup copy, see To import a cold backup copy or To import a hot backup copy.)
4. Click Recover Files.
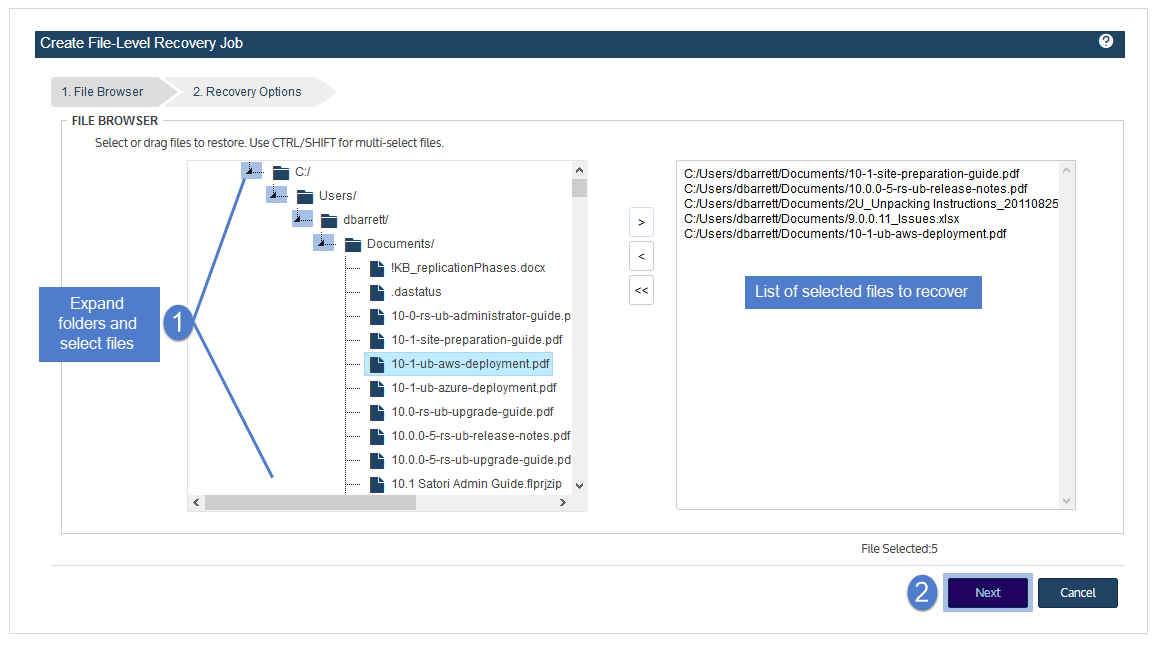
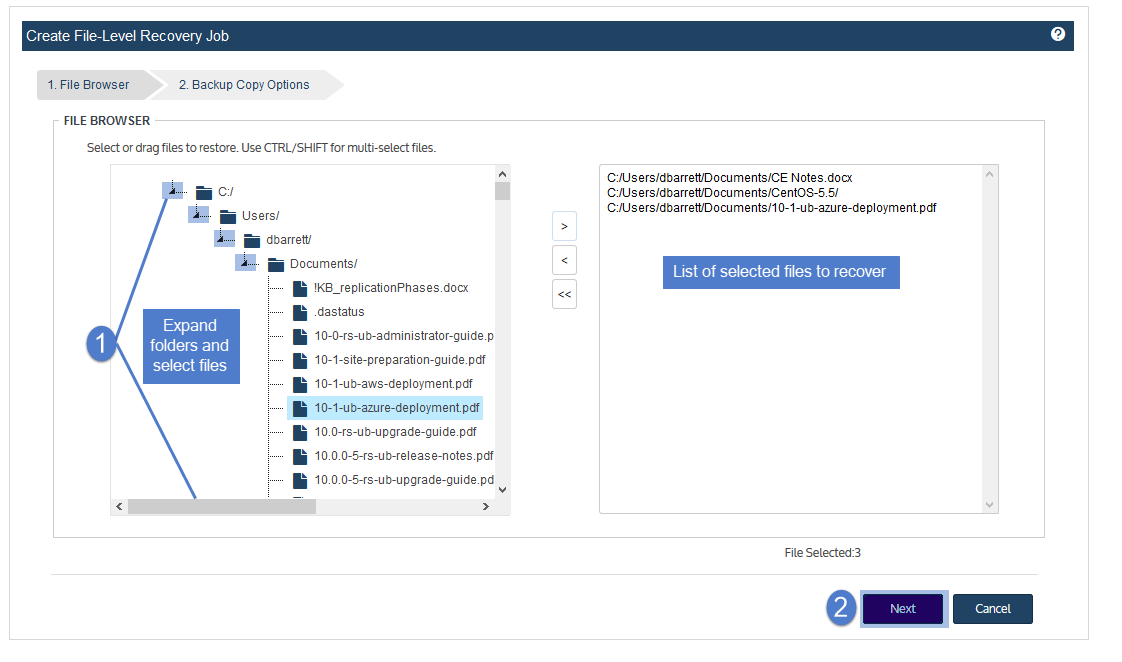
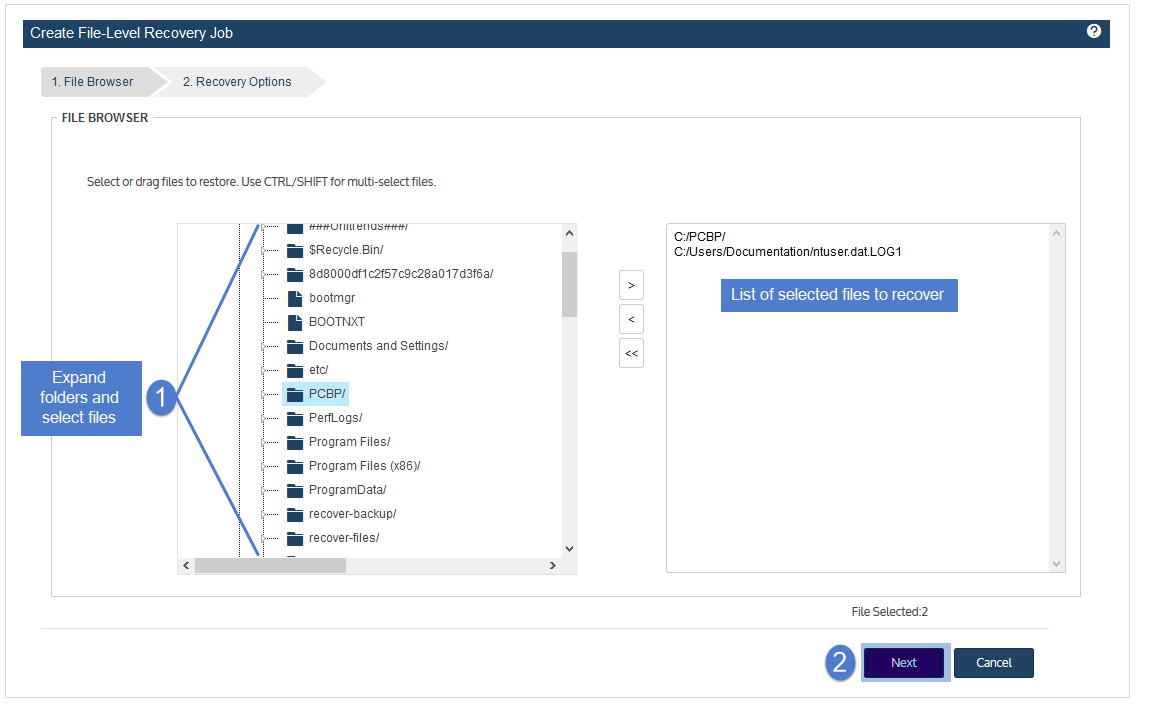
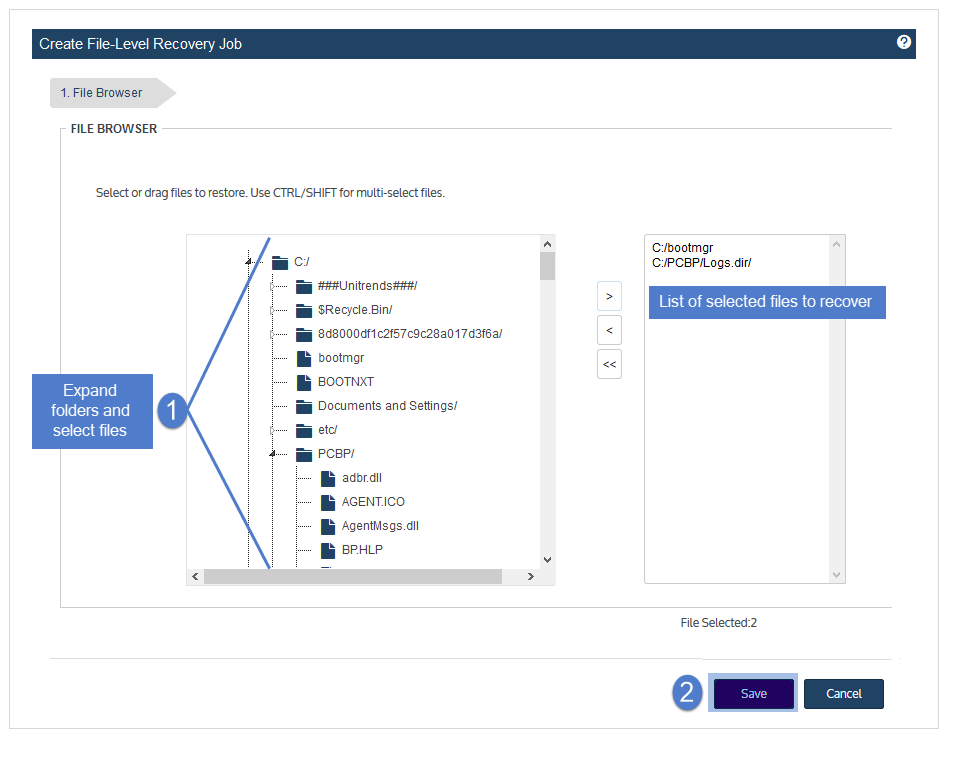
5. In the File Browser, expand folders to view items in the backup.
6. Select or drag files and/or folders to recover.
7. Click Next.
8. Select an Asset. Choose from the agent-based assets that have been added to this appliance.
9. (Optional) Enter a Directory path or click Browse and select a Directory path from the drop-down list.
● If the directory does not exist, the job creates it on the target asset.
● Leave the Directory field empty to recover files to their original location.
10. (Optional) Specify Exclusions.
11. (Optional) Specify Advanced Options.
|
Option |
Description |
|---|---|
|
Commands to run pre-restore |
To run a command or script on the asset before the recovery, enter the full path to the command or script in the Commands to run pre-restore field. For example, C:\Data\script.bat or /usr/jsmith/script.sh. |
|
Commands to run post-restore |
To run a command or script on the asset after the recovery, enter the full path to the command or script in the Commands to run post-restore field. For example, C:\Data\script.bat or /usr/jsmith/script.sh. |
|
Preserve directory structure |
Check this box to preserve the existing file structure within the target directory. NOTE To recover the file(s) to the original location, Preserve Directory Structure must be selected. If you attempt to recover to the original location and uncheck this box, the recovery fails. |
|
Overwrite existing files |
If this box is checked, files in the Target Directory may be overwritten. (See Overwrite existing files and Restore newer files only options for details.) This is useful if you are recovering an updated version of a document and only want the most up to date version. |
|
Restore newer files only |
Check this box to recover a file only if its date is newer than the existing version in the Target Directory. (See Overwrite existing files and Restore newer files only options for details.) If the file does not exist in the Target Directory, the file is recovered. |
|
Set file dates to today |
Check this box to update the recovered files with the recover date and time. If not checked, file dates are not updated during the recovery. |
|
UNIX text conversion |
When recovering UNIX Text files to MS-DOS systems, checking this option prevents new lines from being converted to CR-LF. |
This table describes how Overwrite existing files and Restore newer files only work if the file exists in the Target Directory.
|
Option selected? |
Recovery behavior |
|
|---|---|---|
|
Windows backup |
Non-Windows backup |
|
|
Overwrite existing files = Yes |
Recovers the file and overwrites the existing file. |
● If the file to recover is newer than the one in the Target Directory, recovers the file and overwrites the existing file. ● If the file to recover is older than the one in the Target Directory, does not recover the file. |
|
Overwrite existing files = Yes |
Recovers the file and overwrites the existing file. |
Recovers the file and overwrites the existing file. |
|
Overwrite existing files = No |
Does not recover the file. |
Does not recover the file. |
12. Click Save.
13. Click OK to close the Notice message.

14. To monitor the recovery job:
● Select Jobs > Active Jobs.
● Select the job in the list and click View Details.
● The recovery is complete when the job's status changes to Success.
15. Access the recovered files on the recovery target.
NOTE Windows assets – Files that are locked because they are in use in the location where you are performing the restore (system files, database files, etc.) cannot be restored while the system is live. During recovery, these files are moved to a temporary location and an entry is added into the registry telling Windows to restore the files to their actual final location on the next boot.
Use this procedure to browse the contents of one backup and recover selected files.
NOTES
● You must use the Backup Catalog to recover from an imported backup. (See the procedure above.)
● The file browser contains the backup you select plus all dependent data in the backup group. For example, selecting an incremental enables you to browse the incremental plus its parent full and any other dependent incrementals in the chain. (For details, see Backup groups.)
1. Log in to the backup appliance.
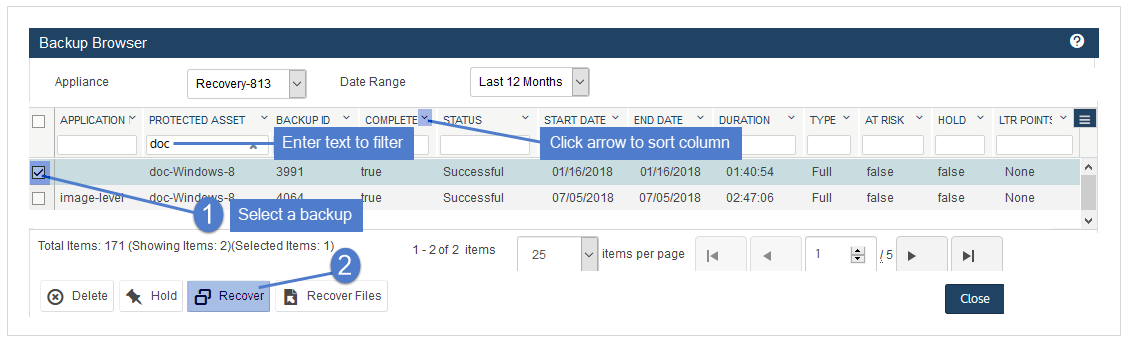
2. Select Recover > Backup Catalog and click Backup Browser.
3. Select the Appliance and Date Range of backups to search. Backups that ran during the date range display:
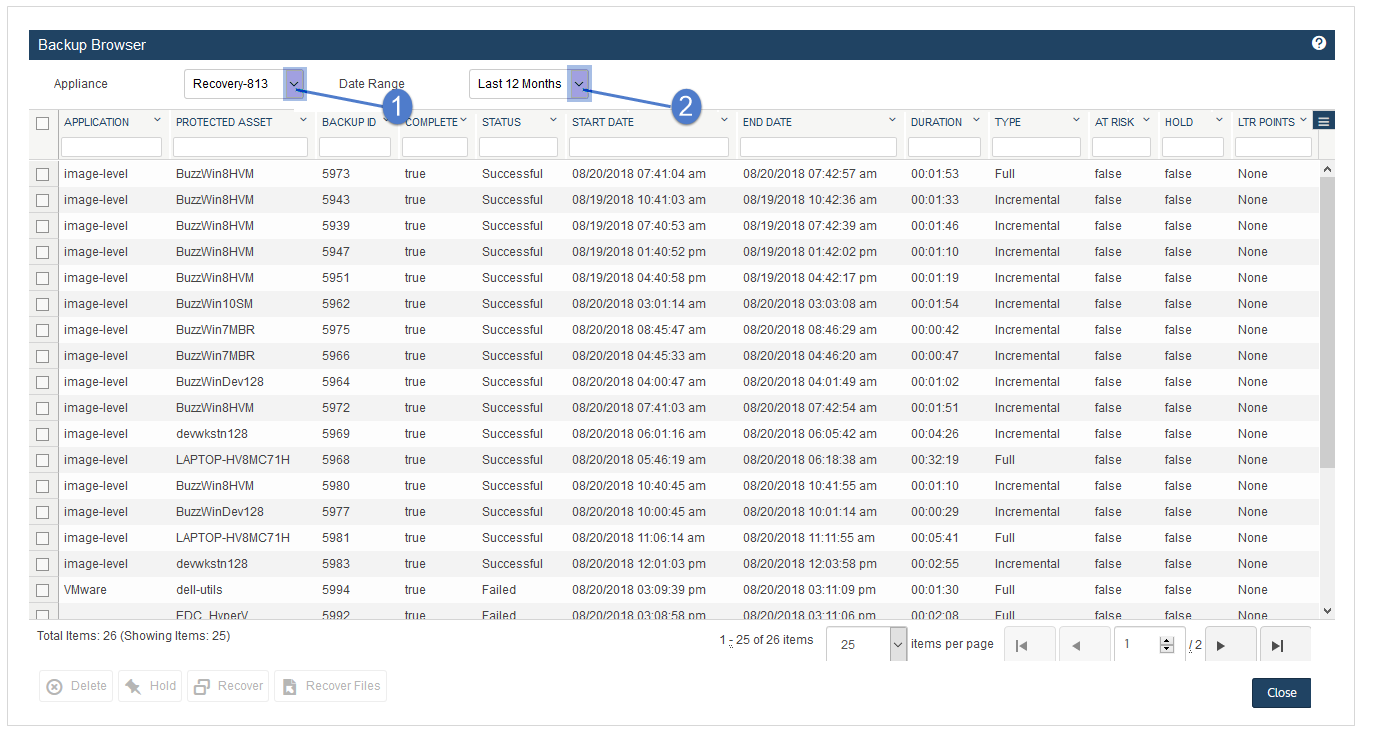
4. (Optional) Refine the search:
● Enter text in any column field to filter the display.
● Click an arrow to sort by column.
● Click the accordion icon to add or remove columns from the display. (Not all columns display by default.)
● For a description of each column, see Backup Browser column descriptions.
5. Select the file-level backup and click Recover Files.
6. In the File Browser, expand folders to view items in the backup.
7. Select or drag files and/or folders to recover.
8. Click Next.
9. Select an Asset. Choose from the agent-based assets that have been added to this appliance.
10. (Optional) Enter a Directory path or click Browse and select a Directory path from the drop-down list.
● If the directory does not exist, the job creates it on the target asset.
● Leave the Directory field empty to recover files to their original location.
11. (Optional) Specify Exclusions.
12. (Optional) Specify Advanced Options.
|
Option |
Description |
|---|---|
|
Commands to run pre-restore |
To run a command or script on the asset before the recovery, enter the full path to the command or script in the Commands to run pre-restore field. For example, C:\Data\script.bat or /usr/jsmith/script.sh. |
|
Commands to run post-restore |
To run a command or script on the asset after the recovery, enter the full path to the command or script in the Commands to run post-restore field. For example, C:\Data\script.bat or /usr/jsmith/script.sh. |
|
Preserve directory structure |
Check this box to preserve the existing file structure within the target directory. NOTE To recover the file(s) to the original location, Preserve Directory Structure must be selected. If you attempt to recover to the original location and uncheck this box, the recovery fails. |
|
Overwrite existing files |
If this box is checked, files in the Target Directory may be overwritten. (See Overwrite existing files and Restore newer files only options for details.) This is useful if you are recovering an updated version of a document and only want the most up to date version. |
|
Restore newer files only |
Check this box to recover a file only if its date is newer than the existing version in the Target Directory. (See Overwrite existing files and Restore newer files only options for details.) If the file does not exist in the Target Directory, the file is recovered. |
|
Set file dates to today |
Check this box to update the recovered files with the recover date and time. If not checked, file dates are not updated during the recovery. |
|
UNIX text conversion |
When recovering UNIX Text files to MS-DOS systems, checking this option prevents new lines from being converted to CR-LF. |
This table describes how Overwrite existing files and Restore newer files only work if the file exists in the Target Directory.
|
Option selected? |
Recovery behavior |
|
|---|---|---|
|
Windows backup |
Non-Windows backup |
|
|
Overwrite existing files = Yes |
Recovers the file and overwrites the existing file. |
● If the file to recover is newer than the one in the Target Directory, recovers the file and overwrites the existing file. ● If the file to recover is older than the one in the Target Directory, does not recover the file. |
|
Overwrite existing files = Yes |
Recovers the file and overwrites the existing file. |
Recovers the file and overwrites the existing file. |
|
Overwrite existing files = No |
Does not recover the file. |
Does not recover the file. |
13. Click Save.
14. Click OK to close the Notice message.
15. To monitor the recovery job:
● Select Jobs > Active Jobs.
● Select the job in the list and click View Details.
● The recovery is complete when the job's status changes to Success.
16. Access the recovered files on the recovery target.
NOTE Windows assets – Files that are locked because they are in use in the location where you are performing the restore (system files, database files, etc.) cannot be restored while the system is live. During recovery, these files are moved to a temporary location and an entry is added into the registry telling Windows to restore the files to their actual final location on the next boot.
Use this procedure to recover a backup or imported backup copy.
NOTE This procedure recovers the backup you select, plus all dependent data in the backup group. For example, recovering an incremental also recovers its parent full and any other dependent incrementals in the chain. (For details, see Backup groups.)
1. Log in to the backup appliance.
2. Select Recover > Backup Catalog.
(Optional) Use Filter Backups to the right to customize the backups that display. For details, see Working with custom filters.
3. Expand the asset and select a backup or imported backup copy.
(To import a backup copy, see To import a cold backup copy or To import a hot backup copy.)
4. Click Recover.
5. Select an Asset. Choose from the agent-based assets that have been added to this appliance.
6. (Optional) Enter a Directory path or click Browse and select a Directory path from the drop-down list.
● If the directory does not exist, the job creates it on the target asset.
● Leave the Directory field empty to recover files to their original location.
7. (Optional) Specify Advanced Options.
|
Option |
Description |
|---|---|
|
Commands to run pre-restore |
To run a command or script on the asset before the recovery, enter the full path to the command or script in the Commands to run pre-restore field. For example, C:\Data\script.bat or /usr/jsmith/script.sh. |
|
Commands to run post-restore |
To run a command or script on the asset after the recovery, enter the full path to the command or script in the Commands to run post-restore field. For example, C:\Data\script.bat or /usr/jsmith/script.sh. |
|
Preserve directory structure |
Check this box to preserve the existing file structure within the target directory. NOTE To recover the file(s) to the original location, Preserve Directory Structure must be selected. If you attempt to recover to the original location and uncheck this box, the recovery fails. |
|
Overwrite existing files |
If this box is checked, files in the Target Directory may be overwritten. (See Overwrite existing files and Restore newer files only options for details.) This is useful if you are recovering an updated version of a document and only want the most up to date version. |
|
Restore newer files only |
Check this box to recover a file only if its date is newer than the existing version in the Target Directory. (See Overwrite existing files and Restore newer files only options for details.) If the file does not exist in the Target Directory, the file is recovered. |
|
Set file dates to today |
Check this box to update the recovered files with the recover date and time. If not checked, file dates are not updated during the recovery. |
|
UNIX text conversion |
When recovering UNIX Text files to MS-DOS systems, checking this option prevents new lines from being converted to CR-LF. |
This table describes how Overwrite existing files and Restore newer files only work if the file exists in the Target Directory.
|
Option selected? |
Recovery behavior |
|
|---|---|---|
|
Windows backup |
Non-Windows backup |
|
|
Overwrite existing files = Yes |
Recovers the file and overwrites the existing file. |
● If the file to recover is newer than the one in the Target Directory, recovers the file and overwrites the existing file. ● If the file to recover is older than the one in the Target Directory, does not recover the file. |
|
Overwrite existing files = Yes |
Recovers the file and overwrites the existing file. |
Recovers the file and overwrites the existing file. |
|
Overwrite existing files = No |
Does not recover the file. |
Does not recover the file. |
8. Click Next.

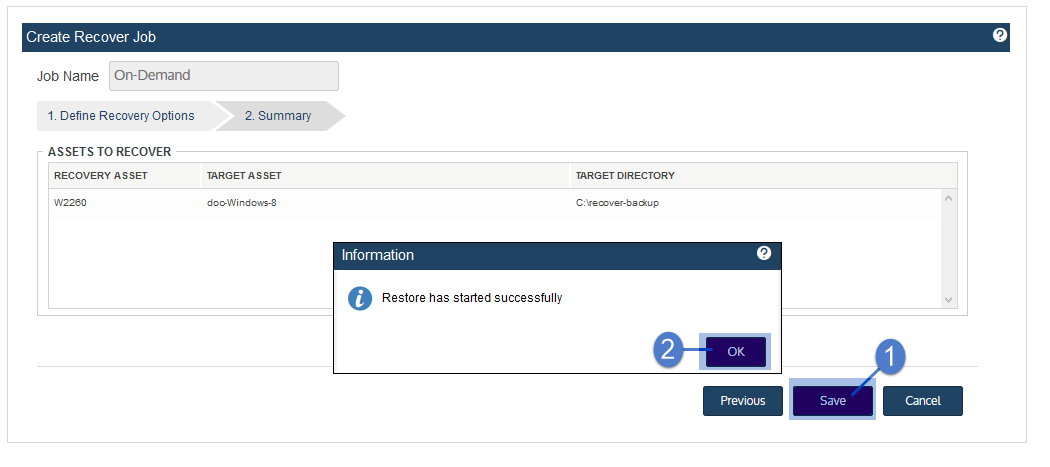
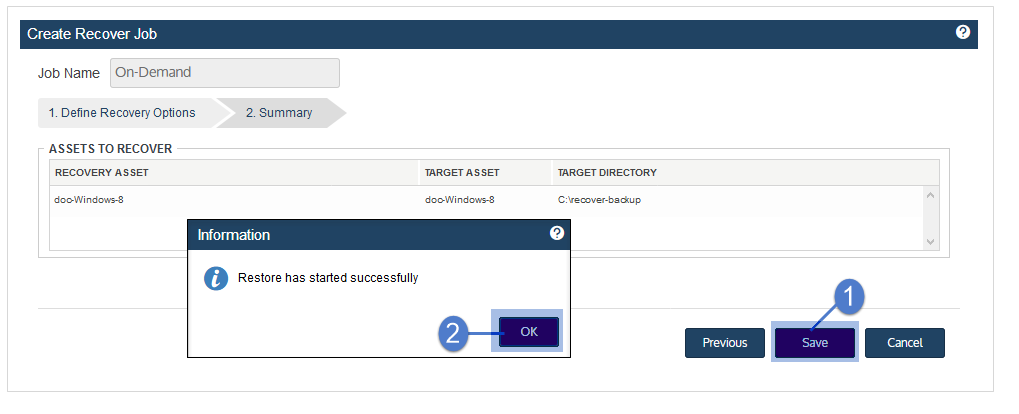
9. Review settings and click Save.
10. Click OK to close the Information message.

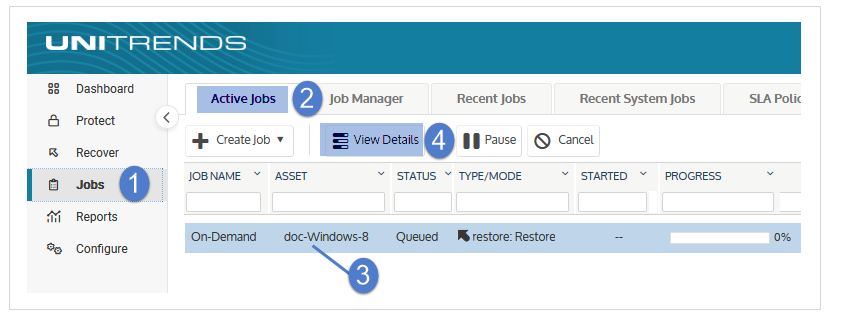
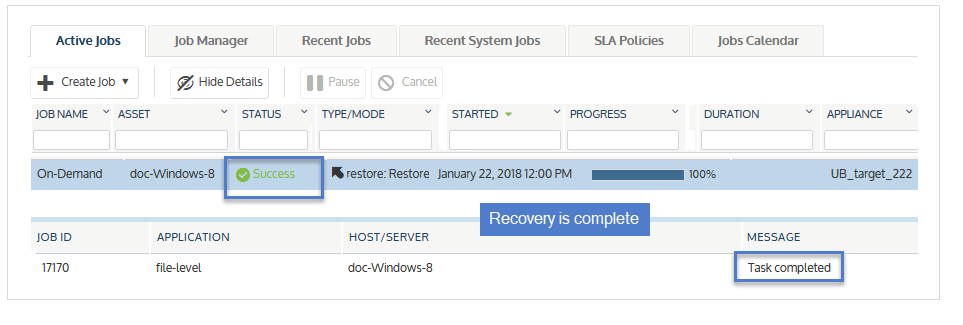
11. To monitor the recovery job:
● Select Jobs > Active Jobs.
● Select the job in the list and click View Details.
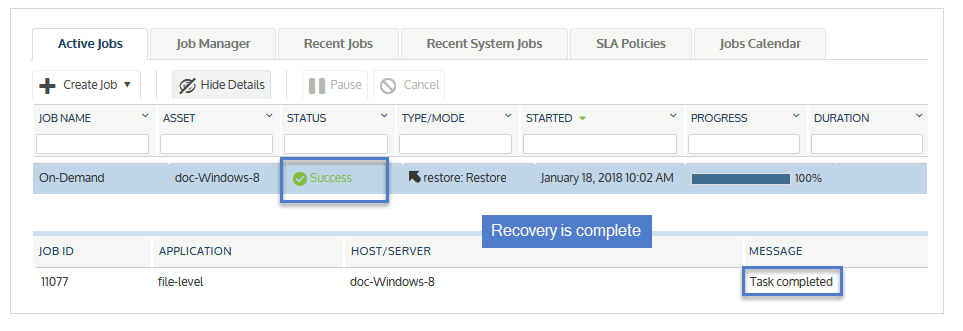
● The recovery is complete when the job's status changes to Success.
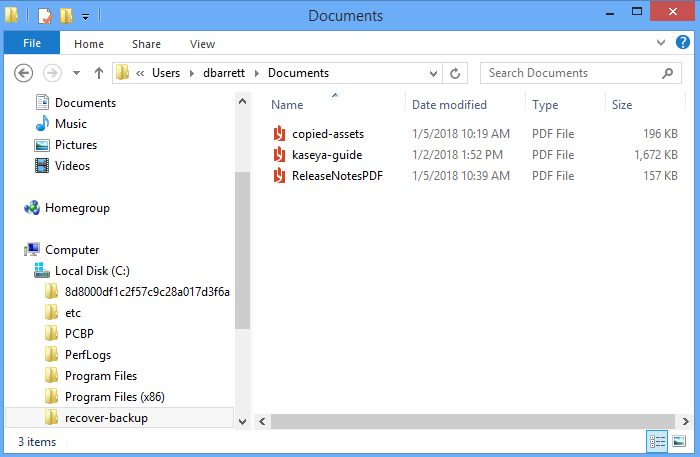
12. Access the recovered files on the recovery target.
NOTE Windows assets – Files that are locked because they are in use in the location where you are performing the restore (system files, database files, etc.) cannot be restored while the system is live. During recovery, these files are moved to a temporary location and an entry is added into the registry telling Windows to restore the files to their actual final location on the next boot.
Use this procedure to recover a backup.
NOTES
● You must use the Backup Catalog to recover an imported backup. (See the procedure above.)
● This procedure recovers the backup you select, plus all dependent data in the backup group. For example, recovering an incremental also recovers its parent full and any other dependent incrementals in the chain. (For details, see Backup groups.)
1. Log in to the backup appliance.
2. Select Recover > Backup Catalog and click Backup Browser.
3. Select the Appliance and Date Range of backups to search. Backups that ran during the date range display:
4. (Optional) Refine the search:
● Enter text in any column field to filter the display.
● Click an arrow to sort by column.
● Click the accordion icon to add or remove columns from the display. (Not all columns display by default.)
● For a description of each column, see Backup Browser column descriptions.
5. Select the file-level backup and click Recover.
6. Select an Asset. Choose from the agent-based assets that have been added to this appliance.
7. (Optional) Enter a Directory path or click Browse and select a Directory path from the drop-down list.
● If the directory does not exist, the job creates it on the target asset.
● Leave the Directory field empty to recover files to their original location.
8. (Optional) Specify Advanced Options.
|
Option |
Description |
|---|---|
|
Commands to run pre-restore |
To run a command or script on the asset before the recovery, enter the full path to the command or script in the Commands to run pre-restore field. For example, C:\Data\script.bat or /usr/jsmith/script.sh. |
|
Commands to run post-restore |
To run a command or script on the asset after the recovery, enter the full path to the command or script in the Commands to run post-restore field. For example, C:\Data\script.bat or /usr/jsmith/script.sh. |
|
Preserve directory structure |
Check this box to preserve the existing file structure within the target directory. NOTE To recover the file(s) to the original location, Preserve Directory Structure must be selected. If you attempt to recover to the original location and uncheck this box, the recovery fails. |
|
Overwrite existing files |
If this box is checked, files in the Target Directory may be overwritten. (See Overwrite existing files and Restore newer files only options for details.) This is useful if you are recovering an updated version of a document and only want the most up to date version. |
|
Restore newer files only |
Check this box to recover a file only if its date is newer than the existing version in the Target Directory. (See Overwrite existing files and Restore newer files only options for details.) If the file does not exist in the Target Directory, the file is recovered. |
|
Set file dates to today |
Check this box to update the recovered files with the recover date and time. If not checked, file dates are not updated during the recovery. |
|
UNIX text conversion |
When recovering UNIX Text files to MS-DOS systems, checking this option prevents new lines from being converted to CR-LF. |
This table describes how Overwrite existing files and Restore newer files only work if the file exists in the Target Directory.
|
Option selected? |
Recovery behavior |
|
|---|---|---|
|
Windows backup |
Non-Windows backup |
|
|
Overwrite existing files = Yes |
Recovers the file and overwrites the existing file. |
● If the file to recover is newer than the one in the Target Directory, recovers the file and overwrites the existing file. ● If the file to recover is older than the one in the Target Directory, does not recover the file. |
|
Overwrite existing files = Yes |
Recovers the file and overwrites the existing file. |
Recovers the file and overwrites the existing file. |
|
Overwrite existing files = No |
Does not recover the file. |
Does not recover the file. |
9. Click Next.
10. Review settings and click Save.
11. Click OK to close the Information message.
12. To monitor the recovery job:
● Select Jobs > Active Jobs.
● Select the job in the list and click View Details.
● The recovery is complete when the job's status changes to Success.
13. Access the recovered files on the recovery target.
NOTE Windows assets – Files that are locked because they are in use in the location where you are performing the restore (system files, database files, etc.) cannot be restored while the system is live. During recovery, these files are moved to a temporary location and an entry is added into the registry telling Windows to restore the files to their actual final location on the next boot.
Run these procedures to recover files from cold backup copies:
By using Search Files, you can find files in a cold backup copy, import them to the appliance, then recover them to the desired target location. The appliance creates and imports a selective backup containing the files you have picked. Once this backup has been imported, you recover the imported backup.
Search Files searches all cold backup copies that have been created by or imported to this appliance for the selected asset. To import files, the appliance must have access to the associated backup copy. To access the backup copy:
● The backup copy target must be connected to the appliance. To check that the target is connected:
1. On the Configure > Appliances page, select the source backup appliance.
2. Click the Backup Copy Targets tab below.
3. Click Scan For Media. The target displays in Offline status.
● If you are using removable media, the tape(s) or disk(s) where the files are stored must be loaded in the target. Do one of the following:
● If you know which media contains the files you want to recover, you can load the required media before you run the recovery procedure.
● If you do NOT know which media contains the files you want to recover, load the required media during the recovery procedure. After you enter file search criteria, the search results show the serial number(s) of the media where the files are stored.
Use these procedures to search an asset's cold backup copies for files that meet specified criteria and recover selected files from the search results.
Find, select, and import files
1. Log in to the backup appliance.
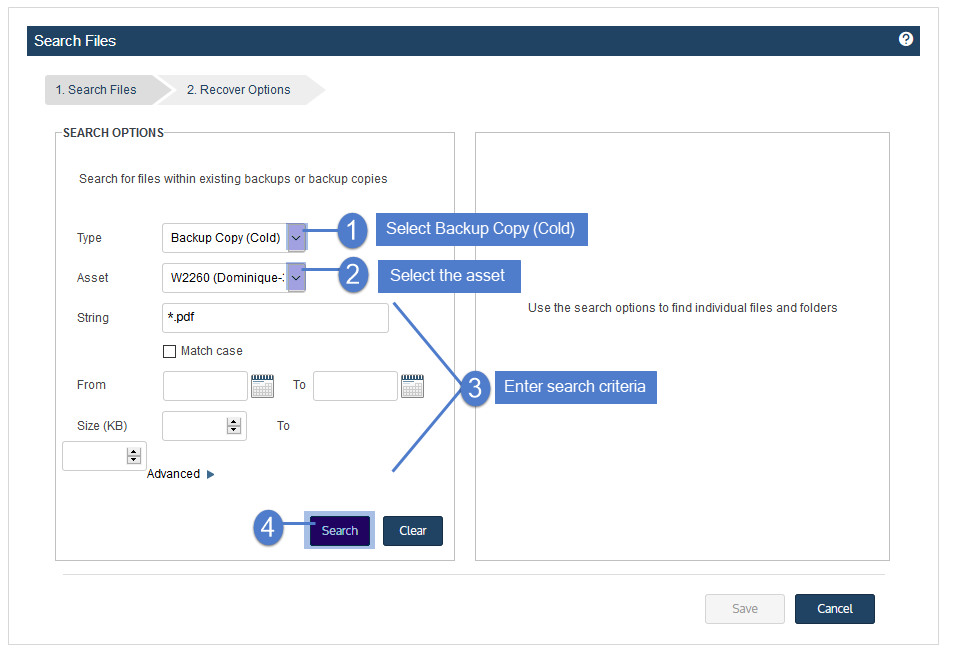
2. Click Recover > Backup Catalog > Search Files.
3. In the Type list, select Backup Copy (Cold).
4. Select the Asset whose backups and imported backup copies will be searched.
5. Enter one or more search options:
|
Search Options |
Description |
|---|---|
|
String |
Enter text to search. The wildcard character * is supported. |
|
Match Case |
Select to match the letter case of the entered string. |
|
From/To |
Use to search for files that were last modified within the specified date range. Results do not include files modified on the From or To date. |
|
Size |
Use to search for files that meet this size criteria. |
|
Advanced |
Click to search using a regular expression. |
6. Click Search.
All cold backup copies of this asset are searched for matching files.
7. The returned files display. For disk or tape targets, the Serial # column shows the serial number of the disk(s) or tape(s) where the copy is stored.
8. (For disk or tape targets) Load the media that contains the files to import.
9. In the results list, click to select files to recover.
10. Click Save.
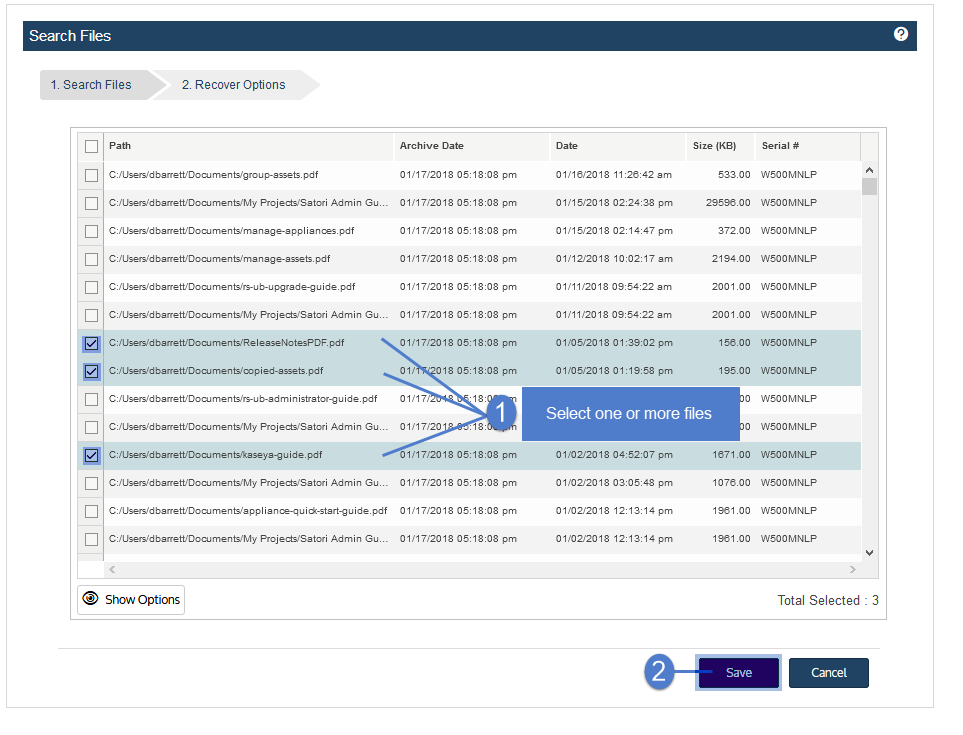
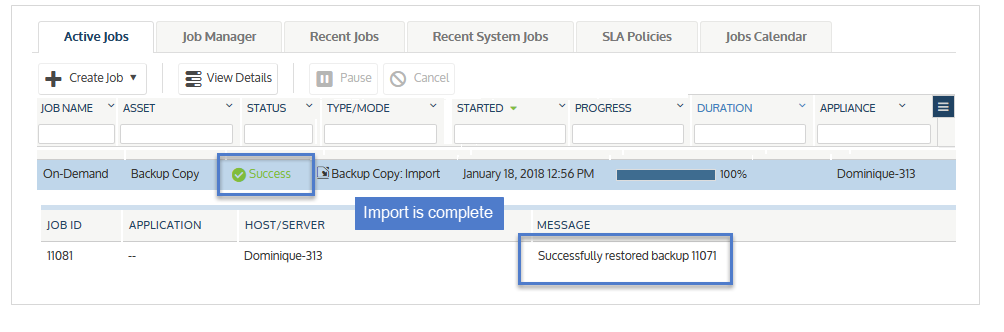
11. The recovery starts. Click View Jobs.
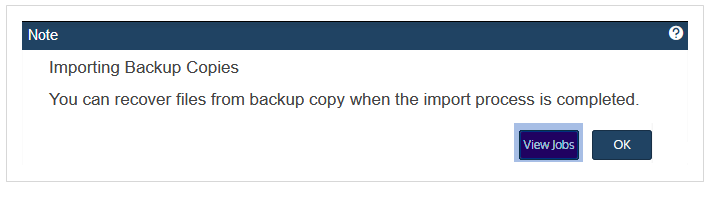
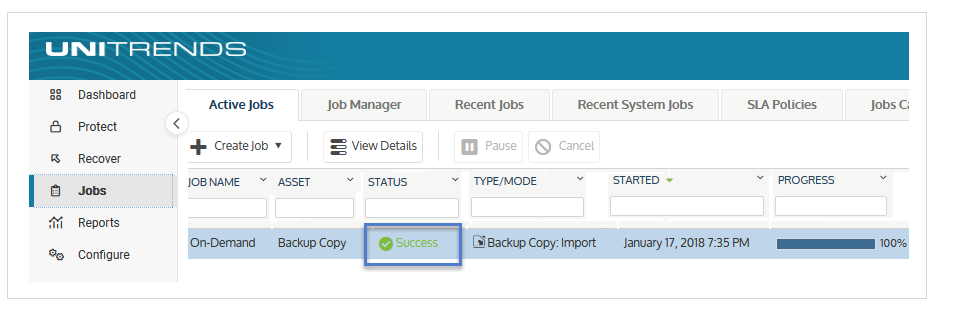
12. The recovery is complete when the job's status changes to Success.
13. Once the import is complete, proceed to Recover imported files.
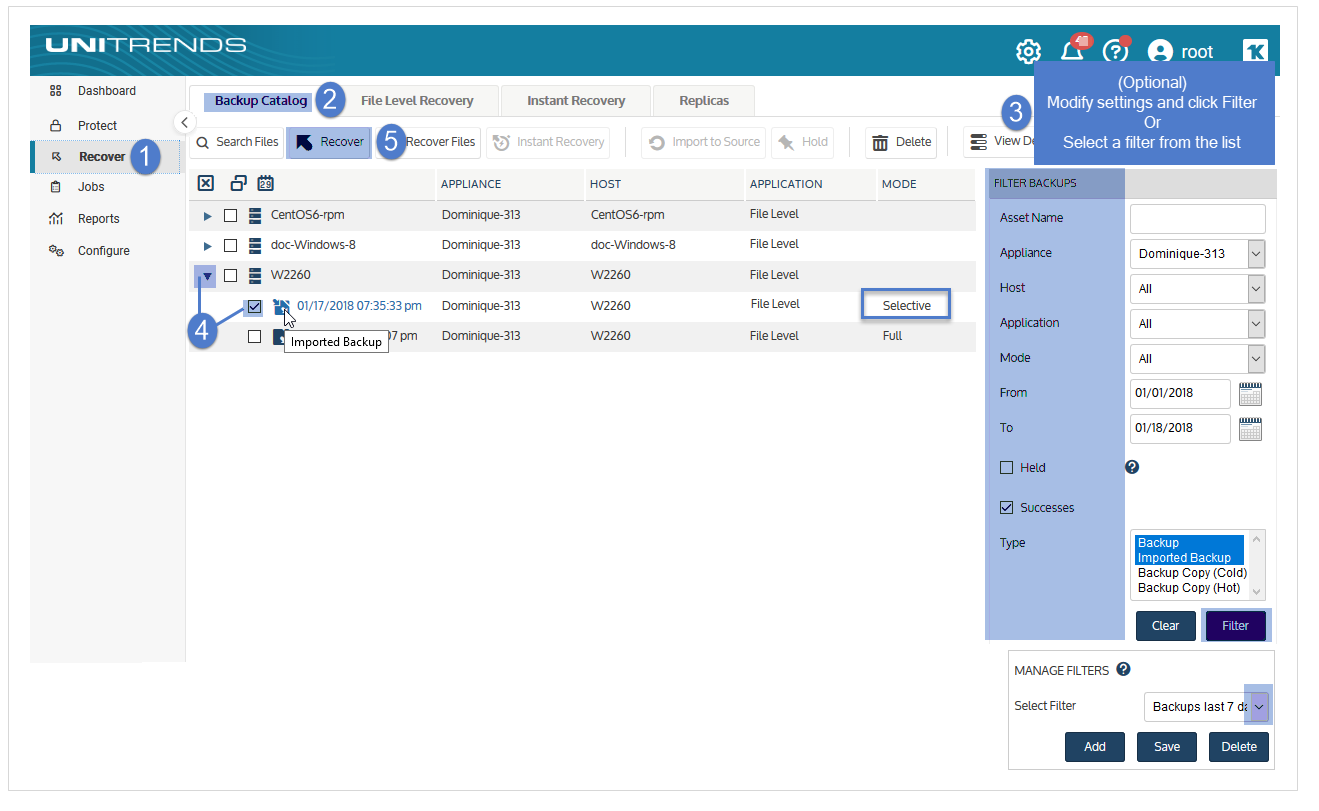
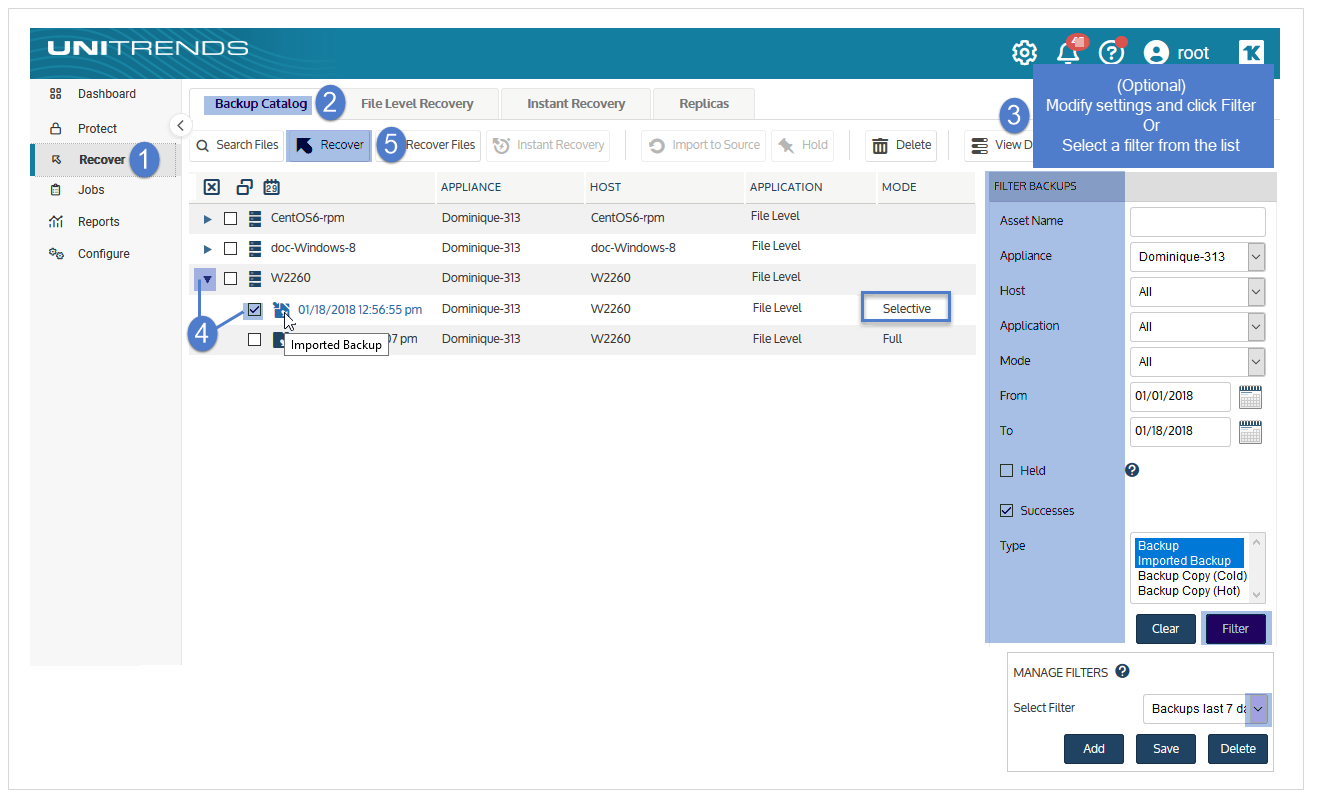
1. Select Recover and click the Backup Catalog tab.
(Optional) Use Filter Backups to the right to customize the backups that display. For details, see Working with custom filters.
2. Expand the asset and select the imported backup copy to use for the recovery.
To locate the files you imported, check the date and time, and look for an imported backup whose Mode is Selective.
3. Click Recover.
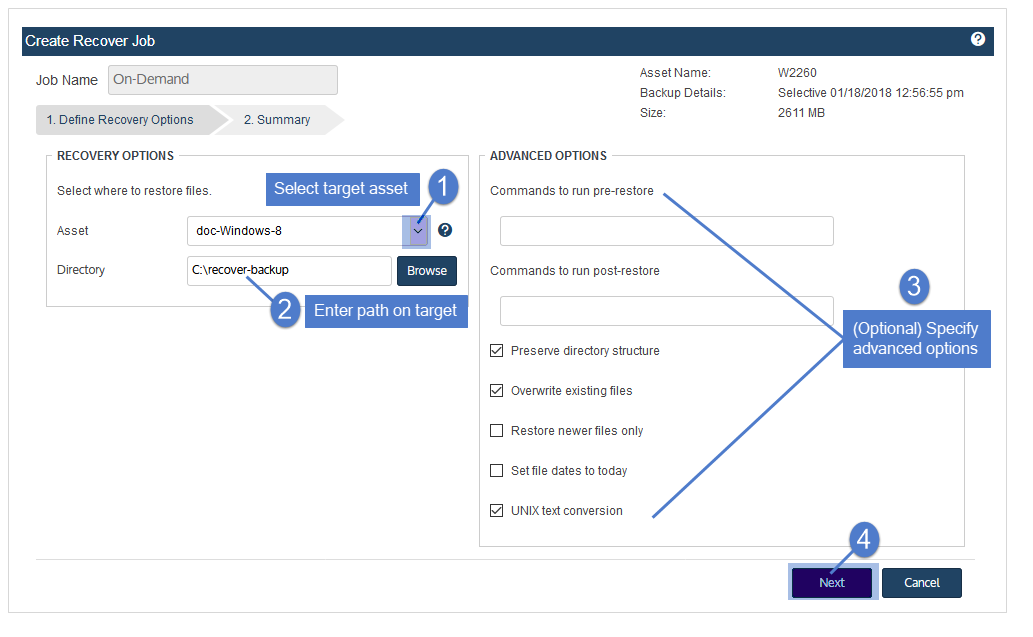
4. Select an Asset. Choose from the agent-based assets that have been added to this appliance.
5. (Optional) Enter a Directory path or click Browse and select a Directory path from the drop-down list.
● If the directory does not exist, the job creates it on the target asset.
● Leave the Directory field empty to recover files to their original location.
6. (Optional) Specify Advanced Options.
|
Option |
Description |
|---|---|
|
Commands to run pre-restore |
To run a command or script on the asset before the recovery, enter the full path to the command or script in the Commands to run pre-restore field. For example, C:\Data\script.bat or /usr/jsmith/script.sh. |
|
Commands to run post-restore |
To run a command or script on the asset after the recovery, enter the full path to the command or script in the Commands to run post-restore field. For example, C:\Data\script.bat or /usr/jsmith/script.sh. |
|
Preserve directory structure |
Check this box to preserve the existing file structure within the target directory. NOTE To recover the file(s) to the original location, Preserve Directory Structure must be selected. If you attempt to recover to the original location and uncheck this box, the recovery fails. |
|
Overwrite existing files |
If this box is checked, files in the Target Directory may be overwritten. (See Overwrite existing files and Restore newer files only options for details.) This is useful if you are recovering an updated version of a document and only want the most up to date version. |
|
Restore newer files only |
Check this box to recover a file only if its date is newer than the existing version in the Target Directory. (See Overwrite existing files and Restore newer files only options for details.) If the file does not exist in the Target Directory, the file is recovered. |
|
Set file dates to today |
Check this box to update the recovered files with the recover date and time. If not checked, file dates are not updated during the recovery. |
|
UNIX text conversion |
When recovering UNIX Text files to MS-DOS systems, checking this option prevents new lines from being converted to CR-LF. |
This table describes how Overwrite existing files and Restore newer files only work if the file exists in the Target Directory.
|
Option selected? |
Recovery behavior |
|
|---|---|---|
|
Windows backup |
Non-Windows backup |
|
|
Overwrite existing files = Yes |
Recovers the file and overwrites the existing file. |
● If the file to recover is newer than the one in the Target Directory, recovers the file and overwrites the existing file. ● If the file to recover is older than the one in the Target Directory, does not recover the file. |
|
Overwrite existing files = Yes |
Recovers the file and overwrites the existing file. |
Recovers the file and overwrites the existing file. |
|
Overwrite existing files = No |
Does not recover the file. |
Does not recover the file. |
7. Click Next.

8. Review settings and click Save.
9. Click OK to close the Information message.
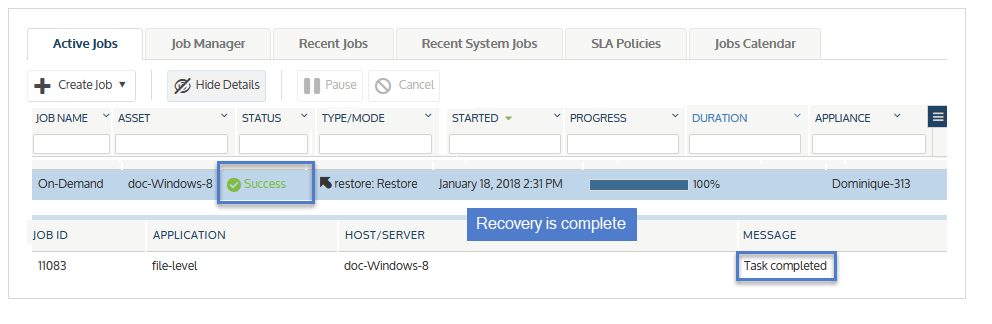
10. To monitor the recovery job:
● Select Jobs > Active Jobs.
● Select the job in the list and click View Details.
● The recovery is complete when the job's status changes to Success.
11. Access the recovered files on the recovery target.
NOTE Windows assets – Files that are locked because they are in use in the location where you are performing the restore (system files, database files, etc.) cannot be restored while the system is live. During recovery, these files are moved to a temporary location and an entry is added into the registry telling Windows to restore the files to their actual final location on the next boot.
By using Recover Files, you can browse a cold backup copy and select specific files to recover. The appliance creates and imports a selective backup containing the files you have picked. Once this backup has been imported, you recover the imported backup.
Recover Files enables you to browse a cold backup copy that currently resides on the cold backup copy target. Verify the following before starting this procedure:
● The backup copy target is connected. To check this:
● On the Configure > Appliances page, select the source backup appliance.
● Click the Backup Copy Targets tab below.
● (If needed) Click Scan For Media. The target displays in Offline status.
● If you are using removable media, the tape(s) or disk(s) where the files are stored must be loaded in the target.
Use these procedures to browse the contents of one cold backup copy and recover selected files.
NOTE The file browser contains the backup copy you select plus all dependent data in the backup group. For example, selecting an incremental enables you to browse the incremental plus its parent full and any other dependent incrementals in the chain. (For details, see Backup groups.)
Find, select, and import files
1. Log in to the backup appliance.
2. Select Recover and click the Backup Catalog tab.
3. Use Filter Backups to the right to display cold backup copies:
● In the Type box, select Backup Copy (Cold).
● Select other filter options as desired. For details, see Working with custom filters.
● Click Filter.
4. Expand the asset and select a backup copy to use for the recovery.
5. Click Recover Files.
6. Select or drag files and/or directories to recover.
7. Click Next.
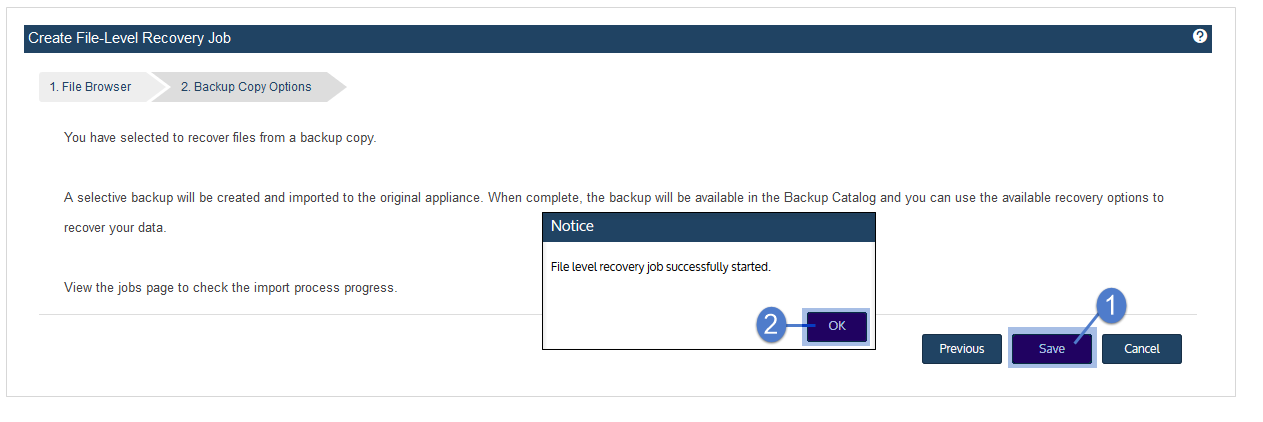
8. You see a message indicating that a selective backup will be created and imported to the appliance. Click Save to continue.
9. The recovery starts. Click OK to close the Notice message.
10. To monitor progress of the import:
● Select Jobs > Active Jobs.
● Select the job in the list and click View Details.
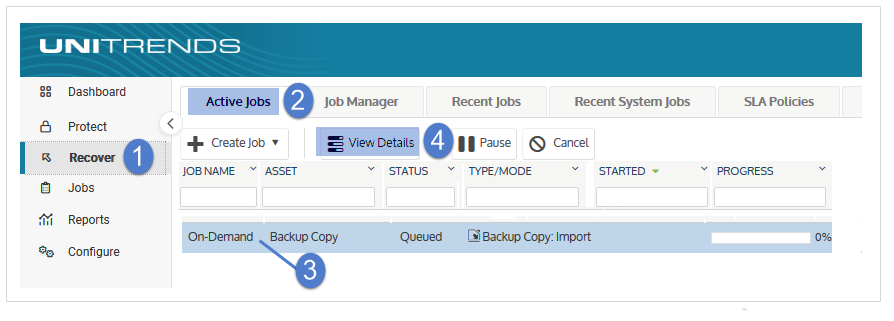
11. The import is complete when the job's status changes to Success.
12. Once the import is complete, proceed to the next procedure to recover the imported files.
Recover imported files
1. Select Recover and click the Backup Catalog tab.
(Optional) Use Filter Backups to the right to customize the backups that display. For details, see Working with custom filters.
2. Expand the asset and select the imported backup copy to use for the recovery.
To locate the files you imported, check the date and time, and look for an imported backup whose Mode is Selective.
3. Click Recover.
4. Select an Asset. Choose from the agent-based assets that have been added to this appliance.
5. (Optional) Enter a Directory path or click Browse and select a Directory path from the drop-down list.
● If the directory does not exist, the job creates it on the target asset.
● Leave the Directory field empty to recover files to their original location.
6. (Optional) Specify Advanced Options.
|
Option |
Description |
|---|---|
|
Commands to run pre-restore |
To run a command or script on the asset before the recovery, enter the full path to the command or script in the Commands to run pre-restore field. For example, C:\Data\script.bat or /usr/jsmith/script.sh. |
|
Commands to run post-restore |
To run a command or script on the asset after the recovery, enter the full path to the command or script in the Commands to run post-restore field. For example, C:\Data\script.bat or /usr/jsmith/script.sh. |
|
Preserve directory structure |
Check this box to preserve the existing file structure within the target directory. NOTE To recover the file(s) to the original location, Preserve Directory Structure must be selected. If you attempt to recover to the original location and uncheck this box, the recovery fails. |
|
Overwrite existing files |
If this box is checked, files in the Target Directory may be overwritten. (See Overwrite existing files and Restore newer files only options for details.) This is useful if you are recovering an updated version of a document and only want the most up to date version. |
|
Restore newer files only |
Check this box to recover a file only if its date is newer than the existing version in the Target Directory. (See Overwrite existing files and Restore newer files only options for details.) If the file does not exist in the Target Directory, the file is recovered. |
|
Set file dates to today |
Check this box to update the recovered files with the recover date and time. If not checked, file dates are not updated during the recovery. |
|
UNIX text conversion |
When recovering UNIX Text files to MS-DOS systems, checking this option prevents new lines from being converted to CR-LF. |
This table describes how Overwrite existing files and Restore newer files only work if the file exists in the Target Directory.
|
Option selected? |
Recovery behavior |
|
|---|---|---|
|
Windows backup |
Non-Windows backup |
|
|
Overwrite existing files = Yes |
Recovers the file and overwrites the existing file. |
● If the file to recover is newer than the one in the Target Directory, recovers the file and overwrites the existing file. ● If the file to recover is older than the one in the Target Directory, does not recover the file. |
|
Overwrite existing files = Yes |
Recovers the file and overwrites the existing file. |
Recovers the file and overwrites the existing file. |
|
Overwrite existing files = No |
Does not recover the file. |
Does not recover the file. |
7. Click Next.
8. Review settings and click Save.
9. Click OK to close the Information message.
10. To monitor the recovery job:
● Select Jobs > Active Jobs.
● Select the job in the list and click View Details.
● The recovery is complete when the job's status changes to Success.
11. Access the recovered files on the recovery target.
NOTE Windows assets – Files that are locked because they are in use in the location where you are performing the restore (system files, database files, etc.) cannot be restored while the system is live. During recovery, these files are moved to a temporary location and an entry is added into the registry telling Windows to restore the files to their actual final location on the next boot.
Run the these procedures from the backup copy target appliance to recover hot backup copies that are stored on that appliance. Before you start, verify that a recovery target is available. You must recover to an agent-based asset that has been added to this target appliance. (The asset must have a Unitrends agent installed and must display on the appliance's Protected Assets tab.) If necessary, add the target asset as described in To add an agent-based asset.
NOTE To recover hot backup copies that reside in the Unitrends Cloud, see Recover from hot backup copies by running procedures on the source appliance.
Use this procedure to browse the contents of one backup copy and recover selected files.
NOTE The file browser contains the backup copy you select plus all dependent data in the backup group. For example, selecting an incremental enables you to browse the incremental plus its parent full and any other dependent incrementals in the chain. (For details, see Backup groups.)
1. Log in to the backup copy target appliance.
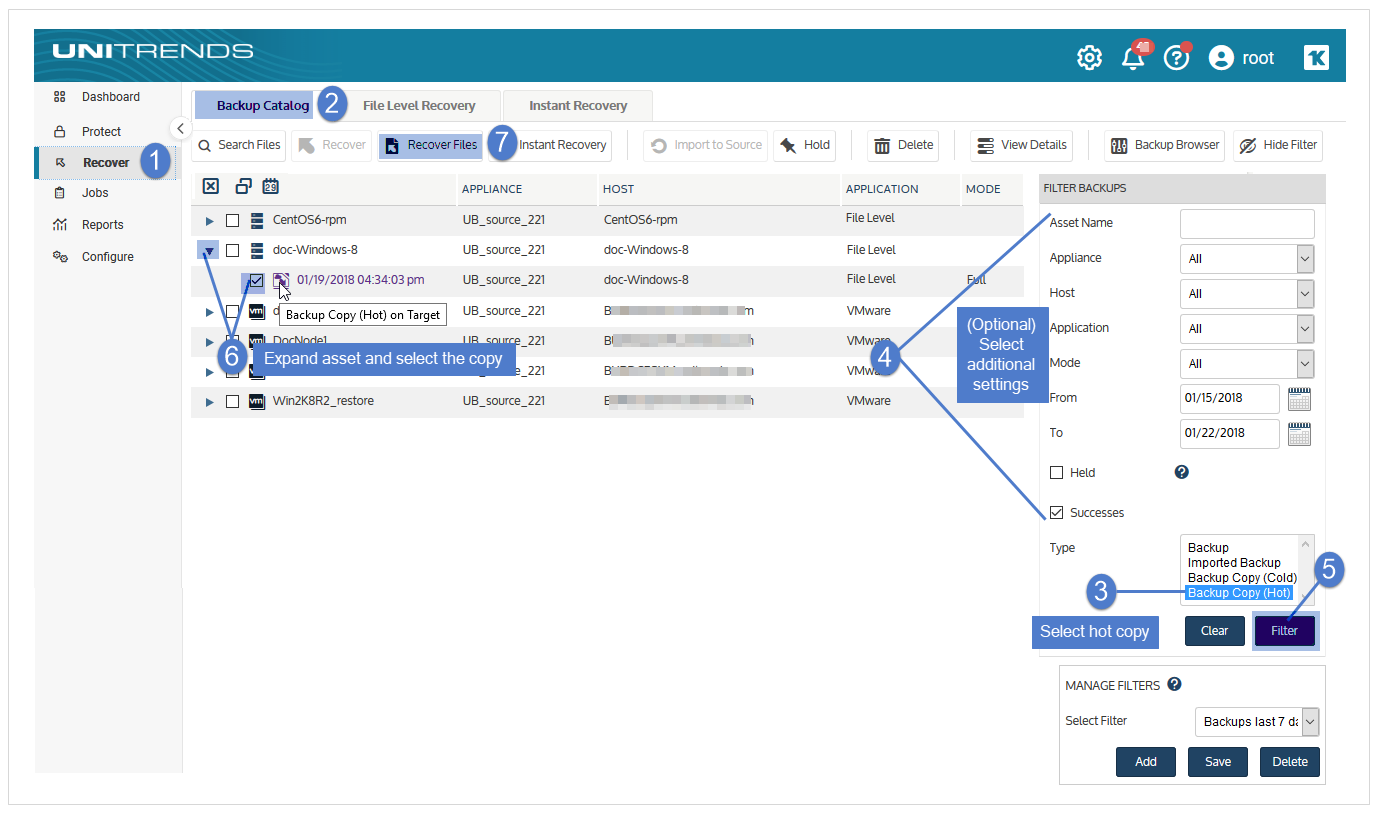
2. Select Recover and click the Backup Catalog tab.
3. Use Filter Backups to display hot backup copies:
● In the Type box, select Backup Copy (Hot).
● Select other filter options as desired. For details, see Working with custom filters.
● Click Filter.
4. Expand the asset and select a hot backup copy to use for the recovery.
5. Click Recover Files.

6. In the File Browser, expand folders to view items in the backup copy.
7. Select or drag files and/or directories to recover.
8. Click Next.
9. Select an Asset. Choose from the agent-based assets that have been added to this appliance.
10. (Optional) Enter a Directory path or click Browse and select a Directory path from the drop-down list.
● If the directory does not exist, the job creates it on the target asset.
● Leave the Directory field empty to recover files to their original location.
11. (Optional) Specify Exclusions.
12. (Optional) Specify Advanced Options.
|
Option |
Description |
|---|---|
|
Commands to run pre-restore |
To run a command or script on the asset before the recovery, enter the full path to the command or script in the Commands to run pre-restore field. For example, C:\Data\script.bat or /usr/jsmith/script.sh. |
|
Commands to run post-restore |
To run a command or script on the asset after the recovery, enter the full path to the command or script in the Commands to run post-restore field. For example, C:\Data\script.bat or /usr/jsmith/script.sh. |
|
Preserve directory structure |
Check this box to preserve the existing file structure within the target directory. NOTE To recover the file(s) to the original location, Preserve Directory Structure must be selected. If you attempt to recover to the original location and uncheck this box, the recovery fails. |
|
Overwrite existing files |
If this box is checked, files in the Target Directory may be overwritten. (See Overwrite existing files and Restore newer files only options for details.) This is useful if you are recovering an updated version of a document and only want the most up to date version. |
|
Restore newer files only |
Check this box to recover a file only if its date is newer than the existing version in the Target Directory. (See Overwrite existing files and Restore newer files only options for details.) If the file does not exist in the Target Directory, the file is recovered. |
|
Set file dates to today |
Check this box to update the recovered files with the recover date and time. If not checked, file dates are not updated during the recovery. |
|
UNIX text conversion |
When recovering UNIX Text files to MS-DOS systems, checking this option prevents new lines from being converted to CR-LF. |
This table describes how Overwrite existing files and Restore newer files only work if the file exists in the Target Directory.
|
Option selected? |
Recovery behavior |
|
|---|---|---|
|
Windows backup |
Non-Windows backup |
|
|
Overwrite existing files = Yes |
Recovers the file and overwrites the existing file. |
● If the file to recover is newer than the one in the Target Directory, recovers the file and overwrites the existing file. ● If the file to recover is older than the one in the Target Directory, does not recover the file. |
|
Overwrite existing files = Yes |
Recovers the file and overwrites the existing file. |
Recovers the file and overwrites the existing file. |
|
Overwrite existing files = No |
Does not recover the file. |
Does not recover the file. |
13. Click Save.
14. Click OK to close the Notice message.
15. To monitor the recovery job:
● Select Jobs > Active Jobs.
● Select the job in the list and click View Details.
● The recovery is complete when the job's status changes to Success.

16. Access the recovered files on the recovery target.
NOTE Windows assets – Files that are locked because they are in use in the location where you are performing the restore (system files, database files, etc.) cannot be restored while the system is live. During recovery, these files are moved to a temporary location and an entry is added into the registry telling Windows to restore the files to their actual final location on the next boot.
NOTE This procedure recovers the backup copy you select, plus all dependent data in the backup group. For example, recovering an incremental also recovers its parent full and any other dependent incrementals in the chain. (For details, see Backup groups.)
1. Log in to the backup copy target appliance.
2. Select Recover and click the Backup Catalog tab.
3. Use Filter Backups to the right to display hot backup copies:
● In the Type box, select Backup Copy (Hot).
● Select other filter options as desired. For details, see Working with custom filters.
● Click Filter.
4. Expand the asset and select a hot backup copy to use for the recovery.
5. Click Recover.

6. Select an Asset. Choose from the agent-based assets that have been added to this appliance.
7. (Optional) Enter a Directory path or click Browse and select a Directory path from the drop-down list.
● If the directory does not exist, the job creates it on the target asset.
● Leave the Directory field empty to recover files to their original location.
8. (Optional) Specify Advanced Options.
|
Option |
Description |
|---|---|
|
Commands to run pre-restore |
To run a command or script on the asset before the recovery, enter the full path to the command or script in the Commands to run pre-restore field. For example, C:\Data\script.bat or /usr/jsmith/script.sh. |
|
Commands to run post-restore |
To run a command or script on the asset after the recovery, enter the full path to the command or script in the Commands to run post-restore field. For example, C:\Data\script.bat or /usr/jsmith/script.sh. |
|
Preserve directory structure |
Check this box to preserve the existing file structure within the target directory. NOTE To recover the file(s) to the original location, Preserve Directory Structure must be selected. If you attempt to recover to the original location and uncheck this box, the recovery fails. |
|
Overwrite existing files |
If this box is checked, files in the Target Directory may be overwritten. (See Overwrite existing files and Restore newer files only options for details.) This is useful if you are recovering an updated version of a document and only want the most up to date version. |
|
Restore newer files only |
Check this box to recover a file only if its date is newer than the existing version in the Target Directory. (See Overwrite existing files and Restore newer files only options for details.) If the file does not exist in the Target Directory, the file is recovered. |
|
Set file dates to today |
Check this box to update the recovered files with the recover date and time. If not checked, file dates are not updated during the recovery. |
|
UNIX text conversion |
When recovering UNIX Text files to MS-DOS systems, checking this option prevents new lines from being converted to CR-LF. |
This table describes how Overwrite existing files and Restore newer files only work if the file exists in the Target Directory.
|
Option selected? |
Recovery behavior |
|
|---|---|---|
|
Windows backup |
Non-Windows backup |
|
|
Overwrite existing files = Yes |
Recovers the file and overwrites the existing file. |
● If the file to recover is newer than the one in the Target Directory, recovers the file and overwrites the existing file. ● If the file to recover is older than the one in the Target Directory, does not recover the file. |
|
Overwrite existing files = Yes |
Recovers the file and overwrites the existing file. |
Recovers the file and overwrites the existing file. |
|
Overwrite existing files = No |
Does not recover the file. |
Does not recover the file. |
9. Click Next.
10. Review settings and click Save.
11. Click OK to close the Information message.
12. To monitor the recovery job:
● Select Jobs > Active Jobs.
● Select the job in the list and click View Details.
● The recovery is complete when the job's status changes to Success.
13. Access the recovered files on the recovery target.
NOTE Windows assets – Files that are locked because they are in use in the location where you are performing the restore (system files, database files, etc.) cannot be restored while the system is live. During recovery, these files are moved to a temporary location and an entry is added into the registry telling Windows to restore the files to their actual final location on the next boot.
From the source appliance, you can recover hot backup copies that reside in the Unitrends Cloud or that reside on a target appliance. The recovery procedures either import the backup copy to the source appliance or recover files directly from the backup copy on the target.
To recover an entire backup copy, you must first import the backup copy to the source backup appliance. Once the backup copy has been imported, recover from the imported backup copy by using the Recover from backups or imported backup copies procedures. For details on importing a backup copy, see To import a hot backup copy.
To recover files from backup copies that reside in the Unitrends Cloud or reside on a target appliance, run these procedures from the source backup appliance:
Use this procedure to browse a file-level backup copy and recover selected files.
NOTE The file browser contains the backup copy you select plus all dependent data in the backup group. For example, selecting an incremental enables you to browse the incremental plus its parent full and any other dependent incrementals in the chain. (For details, see Backup groups.)
1. Log in to the source backup appliance.
2. Select Recover and click the Backup Catalog tab.
3. Use Filter Backups to the right to display hot backup copies:
● In the Type box, select Backup Copy (Hot).
● Select other filter options as desired. For details, see Working with custom filters.
● Click Filter.
4. Expand the asset and select a Backup Copy (Hot) on Target to use for the recovery.
To be certain you are viewing a backup copy that resides on the target appliance or in the Unitrends Cloud, hover over the backup copy icon and verify the description that displays is Backup Copy (Hot) on Target.
5. Click Recover Files.
6. In the File Browser, expand folders to view items in the backup copy.
7. Select or drag files and/or directories to recover.
NOTE Softlinks (also called symbolic links) are excluded from download. If you select a directory that contains files and softlinks, only the files are downloaded.
8. Click Save.
9. The message Starting File Level Recovery on the Target displays, indicating that the recovery has started.
10. To verify that the download starts, leave the message dialog open and view the status messages. Job status changes from Queued to Active to Downloading.
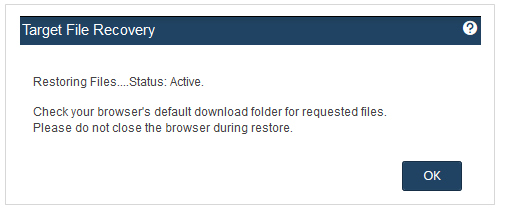
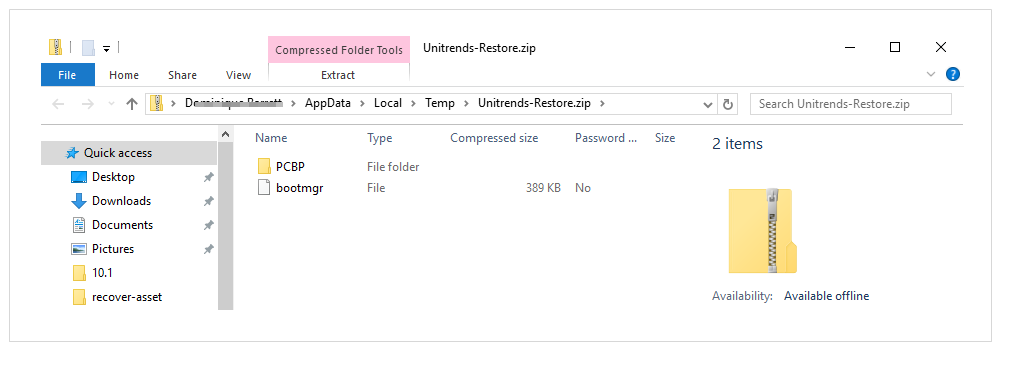
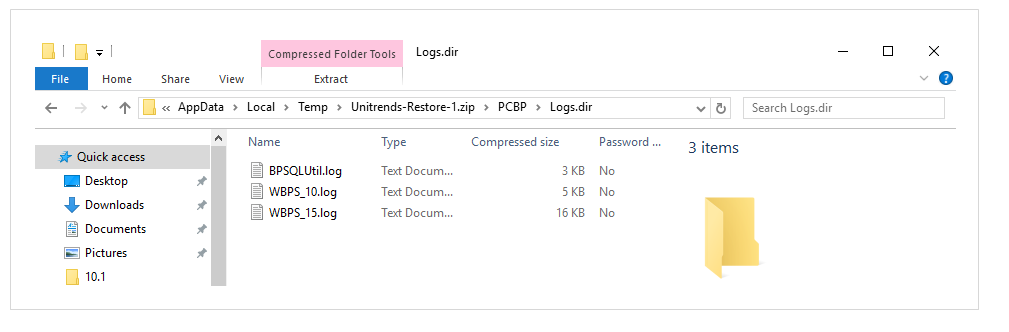
11. A .zip file containing the recovered files is placed in the default download location of the browser where the source appliance UI is running.
12. When the download completes, the Unitrends-Restore.zip file displays in the browser. Open the .zip file to access the recovered files.
NOTES
● The duration of the download is impacted by various factors, such as the size of the files, bandwidth, and download speed.
● Persistent browser and UI sessions are required to create the .zip file in the browser's default download location. If you close the browser or UI session during the recovery, you must run a new job.

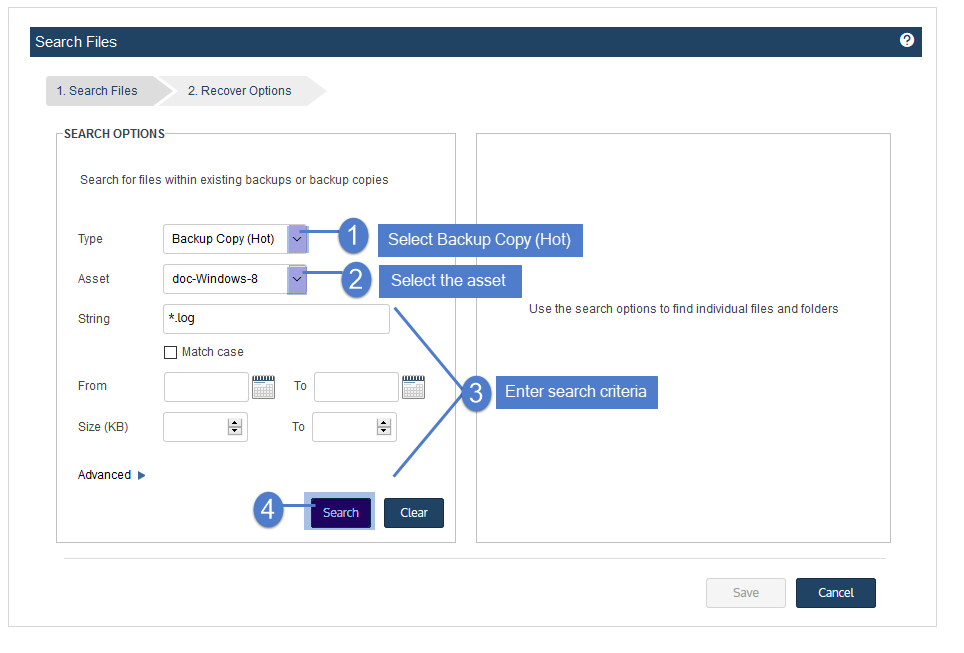
Use this procedure to search an asset's backup copies for files that meet specified criteria and recover selected files from the search results.
1. Log in to the source backup appliance.
2. Click Recover > Backup Catalog > Search Files.
3. Select Backup Copy (Hot) from the Type list.
4. Select the Asset whose hot backup copies will be searched.
NOTES
● The Asset list contains all assets whose backups are being copied to one or more hot backup copy targets. The hot backup copy target displays in parenthesis next to the asset name. If an asset is copying to more than one hot target, the list contains an entry for each. Be sure to select the correct asset and target in the list.
● Multi-target example:
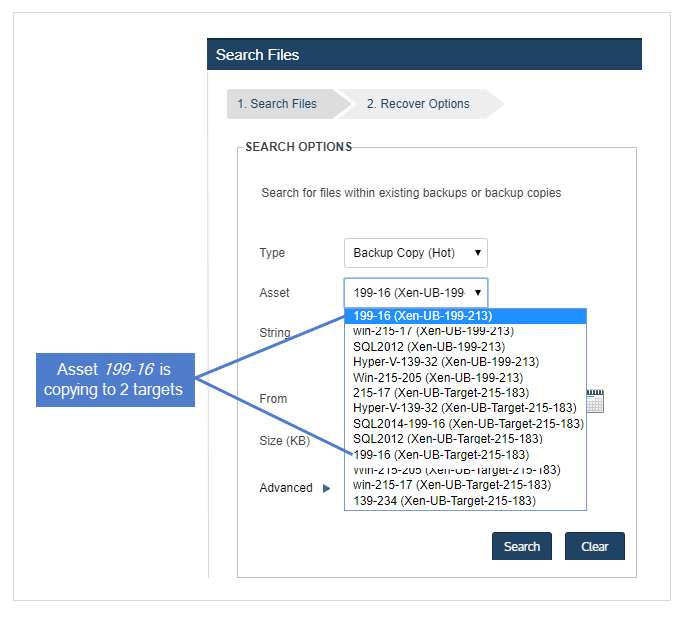
5. Enter one or more search options:
|
Search Options |
Description |
|---|---|
|
String |
Enter text to search. The wildcard character * is supported. |
|
Match Case |
Select to match the letter case of the entered string. |
|
From/To |
Use to search for files that were last modified within the specified date range. Results do not include files modified on the From or To date. |
|
Size |
Use to search for files that meet this size criteria. |
|
Advanced |
Click to search using a regular expression. |
6. Click Search.
All hot backup copies of this asset are searched for matching files.
7. In the results list, click to select files to recover.
NOTES
● All files you select must be from a single backup. Check the Backup ID to determine a file's backup. If you select files from multiple backups, the Save button becomes disabled.
● Softlinks cannot be downloaded and are not included in the search results.
8. Click Save.
9. The message Starting File Level Recovery on the Target displays, indicating that the recovery has started.
10. To verify that the download starts, leave the message dialog open and view the status messages. Job status changes from Queued to Active to Downloading.
11. A .zip file containing the recovered files is placed in the default download location of the browser where the source appliance UI is running.
12. When the download completes, the Unitrends-Restore.zip file displays in the browser. Open the .zip file to access the recovered files.
NOTES
● The duration of the download is impacted by various factors, such as the size of the files, bandwidth, and download speed.
● Persistent browser and UI sessions are required to create the .zip file in the browser's default download location. If you close the browser or UI session during the recovery, you must run a new job.
Active Directory (AD) database and SYSVOL backups are included with the system state in Windows file-level backups. To recover AD information from a file-level backup, special steps are needed. Use this procedure:
1. Boot the AD server into Directory Service Restore Mode.
2. Recover the last incremental or full backup to the AD server as described in To recover an entire file-level backup by using the Backup Catalog.
The Unitrends agent performs a non-authoritative restore of the AD database.
3. You can proceed with authoritative restore by using the ntdsutil.exe command. Follow the best practices around Active Directory Authoritative restores described in the Active Directory Domain Services Operations Guide at https://msdn.microsoft.com/en-us/library/bb727048.aspx.
NOTE In certain circumstances, you may wish to recover NTDS or SYSVOL files for a domain controller to an alternate location, and then use Microsoft Utilities to recover from these restored files. You can recover system files to an alternate SystemState.dir location while Active Directory is running without recovering the entire backup. Use the procedure To browse one file-level backup and recover files by using the Backup Catalog.
On Windows servers where the cluster service is active, the cluster database is included with the system state in Windows file-level backups.
A cluster database only needs to be recovered if all nodes in a cluster lose their copy of the database. (If just one node loses the database, the lost database will be restored from another node in the cluster.)
If you need to recover the cluster database, use these steps:
1. Recover the Windows file-level backup as described in To recover an entire file-level backup by using the Backup Catalog.
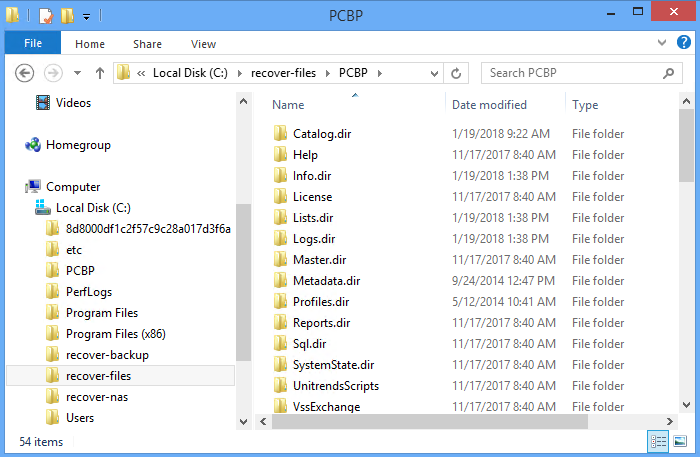
2. The cluster database (CLUSDB) is recovered to C:/PCBP/SystemState.dir. (The exact path may differ if the Unitrends agent was installed to a directory other than the default).
3. From the PCBP directory on the Windows server, run the utility cdrestore.bat to recover the cluster database. If a cluster database file exists in C:/PCBP/SystemState.dir, the utility shows the date that the database was recovered and prompts you to ensure that the Cluster Service (ClusSvc) is stopped on all nodes of the cluster before continuing.
4. Press y to continue. The database is recovered. (If the first attempt to restore the database fails, the utility displays the steps required to clear the existing clustering hive from the registry hive so that the database file may be restored. )
5. After the database has been recovered, restart the cluster service.


