Recovering a virtual machine
Virtual machine recovery enables you to recover VMs running any operating system. This method restores the entire VM and associated metadata with the configured peripherals, from any given Unitrends recovery point. The appliance uses the backup or backup copy to recreate the VM on the recovery target. The recovery target can be the original VM's host or an alternate host.
You select the backup or backup copy to use for the recovery. With an incremental backup, the appliance uses all dependent backups in the group to recreate the VM.
Recovery time depends on various factors, such as the amount of data on the VM and other tasks running on the appliance. For example, recovering an incremental that has a long chain of dependent incrementals can take extra time.
Unitrends supports recovery of VMware, Hyper-V, AHV, and XenServer virtual machines. You can recover the VM to the original host or to another host that has been added to the backup appliance. If necessary, add the target host as described in Adding a virtual host before recovering a VM.
Review the following information on recovering VMware VMs:
| • | The target ESXi host must be added to the appliance as an asset. See Adding a virtual host. |
| • | The VM must be recovered to an ESXi host running the same version as the original host, or to a higher supported version listed in the Compatibility and Interoperability Matrix. |
| • | The target ESXi host must support the operating system (OS) of the VM you are recovering. (See the VMware documentation for details.) For example, you cannot recover a Windows 2016 VM to ESXi 5.1. |
| • | The target ESXi host must have sufficient space and compute resources for the new VM. |
| • | A recovered VM is configured with the latest hardware version supported by the target ESXi host. |
| • | A recovered VMware VM is created with the following default name: <original_VM_name>_restore. You can edit this name when you create the recover job. |
| • | Any virtual-mode raw device mapping (RDM) disks recover as standard virtual disks. |
Review the following information on recovering Hyper-V VMs:
| • | The target Hyper-V host must be added to the appliance as an asset. See Adding a virtual host. |
| • | The VM must be recovered to a Hyper-V host running the same version as the original host, or to a higher supported version listed in the Compatibility and Interoperability Matrix. |
| • | The target Hyper-V host must support the operating system (OS) of the VM you are recovering. (See the Hyper-V documentation for details.) For example, you cannot recover a Windows 2016 VM to Hyper-V 2008 R2. |
| • | The target Hyper-V host must have sufficient space and compute resources for the new VM. |
| • | A recovered VM is configured with the latest hardware generation version supported by the target Hyper-V host. |
| • | A recovered VM's configuration version matches that of the source Hyper-V backup used for the recovery. |
| • | A recovered Hyper-V VM is created with the same name as the original VM and no suffix. Due to Hyper-V limitations, it is not possible to rename the VM during the recovery. |
| • | VMs are uniquely identified by GUID (not by VM name), and VMs are recovered with the same GUID as the VM that was backed up. (A recovered VMs GUID matches that of the source Hyper-V backup used for the recovery.) |
| • | If the recovery target is hosting a VM with the same GUID as the one that is being recovered, the original VM is overwritten by the recovery operation. |
| • | If the recovery target is hosting a VM with the same name but a different GUID as the one that is being recovered, the original VM is not overwritten by the recovery operation. Once the recovery operation completes, the host has two VMs with the same name (but different GUIDs). |
| • | VM configured with the Hyper-V native replication feature – Native replication settings may not be recovered. After recovery, use Hyper-V Manager to check whether replication settings were recovered. If not, delete any existing replica VM from the replica server and re-enable replication for the recovered VM on the primary server. |
Review the following information on recovering AHV VMs:
| • | The target AHV host cluster must be added to the appliance as an asset. See Adding a virtual host. |
| • | Unitrends recommends recovering to an AHV cluster that is running the same version as the original cluster (but you can recover to a higher supported version listed in the Compatibility and Interoperability Matrix if necessary). |
| • | The target AHV host cluster must support the operating system (OS) of the VM you are recovering. (See this Nutanix document for details: Supported Guest VM Types for AHV.) |
| • | The target AHV host cluster must have sufficient space and compute resources for the new VM. |
| • | AHV recovery jobs access the target AHV host over the iSCSI protocol. The Unitrends appliance must be able to connect to the iSCSI targets on the Nutanix storage LAN. |
| • | A recovered AHV VM is created with the following default name: <original_VM_name>_restore. You can edit this name when you create the recover job. |
| • | VMs are uniquely identified by UUID (not by VM name). VMs are recovered with a new UUID. A recovered VMs UUID does not match that of the source AHV backup used for the recovery. |
| • | If the recovery target is hosting a VM with the same name as the one that is being recovered, the original VM is not overwritten by the recovery operation. Once the recovery operation completes, the host has two VMs with the same name (but different UUIDs). |
Review the following information on recovering XenServer VMs:
| • | The target XenServer host must be added to the appliance as an asset. See Adding a virtual host. |
| • | Unitrends recommends recovering to a XenServer host that is running the same version as the original host (but you can recover to a higher supported version listed in the Compatibility and Interoperability Matrix if necessary). |
| • | The target XenServer host must support the operating system (OS) of the VM you are recovering. (See the Citrix XenServer documentation for details.) |
| • | The target XenServer host must have sufficient space and compute resources for the new VM. |
| • | A recovered XenServer VM is created with the following default name: <original_VM_name>_restore. You can edit this name when you create the recover job. |
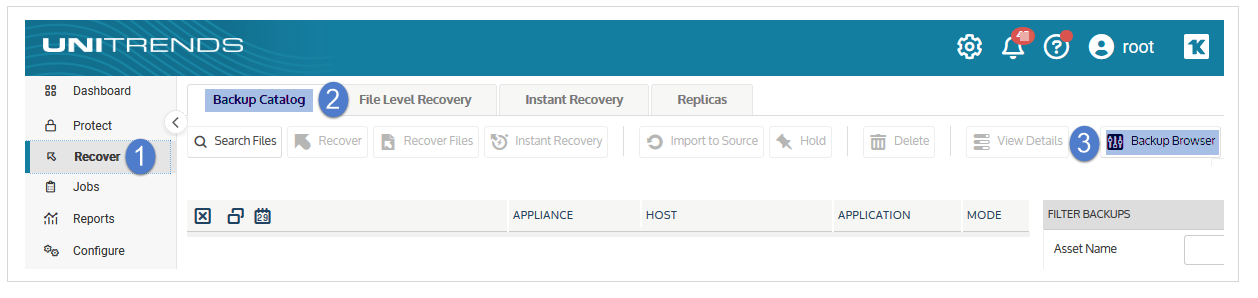
To perform the recovery, you will start by selecting a backup or backup copy. For backups, you can do this in the Backup Catalog or in the Backup Browser. For backup copies and imported backups, you must use the Backup Catalog.
In the Backup Catalog, backups and backup copies display under the protected asset. You can modify the display by entering filter criteria. Expand an asset to view its backups and backup copies:

The Backup Browser provides advanced search and filter options. Backups are not grouped under the protected asset. Search for backups by selecting an appliance and date range. Filter the display by entering text in the column fields. Click an arrow to sort by column:

For more on working with these features, see Backup Catalog tab.
To recover a VM, use one of these procedures:
Use this procedure to recover an entire virtual machine by using the Backup Catalog.
| 1 | Log in to the backup appliance or target appliance (if recovering from a hot backup copy). |
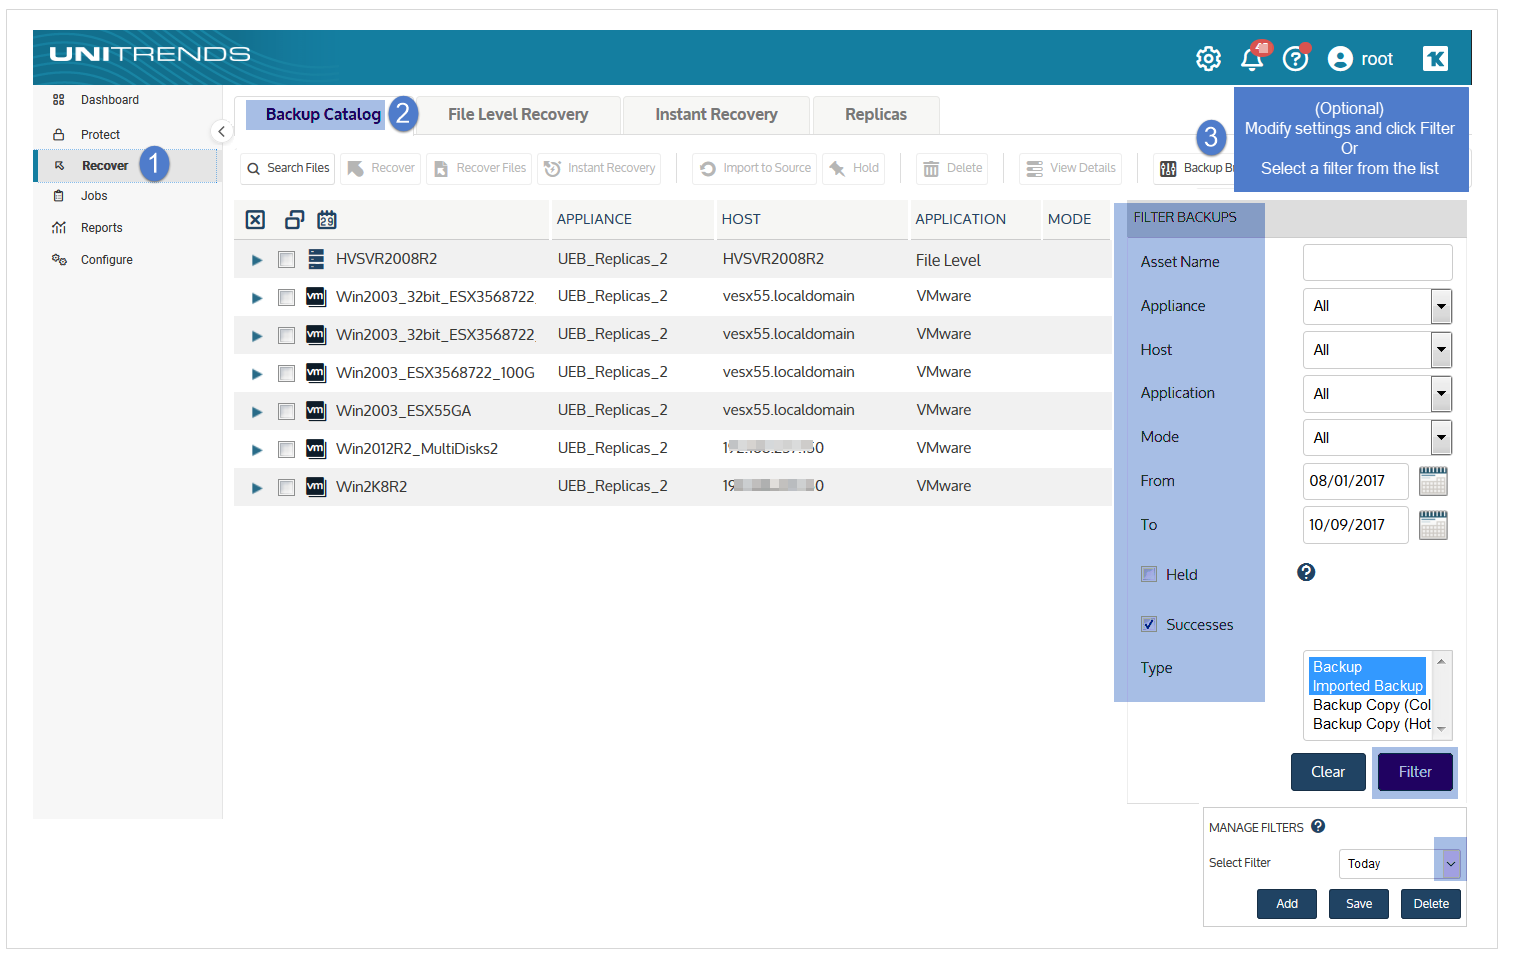
| 2 | Select Recover and click the Backup Catalog tab. |
| 3 | Locate the backup to use for the recovery |
(Optional) Use Filter Backups to the right to customize the backups that display. For details, see Working with custom filters.
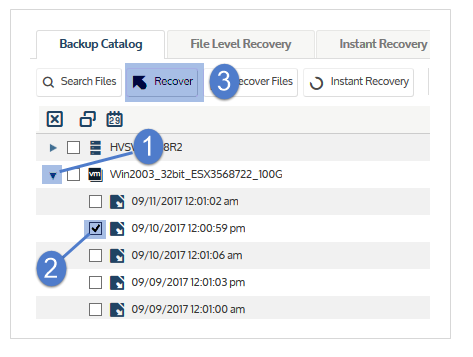
| 4 | Expand the VM asset and select one of the following to use for the recovery: |
| • | A host-level backup. |
| • | An imported host-level backup copy. (To import a backup copy, see To import a cold backup copy or To import a hot backup copy.) |
| • | A hot backup copy (supported if performing the recovery on the target appliance where the hot copy resides). |
| 5 | Click Recover. |
| 6 | Select these Recovery Options: |
|
Recovery Options |
Description |
||||||
|---|---|---|---|---|---|---|---|
|
Target Location |
Select the host where the VM will be recovered. The list contains hosts that have been added to the appliance and are compatible with the VM being recovered. Incompatible hosts do not display in the list.
|
||||||
|
Target Resource |
(Optional) Select a resource pool. This field displays only if the Target Location is an ESXi host that has resource pools. |
||||||
|
Target Storage |
Select a datastore (ESXi host), a volume (Hyper-V host), a storage container (AHV host), or a Storage Repository (XenServer host). |
||||||
|
Recover excluded disk metadata |
(Optional) Check this box to recover the metadata for disks that were excluded from the backup. |
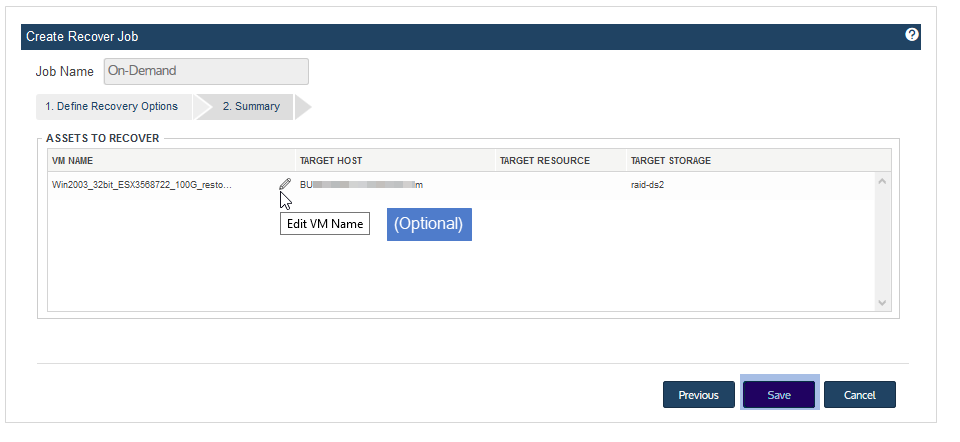
| 7 | Click Next. |

A summary of the selected recovery options display.
| 8 | (Optional) Modify the VM Name by clicking it in the Assets to Recover list and entering a new name. (Supported for VMware, AHV, and XenServer only.) |
| 9 | Click Save. The job is queued immediately. |
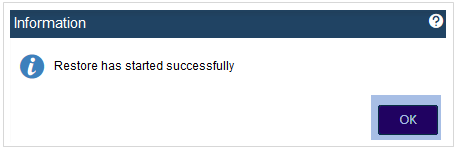
| 10 | Click OK to close the Information message. |
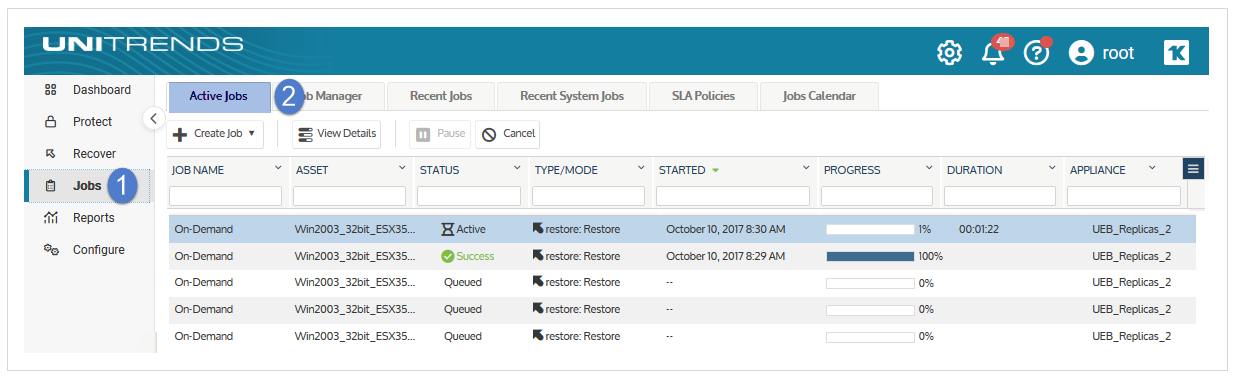
| 11 | To view job progress, select Jobs > Active Jobs. Recovery is complete when the job status changes to Success. |
Notes:
| • | For VMware, Hyper-V, and XenServer, recovery consists of these tasks: first the VM's configuration files (metadata) are recovered; next the VM's data is recovered. In our example, the VM has multiple disks. Data for each disk is recovered as a separate task. |
| • | For AHV, recovery is done in one task. |
| • | The recovered VM is created in a powered off state. |
| 12 | After the recovery job completes, go to the hypervisor and power on the recovered virtual machine. |
| 13 | Modify VM settings and backup schedules as needed. |
| • | A recovered VM may not have the same network settings as the original. Check network settings and modify if needed. |
| • | The recovered VM has the same username/password credentials as the original VM. Access the VM and verify that it is functioning as expected in production. |
| • | Create or edit backup schedules to begin protecting the recovered VM. The next backup of the recovered VM is promoted to a full. |
Notes:
| • | Windows server VMs - In rare instances, after a restore is performed for a Windows server VM, a disk may be inaccessible because it has been placed in an offline state. To bring disks into an online state, login to the VM, go to Disk Management, right-click on the offline disk, and select Online from the drop-down menu. |
| • | Debian VMs - In some instances, Gnome might not start after a Debian VM is recovered. You can resolve this issue by rebooting the VM or restarting Gnome from the console. To access the console, enter Ctl+Alt+F1 and log in as root. Then run startx. |
Use this procedure to recover an entire virtual machine by using the Backup Browser.
Note: Backup copies and imported backups cannot be viewed in the Backup Browser. To recover from a backup copy or imported backup, use the Backup Catalog procedure above.
| 1 | Log in to the backup appliance . |
| 2 | Select Recover > Backup Catalog and click Backup Browser. |
| 3 | Select the Appliance and Date Range of backups to search. Backups that ran during the date range display: |
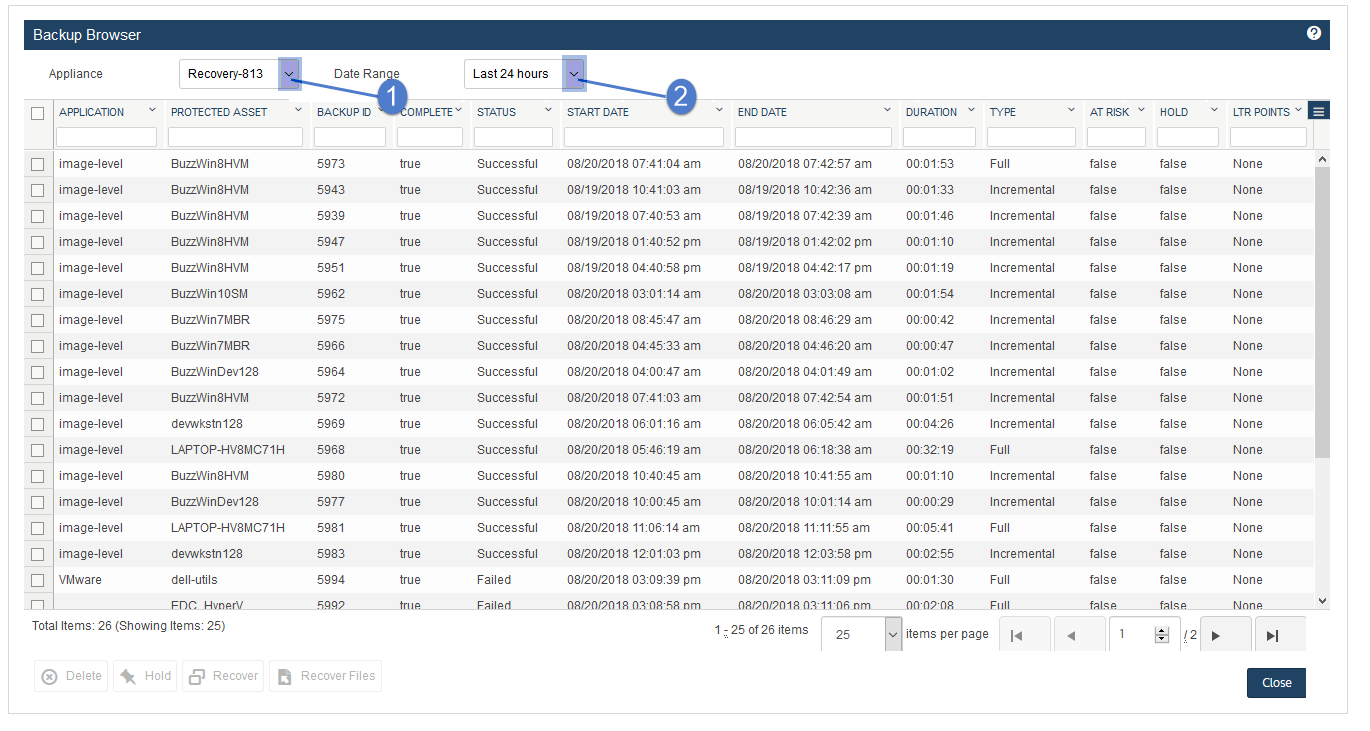
| 4 | (Optional) Refine the search: |
| • | Enter text in any column field to filter the display. |
| • | Click an arrow to sort by column. |
| • | Click the accordion icon to add or remove columns from the display. (Not all columns display by default.) |
| • | For a description of each column, see Backup Browser column descriptions. |
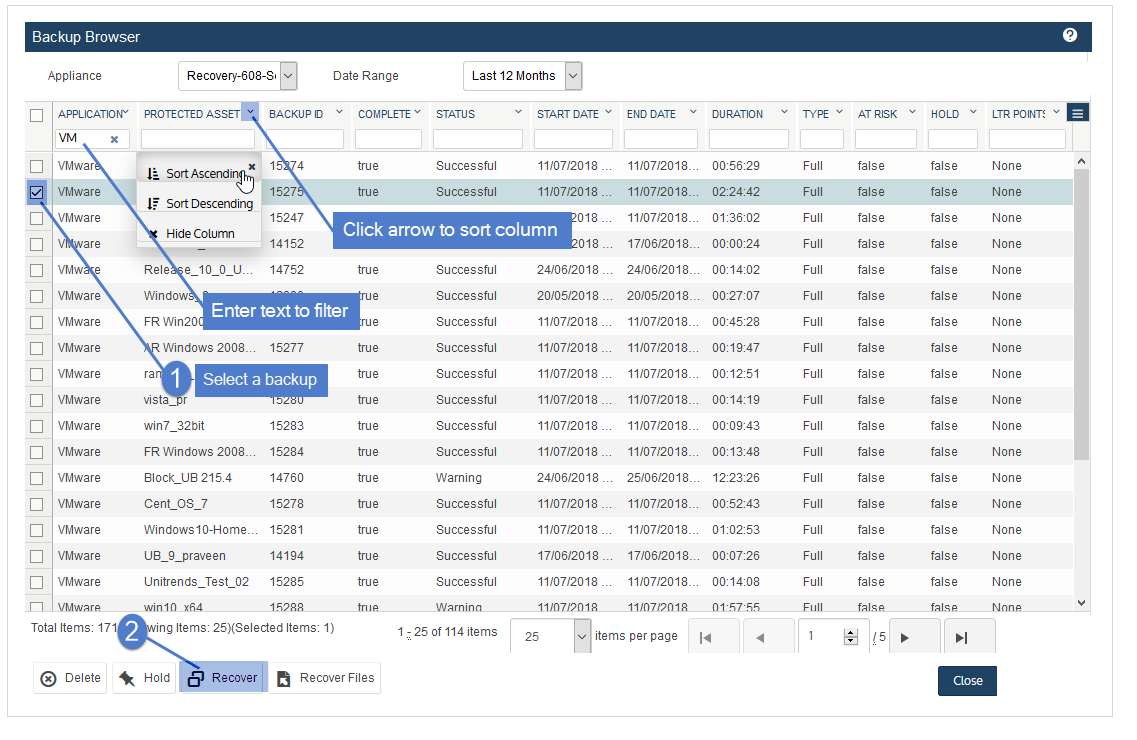
| 5 | Select the host-level backup. |
| 6 | Click Recover. |
| 7 | Select these Recovery Options: |
|
Recovery Options |
Description |
||||||
|---|---|---|---|---|---|---|---|
|
Target Location |
Select the host where the VM will be recovered. The list contains hosts that have been added to the appliance and are compatible with the VM being recovered. Incompatible hosts do not display in the list.
|
||||||
|
Target Resource |
(Optional) Select a resource pool. This field displays only if the Target Location is an ESXi host that has resource pools. |
||||||
|
Target Storage |
Select a datastore (ESXi host), a volume (Hyper-V host), a storage container (AHV host), or a Storage Repository (XenServer host). |
||||||
|
Recover excluded disk metadata |
(Optional) Check this box to recover the metadata for disks that were excluded from the backup. |
| 8 | Click Next. |
A summary of the selected recovery options display.
| 9 | (Optional) Modify the VM Name by clicking it in the Assets to Recover list and entering a new name. (Supported for VMware, AHV, and XenServer only.) |
| 10 | Click Save. The job is queued immediately. |
| 11 | Click OK to close the Information message. |
| 12 | To view job progress, select Jobs > Active Jobs. Recovery is complete when the job status changes to Success. |
Notes:
| • | For VMware, Hyper-V, and XenServer, recovery consists of these tasks: first the VM's configuration files (metadata) are recovered; next the VM's data is recovered. In our example, the VM has multiple disks. Data for each disk is recovered as a separate task. |
| • | For AHV, recovery is done in one task. |
| • | The recovered VM is created in a powered off state. |
| 13 | After the recovery job completes, go to the hypervisor and power on the recovered virtual machine. |
| 14 | Modify VM settings and backup schedules as needed. |
| • | A recovered VM may not have the same network settings as the original. Check network settings and modify if needed. |
| • | The recovered VM has the same username/password credentials as the original VM. Access the VM and verify that it is functioning as expected in production. |
| • | Create or edit backup schedules to begin protecting the recovered VM. The next backup of the recovered VM is promoted to a full. |
Notes:
| • | Windows server VMs - In rare instances, after a restore is performed for a Windows server VM, a disk may be inaccessible because it has been placed in an offline state. To bring disks into an online state, login to the VM, go to Disk Management, right-click on the offline disk, and select Online from the drop-down menu. |
| • | Debian VMs - In some instances, Gnome might not start after a Debian VM is recovered. You can resolve this issue by rebooting the VM or restarting Gnome from the console. To access the console, enter Ctl+Alt+F1 and log in as root. Then run startx. |