Recovering files from Windows image-level backups
Use the procedures in this section to recover files from an image-level backup.
Note: You must recover to an agent-based asset that has been added to the backup appliance. (The asset must have a Unitrends agent installed and must display on the appliance's Protected Assets tab.) If necessary, add the asset (as described in To add an agent-based asset) before you start the recovery.
See these procedures to recover files:
| • | Recovering from an indexed image-level backup by using Search Files – Run this procedure from the backup appliance to recover from an indexed backup. (This procedure is not supported for imported backup copies). |
| • | Recovering files by browsing a Windows image-level backup – Run this procedures from the backup appliance to recover from any of the following: a backup, an imported backup copy, or a hot backup copy that resides on a target appliance or in the Unitrends Cloud. Run this procedure from the target appliance to recover from a hot backup copy that resides on the that target appliance. |
Use this procedure to search an asset's indexed image-level backups for files/folders that meet specified criteria and recover selected items from the search results.
Notes:
| • | This procedure can only be used for local backups that were run with the Edit Asset > Index Image-Level Backups option. For details on configuring this option, see To edit an agent-based asset. |
| • | This procedure is not supported for recovery of ReFS filesystems. Recover by browsing the backup instead (see Recovering files by browsing a Windows image-level backup). |
| • | File search of imported backup copies is not supported. Recover by browsing the backup instead (see Recovering files by browsing a Windows image-level backup). |
| 1 | Log in to the backup appliance. |
| 2 | Click Recover > Backup Catalog > Search Files. |
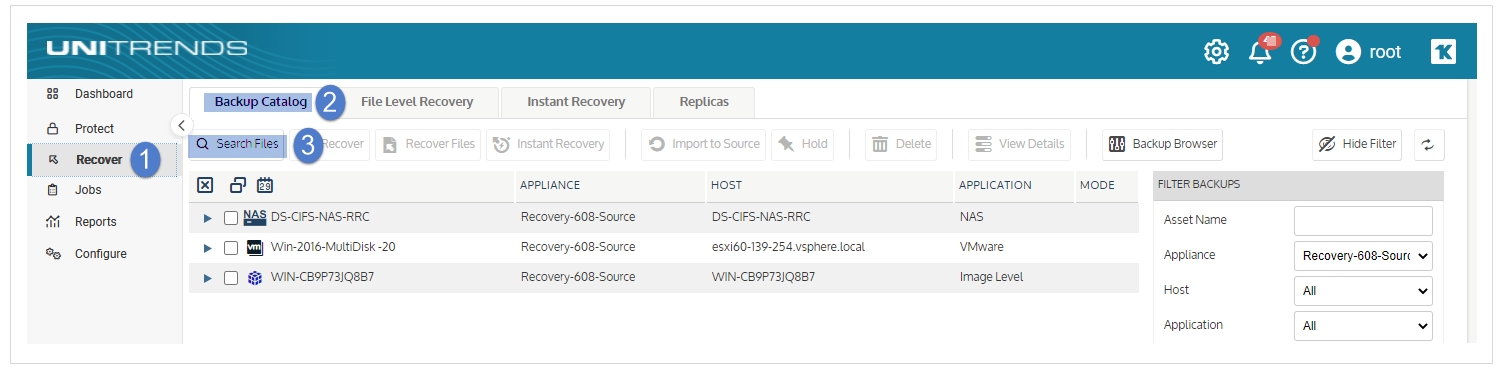
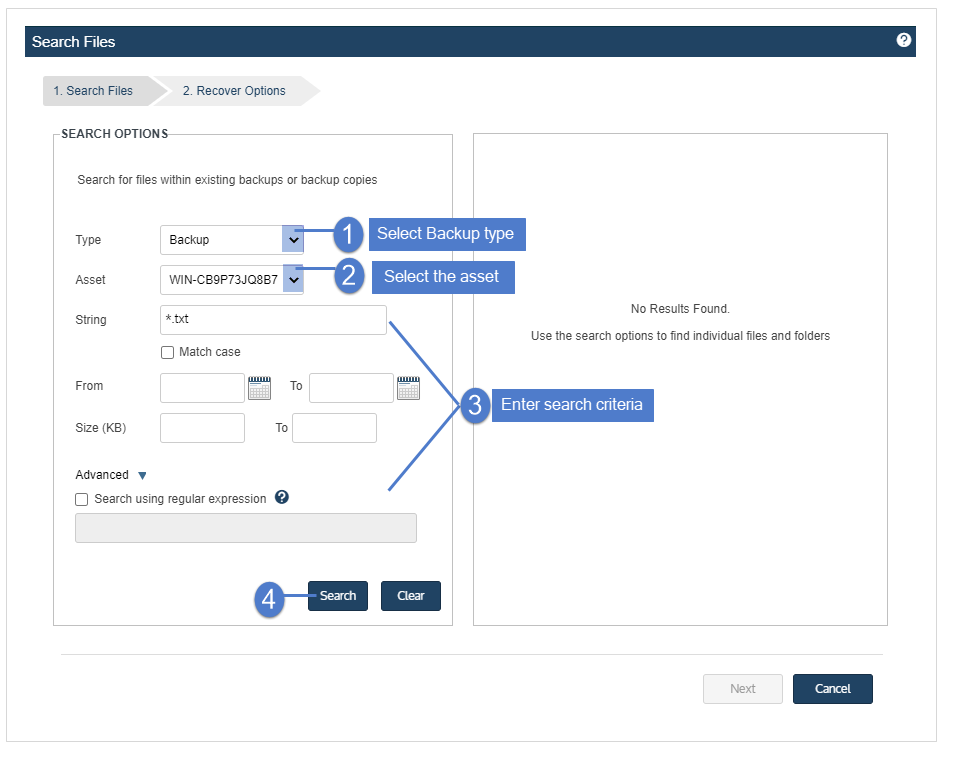
| 3 | In the Type list, select Backup. |
| 4 | Select the Asset whose backups will be searched. |
| 5 | Enter one or more search options: |
|
Search Options |
Description |
|---|---|
|
String |
Enter text to search. The wildcard character * is supported. |
|
Match Case |
Select to match the letter case of the entered string. |
|
From/To |
Use to search for files that were last modified within the specified date range. Results do not include files modified on the From or To date. |
|
Size |
Use to search for files that meet this size criteria. |
|
Advanced |
Click to search using a regular expression. |
| 6 | Click Search. |
All backups of this asset stored on the appliance are searched for matching files.
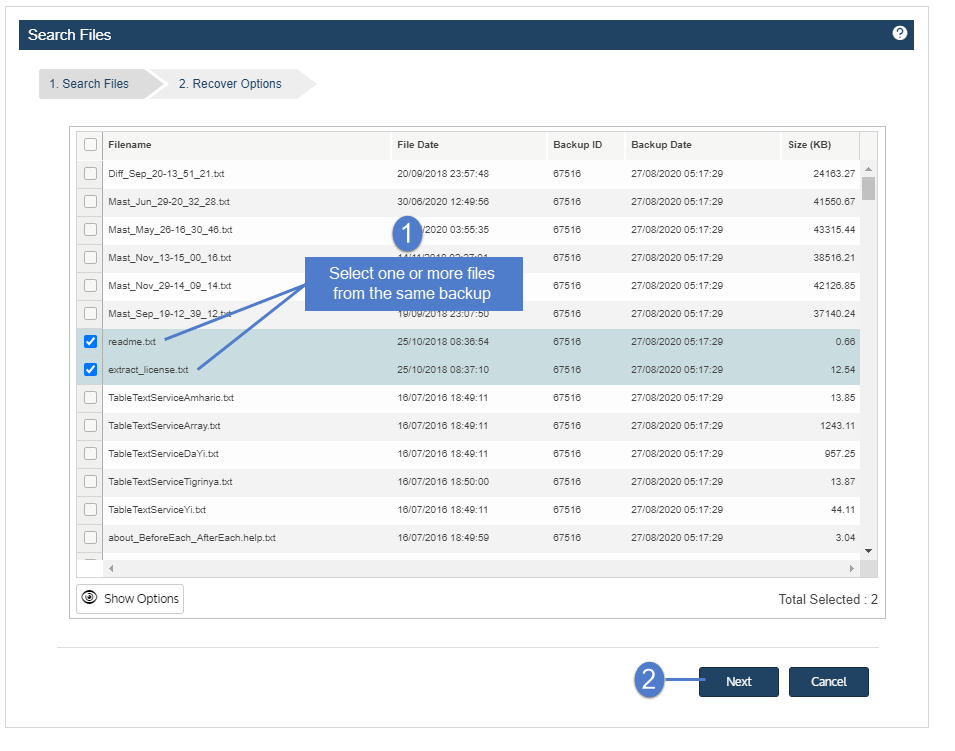
| 7 | In the results list, click to select files to recover. |
Notes:
| • | All files you select must be from a single backup. Check the Backup ID to determine a file's backup. If you select files from multiple backups, the Next button becomes disabled. |
| • | Softlinks cannot be downloaded and are not included in the search results. |
| 8 | Click Next. |
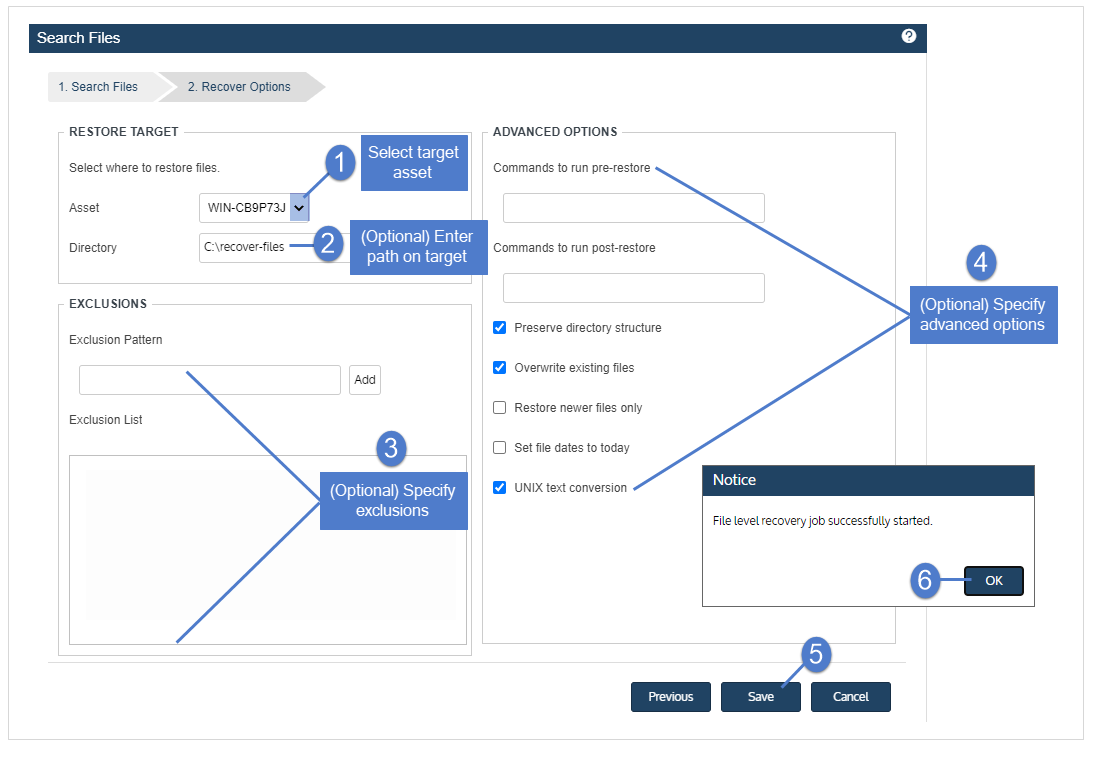
| 9 | Select the Asset where the files will be recovered. |
| 10 | (Optional) Enter a Directory path or click Browse and select a Directory path from the drop-down list. |
| • | If the directory does not exist, the job creates it on the target asset. |
| • | Leave the Directory field empty to recover files to their original location. |
| 11 | (Optional) Specify Exclusions. |
| 12 | (Optional) Specify Advanced Options. |
|
Option |
Description |
|---|---|
|
Commands to run pre-restore |
To run a command or script on the asset before the recovery, enter the full path to the command or script in the Commands to run pre-restore field. For example, C:\Data\script.bat or /usr/jsmith/script.sh. |
|
Commands to run post-restore |
To run a command or script on the asset after the recovery, enter the full path to the command or script in the Commands to run post-restore field. For example, C:\Data\script.bat or /usr/jsmith/script.sh. |
|
Preserve directory structure |
Check this box to preserve the existing file structure within the target directory. Note: To recover the file(s) to the original location, Preserve Directory Structure must be selected. If you attempt to recover to the original location and uncheck this box, the recovery fails. |
|
Overwrite existing files |
If this box is checked, files in the Target Directory may be overwritten. (See Overwrite existing files and Restore newer files only options for details.) This is useful if you are recovering an updated version of a document and only want the most up to date version. |
|
Restore newer files only |
Check this box to recover a file only if its date is newer than the existing version in the Target Directory. (See Overwrite existing files and Restore newer files only options for details.) If the file does not exist in the Target Directory, the file is recovered. |
|
Set file dates to today |
Check this box to update the recovered files with the recover date and time. If not checked, file dates are not updated during the recovery. |
|
UNIX text conversion |
When recovering UNIX Text files to MS-DOS systems, checking this option prevents new lines from being converted to CR-LF. |
This table describes how Overwrite existing files and Restore newer files only work if the file exists in the Target Directory.
|
Option selected? |
Recovery behavior |
|||||||
|---|---|---|---|---|---|---|---|---|
|
Windows backup |
Non-Windows backup |
|||||||
|
Overwrite existing files = Yes |
Recovers the file and overwrites the existing file. |
|
||||||
|
Overwrite existing files = Yes |
Recovers the file and overwrites the existing file. |
Recovers the file and overwrites the existing file. |
||||||
|
Overwrite existing files = No |
Does not recover the file. |
Does not recover the file. |
||||||
| 13 | Click Save. |
| 14 | Click OK to close the Notice message. |
| 15 | To monitor the recovery job: |
| • | Select Jobs > Active Jobs. |
| • | Select the job in the list and click View Details. |
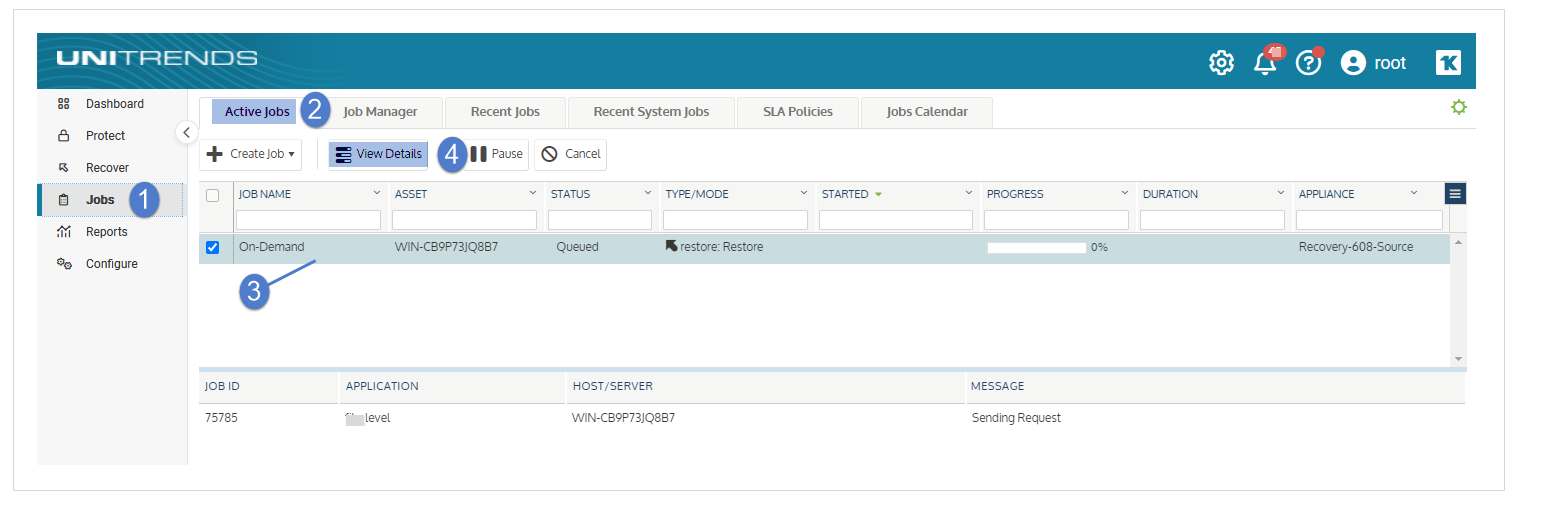
| • | The recovery is complete when the job's status changes to Success. |
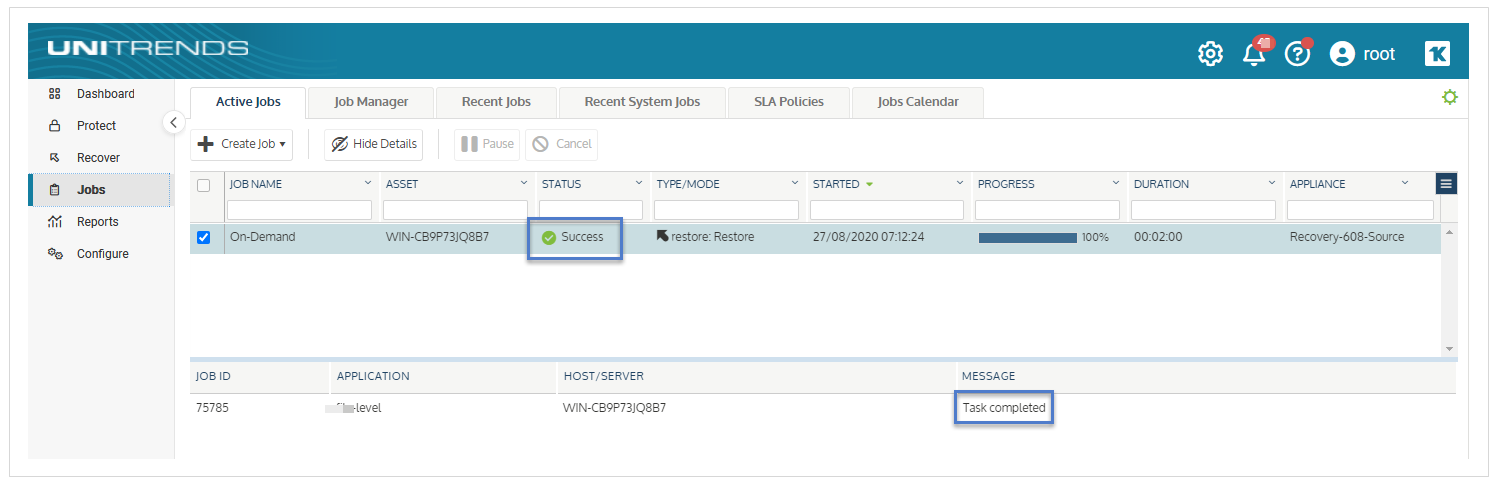
| 16 | Access the recovered files on the recovery target. |
Note: Files that are locked because they are in use in the location where you are performing the restore (system files, database files, etc.) cannot be restored while the system is live. During recovery, these files are moved to a temporary location and an entry is added into the registry telling Windows to restore the files to their actual final location on the next boot.
To recover files by browsing the backup, ensure that Prerequisites and considerations have been met, then proceed to File recovery procedures.
The following requirements and considerations apply to recovering files by browsing a Windows image-level backup:
|
Prerequisite or consideration |
Description |
||||||||||||
|---|---|---|---|---|---|---|---|---|---|---|---|---|---|
|
Backup |
You can use an indexed or non-indexed Windows image-level backup for the recovery. |
||||||||||||
|
Supported recovery methods |
To recover from a backup or imported backup copy, you must log in to the backup appliance directly. Logging in to an appliance that is managing the backup appliance is not supported. To recover from a hot backup copy that resides in the Unitrends Cloud or on another Unitrends appliance, you can either run the procedure from the source backup appliance (without first importing the backup copy) or run the procedure from the target appliance. During the recovery procedure, the appliance creates a recovery object that contains the backup's files. For some Windows assets, this object is also exposed as a CIFS (Samba) share and/or an iSCSI LUN on the backup appliance. After you create the recovery object, you will view it on the File Level Recovery tab to see whether the CIFS and iSCSI options are available. You can recover files from this object in several ways. Options include:
|
||||||||||||
|
Recovery target requirements |
The target can be configured with basic, GUID Partition Table (GPT), or dynamic disks. All configured disks must have unique names. |
||||||||||||
|
You must recover by mounting the iSCSI LUN to perform the following tasks:
Note: ReFS limitation - ReFS file system versions are not compatible with all Windows operating system versions. To avoid compatibility issues, recover ReFS files by mounting the iSCSI LUN on a machine whose operating system version is the same or later than that of the machine where the backup was taken.
Note: For the recovery, iSCSI disks are writable and a 1 GB write limit is enforced. Errors display on the recovery target machine if more than 1 GB is required. In this case, you cannot recover by using iSCSI. Recover files by downloading to a .zip file or by mounting the CIFS share, or recover the entire asset (by using Instant recovery of Windows image-level backups or Windows unified bare metal recovery). |
Use the following procedures to recover files from a Windows image-level backup. Before you start, be sure all Prerequisites and considerations have been met.
Use one of these procedures to create the recovery object:
Note: If a previously-created recovery object is still mounted for the Windows asset, you must remove it before creating a new one.
| 1 | Log in to the backup appliance. |
Note: You must log in to the backup appliance directly. Logging in to an appliance that is managing the backup appliance is not supported.
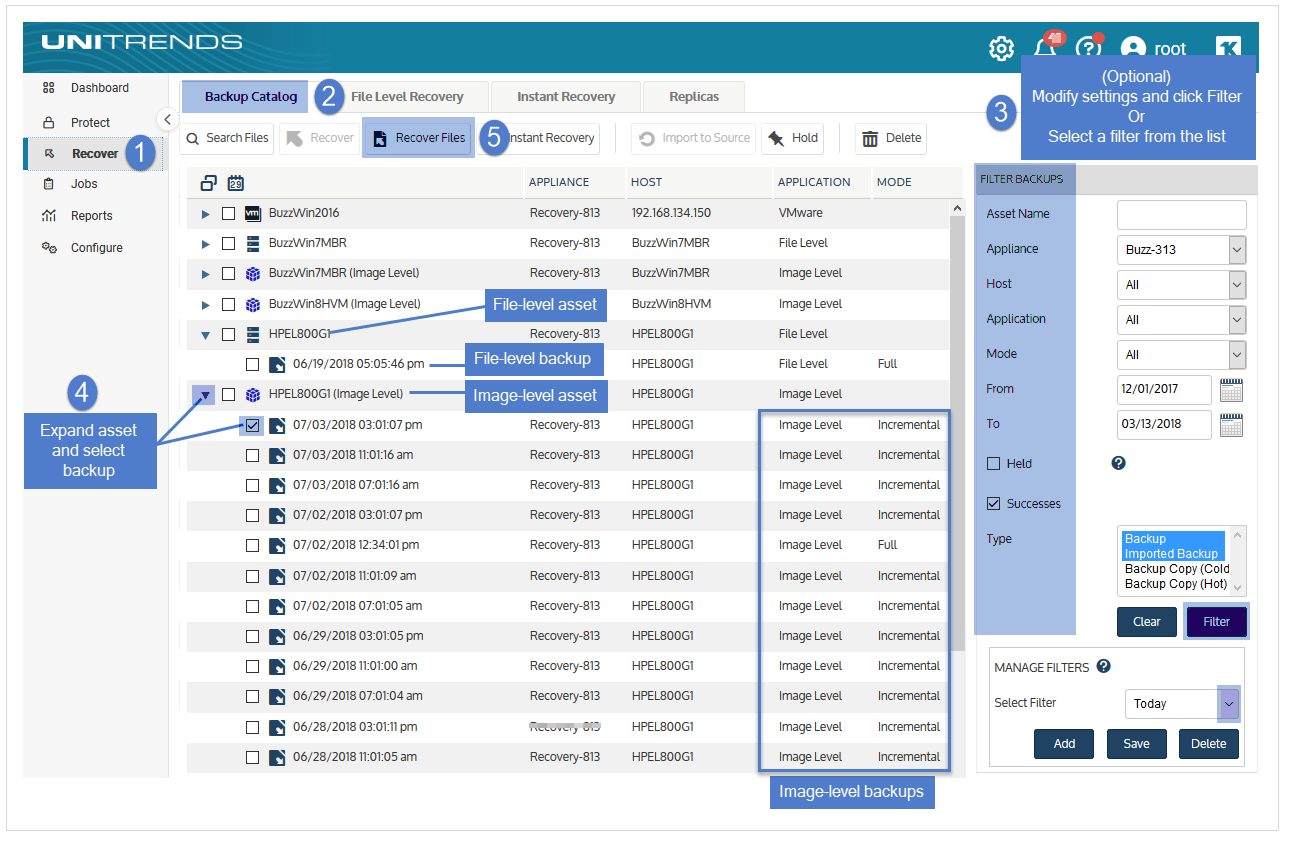
| 2 | Select Recover and click the Backup Catalog tab. |
(Optional) Use Filter Backups to the right to customize the backups that display. (For details, see Working with custom filters.)
| 3 | Expand the Windows asset and select the image-level backup from which you want to recover files. |
| 4 | Click Recover Files. |
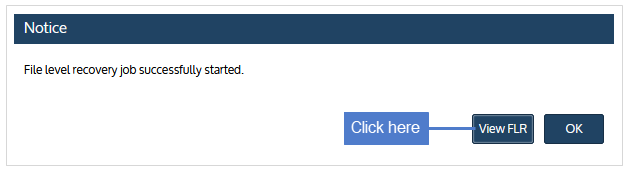
| 5 | Click Confirm to continue. The appliance creates the recovery object. |
Note: If you receive an error on a Unitrends Backup appliance while creating the recovery object, increase the memory allocation for the Unitrends Backup VM by using the host that manages it.

| 6 | Click View FLR. |
| 7 | Proceed to " Step 2: Recover files". |
Run this procedure on the backup appliance to recover from a backup copy that resides on a target appliance or in the Unitrends Cloud.
Note: You must log in to the backup appliance directly. Logging in to an appliance that is managing the backup appliance is not supported.
| 1 | Log in to the source backup appliance. |
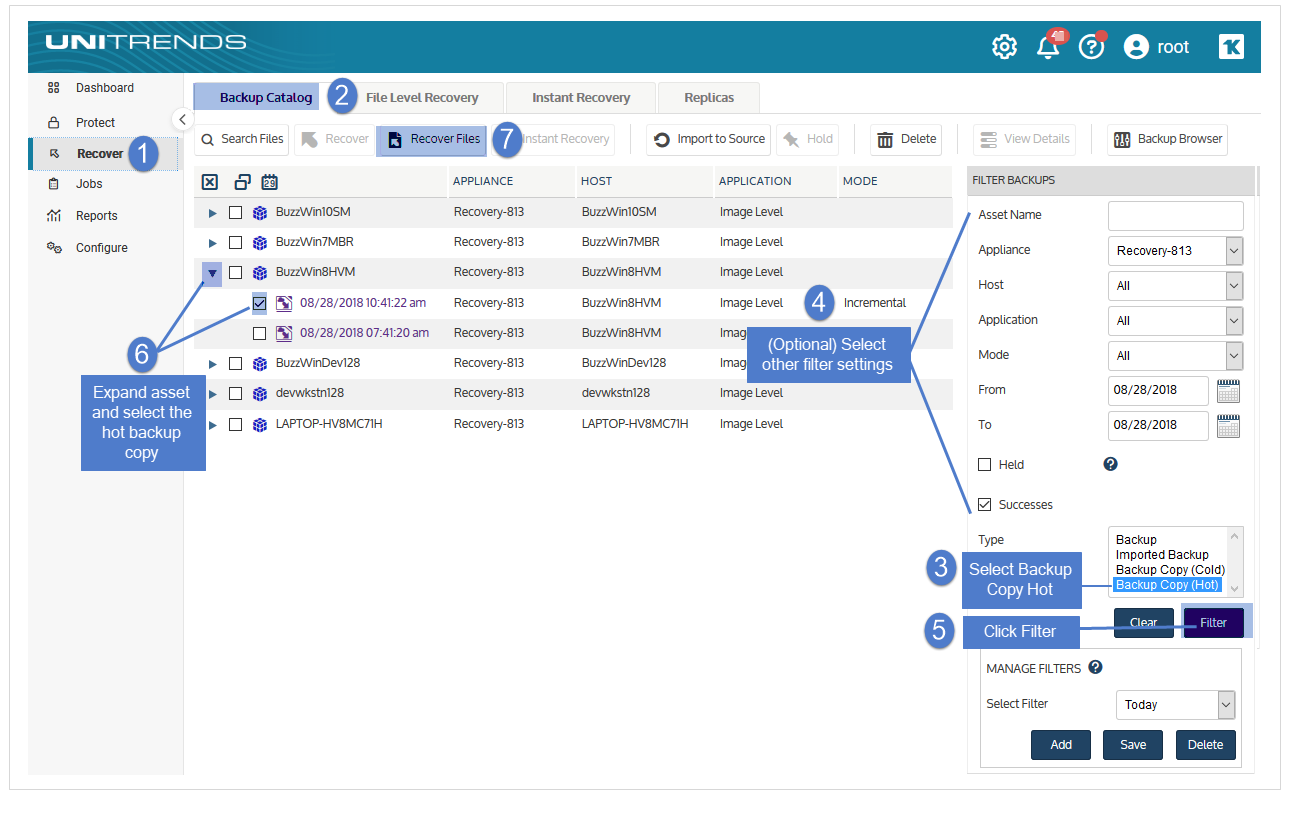
| 2 | Select Recover and click the Backup Catalog tab. |
| 3 | Use Filter Backups to the right to display hot backup copies: |
| • | In the Type box, select Backup Copy (Hot). |
(Optional) Use Filter Backups to the right to customize the backups that display. (For details, see Working with custom filters.)
| • | Click Filter. |
| 4 | Expand the asset and select the hot backup copy from which you want to recover files. |
| 5 | Click Recover Files. |
| 6 | Click Confirm to continue. The appliance creates the recovery object in the Cloud or on the target appliance. |
Notes:
| • | If your appliance is a Unitrends Backup virtual appliance and you receive an error while creating the recovery object, increase the memory allocation for the Unitrends Backup VM using the host that manages it. |
| • | Recovery objects created in the Unitrends Cloud are automatically removed after 96 hours. |
| 7 | Click View FLR to view the recovery object on the File Level Recovery tab. The recovery object Name is AssetName (on the target). |

| 8 | Proceed to " Step 2: Recover files". |
Run this procedure on the target appliance to recover from a backup copy that resides on that target appliance.
| 1 | Log in to the backup copy target appliance. |
| 2 | Select Recover and click the Backup Catalog tab. |
| 3 | Use Filter Backups to the right to display hot backup copies: |
| • | In the Type box, select Backup Copy (Hot). |
(Optional) Use Filter Backups to the right to customize the backups that display. (For details, see Working with custom filters.)
| • | Click Filter. |
| 4 | Expand the asset and select the hot backup copy from which you want to recover files. |
| 5 | Click Recover Files. |
| 6 | Click Confirm to continue. The appliance creates the recovery object on the target appliance. |
Note: If your appliance is a Unitrends Backup virtual appliance and you receive an error while creating the recovery object, increase the memory allocation for the Unitrends Backup VM using the host that manages it.
| 7 | Click View FLR to view the recovery object on the File Level Recovery tab. |
| 8 | Proceed to " Step 2: Recover files". |
View the recovery object on the File Level Recovery tab to see which recovery options are supported for the asset you selected. Use one of the following procedures to recover files:
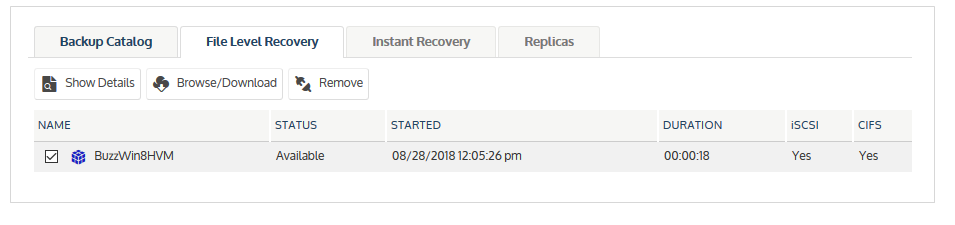
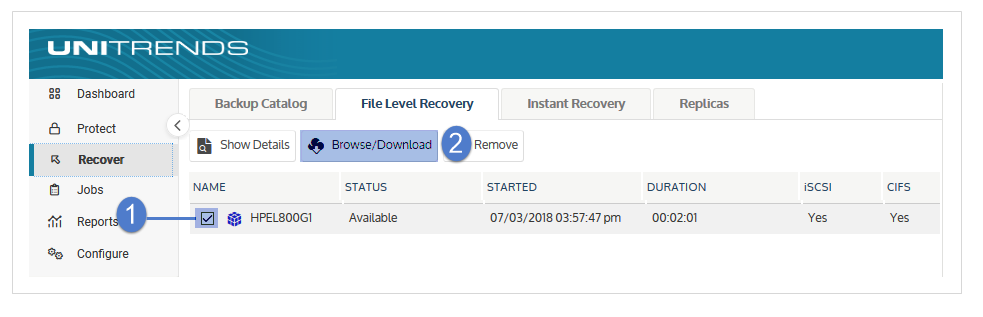
| 1 | On the File Level Recovery tab, locate the recovery object. |
Recovery objects display on the tab with the following details: the name of the Windows asset, the status of the object, the date and time it was created, the length of time it has existed on the appliance, and whether it can be accessed through iSCSI or CIFS.
| 2 | Select the recovery object and click Browse/Download. |
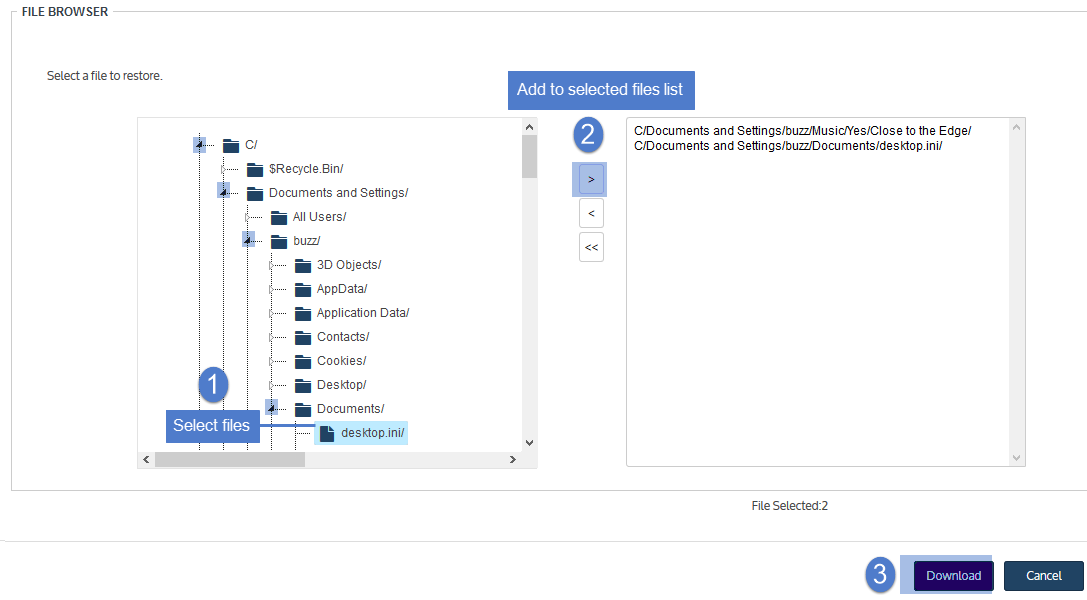
| 3 | In the File Browser, select or drag files and/or directories to recover. |
Note: Softlinks (also called symbolic links) are excluded from download. If you select a directory that contains files and softlinks, only the files are downloaded.
| 4 | Click Download. |
| 5 | Click Confirm to download the selected files to a .zip file. The .zip file is downloaded to your browser's default location. |

Notes:
| • | Volumes are assigned letters during recovery that may not match the letters from the original disks. |
| • | The duration of the download is impacted by various factors, such as the size of the files, bandwidth, and download speed. |
| • | Persistent browser and UI sessions are required to create the .zip file in the browser's default download location. Do not close the browser or UI session during the recovery. |
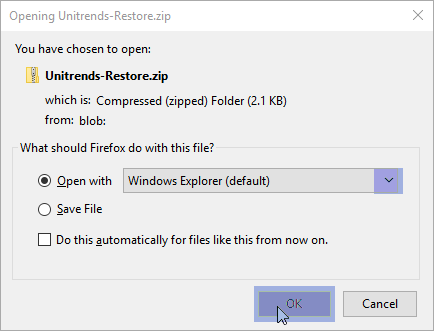
| 6 | When the download completes, the Unitrends-Restore.zip file displays in the browser. Select whether to open or save the file. |
| 7 | Access the recovered files in the download location and move them to another location on the local machine. |
Note: The Windows file explorer contains a setting to hide protected/system files. Turn off this setting to access all files.

| 8 | Proceed to Step 3: Remove the recovery object from the appliance. |
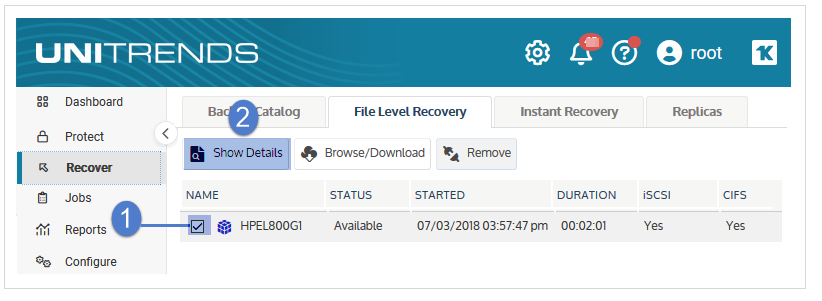
| 1 | Select Recover and click the File Level Recovery tab. |
Recovery objects display with the following details: the name of the Windows asset, the status of the object, the date and time it was created, the length of time it has existed on the appliance, and whether it can be accessed through iSCSI or CIFS.
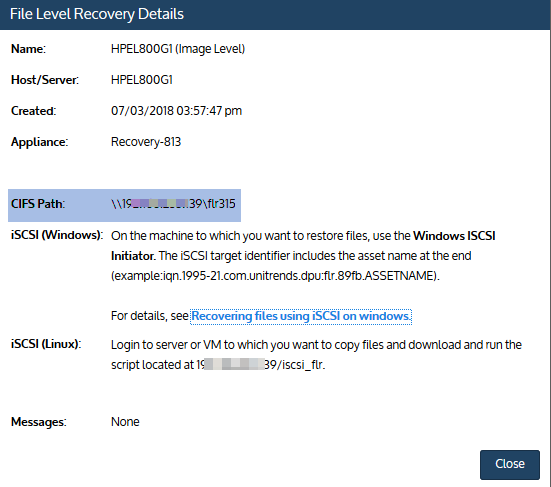
| 2 | Select the recovery object and click Show Details. |
| 3 | Note the CIFS path that displays in the File Level Recovery Details window. You will need this path to mount the CIFS share on the target machine. |
| 4 | Log in to the recovery target workstation. |
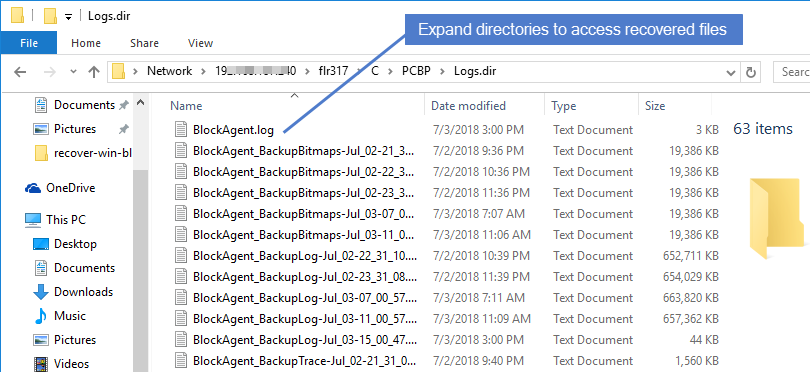
| 5 | Enter the CIFS path into a file browser on the recovery target. |

| 6 | Browse the share to locate the files you want to recover. |
Notes:
| • | Volumes are assigned letters during recovery that may not match the letters from the original disks. |
| • | The Windows file explorer contains a setting to hide protected/system files. Turn off this setting to access all files. |
| 7 | Move selected files to another location on the local machine. |
| 8 | Disconnect the network share by right-clicking the share and selecting Disconnect. |
| 9 | Proceed to Step 3: Remove the recovery object from the appliance. |
| 1 | Log in to the recovery target. |
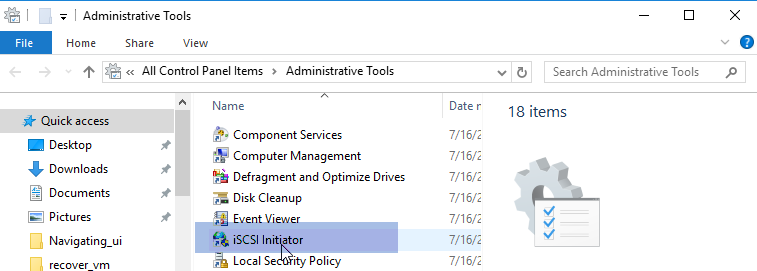
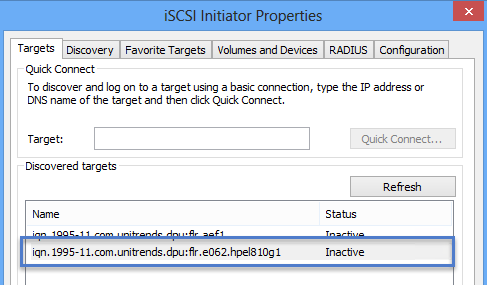
| 2 | Launch the iSCSI Initiator from Administrative Tools in the Control Panel. |
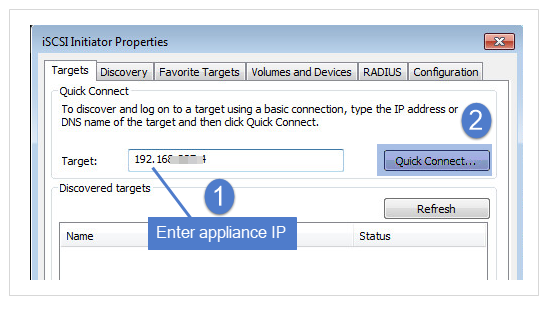
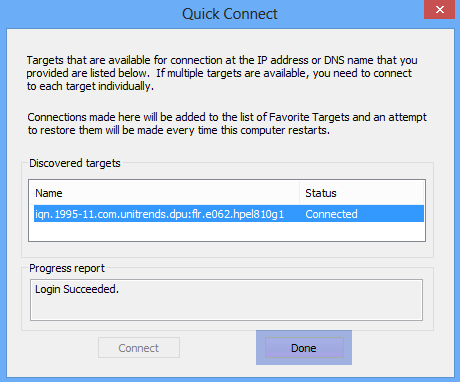
| 3 | In the Target field, enter the appliance IP address and click Quick Connect.... |
The Discovered targets field populates with a list of iSCSI LUN targets.
| 4 | Select the iSCSI target from the list. |
| 5 | The iSCSI target is discovered and connected to the local machine. Click Done. |
| 6 | Use Disk Manager or diskpart to verify that the mounted iSCSI disk is online. If not, bring the drive online. |
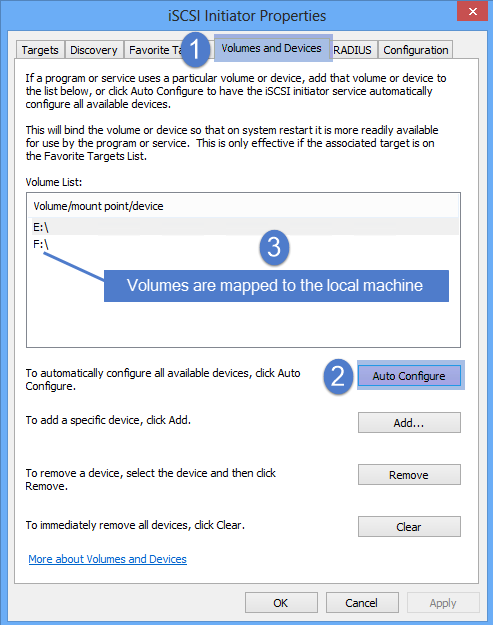
| 7 | Return to the iSCSI Initiator. On the Volumes and Devices tab, click Auto Configure to map drives from the iSCSI target to the local machine (or map them manually if you prefer). |
Note: Volumes are assigned letters during recovery that may not match the letters from the original disks.
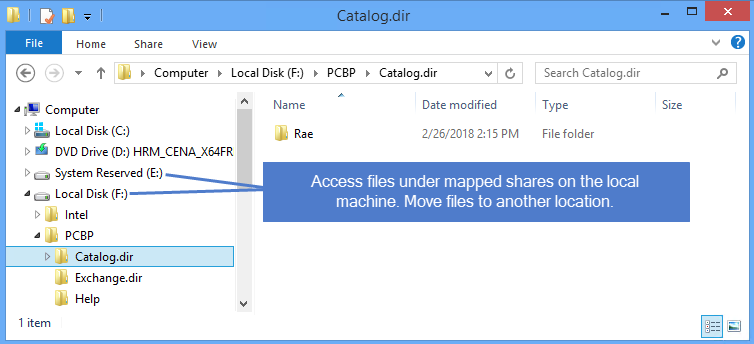
| 8 | Access the files under the mapped drives and move them to another location on the local machine. |
Note: The Windows file explorer contains a setting to hide protected/system files. Turn off this setting to access all files.
| 9 | Use the iSCSI Initiator to disconnect from the LUN. |
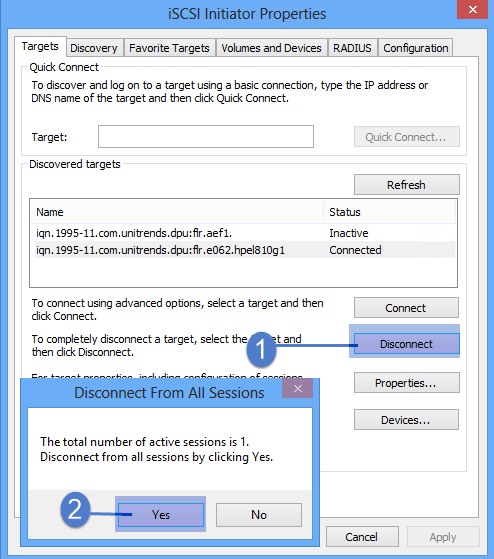
| 10 | Proceed to Step 3: Remove the recovery object from the appliance. |
To ensure optimal performance, remove the recovery object from the appliance.
Warning! If you mounted the CIFS share or iSCSI LUN, be sure to unmount it from the target before you remove the recovery object. Removing the recovery object while the target is still connected causes undesired results and errors on the target machine.
To remove a file-level recovery object
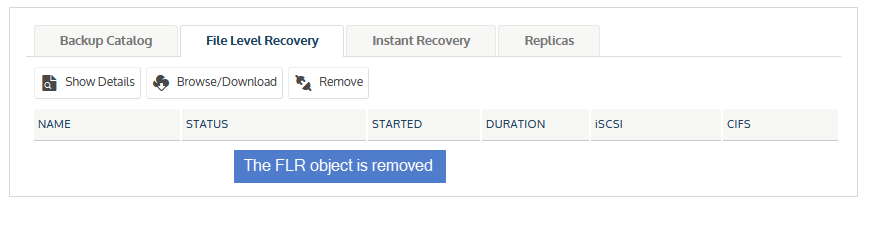
| 1 | Select Recover and click the File Level Recovery tab. |
| 2 | Select the recovery object. |
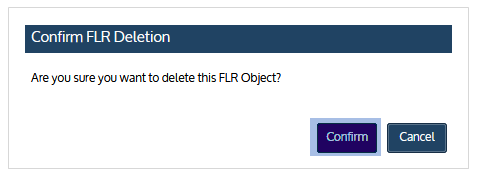
| 3 | Click Remove. |
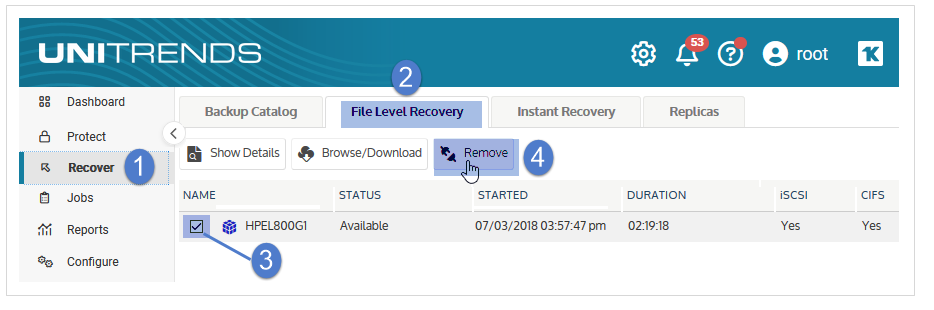
| 4 | Click Confirm to continue. The object is removed and no longer displays on the File Level Recovery tab. |