Instant recovery of Windows image-level backups
Instant recovery (IR) enables you to recover a failed or corrupted Windows machine and access it in minutes.
To perform instant recovery, you specify a recovery point (by selecting an image-level backup or backup copy) and a target location where the recovered asset will reside. The recovered asset can reside on:
● A Recovery Series physical appliance
● A Recovery MAX physical appliance
● An ESXi host
● A Hyper-V server
Instant recovery then creates a disk image recovery object on the Unitrends appliance and a virtual machine (VM) on the backup appliance or target virtual host. This takes just a few minutes. The IR VM is created by using the backup you selected and has the same network settings as the original Windows asset, so it can immediately assume production operations.
Upon creating the IR VM, instant recovery migrates data from the on-appliance recovery object to the new VM. The IR VM remains fully operational during the migration.
After the data has been migrated, instant recovery is complete. If you have recovered to a virtual host, the recovery object is no longer needed and you can tear down the instant recovery session. If you have recovered to a Recovery Series or Recovery MAX appliance, the instant recovery session is needed as long as you are using the IR VM.
Tearing down the instant recovery session deletes the recovery object, freeing the appliance resources and reserved space. For appliance performance, it is best to tear down the instant recovery session as soon as possible.
See these topics for details on using the instant recovery feature:
You can choose to perform the recovery in audit mode or instant recovery mode. Use audit mode to verify recovery points for Windows assets that are still running in production. Use instant recovery mode to replace a failed or corrupted Windows asset. Descriptions of each mode are given in the following table:
|
Mode |
Description |
|---|---|
|
Audit |
Enables you to verify that a VM can be created from an image-level backup or backup copy. The appliance uses data from the selected backup or backup copy to create a disk image on the appliance and a new VM on the appliance or on the target host. If recovering to a virtual host, the VM resides on the host but it runs from the disk image on the appliance. All other resources, such as the processors and memory, reside on the host. A VM in audit mode is not intended for production use. It does not have network connectivity, and changes made to the VM in audit mode are not backed up on the Unitrends appliance. Applications on the IR VM that require network access are not fully functional in audit mode. Recovering in audit mode has no impact on the original Windows asset. It is not necessary to shut down the original Windows asset during the audit. After verifying that the VM has booted and its data is accessible, you tear down the recovery session. This deletes the IR VM from the appliance or target host and deletes the on-appliance recovery object, freeing the appliance resources. |
|
Instant recovery |
Enables you to replace a failed or corrupted Windows asset. The appliance uses data from the selected backup or backup copy to create a disk image recovery object on the appliance and a VM on the appliance or on the target host. The IR VM is available for use immediately. ● IR VM on a Recovery Series or Recovery MAX appliance – The instant recovery session is needed for the IR VM to run. When you are no longer using the IR VM, tear down the IR session to remove both the recovery object and the IR VM. ● IR VM on a virtual host – The Unitrends appliance uses Storage vMotion (VMware) or Storage Live Migration (Hyper-V) to copy the data from the disk image to the target Hyper-V or ESXi host. Once data migration is complete, you tear down the recovery session to free appliance resources. The IR VM remains on the virtual host and continues to operate. |
Unitrends recommends planning for instant recovery before a Windows asset fails. Following is a summary of the steps needed to set up instant recovery for your Windows machines. Steps include links to detailed instructions for each procedure.
Step 1: Ensure that all requirements have been met. For details, see Prerequisites for Windows image-level instant recovery.
Step 2: Run image-level backups of the Windows assets.
Back up the Windows asset regularly to ensure recent recovery points are available:
● To create a job manually, see To create an image-level backup job.
● To create a job by using an SLA policy, see To create an SLA policy for Windows image-level assets.
● For a comparison of the manual and SLA policy job creation methods, see About creating backup and backup copy jobs.
Step 3: Reserve space on the appliance for instant recovery. For details, see Allocate storage for instant recovery.
Step 4: (Hypervisor target only) Add target virtual hosts to the Unitrends appliance. (Skip this step if you will be running IR on the backup appliance.)
While running the IR procedure, you select a Hyper-V or ESXi host where the IR VM will be created. If needed, add virtual hosts to the appliance to make them available for IR. For details, see Adding a virtual host.
NOTE For VMware, a vCenter is required. Add the ESXi hosts and the vCenter managing the hosts.
Step 5: Run IR in audit mode to check the IR VMs. For details, see Perform instant recovery in audit mode.
See the following topics for instant recovery requirements:
An image-level backup of the physical Windows machine is required for instant recovery. The backup must contain all critical system volumes.
NOTES
● By default, image-level backups include all system information needed for instant recovery. If you opt to exclude volumes from backup, use care not to exclude the boot and critical system (OS) volumes.
● The instant recovery virtual machine is created based on the backup you select. Volumes that were excluded from backup are not recovered.
● For SQL, the master, model, and msdb system databases must also be present in the image-level backup of the Windows asset. (These are included by default. If you want the recovered asset to include a hosted SQL application, use care not to exclude these system databases from the image-level backup.)
Back up the Windows asset regularly to ensure recent recovery points are available:
● To create a job manually, see To create an image-level backup job.
● To create a job by using an SLA policy, see To create an SLA policy for Windows image-level assets.
● For a comparison of the manual and SLA policy job creation methods, see About creating backup and backup copy jobs.
Requirements vary by where the IR VM resides. See these topics for details:
Instant recovery creates a virtual machine based on the image-level backup you select. The IR VM can reside on any of the following: a Recovery Series physical appliance, a Recovery MAX physical appliance, an ESXi server, or a Hyper-V server. Considerations for each are give in the following table.
|
Target location |
Considerations |
|---|---|
|
Recovery Series or Recovery MAX physical appliance |
Running the IR VM on the backup appliance itself provides a simple, seamless solution. Note that only physical appliances have this option. (An IR VM cannot reside on a Unitrends Backup virtual appliance.) Consider the following to determine whether this is the optimal location for your environment: ● Requires no additional hardware. Provides near-zero RTO without having to increase CapEx. ● Assumes the role of a failed Windows server temporarily, until you can get new hardware and run a bare metal recovery. ● Provides seamless, continuous protection in a failover scenario. The 'live' IR VM is automatically protected by the existing backup schedule after assuming the identity of the original Windows machine. ● Uses the compute resources of the appliance to bring the IR VM 'live' in a failover scenario. If the appliance is already under high load, there may not be sufficient resources to provide for instant recovery. ● Reduces on-appliance backup retention because a portion of the appliance’s storage is reserved for the IR VM. |
|
ESXi or Hyper-V server |
Running the IR VM on an ESXi or Hyper-V server enables access to the compute and storage in your virtual environment, greatly increasing the pool of resources that can be used for instant recovery. Consider the following to determine whether this is the optimal location for your environment: ● Leverages virtual infrastructure for IR VMs. Disk space and compute resources of the Unitrends appliance are minimally impacted. ● Provides the option to use the IR VM as a permanent replacement for the failed Windows asset. Can be used to migrate a physical Windows machine to your virtual infrastructure. |
Ensure that the following requirements have been met before you set up instant recovery.
|
Requirement |
Description |
|---|---|
|
Allocate IR storage |
Appliance storage can be used to store backups, for instant recovery, or for Windows replicas. To recover to the Unitrends appliance, you must allocate a portion of the appliance storage to Instant Recovery in the Edit Storage dialog (as described in Allocate storage for instant recovery). The amount of available instant recovery storage space must be at least 20% of the space used on the original Windows asset. |
|
Unitrends appliance resources |
Instant recovery uses part of the Unitrends appliance’s processors, memory, and storage. This usage may impact the performance of regular system functions (such as backups, backup copies, deduplication, and purging). Monitor the appliance closely and make adjustments as necessary. The IR VM is assigned 2 CPUs and 4GB of RAM by default. If needed, you can modify these settings while creating your IR VM. |
|
IR VM changeability |
Consider the following when modifying the IR VM: ● In audit mode - The IR VM has no network connectivity. Changes made in audit mode are not captured by Unitrends backups and are lost after you tear down the IR session. ● In instant recovery mode - Changes to the IR VM are captured by Unitrends backups of the original Windows asset. |
|
Assets with more than 4 disks |
On-appliance instant recovery is supported for assets with up to 4 disks. For assets with more than 4 disks, recover to an ESXi or Hyper-V server instead. |
|
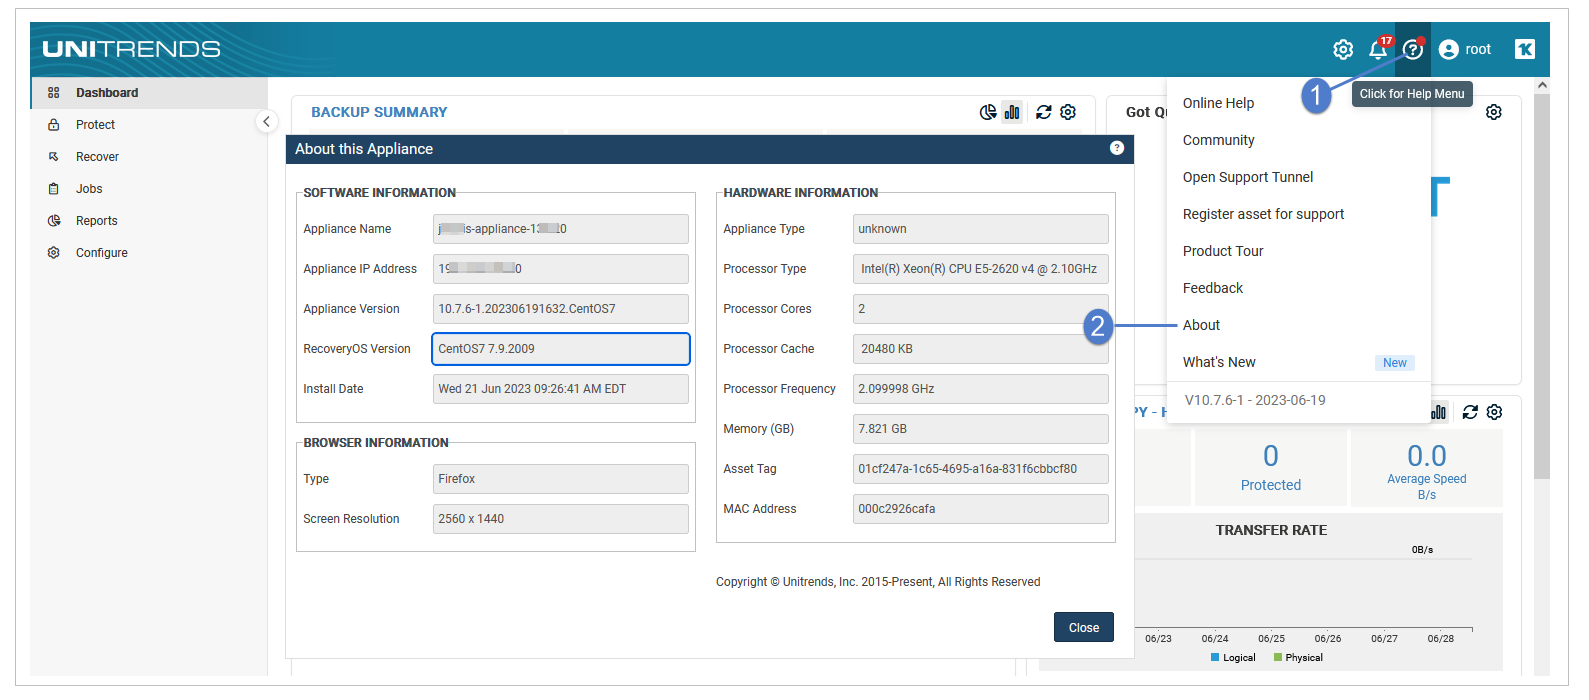
Instant recovery of GPT partitioned and UEFI-based assets is supported on Recovery Series and Recovery MAX appliances that are running the CentOS 7 operating system. To check the appliance OS version, select ? > About in the appliance UI:
|
Ensure that the following requirements have been met before you set up instant recovery.
|
Requirement |
Description |
|---|---|
|
vCenter version and license |
To perform instant recovery, the ESXi server used as the instant recovery target must be managed by a vCenter that meets the following requirements: ● Must be running one of the following: vCSA 5, vCenter version 5, or a higher vCenter version listed in the Compatibility and Interoperability Matrix. ● Must have a license that supports Storage vMotion. ● Must be a added to the Unitrends appliance from which you are performing the instant recovery. (For details, see Adding a virtual host.) NOTE You can perform the audit process using a stand-alone ESXi server, but instant recovery mode is not supported. |
|
ESXi server |
The ESXi server used as the instant recovery target must meet the following requirements: ● Must be managed by a vCenter that meets the version and license criteria above. ● Must be running ESXi version 5 or a higher version listed in the Compatibility and Interoperability Matrix. ● Must be added to the Unitrends appliance from which you are performing the instant recovery. (For details, see Adding a virtual host.) ● Must support the operating system (OS) of the Windows asset you are recovering. (See the VMware documentation for details.) For example, you cannot recover a Windows 2016 asset to ESXi 5.1. ● Must have sufficient space and compute resources for the IR VM. |
|
IR VM resources |
The IR VM is assigned resources based on the original asset. CPU is assigned as follows: ● If the original asset had more than 6 CPU, the IR VM is assigned 4 CPU. ● If the original asset had more than 2 CPU, the IR VM is assigned 2 CPU. ● If the original asset had less than 2 CPU, the IR VM is assigned 1 CPU. Memory is assigned as follows: ● If the original asset had more than 8GB of RAM, the IR VM is assigned 8GB. ● If the original asset had more than 4GB of RAM, the IR VM is assigned 4GB. ● If the original asset had more than 2GB of RAM, the IR VM is assigned 2GB. ● If the original asset had less than 2GB of RAM, the IR VM is assigned 1GB. |
|
IR VM changeability |
Consider the following when modifying the IR VM: ● In audit mode - The IR VM has no network connectivity. Changes made in audit mode are not captured by Unitrends backups and are lost after you tear down the IR session. NOTE Performing operations through the hypervisor on an IR VM that is running in audit mode on an ESXi server is not recommended and may yield undesirable results. ● In instant recovery mode - Changes to the IR VM are captured by Unitrends backups of the original Windows asset and are retained after you tear down the IR session. |
|
Maximum disk size |
The maximum disk size is capped by what the hypervisor supports. The IR VM's disks will be the same size as those on the original asset. For Windows assets with disks larger than 2 TB, the ESXi server must be running ESXi 5.5 or a higher version listed in the Compatibility and Interoperability Matrix. |
|
IR VM configuration |
The following configuration settings apply to the IR VM: ● The Mac address and network settings of the IR VM match those of the source backup used for the recovery. ● The IR VM is configured with the latest hardware version that is supported by the target hypervisor. For example, if recovering to an ESXi 5.5 server, the IR VM is hardware version 10. ● The IR VM's disks are provisioned as Thick Eager Zeroed. |
Ensure that the following requirements have been met before you set up instant recovery.
|
Requirement |
Description |
|---|---|
|
Hyper-V server |
The Hyper-V server used as the instant recovery target must meet the following requirements. ● Must be one of the following: ● A Windows Server with the Hyper-V role enabled, running Windows 2012 or a higher version listed in the Compatibility and Interoperability Matrix. ● A Hyper-V Server running Windows 2012 or a higher version listed in the Compatibility and Interoperability Matrix. ● Must support the operating system (OS) of the Windows asset. (See this Microsoft article for details: Should I create a generation 1 or 2 virtual machine in Hyper-V?) ● Must be added to the Unitrends appliance from which you are performing the instant recovery. (For details, see Adding a virtual host.) ● Must have sufficient space and compute resources for the IR VM. ● Must be running Unitrends agent version 10.3 or higher with the CBT volume driver installed. To enable incremental image-level backups, you must reboot the Hyper-V server after installing the image driver. (For details, see .) NOTES ● It is best practice to run the latest Unitrends appliance and agent software versions. Older versions do not support all current Unitrends features. ● Unitrends recommends reloading the list of VMs on the appliance after installing the agent on the host Hyper-V servers. ● To reload the list of VMs, click the Gear icon in the upper-right of the UI and select Inventory Sync:
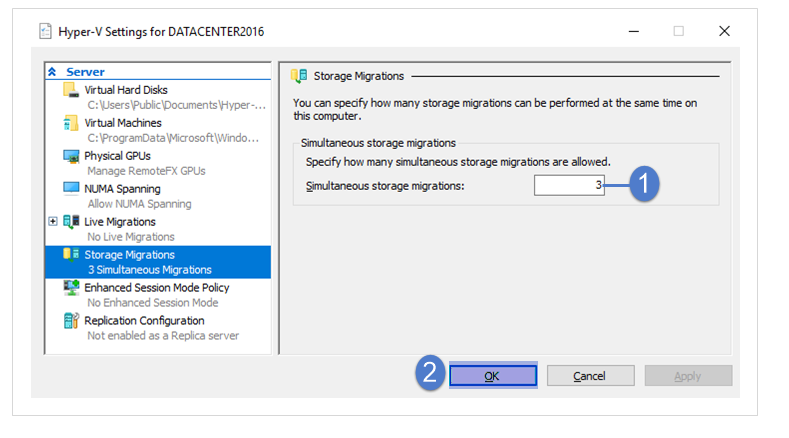
● Must be configured for adequate simultaneous storage migrations. The host must be able to run simultaneous storage migrations for all sessions that are currently running in instant recovery mode. (Storage migration is not needed to run IR in audit mode). Inadequate simultaneous storage migrations leads to undesirable results. To modify the number of simultaneous storage migrations, open Hyper-V manager, right-click the host server and select Properties, select Storage Migrations and modify the Simultaneous storage migrations setting:
|
|
IR VM resources |
The IR VM is assigned resources based on the original asset. CPU is assigned as follows: ● If the original asset had more than 6 CPU, the IR VM is assigned 4 CPU. ● If the original asset had more than 2 CPU, the IR VM is assigned 2 CPU. ● If the original asset had less than 2 CPU, the IR VM is assigned 1 CPU. Dynamic memory is used for the IR VM: ● If the original asset had more than 2048MB of RAM, the IR VM uses 2GB at startup. Maximum RAM used equals the amount of RAM assigned to the original asset. ● If the original asset had less than 2048MB of RAM, the IR VM uses the amount of RAM assigned to the original asset at startup. Maximum RAM used equals twice the amount of RAM assigned to the original asset. |
|
IR VM changeability |
Consider the following when modifying the IR VM: ● In audit mode - The IR VM has no network connectivity. Changes made in audit mode are not captured by Unitrends backups and are lost after you tear down the IR session. NOTE Performing operations through the hypervisor on an IR VM that is running in audit mode on a Hyper-V server is not recommended and may yield undesirable results. For example, creating a Hyper-V checkpoint of an IR VM in audit mode causes an error on the hypervisor. ● In instant recovery mode - Changes to the IR VM are captured by Unitrends backups of the original Windows asset and are retained after you tear down the IR session. |
|
Maximum disk size |
The maximum disk size is capped by what the hypervisor supports. The IR VM's disks will be the same size as those on the original asset. |
|
IR VM configuration |
The IR VM is created with this configuration: ● Disk names match those of the source backup used for the recovery. ● All disks created on the IR VM must have unique names. ● The network settings of the IR VM match those of the source backup used for the recovery. ● The IR VM is configured with the latest hardware generation version that is supported by the target Hyper-V server. ● The IR VM's configuration version is the highest version that the hypervisor supports. |
|
Hyper-V clusters |
If recovering to a Hyper-V host that is part of a cluster, instant recovery treats the host as a stand-alone Hyper-V server. The IR VM is not part of the cluster and does not fail over to other cluster nodes. |
The Windows asset must meet the following requirements to use the instant recovery feature:
|
Requirement |
Description |
|---|---|
|
Client Operating Systems |
Instant recovery is supported for the client operating systems listed below. Additional version limitations apply. See the Compatibility and Interoperability Matrix for details. ● Windows 7, 64-bit only ● Windows 8, 64-bit only ● Windows 8.1, 64-bit only ● Windows 10, 64-bit only ● Windows 11, 64-bit only NOTE To run instant recovery on a virtual host, the Hyper-V or ESXi host must support the guest OS of the IR VM. (See the Microsoft or VMware documentation for details.) For example, a Windows 10 IR VM cannot reside on ESXi 5.1 or Hyper-V 2008 R2. |
|
Server Operating Systems |
Instant recovery is supported for the server operating systems listed below. Additional version limitations apply. See the Compatibility and Interoperability Matrix for details. ● Windows 2008 R2, 64-bit only ● Windows 2012, 64-bit only ● Windows 2012 R2, 64-bit only ● Windows 2016, 64-bit only ● Windows 2019, 64-bit only ● Windows 2022, 64-bit only NOTE To run instant recovery on a virtual host, the Hyper-V or ESXi host must support the guest OS of the IR VM. (See the Microsoft or VMware documentation for details.) For example, a Windows 2016 IR VM cannot reside on ESXi 5.1 or Hyper-V 2008 R2. |
|
Firmware interface type |
The instant recovery feature is supported for BIOS- and UEFI-based assets. For BIOS-based assets, the boot and system disks must be MBR. For UEFI-based assets, these requirements apply: ● Boot and system disks must be GPT. ● The IR VM must reside on one of the following: ● An ESXi server running ESXi 5.1 or a higher version listed in the Compatibility and Interoperability Matrix. ● A Hyper-V server running 2012 R2 or a higher version listed in the Compatibility and Interoperability Matrix. ● A Recovery Series or Recovery MAX appliance that is running the CentOS 7 operating system. NOTE A UEFI-based asset cannot run on a physical appliance that is running CentOS 6. For details on checking the appliance OS, see GPT partitioned and UEFI-based assets. |
|
Disk partition type |
Instant recovery is supported for Master Boot Record (MBR) and GUID Partition Table (GPT) partition types. For GPT partitioned assets, the IR VM must reside on one of the following: ● An ESXi server ● A Hyper-V server ● A Recovery Series or Recovery MAX appliance that is running the CentOS 7 operating system. NOTE A GPT partitioned asset cannot run on a physical appliance that is running CentOS 6. For details on checking the appliance OS, see GPT partitioned and UEFI-based assets. |
|
Deduplicated volumes |
Data is applied to the IR VM in its non-deduplicated form. ● If recovering to a Recovery Series or Recovery MAX appliance, ensure that enough IR storage space has been allocated to house this non-deduplicated data. ● If recovering to a virtual host, ensure that the datastore (VMware) or volume (Hyper-V) that will be used to create the VM disks has enough capacity to house this non-deduplicated data. |
|
Number of volumes |
The Windows asset can have a maximum of 20 volumes, including the System Reserved volume and other unmounted volumes. An IR VM with more than 20 volumes may fail to boot. |
|
Separate boot and system partitions |
For Windows assets with boot and system partitions located on different disks, the system partition must reside on the first disk (Disk 0). |
|
File System Configuration |
Instant recovery is supported for the following file systems: ● NTFS ● FAT/FAT32/exFAT ● ReFS (Windows 2012 and later) |
|
Active Directory |
Instant recovery supports Active Directory database (NTDS) located on the boot volume only. (If it is not on the boot volume, the configuration is not supported and you see an error message when you attempt to create the IR VM.) |
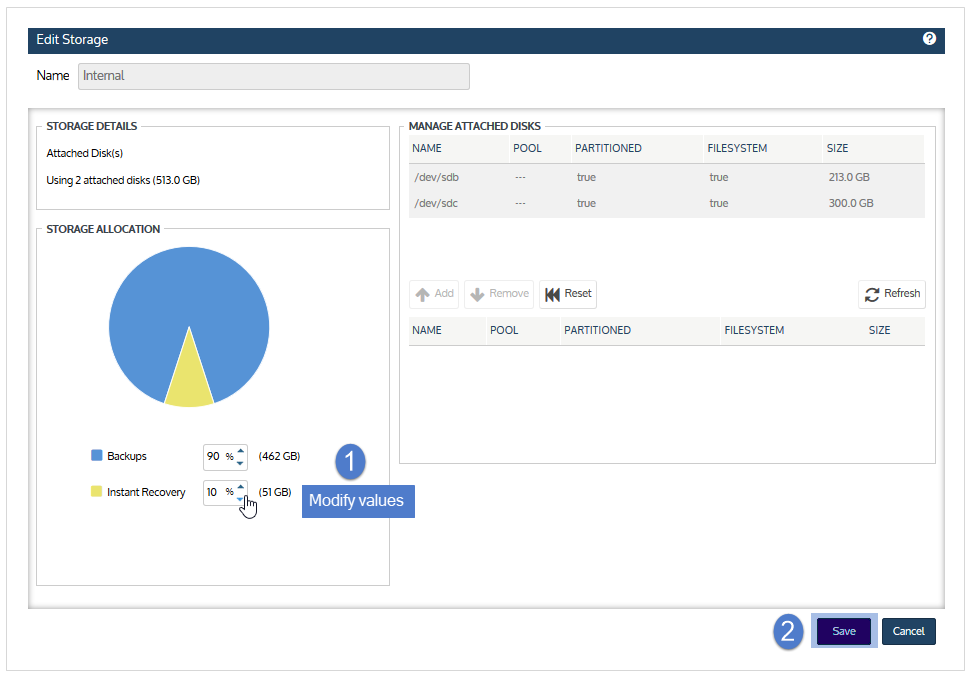
Instant recovery can be performed at any time, as long as there are image-level backups or backup copies of your Windows assets and sufficient backup storage is allocated as instant recovery space. Unitrends strongly recommends reserving space for instant recovery soon after initial deployment and before an asset fails. If necessary, you can allocate instant recovery space later, but doing so may require the appliance to purge local backups to make room for the newly allocated instant recovery space.
Because the disks for a recovered asset reside on the appliance until storage migration completes, you must allocate a portion of your backup storage for instant recovery. Allocate at least 20% of the space used on the original Windows asset. Additionally, ensure that there is enough extra storage to account for anticipated growth during the recovery process, especially for long-running recoveries. Once disks have been migrated to another location, or BMR is complete and the IR is torn down, the appliance’s instant recovery storage is no longer needed.
NOTES
● Appliance storage that is allocated to instant recovery can also be used for the Windows replica feature.
● Storage allocated for instant recovery cannot be used for backups.
● Physical appliances come with a set amount of backup storage. Backup storage allocation can be modified to increase the amount used for instant recovery. Backup storage cannot be added to the appliance.
● Unitrends Backup virtual appliances are deployed as virtual machines. After initial deployment, you can add more backup storage as desired. For details, see About adding backup storage to a Unitrends Backup appliance.
1. On the Configure > Appliances page, select the appliance.
2. On the Storage tab, select the Internal storage and click Edit.
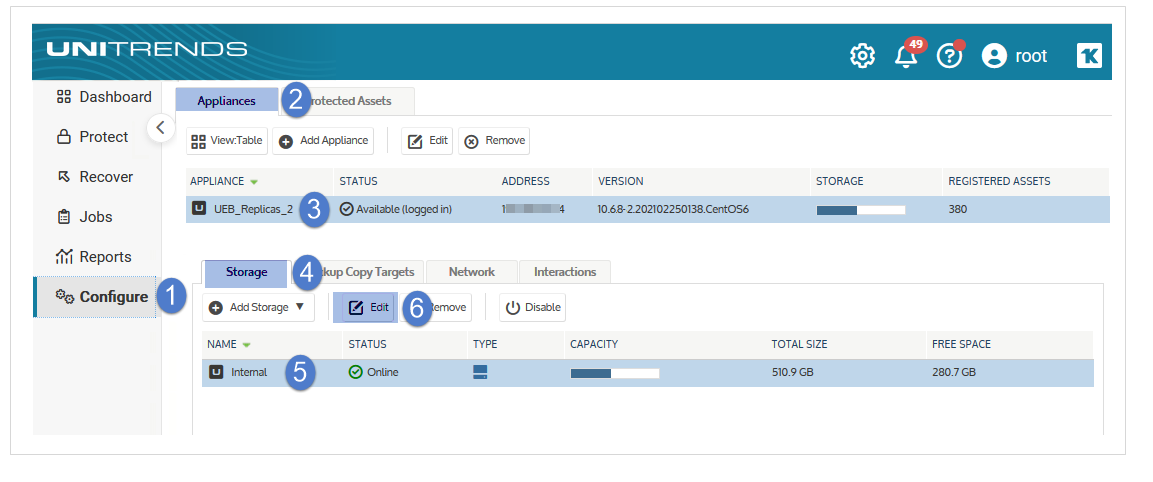
3. Modify the percentages used for backups versus instant recovery, and click Save.
Perform instant recovery in audit mode to verify that backups and backup copies can be used to recover the Windows asset in the event of a disaster. Repeat this procedure as needed to test new backups.
Run this procedure from the backup appliance to recover from a backup or imported backup copy. Run this procedure from the backup copy target appliance to recover from a hot backup copy.
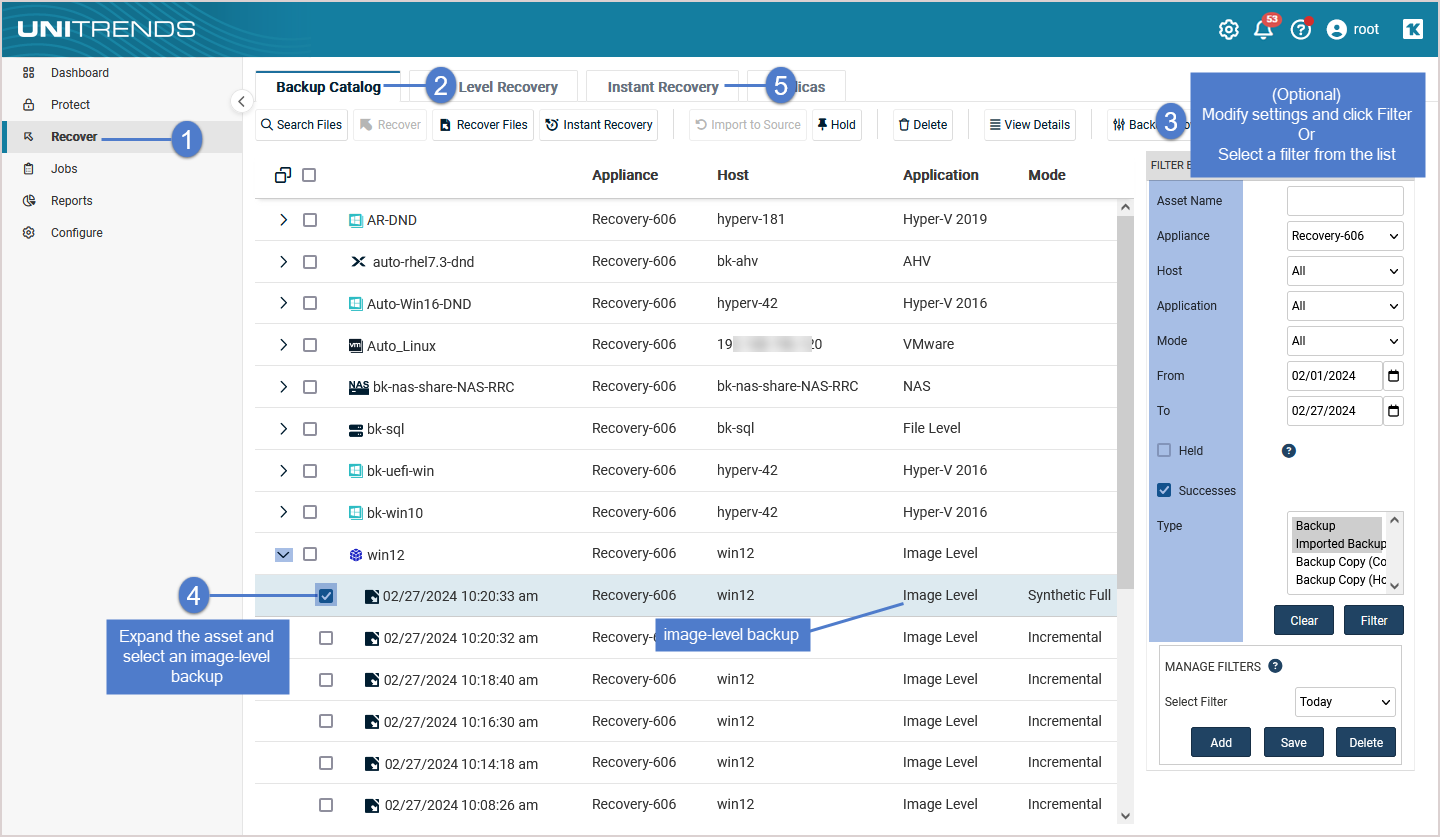
1. Log in to the backup appliance or target appliance (if recovering from a hot backup copy).
2. Select Recover and click the Backup Catalog tab.
(Optional) Use Filter Backups to the right to customize the backups that display. (For details, see Working with custom filters.)
3. Expand the Windows asset and select one of the following to use for the recovery:
● An image-level backup.
● An imported image-level backup copy. (To import a backup copy, see To import a cold backup copy or To import a hot backup copy.)
● A hot image-level backup copy (supported if performing IR on the target appliance where the hot copy resides).
NOTE If you are running both file-level and image-level backups for the Windows asset, two asset instances display in the catalog: one for file-level backups and one for image-level backups. Be sure to select an image-level backup (where the application is image level).
4. Click Instant Recovery.
5. Check the Recover this VM in Audit Mode box.
6. Enter Location Details to specify the location where the IR VM will reside.
The details that display vary by Target Hypervisor Type. The list contains only the types that are available in your environment. For example, the Unitrends Appliance type is not an option for Unitrends Backup virtual appliances. The Hyper-V Host type is not an option if a compatible Hyper-V virtual host asset has not been added to the appliance.
● If you select Unitrends Appliance, the IR VM is assigned 2 CPUs and 4GB of RAM by default. Modify these settings as needed. Then continue to step 7. .
NOTE Use care when modifying these settings to ensure that the appliance has adequate CPU and RAM for regular operations. For example, Unitrends recommends reserving at least 50% of the available RAM.
● If you select VMware Host or Hyper-V Host, provide details for the virtual host server. See the table below for descriptions of the Location Details fields.
|
Item |
Description |
|---|---|
|
Target Hypervisor Type |
Select a location type from the list (Unitrends Appliance, VMware Host, or Hyper-V Host). |
|
Target Location |
Select a VMware or Hyper-V host from the list. The list contains all VMware and Hyper-V virtual host assets that have been added to the appliance and are compatible with the Windows asset. For example, an ESXi 5.1 host does not display for a Windows 2016 asset. (For details, see Adding a virtual host.) |
|
Target Resource Pool (VMware only) |
(Optional) If your VMware environment has resource pools, you can opt to select one in the list. |
|
Target Storage |
Select the datastore (VMware) or volume (Hyper-V) that will be used to create the VM's disks. |
|
Target Appliance Network |
Select a virtual network from the list. The list contains the virtual networks that are discovered and available on the VMware or Hyper-V host. |
|
Network Switch (Hyper-V only) |
If the Hyper-V host has multiple switches, select one from the list. The list contains all network switches that are discovered and available on the Hyper-V host. |
Virtual host example:
Unitrends appliance example:
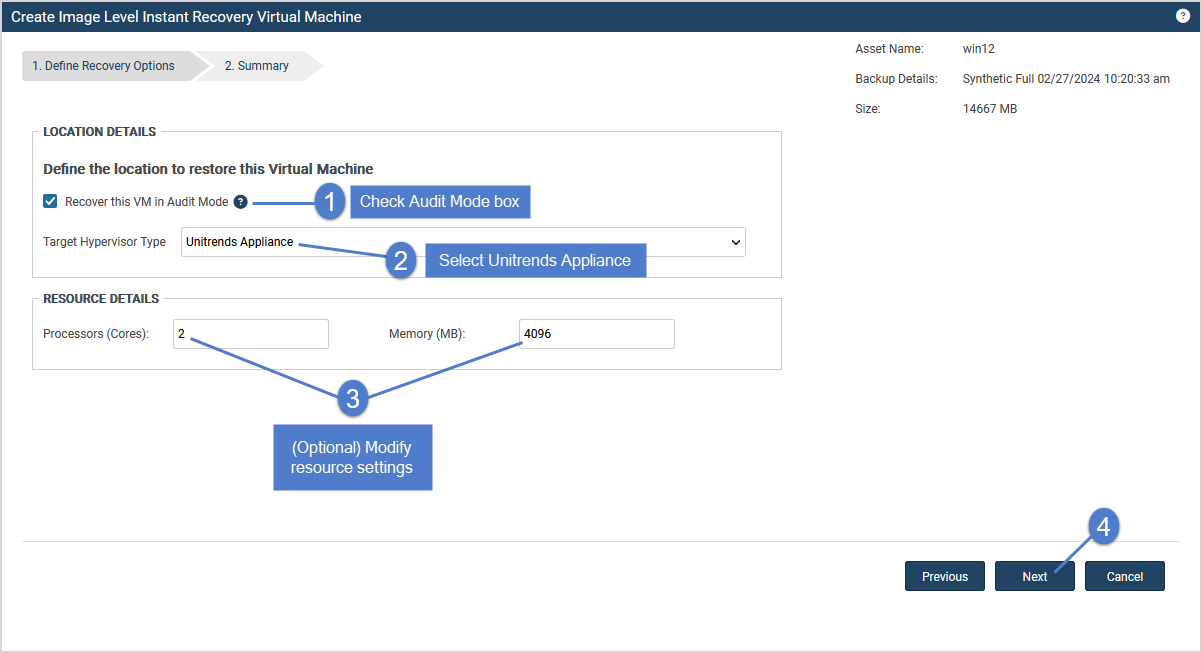
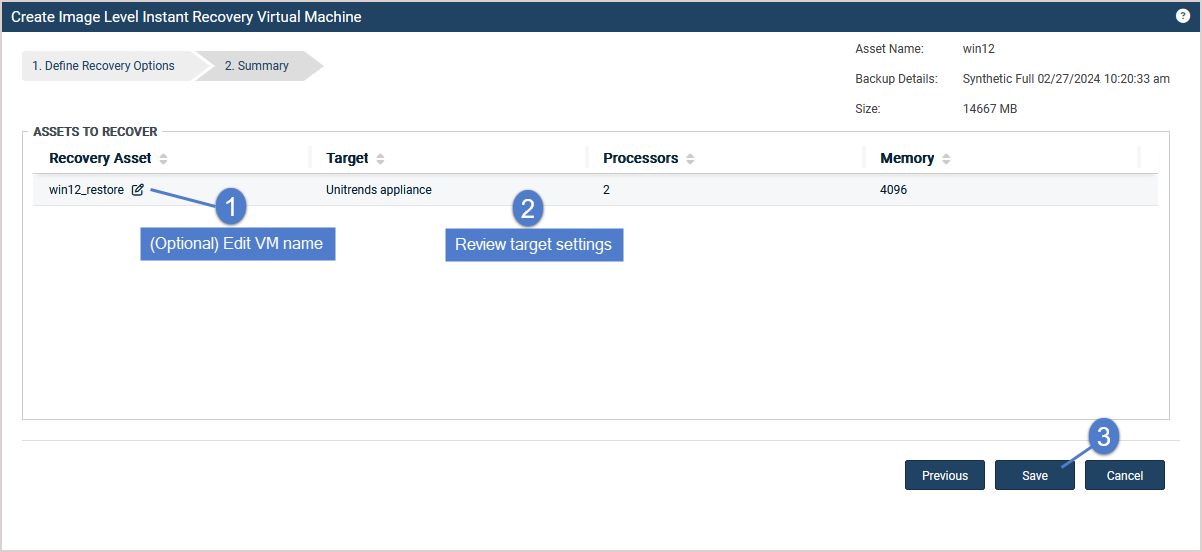
8. Review the recovery settings.
The VM is created with the following default name: <Windows_asset_name>_restore. To change this name, click the pencil icon.
9. Click Save to start the recovery.
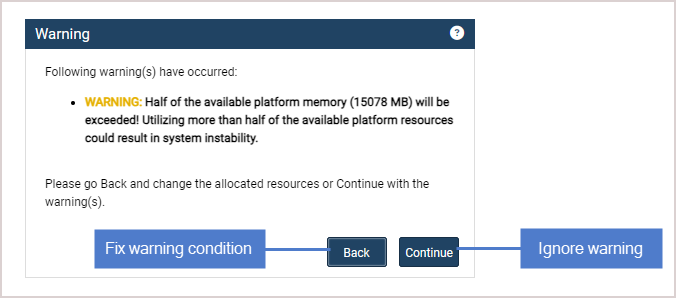
10. (If needed) Address any error or warning messages as shown below.
● Error – If you see an error, click Back to resolve the issue.
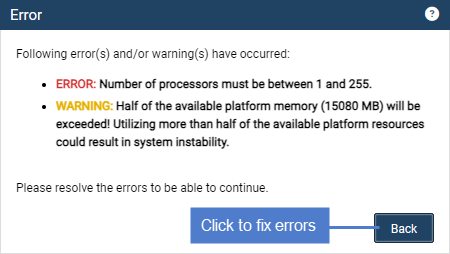
● Warning – If you see a warning message, click Back to address the warning or Continue to create the IR VM without addressing the warning condition.
11. Click OK to close the Information message.
The VM is created on the appliance or target virtual host. The VM has no network settings.

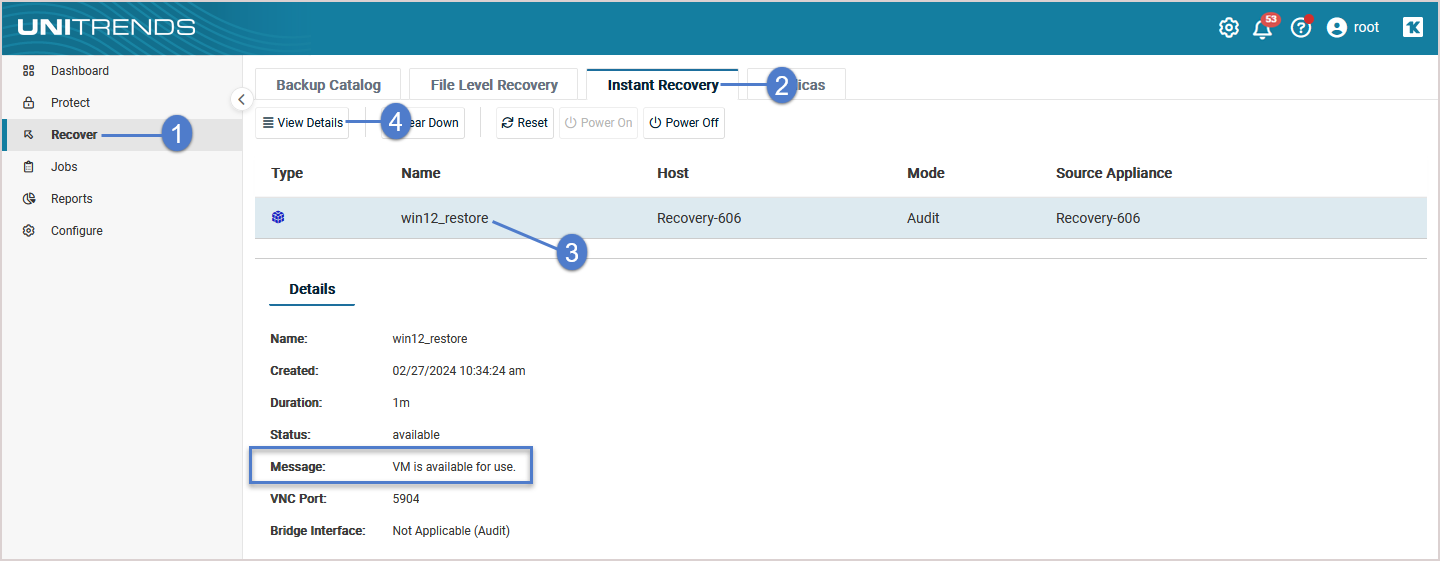
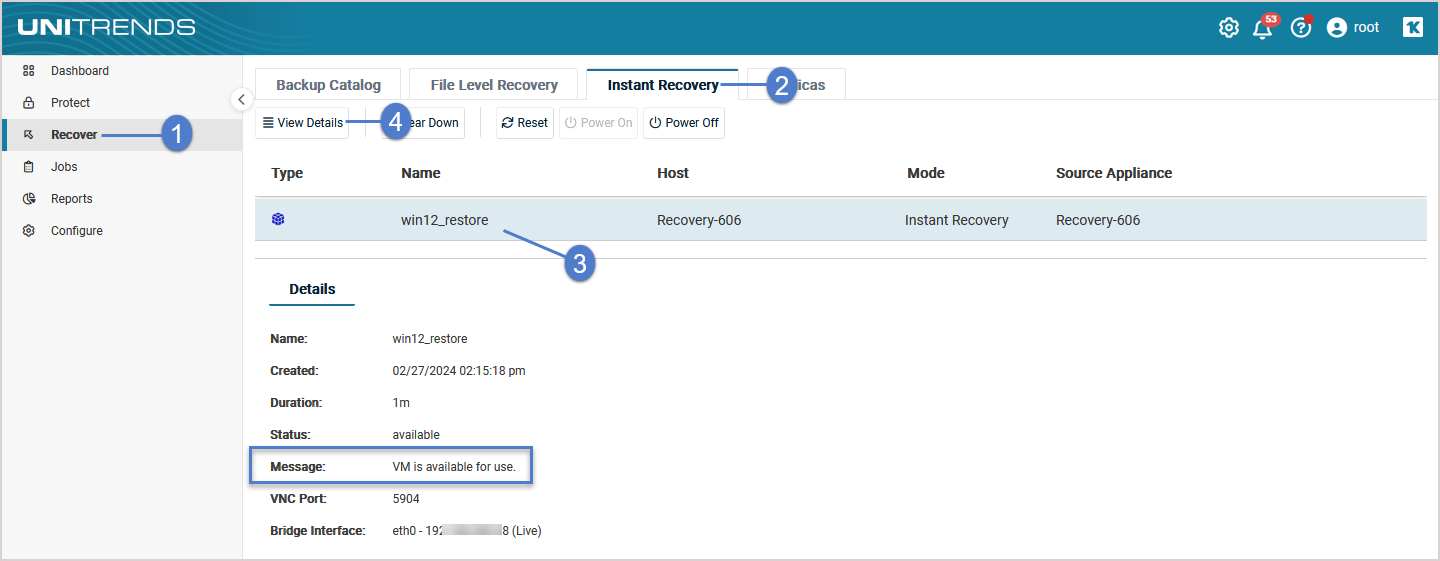
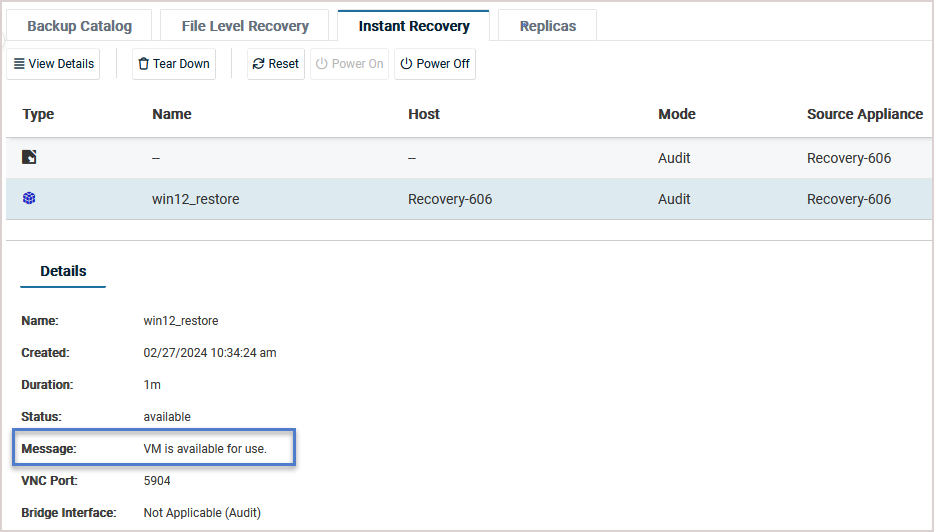
12. Check IR progress by viewing details on the Instant Recovery tab.
NOTE If you are recovering an incremental that has a long chain of dependent incrementals, it can take extra time to create the IR VM.
● Click the Instant Recovery tab. Active IR sessions display by VM name.
● Click to select the IR session you created.
● Click View Details above.
● Status messages display in the Details tab below. IR moves through several phases. The VM can be accessed when you see this message: VM is available for use.
13. Access the IR VM to verify that it is functioning as expected. See one of the following for details:
● To access an IR VM on a Recovery Series or Recovery MAX appliance
OR
● To access an IR VM on an external hypervisor
NOTES
● Any features or applications that require network access do not have full functionality in audit mode.
● Any changes made to the IR VM in audit mode are lost when you tear down the IR session. These changes are not applied to the production Windows asset that you are auditing.
● In rare instances, after IR is performed for a Windows server, a disk may be inaccessible because it has been placed in an offline state. To bring disks into an online state, login to the VM, go to Disk Management, right-click on the offline disk, and select Online from the drop-down menu.
● While running the IR VM, you can power on, power off, or reset the IR VM right from the Instant Recovery tab. For details, see Working with the instant recovery session.
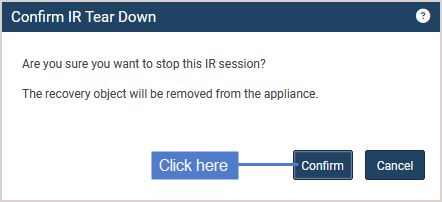
14. Tear down the IR session:
● On the Instant Recovery tab, click to select the IR session.
● Click Tear Down.

● Click Confirm.
The recovery object is removed from the appliance and the IR VM is removed from the appliance or target virtual host.
Perform instant recovery after the Windows asset fails. (If the Windows asset has not failed, you can use audit mode to verify that the IR VM can be created from a backup. See Perform instant recovery in audit mode for details.)
Review these recommendations before going into instant recovery mode:
● Instant recovery mode should be used temporarily. The appliance begins sending alerts after a live IR VM has run for 14 days.
● You can tear down the IR session after you have recovered to new hardware (supported in all cases) or by retaining the IR VM as a permanent replacement (supported only for IR VMs that reside on external hypervisors).
● A live IR VM running on an ESXi or Hyper-V server uses hypervisor resources. Disk space and compute resources of the Unitrends appliance are minimally impacted. Tear down the IR session as soon as VM data has been migrated to the hypervisor. This removes the IR session only. The IR VM remains fully functional on the target hypervisor.
IMPORTANT Be sure to shut down the original Windows asset before running this procedure.
Run this procedure from the backup appliance to recover from a backup or imported backup copy. Run this procedure from the backup copy target appliance to recover from a hot backup copy.
1. Log in to the backup appliance or target appliance (if recovering from a hot backup copy).
2. Select Recover and click the Backup Catalog tab.
(Optional) Use Filter Backups to the right to customize the backups that display. (For details, see Working with custom filters.)
3. Expand the Windows asset and select one of the following to use for the recovery:
● An image-level backup.
● An imported image-level backup copy. (To import a backup copy, see To import a cold backup copy or To import a hot backup copy.)
● A hot image-level backup copy (supported if performing IR on the target appliance where the hot copy resides).
If you are running both file-level and image-level backups for the Windows asset, two asset instances display in the catalog: one for file-level backups and one for image-level backups. Be sure to select an image-level backup (where the application is image level).
4. Click Instant Recovery.
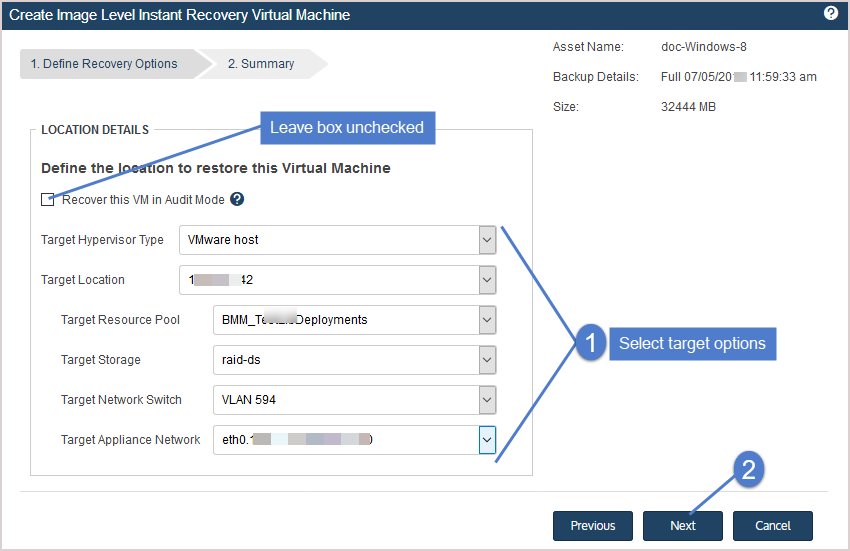
5. Do not check the Recover this VM in Audit Mode box.
This box must be unchecked to recover the failed Windows asset with its original network settings.
NOTE If the Windows asset has not failed, you can Perform instant recovery in audit mode by checking this box.
6. Enter Location Details to specify the location where the IR VM will reside.
The details that display vary by Target Hypervisor Type. The list contains only the types that are available in your environment. For example, the Unitrends Appliance type is not an option for Unitrends Backup virtual appliances. The Hyper-V Host type is not an option if a compatible Hyper-V virtual host asset has not been added to the appliance.
● If you select Unitrends Appliance, the IR VM is assigned 2 CPUs and 4GB of RAM by default. Modify these settings as needed. Then continue to step 7. .
NOTE Use care when modifying these settings to ensure that the appliance has adequate CPU and RAM for regular operations. For example, Unitrends recommends reserving at least 50% of the available RAM.
● If you select VMware Host or Hyper-V Host, provide details for the virtual host server. See the table below for descriptions of the Location Details fields.
|
Item |
Description |
|---|---|
|
Target Hypervisor Type |
Select a location type from the list (Unitrends Appliance, VMware Host, or Hyper-V Host). |
|
Target Location |
Select a VMware or Hyper-V host from the list. The list contains all VMware and Hyper-V virtual host assets that have been added to the appliance and are compatible with the Windows asset. For example, an ESXi 5.1 host does not display for a Windows 2016 asset. (For details, see Adding a virtual host.) |
|
Target Resource Pool (VMware only) |
(Optional) If your VMware environment has resource pools, you can opt to select one in the list. |
|
Target Storage |
Select the datastore (VMware) or volume (Hyper-V) that will be used to create the VM's disks. |
|
Target Appliance Network |
Select a virtual network from the list. The list contains the virtual networks that are discovered and available on the VMware or Hyper-V host. |
|
Network Switch (Hyper-V only) |
If the Hyper-V host has multiple switches, select one from the list. The list contains all network switches that are discovered and available on the Hyper-V host. |
Virtual host example:
Unitrends appliance example:

8. Review the recovery settings.
The VM is created with the following default name: <Windows_asset_name>_restore. To change this name, click the pencil icon.
9. Click Save to start the recovery.
10. (If needed) Address any error or warning messages as shown below.
● Error – If you see an error, click Back to resolve the issue.
● Warning – If you see a warning message, click Back to address the warning or Continue to create the IR VM without addressing the warning condition.
11. Click OK to close the Information message.
The recovery object and IR VM are created, and data migration begins. During this time, the VM is fully operational.
IMPORTANT Do not tear down the recovery session or modify the VM in any way until data migration is complete.
12. Check IR progress on the Instant Recovery tab:
● Click the Instant Recovery tab. Active IR sessions display by asset name.
● Click to select the IR session you created.
● Click View Details.
● Status messages display in the Details tab below. IR moves through several phases. Data migration is complete when you see this message: VM is available for use.
13. When you see the VM is available for use message, all data has been migrated and IR is complete.
● The IR VM has the same network settings and username/password credentials as the original Windows asset.
● Access the VM and verify that it is functioning as expected in production. See these topics for details: To access an IR VM on a Recovery Series or Recovery MAX appliance or To access an IR VM on an external hypervisor.
NOTE In rare instances, after a restore is performed for a Windows server, a disk may be inaccessible because it has been placed in an offline state. To bring disks into an online state, log in to the VM, go to Disk Management, right-click the offline disk, and select Online from the drop-down menu.
14. Modify VM settings and backup schedules as needed to begin protecting the IR VM. The next backup of the IR VM is promoted to a full.
15. Next steps vary by where the IR VM resides. Do one of the following:
● IR VM running on a Recovery Series or Recovery MAX appliance – Tearing down the IR session removes the IR VM from the appliance. After you have recovered the original asset to new physical hardware, tear down the IR session as described in Tearing down the instant recovery session.
● IR VM running on a VMware or Hyper-V host – The IR session is not needed once data has migrated to the IR VM. Tear down the IR session as described in Tearing down the instant recovery session.
NOTE While running the IR VM, you can power on, power off, or reset the virtual machine right from the Instant Recovery tab. For details, see Working with the instant recovery session.
While your IR is running in audit or live mode, use these procedures as needed:
Use this procedure to access an IR VM that is running on a physical appliance in audit or live mode:
NOTE You must use a VNC viewer to access the IR VM in audit or live mode on a physical appliance. If necessary, download one to your workstation before running this procedure.
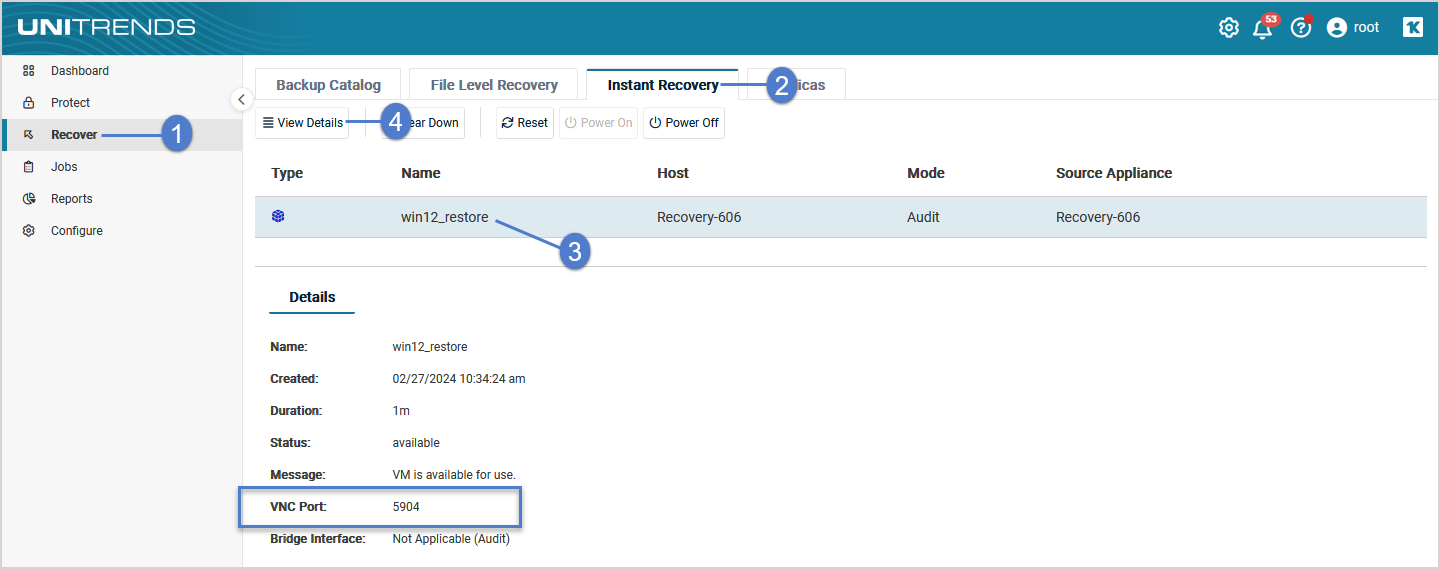
1. On the Instant Recovery tab, view details to obtain the VNC port number:
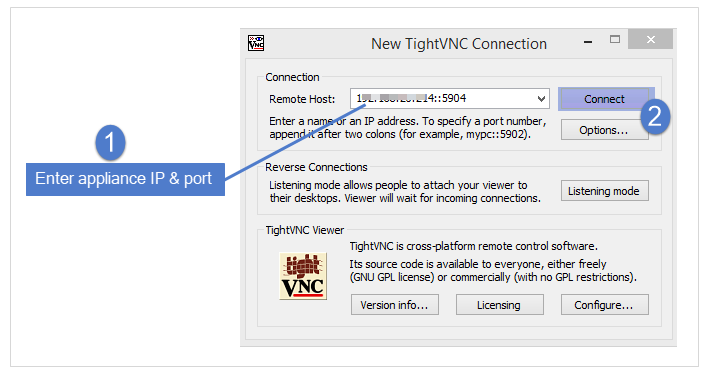
2. Open a VNC viewer. Connect to the VM by entering: <ApplianceIP>::<VNCport>
NOTE If you are unable to connect, check the appliance port security settings and temporarily switch to Low if the setting is Medium or High. For details, see To view or edit port security settings.
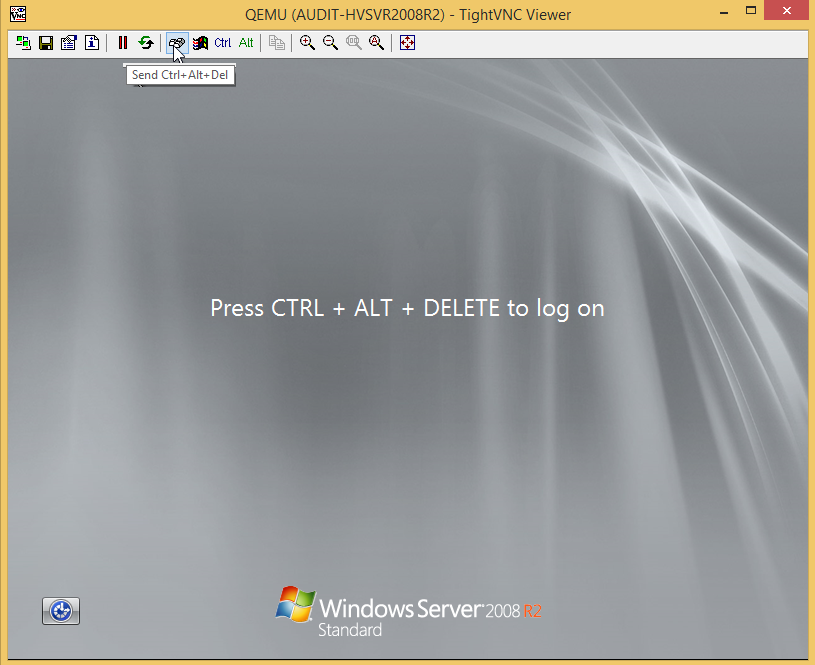
Exact field names, buttons, and syntax vary by VNC viewer. Typically, one or two colons are required between the appliance IP address and port number. An example using VNC port 5904 is given here:
3. The Windows login screen displays, indicating the VM is available.
NOTE If you access the VM before it has booted, you may see the first screen of the Unitrends Windows Unified Bare Metal Recovery Wizard. Do not attempt to complete the steps on the bare metal screen. After several seconds, the login screen for the original Windows asset displays.
4. Log in to the VM by entering the credentials of the original Windows asset.
Use this procedure to access an IR VM that is running on a VMware or Hyper-V host in audit or live mode:
1. Connect to your hypervisor manager.
2. Locate the VM in the list of virtual machines and launch the VM console.
3. Log in to the VM by entering the credentials of the original Windows asset.
NOTES
● If you access the VM before it has booted, you may see the first screen of the Unitrends Windows Unified Bare Metal Recovery Wizard. Do not attempt to complete the steps on the bare metal screen. After several seconds, the login screen for the original Windows asset displays.
● Performing operations through the hypervisor on an IR VM that is running in audit mode on a Hyper-V or ESXi server is not recommended and may yield undesirable results. For example, creating a Hyper-V checkpoint of an IR VM in audit mode causes an error on the hypervisor.
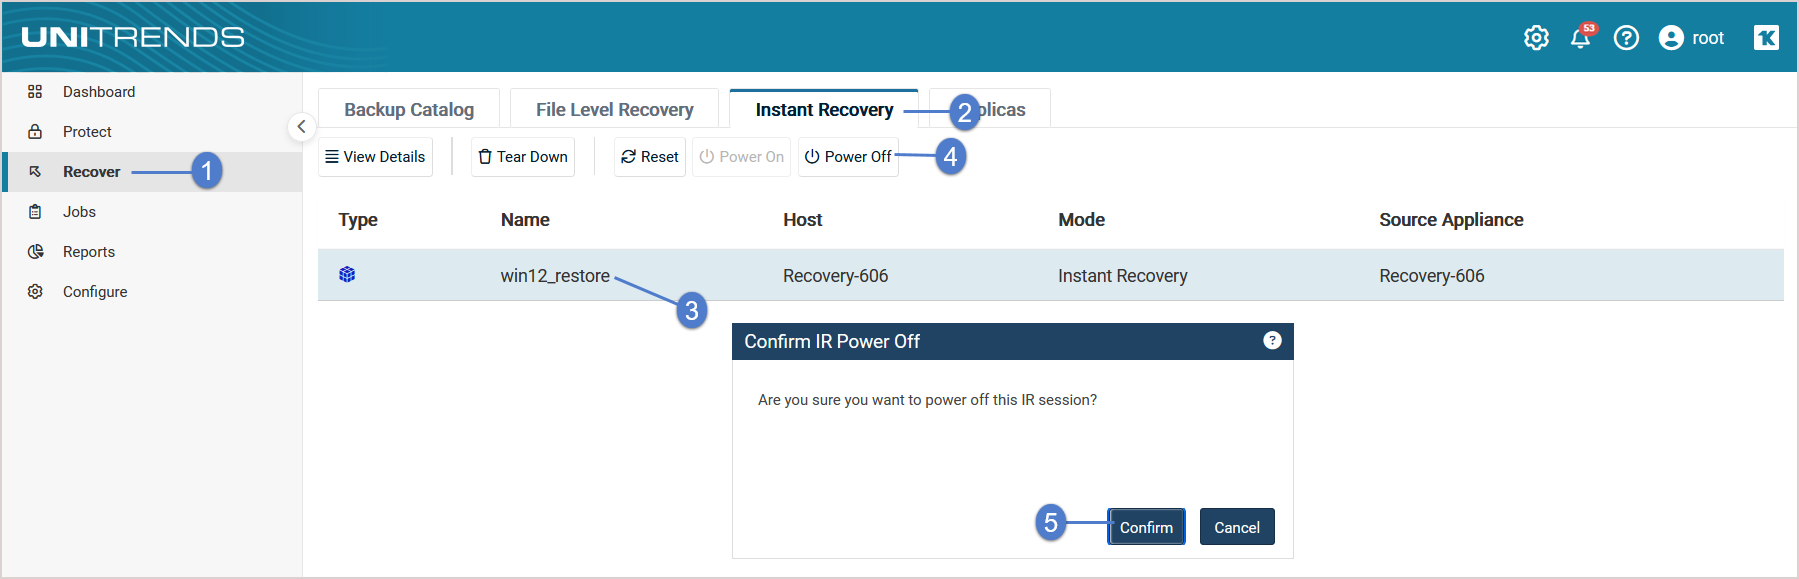
1. On the appliance used for the recovery, select Recover and click the Instant Recovery tab.
2. Click to select the instant recovery session.
3. Click Power Off.
NOTE If the Power Off button is disabled, either the VM is already powered off or you do not have the permissions needed to run this procedure.
4. Click Confirm.
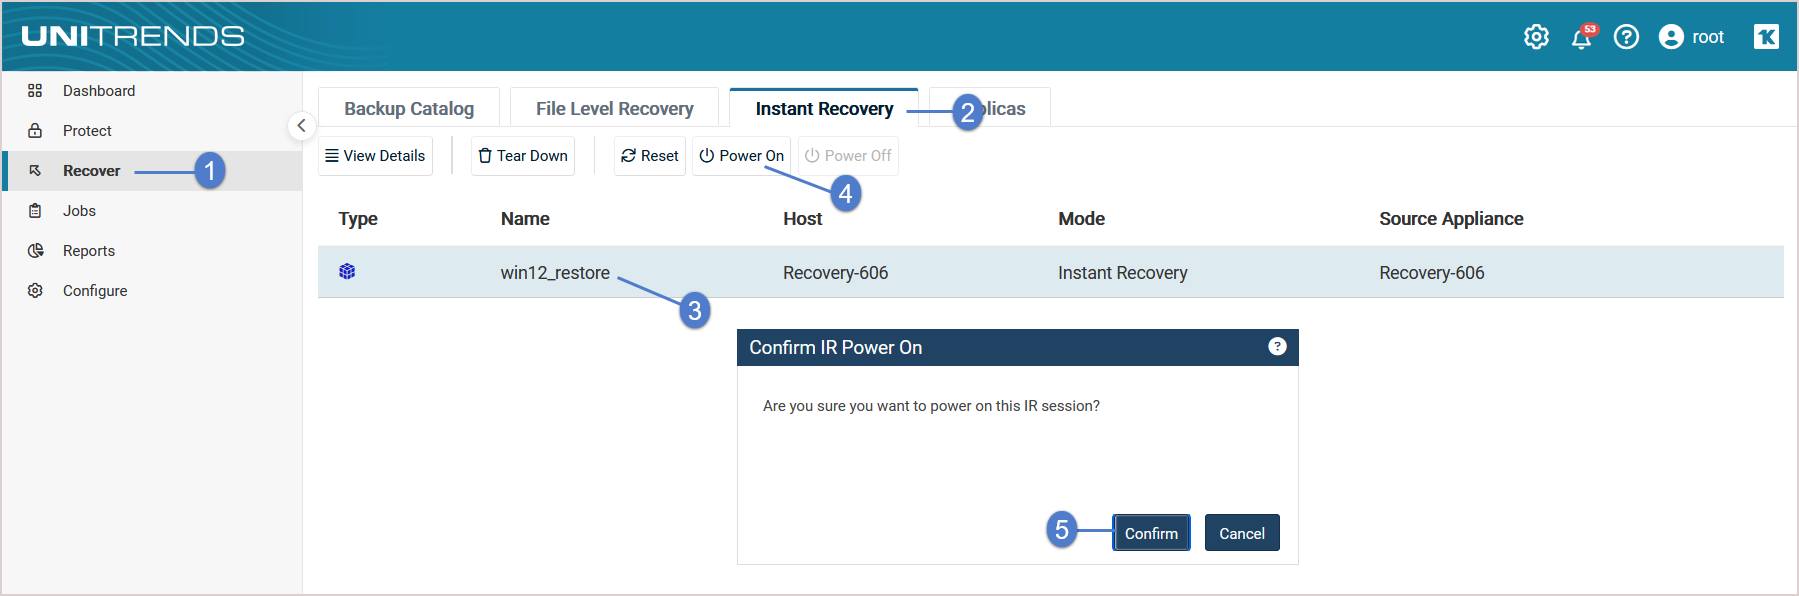
1. On the appliance used for the recovery, select Recover and click the Instant Recovery tab.
2. Click to select the instant recovery session.
3. Click Power On.
NOTE If the Power On button is disabled, either the VM is already powered on or you do not have the permissions needed to run this procedure.
4. Click Confirm.
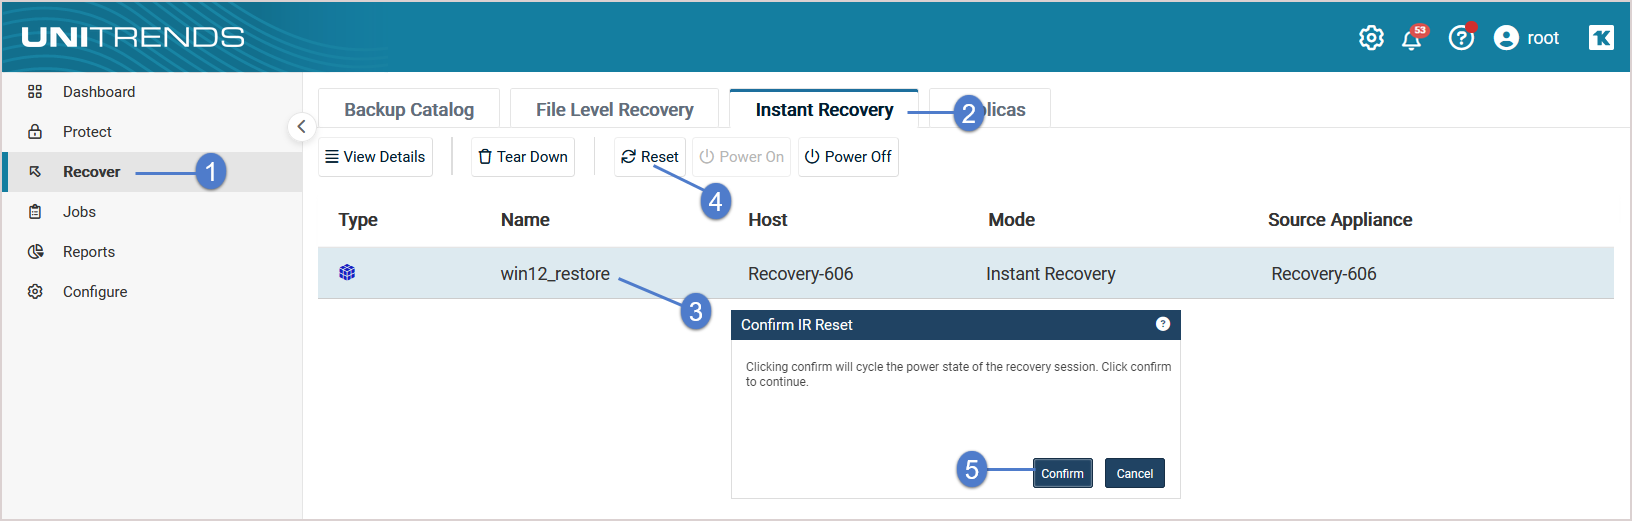
IMPORTANT This procedure performs a hard reset of the IR VM. If possible, use the power off/power on procedures instead.
1. On the appliance used for the recovery, select Recover and click the Instant Recovery tab.
2. Click to select the instant recovery session.
3. Click Reset.
NOTE If the Reset button is disabled, either the VM is not powered on or you do not have the permissions needed to run this procedure.
4. Click Confirm.
Tearing down the instant recovery session deletes the recovery object, freeing the appliance resources and reserved space. For appliance performance, it is best to tear down the instant recovery session as soon as possible.
Tearing down the IR session deletes the IR VM in these cases:
● The IR VM resides on a Recovery Series or Recovery MAX appliance – The instant recovery session is needed for the IR VM to run. Tearing down the IR session removes both the recovery object and the IR VM from the appliance. Do not tear down the session until you are no longer using the IR VM.
● The IR VM is running in audit mode on a virtual host – The instant recovery session is needed for the IR VM to run. Tearing down the IR session removes the recovery object from the appliance and the IR VM from the Hyper-V or ESXi host. Do not tear down the session until you are no longer using the IR VM.
● The IR VM is running in instant recovery (live) mode on a virtual host– Tearing down the IR session removes the recovery object from the appliance. The IR VM remains on the virtual host server. The Unitrends appliance uses Storage vMotion (VMware) or Storage Live Migration (Hyper-V) to copy the data from the disk image to the target Hyper-V or ESXi host. Do not tear down the IR session until all data has been migrated and the VM is ready for use. Tearing down too early invalidates the IR VM (and you must perform IR again to create a new one).
To verify that data has been migrated, go to the Instant Recovery tab, select the session and click Details. Data migration is complete when you see the message VM is available for use:
Use these steps to tear down the instant recovery session:
NOTE Be sure to review the information above before running this procedure.
1. On the appliance used for the recovery, select Recover and click the Instant Recovery tab.
Active IR sessions display by asset name.
2. Click to select the instant recovery session.
3. Click Tear Down.
4. Click Confirm.
The session is removed from the appliance and no longer displays on the Instant Recovery tab:
● If the IR VM was running on a Recovery Series or Recovery MAX appliance, the IR VM is removed from the appliance.
● If the IR VM was running in audit mode on a VMware or Hyper-V host, it is removed from the virtual host.
● If the IR VM was running in instant recovery (live) mode on a VMware or Hyper-V host, it is retained on the virtual host.


