Performing unified bare metal recovery
Use the following procedures to perform unified bare metal recovery. For a successful recovery, be sure to run the procedures in order. Before you start, it is recommended that you read Implementing Windows unified bare metal protection for prerequisites and supported recovery scenarios.
For the recovery, you must use the 32-bit or 64-bit unified BMR ISO image provided on the Unitrends backup appliance.
To access the unified bare metal recovery ISO images
| 1 | Mount a working asset to the virtual_failover share on your Unitrends appliance by entering \\<ApplianceIP>\virtual_failover in the Windows File Explorer. |
| 2 | Download winbm.iso (64-bit assets) or winbm32.iso (32-bit assets). |

| 3 | Do one of the following: |
| • | If recovering to a physical machine, burn the ISO to CD. Refer to the documentation for the burner you are using to walk you through the process of creating a bootable CD from an ISO image, which is not the same as burning an ISO image to a CD. |
| • | If recovering to a virtual machine, save the ISO in a location that you can access from your hypervisor. |
| 4 | Proceed to Step 2: Prepare the recovery target machine. |
You can recover a failed asset to a physical or virtual machine (VM). Use one of the following procedures to prepare the recovery target machine:
| 1 | Ensure that the target machine meets the following requirements: |
| Requirement | Description | ||||||||||||
|---|---|---|---|---|---|---|---|---|---|---|---|---|---|
|
Processor features |
WinPE requires these processor features to be enabled on the recovery target machine: NX, PAE, and SSE2. Be sure these features are enabled before you boot from the ISO image. For instructions, see Error 0x0000005D (Unsupported Processor) when booting Release 7.4 Integrated Bare Metal restore media. Machines that do not have these processor features cannot be used for the recovery. |
||||||||||||
|
Firmware interface type |
Ensure that the machine’s firmware interface type (BIOS or UEFI) matches the firmware interface type of the failed asset. The recovered asset will not boot if you recover to a dissimilar interface type. |
||||||||||||
|
Disk space |
Make sure the machine has enough disk space for the recovery. See these rows below for requirements by backup type: File-level backup and Image-level backup. |
||||||||||||
|
To recover from a file-level backup, adhere to these requirements:
|
|||||||||||||
|
To recover from an image-level backup, adhere to these requirements:
|
| 2 | Load the disk containing the bootable ISO image into the machine’s CD/DVD drive. (For details on creating the ISO disk, see Step 1: Access the unified bare metal recovery ISO image.) |
| 3 | Proceed to Step 3: Run the Unified Bare Metal Recovery wizard. |
A VMware, Hyper-V, or XenServer virtual machine can be used as the recovery target. You can create a new VM or edit the settings of an existing VM.
| 1 | Ensure that the target VM meets the following requirements: |
| Requirement | Description | ||||||||||||
|---|---|---|---|---|---|---|---|---|---|---|---|---|---|
|
Firmware interface type |
Ensure the VM’s firmware interface type (or UEFI) matches the firmware interface type of the failed asset. The recovered asset will not boot if you recover to a dissimilar interface type. |
||||||||||||
|
Memory |
Add enough memory to satisfy Microsoft’s support guidelines for the operating system being recovered. The recovery requires at least 1 GB of memory. |
||||||||||||
|
Disk space |
The VM's virtual hard disks must have adequate space for the recovery. See these rows below for requirements by backup type: File-level backup and Image-level backup. |
||||||||||||
|
To recover from a file-level backup, adhere to these requirements:
|
|||||||||||||
|
To recover from an image-level backup, adhere to these requirements:
|
|||||||||||||
|
Secure Boot (Windows 10 and 11, Server 2016, 2019, and 2022) |
The Windows Secure Boot option is not supported. Ensure that Secure Boot is set to OFF before you perform the bare metal recovery. |
||||||||||||
|
VMware NIC |
For recovery to a VMware virtual machine, make sure you are using the E1000 NIC. This NIC is only required during the recovery. After rebooting the recovered VM, you can use a different NIC.
|

| 2 | Edit the VM settings to boot from the bare metal ISO. (For details on accessing the ISO, see Step 1: Access the unified bare metal recovery ISO image.) |
Procedures vary by hypervisor. A VMware example is given here:
| • | Power off the VM. |
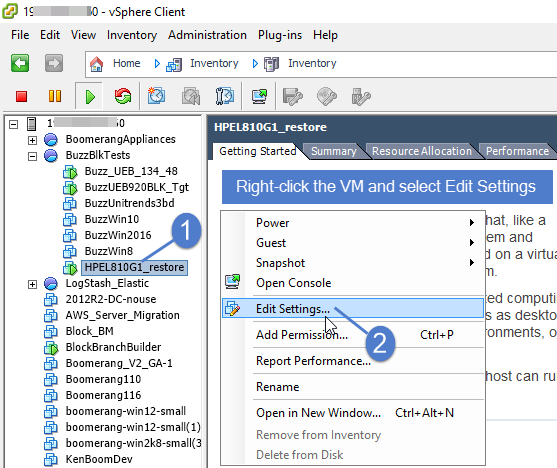
| • | Right-click the VM and select Edit Settings: |
| • | On the Hardware tab, click Add, select CD/DVD Drive and click Next: |

| • | Select Use ISO image and click Next: |

| • | Browse or enter a path to select the unified bare metal recovery ISO, check the Connect at power on box, and click Next: |

| • | Click Next to continue: |

| • | Click Finish to add the device: |

| • | Click OK to save: |

| • | Do one of the following: |
| – | If the target VM does NOT have an operating system installed, proceed to Step 3: Run the Unified Bare Metal Recovery wizard. |
OR
| – | If the target VM has an operating system installed, you must boot into BIOS and change the boot order to force the VM to boot from the bare metal ISO. See the remaining steps in this procedure for a VMware example. |
Note: The remaining steps provide an example of how to boot into BIOS and change the VM's boot order. This example is run on VMware. Details will vary by hypervisor.
| • | Ensure that the VM is powered off. |
| • | Right-click the VM and select Edit Settings. |
| • | On the Options tab, select Boot Options, check the Force BIOS Setup box, then click OK: |

| • | Power on the VM. The VM boots into BIOS. |
| • | Launch the VM console. |
| • | On the Boot menu in the BIOS Setup Utility, select CD-ROM Drive and press + to move it to the top of the list. Press F10 to save. |
| • | Press Enter to save and exit. |

| • | Power off the VM. |
| 3 | Proceed to Step 3: Run the Unified Bare Metal Recovery wizard. |
Perform the recovery by using the Unified Bare Metal Recovery (UBMR) wizard. See the following topics for details:
Before an asset fails, you can perform a test unified bare metal recovery without impacting the original asset. As long as you assign the recovered asset a unique IP address and rename it, the test recovery does not cause any network conflicts with the original asset. IP conflicts will occur if you perform a test recovery and do not assign the recovered asset a unique name and IP address.
To perform the test recovery, use the Perform the recovery by running the Unified Bare Metal Recovery wizard procedures.
Use the procedures in this section to perform the recovery by running the UBMR wizard. These procedures apply to any supported target machine (a physical machine, a virtual machine, dissimilar hardware, etc.).
Notes:
| • | You must prepare the recovery target machine before running the UBMR wizard. (See Step 2: Prepare the recovery target machine for details.) |
| • | If you exit the UBMR wizard before you are finished with the recovery, you are taken to a command window. To return to the wizard from this window, run the following command: z:\pcpb\Restore.exe. |
For a successful recovery, you must run the procedures in the following order:
These steps ensure that the recovery target machine can communicate with the appliance that is storing the backup or hot backup copy you will use for the recovery.
| 1 | Boot the recovery target machine from the bare metal ISO image. The machine boots into WinPE and launches the Unified Bare Metal Recovery wizard. |
Notes:
| • | If you see a message stating that you must set up networking to continue or that no disks are detected on the local system, you might need to load drivers into WinPE. Click OK to allow the boot to continue. You can load drivers later in this procedure. |
| • | If you are recovering to a VM and the Windows login screen displays, you must boot into BIOS and change the boot order to force the VM to boot from the bare metal ISO. For a VMware example, see To prepare a VM for unified bare metal recovery. |


| 2 | Select a Network Adapter. If the machine has more than one adapter, the default adapter displays first. |
If a network adapter does not display, WinPE cannot detect one. To resolve this issue, perform the following:
| • | Ensure that the network cable is plugged in to an active port. |
| • | If the adapter is connected to the network and WinPE is unable to detect it, you must load a network driver into WinPE. In the Load WinPE Drivers section, specify a driver by browsing or entering a path, then click Load Driver. |

| 3 | Review network settings and modify as needed. |
| • | If DHCP is configured for your network, network settings are assigned automatically. |
| • | If DHCP is not configured, or if you want to configure network settings for the target machine manually, click Change Settings. Then enter a unique IP address, the Subnet Mask, and the Gateway. Network settings do not need to match those of the original asset. The only requirement is that the machine can communicate with the appliance that is storing the backup you will use for recovery. |
Note: The network settings that you configure during this step are used only for the recovery. They are not applied to the network adapter when you boot into the recovered operating system. Before connecting the recovered asset to your network, you will reconfigure the asset’s network settings.
| 4 | Select the time zone of the Unitrends appliance storing the backup or hot backup copy that you will use for recovery. |
| 5 | Click Next. |

| 6 | Proceed to Step 2: Select an appliance and the backup to recover. |
| 1 | For Backup Source, specify the Unitrends appliance that is storing the backup or hot backup copy you will use for the recovery. You can either: |
| • | Select the appliance from the Backup Source list. This list contains all appliances on the same subnet as the recovery target machine. |
| • | Enter the IP address of an appliance on a different subnet. |
| 2 | Enter the Username and Password credentials of a UI user account that has superuser or administrator privileges. Click Login. |

| 3 | Select the Windows asset from the Client list. |
Note: Assets that have eligible file-level and/or image-level backups display in the list. (See An eligible file-level backup or An eligible image-level backup for details.)
| 4 | Select a recovery point in the calendar. |
| • | Days with a backup display in bold on the calendar. |
| • | If multiple backups exist on a given day, the different times for these backups display in the Recovery Point list. |
| • | If the recovery times do not match the backup times on the Unitrends appliance, verify that you selected the time zone of the appliance that you are using for the recovery (in Step 1: Boot into WinPE and set up the local environment). |
| • | The selected Recovery Point shows the backup date/time, type ( Img for image-level or File for file-level), and mode (Full or Incr for incremental). |
| 5 | Click Next. |

| 6 | Proceed to Step 3: Map drives and volumes. |
After selecting an appliance, asset, and recovery point, you must map the failed asset’s disks and/or volumes to disks on the recovery target machine. This procedure differs by backup type. Examples are given for file-level and image-level recovery.
| 1 | Map drives and/or volumes as described below in File-level backup example or Image-level backup example. |
| 2 | Click Next. |
| 3 | Click Yes to confirm. |

| 4 | Proceed to Step 4: Start the recovery. |
|
On the Drive/Volume Mapping screen, select the critical volumes to recover by highlighting the disk(s) that contain them.
Consider the following when selecting a destination disk:
|

|
On the Disk Mapping screen, select the disks to recover.
Note: It is recommended to select all disks. The only way to recover all data on a disk is by selecting the disk during this mapping step. After completing the bare metal recovery, you can opt to recover individual files from the backup (as described in Recovering files from Windows image-level backups), but you cannot recover entire disks or volumes.
Consider the following when selecting a destination disk:
|

Run one of the following procedures to start the recovery:
| 1 | Click Restore. Proceed to the next step when the job completes. |
Note: The recovery must complete within 24 hours. If many jobs are running on the appliance, move the UBMR job ahead in the queue by canceling running jobs or pausing queued jobs. For details, see Managing active jobs.

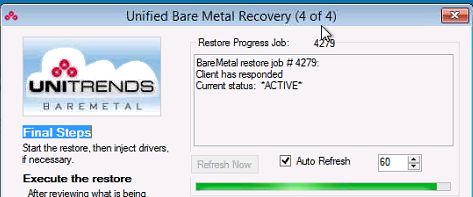
The recovery can take some time. Monitor job progress in the Restore Progress Job area at the top of the screen. Sample messages are given here:


| 2 | Click OK to close the Status message: |

| 3 | Do one of the following: |
| • | If you recovered to identical hardware, remove the bootable ISO CD, then click Reboot. After the target machine reboots, proceed to Step 4: Complete the unified bare metal recovery. (If the target fails to reboot, you need to inject drivers. To inject drivers, boot the machine from the ISO disk, then proceed to step 4.) |
| • | If you recovered to dissimilar hardware, you must inject storage drivers before rebooting. Proceed to step 4. |
| 4 | Inject storage drivers by doing these steps: |
| • | In the UBMR wizard, click one of the following: |
| – | If you have booted from the bare metal ISO after your recovered operating system failed to boot, you are returned to the first screen of the wizard. Click the Driver Injection button on this screen. |
Note: Do not use the Load Driver button under Load WinPE Drivers. This loads drivers into WinPE. Because your operating system has already been recovered, you must inject drivers into the recovered operating system instead.

| – | If you did not reboot, click Add Driver on the screen you used to recover the critical volumes. |

| • | Browse to select the driver and click Done to add it to the list of drivers to inject. Repeat as needed to add more drivers to the list. |
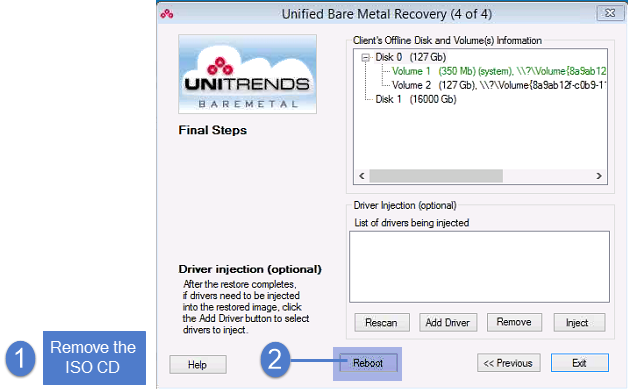
| • | Highlight the volume containing the operating system files in the asset’s Offline Disk and Volume(s) Information area. Then highlight a driver and click Inject. Repeat this step as needed to inject all the necessary drivers. |
| 5 | When you receive a message stating that the driver injection was successful, you are ready to reboot the recovered asset. Do one of the following: |
| • | If you are NOT recovering an Active Directory server, remove the bootable ISO CD, then click Reboot. |
| • | If you ARE recovering an Active Directory server, you must start the target machine in Directory Services Restore Mode by doing these steps: |
| – | Remove the bootable ISO CD. |
| – | Disconnect the server from the network (to ensure the server does not start in normal mode). |
| – | Start the server in Directory Services Restore Mode. |
| – | Do one of the following: |
| • | If a file-level backup is available, connect the server to the network, then recover the file-level backup as described in To recover an entire file-level backup by using the Backup Catalog. |
| • | If you do not have a file-level backup, set the database restored from backup registry value to 1. |
| – | Restart the domain controller in normal mode. |
| 6 | After the recovered asset boots, proceed to Step 4: Complete the unified bare metal recovery. |
Note: If the asset fails to boot, you might need to add additional drivers.
| 1 | Click Restore. Proceed to the next step when the job completes. |
Note: The recovery must complete within 24 hours. If many jobs are running on the appliance, move the UBMR job ahead in the queue by canceling running jobs or pausing queued jobs. For details, see Managing active jobs.
The recovery can take some time. Monitor job progress in the Restore Progress Job area at the top of the screen. Sample messages are given here:
| 2 | Click OK to close the Status message: |
| 3 | In the Restore dialog, click No. (You must inject a guest storage driver before you can reboot the recovered VM.) |

| 4 | Inject an ESX, Hyper-V, or XenServer guest storage driver by doing these steps: |
Notes:
If you attempt to reboot without adding the driver, the VM boots to a blue screen. Return to the wizard by booting from the bare metal ISO image. The first wizard screen displays. Click Driver Injection. Then inject the necessary driver as described below.
| • | Click Add Driver. |
| • | Select the guest storage driver, and then click Done to add the driver to the list of drivers being injected. |

| • | Highlight the volume containing the operating system files in the asset’s Offline Disk and Volume(s) Information area. Then highlight the guest driver and click Inject. |

| • | Click Yes to continue. |

| • | Click OK to close the Restore message. |

| 5 | When you receive a message stating that the driver injection was successful, you are ready to reboot the VM. Do one of the following: |
| • | If the VM is NOT a Hyper-V domain controller, edit the VM settings so it no longer boots from the bare metal ISO. Click Reboot, then click Yes to continue. |

| • | If the VM IS a Hyper-V domain controller, you must start the VM in Directory Services Restore Mode by doing these steps: |
| – | Edit the VM settings so it no longer boots from the bare metal ISO. |
| – | Disconnect the server from the network (to ensure the VM does not start in normal mode). |
| – | Start the VM in Directory Services Restore Mode. |
| – | Do one of the following: |
| • | If a file-level backup is available, connect the VM to the network, then recover the file-level backup as described in To recover an entire file-level backup by using the Backup Catalog. |
| • | If you do not have a file-level backup, set the database restored from backup registry value to 1. For details on editing this registry value, see this Microsoft article: Backup and Restore Considerations for Virtualized Domain Controllers. |
| – | Restart the domain controller in normal mode. |
| 6 | After the VM boots, proceed to Step 4: Complete the unified bare metal recovery. |
Use these steps to complete the recovery:
| 1 | Configure network settings for the recovered asset. The network settings that were used for the recovery are not retained after booting into the recovered operating system. Consider the following when configuring network settings: |
| • | If the original asset is still connected to the network, you must assign the recovered asset a unique IP address and rename it before connecting to the network to avoid conflicts. |
| • | If the original asset is no longer connected to the network, you can assign the recovered asset the same IP address as the failed asset. |
| • | If you are using DHCP and you added the original asset to the backup appliance by using only the asset’s name, the appliance discovers the recovered asset after you connect it to the network. If the original asset is still connected to the network, rename the recovered asset to prevent conflicts. |
| • | If you configure the recovered asset to use the same name and IP as the original asset, the appliance treats the recovered asset as if it is the original asset. No changes are needed on the Unitrends appliance. |
| • | If you configure the recovered asset to use a different name and IP than the original asset, the appliance treats the recovered asset as new asset. To protect the recovered asset, add it to the appliance and add or modify job schedules. |
| 2 | (If needed) Create and format additional drives and volumes: |
| • | If you recovered a file-level backup, only the system critical volumes you selected in Step 3: Map drives and volumes have been restored. If backups of the original Windows machine include other volumes, you must create and format those additional volumes. |
Important! Recovery of file-level backups fails if these additional volumes do not exist.
| • | If you recovered an image-level backup, the disks you selected in Step 3: Map drives and volumes have been recovered. You can opt to create and format additional disks, but this is not required. |
| 3 | (Optional) If you recovered a file-level backup, any data on non-critical volumes has not been restored. To restore this data, recover the failed asset's last file-level backup. For details, see To recover an entire file-level backup by using the Backup Catalog. |
| 4 | (If needed) Do these additional steps as needed: |
| • | For Exchange servers – If you are unable to mount Exchange databases after recovery, the databases may be in a Dirty Shutdown state. See this Microsoft article for details: Exchange Database is in a Dirty Shutdown State. |
| • | For Hyper-V servers – After recovery, you must run the following command on the Hyper-V server: bcdedit /set hypervisorlaunchtype Auto. Then reboot the server. |
| • | For Hyper-V servers recovered to a VMware or XenServer virtual machine – If the Hyper-V server had Integration Services installed, you must remove the Integration Services provider from the recovered VM before running Unitrends backups, as described here: |
| – | Log in to the recovered VM as administrator and open a command prompt. |
| – | Enter this command: vssadmin list providers |
| – | In the output, find Hyper-V IC Software Shadow Copy Provider and note the Provider ID. Example ID: {74600e39-7dc5-4567-a03b-f091d6c7b092} |
| – | Using a registry edit tool like regedit, remove the provider key and all subkeys: [HKEY_LOCAL_MACHINE\SYSTEM\CurrentControlSet\Services\VSS\Providers\{74600e39-7dc5-4567-a03b-f091d6c7b092}] |