Working with Windows file-level replicas
After setting up a Windows file-level replica, use the following procedures as needed:
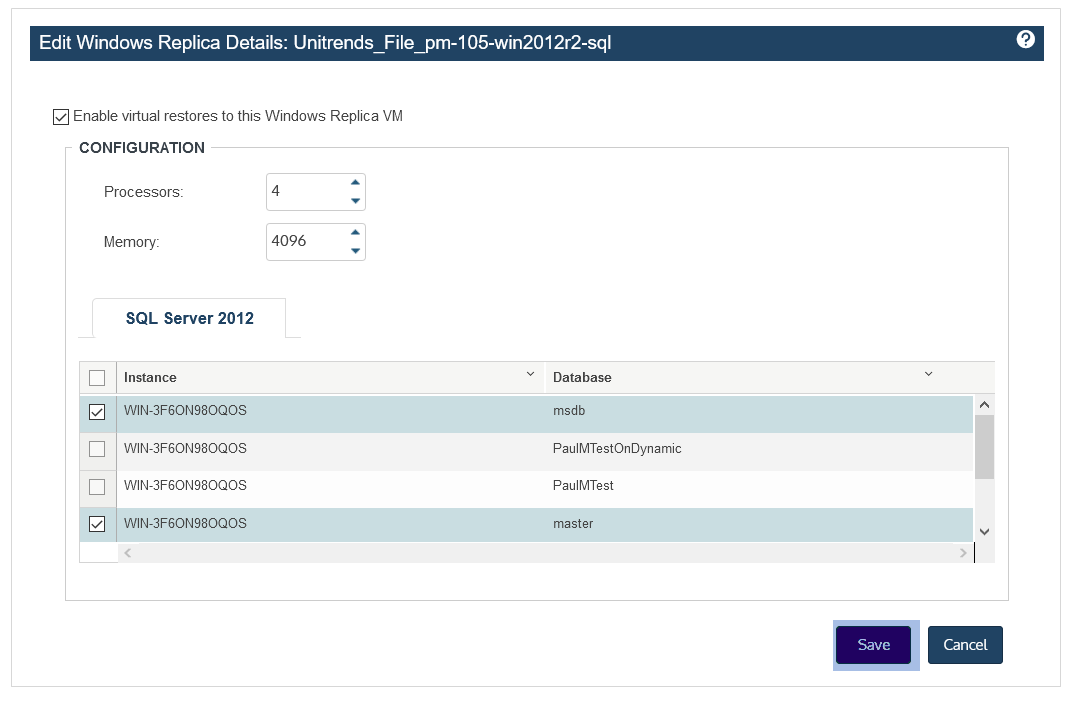
After creating a replica, you can modify the following settings at any time:
| • | The number of processors connected to the replica. |
| • | The amount of memory attached to the replica. |
| • | Whether to apply new backups to the replica (Enable virtual restores checkbox). |
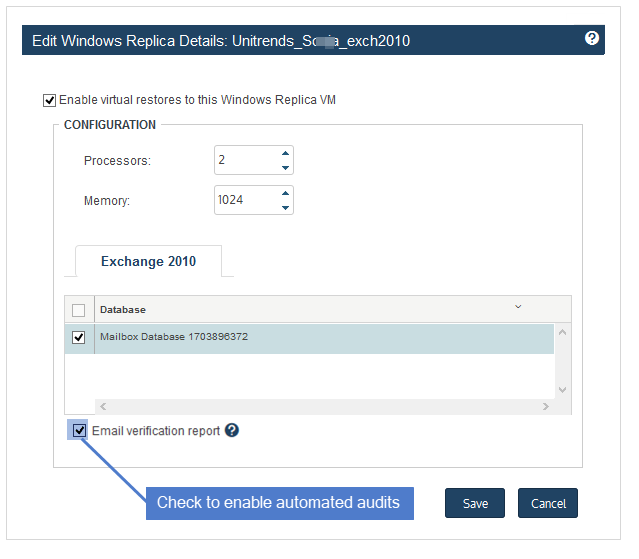
| • | Whether to perform automated audits of the replica (Email verification report checkbox, Hyper-V and Unitrends Appliance only). |
| • | Which hosted Exchange databases to include. |
| • | Which hosted SQL databases to include. |
To edit a Windows replica
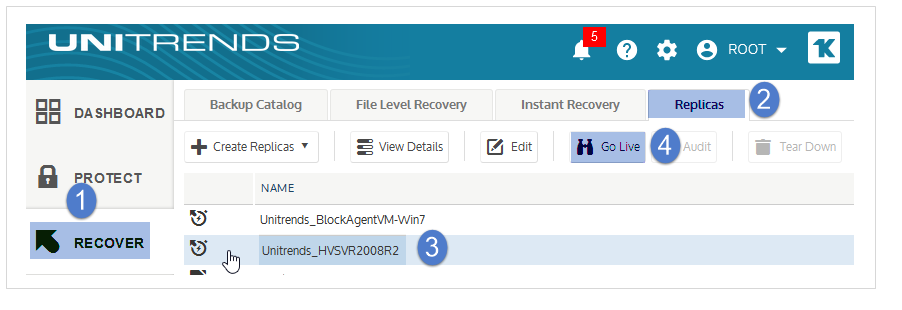
| 1 | Select Recover, then click the Replicas tab. |
| 2 | Select the replica, then click Edit. |

| 3 | Modify settings as desired. Click Save. (The settings that display vary by Windows asset. For example, the SQL tab does not display if the Windows asset does not host a SQL application.) |
Audit mode enables you to run the replica on a private network while the original Windows asset is still operating in production. A replica running in audit mode boots with no network interface. Auditing the replica with the original asset still online does not result in network conflicts or impact the original asset in any way. However, applications on the replica that require network access do not function fully in audit mode.
Note: Some Windows applications require network access and/or rely on underlying hardware, like network interface MAC addresses in order to run properly. When booting a Windows Replica in audit mode, there is no network interface, so applications requiring network connectivity will not function properly. This is expected behavior. When booting a Windows Replica in live or audit mode, applications that rely on unchanging hardware (like MAC addresses) may not function properly or may require re-authentication, reinstallation, or other special actions that are application specific in order for them to work properly. You should work with the application vendor to determine what actions are required.
It is recommended that you audit each newly created replica to ensure it functions as expected, and that you perform additional audits at regular intervals to check subsequent recovery points. You can perform manual audits for all Windows replicas. You can also set up automated audits for replicas that reside on a Unitrends appliance or Hyper-V host.
A newly created replica cannot be audited until at least one backup has been applied. During the audit, no subsequent backups are applied. Upon exiting audit mode, the appliance applies any backups that completed during the audit to bring the replica up to date.
You can automate the audit process by enabling email verification reports for a replica. The following requirements must be met to use this feature:
| • | The replica must reside on one of the following: a Recovery Series physical appliance, a Recovery MAX physical appliance, or a Hyper-V server. (Automated audits are not supported for replicas that reside on ESXi servers. Perform manual audits instead.) |
| • | Email reporting must be enabled on the Unitrends appliance where you created the replica. Email must be configured with the System box checked and at least one valid recipient email address. For details, see Appliance settings. |
To enable verification reports, check the Email verification report box while creating or modifying a replica. (See these procedures for details: Setting up a Windows file-level replica or Editing a Windows replica.)
Once email verification is enabled for a replica, the appliance does the following:
| • | Brings the replica into audit mode after a backup has been applied. |
| • | Takes a screenshot of the Windows login screen (after the replica has had several minutes to boot). |
| • | Sends the screenshot to each email recipient that is configured on the appliance. |
The screenshot normally shows the Windows login screen, but it can also show Windows in other boot states, including error conditions.
Important! Always view the screenshot to make sure the replica boots correctly.
The report runs once a day, but only after a backup has been applied. If the interval between backups lasts longer than 24 hours, you will not receive a report every day. If the replica cannot boot, you will receive an email report indicating that the replica cannot be verified.
Manually auditing the replica is a two-part process where you bring the replica into audit mode and then access the replica to verify that it is functioning as expected. During the audit, you should verify the following:
| • | The replica boots successfully and is operational. |
| • | The replica contains the expected data and applications. (Note that applications requiring network access do not function fully in audit mode.) |
After you have finished auditing the replica, you must take it out of audit mode so the appliance can resume applying backups. (Note that any changes made during the audit are lost upon exiting audit mode.)
Use these procedures to manually audit the replica:
| 1 | Select Recover, then click the Replicas tab. |
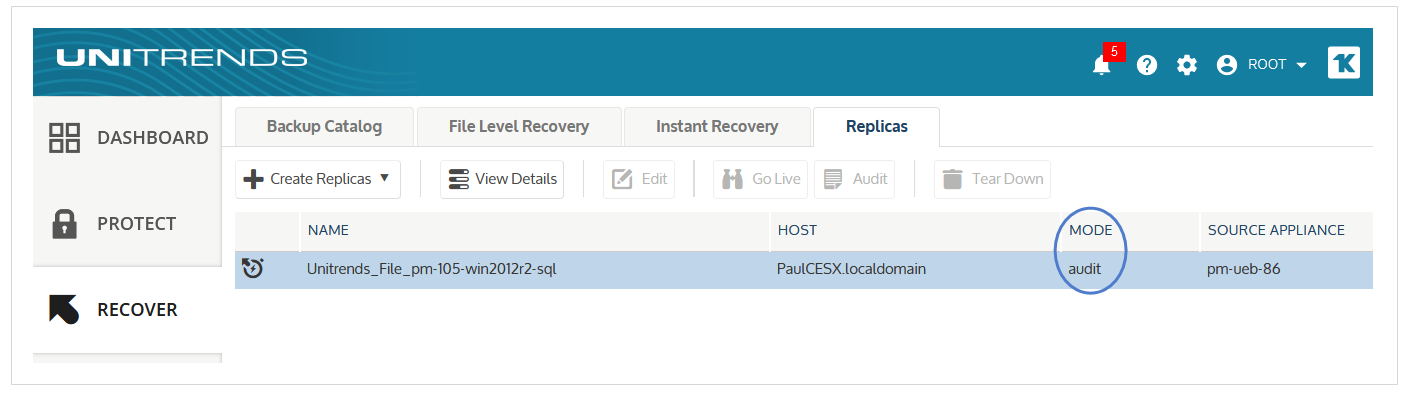
| 2 | Select the replica, then click Audit. Click Confirm. |
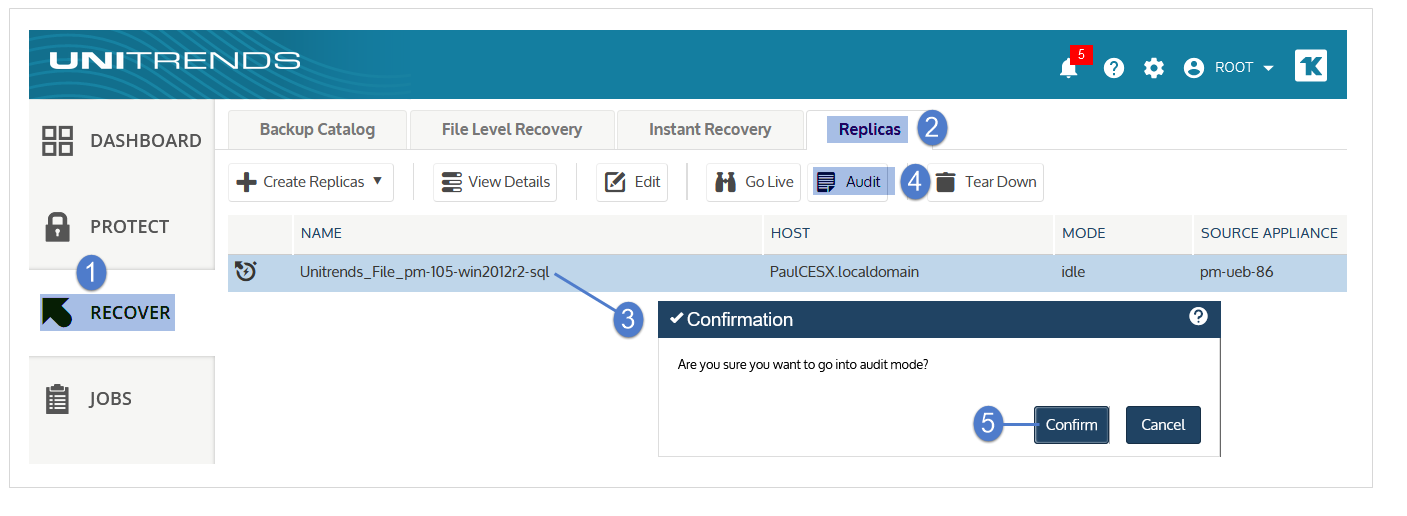
The replica's mode changes to idle (pending audit), then to audit.
Note: If a backup is currently being applied, the replica does not enter audit mode until the restore is complete.
| 3 | After the replica is in audit mode, you can connect to the replica to verify that it is functioning as expected. See the following for details: |
After a Windows replica has entered audit (or live) mode, use this procedure to access the replica:
Note: You must use a VNC viewer to access the replica in audit or live mode on a Recovery Series or Recovery MAX appliance. If necessary, download one to your workstation before running this procedure.
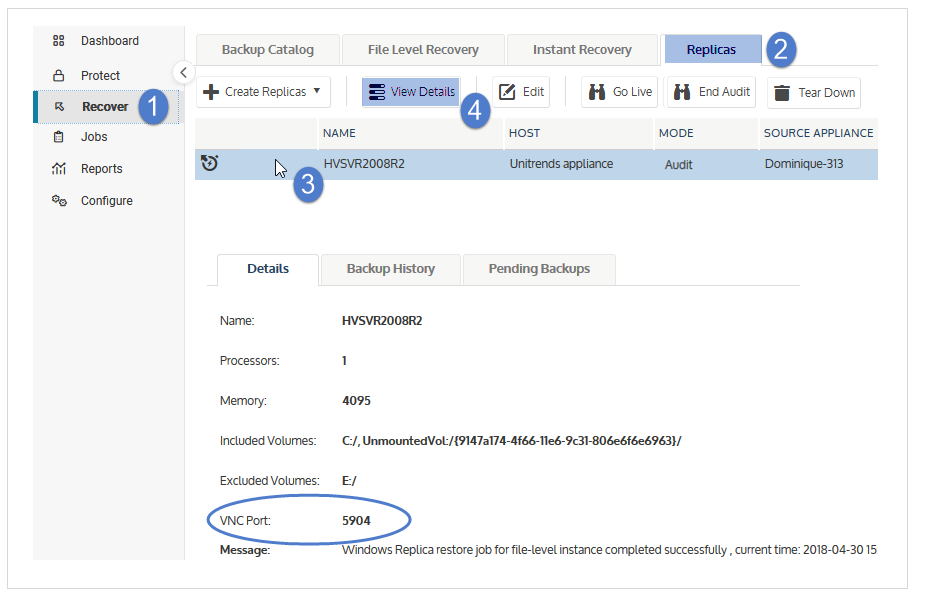
| 1 | On the Replicas tab, view replica details to obtain the VNC port number: |
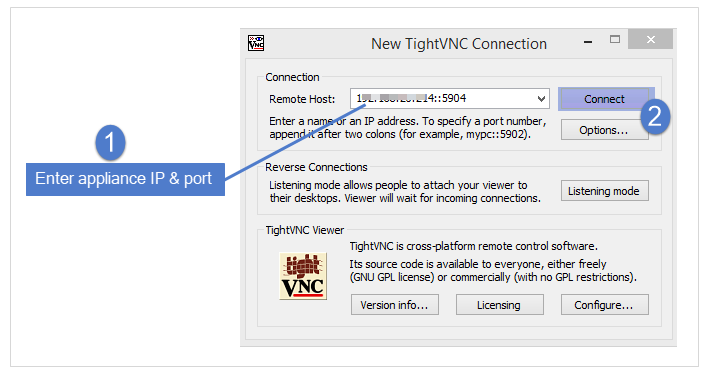
| 2 | Open a VNC viewer. Connect to the replica by entering: <ApplianceIP>::<VNCport> |
Exact field names, buttons, and syntax vary by VNC viewer. Typically, one or two colons are required betwe9en the appliance IP address and port number. An example using VNC port 5904 is given here:
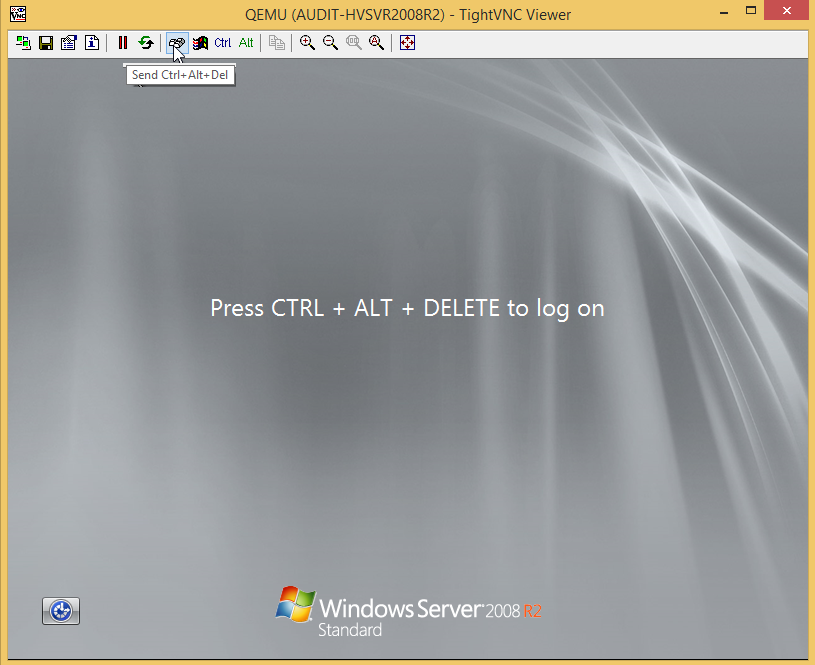
| 3 | The Windows login screen displays, indicating the replica is available. |
Note: If you access the replica before it has booted, you may see the first screen of the Unitrends Windows Integrated Bare Metal Recovery Wizard. Do not attempt to complete the steps on the bare metal screen. After several seconds, the login screen for the original Windows asset displays.
| 4 | Log in to the replica by entering the credentials of the original Windows asset. |
| 5 | After verifying that the replica is running with its recovered data, proceed to To exit audit mode. |
After a Windows replica has entered audit (or live) mode, use this procedure to access the replica:
| 1 | Connect to your hypervisor manager. |
| 2 | Locate the replica in the list of virtual machines, and access it the same way you access all VMs on the hypervisor. |
| 3 | Log in to the replica VM by entering the credentials of the original Windows asset. |
Note: If you access the replica before it has booted, you may see the first screen of the Unitrends Windows Integrated Bare Metal Recovery Wizard. Do not attempt to complete the steps on the bare metal screen. After several seconds, the login screen for the original Windows asset displays.
| 4 | After verifying that the replica is running with its recovered data, proceed to To exit audit mode. |
| 1 | Select Recover, then click the Replicas tab. |
| 2 | Select the replica, then click End Audit. |
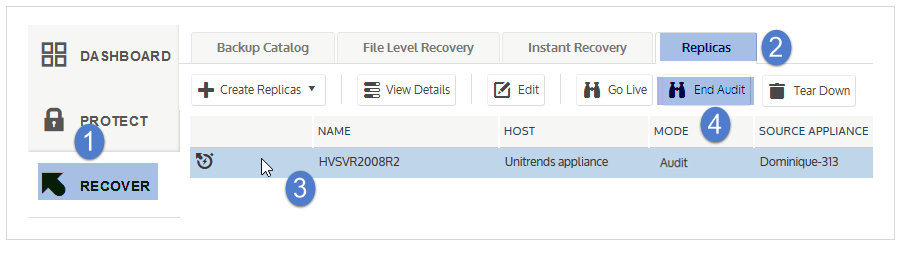
| 3 | The replica exits audit mode. Its mode changes to audit (pending: off), then to one of the following: |
Restore – One or more backups successfully completed during the audit and the appliance is applying those backups.
Idle - The replica is idle (there are no backups to apply).
If disaster strikes and the original asset fails, you can temporarily replace it with the replica by booting into live mode. Because the replica is continually updated with the original asset’s data, it can immediately assume the role of the original asset.
The original asset’s backup and backup copy schedules protect the replica in live mode, so that any changes made to the replica in live mode are captured under the identity of the original asset. This ensures continuity of recovery points in the asset's backup chain.
See these topics for details:
Review these recommendations before going into live mode:
| • | Live mode should be used temporarily. The appliance begins sending alerts after a live replica has run for 14 days. |
| • | You can exit live mode after you have recovered to new hardware (supported in all cases) or by retaining the replica as a permanent replacement (supported only for replicas that reside on external hypervisors). |
| • | The backup schedule for the original asset protects the live replica's data. |
| • | A live replica running on a Unitrends appliance uses appliance resources, so it is important that you recover to new hardware as soon as possible by using Unitrends bare metal recovery. (See the Windows Bare Metal Protection and Recovery for details.) |
| • | A live replica running on an external hypervisor does not use any appliance resources. Instead, it uses hypervisor resources. The replica can replace the original asset temporarily or be used as a permanent replacement. |
| • | Some Windows applications require network access and/or rely on underlying hardware, like network interface MAC addresses in order to run properly. When booting a Windows Replica in live or audit mode, applications that rely on unchanging hardware (like MAC addresses) may not function properly or may require re-authentication, reinstallation, or other special actions that are application specific in order for them to work properly. You should work with the application vendor to determine what actions are required. |
This procedure provides instructions for booting a replica in live mode. Be sure to shut down the original asset before running this procedure.
| 1 | Select Recover, then click the Replicas tab. |
| 2 | Select the replica, then click Go Live. |
| 3 | Click Confirm. The replica's mode changes to live. |
| • | If a backup is currently being applied, the replica does not enter live mode until the restore is complete. |
| • | Upon entering live mode, the replica assumes the identity of the original Windows asset. The replica is marked invalid because the replica role no longer applies. |
| 4 | Log in to the replica by using one of these methods: |
Note: If you access the replica before it has booted, you may see the first screen of the Unitrends Windows Integrated Bare Metal Recovery Wizard. Do not attempt to complete the steps on the bare metal screen. After several seconds, the login screen for the original Windows asset displays.
|
Replica location |
Description |
|---|---|
|
Recovery Series or Recovery MAX appliance |
Connect to the replica by using VNC, then log in using the credentials of the original Windows asset. In the VNC viewer, you will need to enter the appliance IP address and the VNC port (found on the Replicas tab under View Details). For detailed steps, see To access a replica on a Recovery Series or Recovery MAX appliance. (The same steps are used to connect to a replica in audit mode and live mode.) |
|
External hypervisor |
Connect to the replica by using the hypervisor manager, then log in using the credentials of the original Windows asset. |
| 5 | If you see a message about reactivating Windows, you must activate the operating system by using your product key. |
| 6 | Check the disk configuration by using Windows Disk Management. (These steps might be slightly different depending on the Windows version.) |
| • | Press the Start button. |
| • | Right-click the Computer item. |
| • | Choose Manage. |
| • | Choose Storage > Disk Management. This application shows a graphical view of all disks and volumes. |
| • | If the disk manager shows any disks in the Offline state, right-click the disk icon and click Online. |
| • | If the disk manager shows any dynamic disks as Foreign, right-click the disk icon and click Import. All volumes should now display as they did on the original asset. |
| 7 | Set the system clock. The asset may be running with the system clock time used by the latest backup. This issue may cause the macine to boot with a past date or time. |
| 8 | From the Windows Control Panel, update the network properties for the adapter (the TCP/IPv4 address) by using one of the methods in the following table. |
|
Replica location |
Description |
||||||
|---|---|---|---|---|---|---|---|
|
Recovery Series or Recovery MAX appliance |
Do one of the following:
|
||||||
|
External hypervisor |
|
| 9 | Log in to the Unitrends backup appliance and re-save the original Windows asset: |
Note: If you recovered by using a backup copy on an appliance backup copy target, perform these steps from the backup appliance where the original asset resides, rather than from the backup copy target appliance.
| • | Select Configure > Protected Assets. |
| • | Select the original Windows asset. |
| • | Click Edit > Save. |
SQL databases and other applications may require a few minutes to become available.
| 10 | Prepare the replacement machine by doing the steps in Using the live replica as a temporary for the original Windows asset or Using the live replica as a permanent replacement for the original Windows asset. You must do these steps before you tear down the Windows replica. |
If the replica will replace the original asset only temporarily, do these steps after you have booted the replica in live mode:
| 1 | Recover to new hardware as soon as possible, by using Unitrends bare metal recovery. |
Data from the live replica is protected by the backup schedule of the original asset. Use the latest backup to perform the bare metal recovery. For details, see Windows Bare Metal Protection and Recovery.
| 2 | If any additional backups completed on the replica (after the backup you used for the bare metal recovery), recover them to the new Windows asset to bring it up to date. For details, see To recover an entire file-level backup by using the Backup Catalog or To recover an entire file-level backup by using the Backup Browser. |
| 3 | After recovering the replica's data to the new Windows asset, delete the replica from the appliance and from the hypervisor (if applicable). For instructions, see To tear down a Windows replica. |
If the replica will permanently replace the original asset, do these steps after you have booted the replica in live mode:
| 1 | Determine whether to continue protecting the replica with the backup schedules of the original asset or whether to run virtual machine backups for the VM. For a comparison of each method, see Protecting Hyper-V virtual machines with file-level backups or Protecting VMware virtual machines with file-level backups. |
| 2 | Delete the replica from the appliance as described in Tearing down a Windows replica. Be sure to delete the replica from the appliance only, as you have the option to delete it from the hypervisor as well. |
| 3 | If you will be switching to VMware or Hyper-V backups, create the VM backup schedule and remove the asset from the original schedule. See Backup Administration and Procedures for details. |
Notes:
| • | The replica VM is not automatically added to any existing VM backup schedule. |
| • | It can take several minutes for the replica VM to show up in the list of VMs to protect with VMware or Hyper-V backups. To refresh the list of discovered VMs, click the Gear icon in the upper-right of the UI and select Inventory Sync. |
Do not cancel an active replica restore job. Instead, bring the replica into audit mode.
Each successful backup of the original Windows asset is applied to the replica as soon as the backup completes. The appliance applies the backup by running a replica restore job, which displays on the Active Jobs tab as shown here:
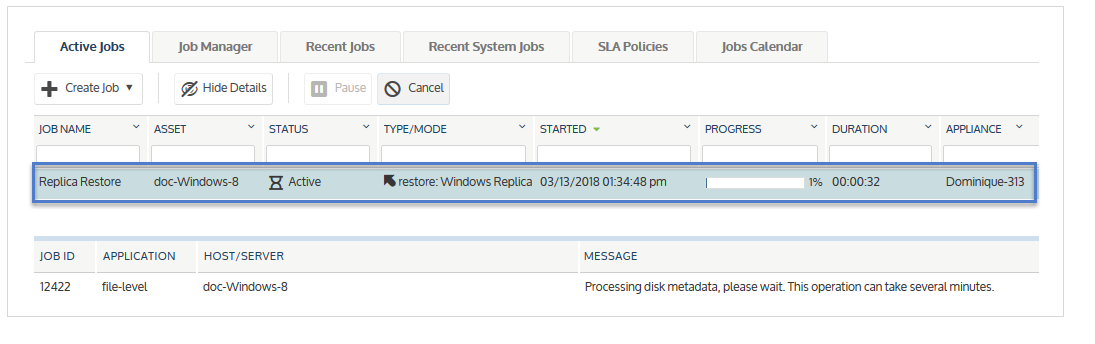
If you cancel a replica restore job by using the Cancel button on the Active Jobs page, the appliance automatically creates a new job to replace the one you canceled. To temporarily stop applying backups, bring the replica into audit mode instead (as described in Working with Windows file-level replicas). Use the procedure To exit audit mode to start applying backups again. Note that all backups that ran while the replica was in audit mode will be applied to the replica upon exiting audit mode. You cannot skip applying a specific backup to a replica.
This section provides instructions for deleting a Windows replica.
For a replica running on a Unitrends appliance, you should delete the replica as soon as you have recovered the original asset to new physical hardware, to free up appliance resources.
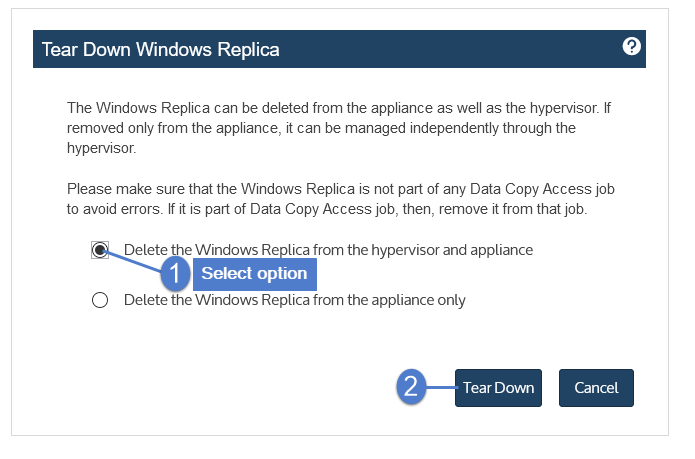
For a replica running on a hypervisor, you have these options:
| • | Delete the replica from the appliance only – Select this option to use the replica VM as a permanent replacement for the failed Windows asset. |
| • | Delete the replica from the appliance and delete the replica VM from the hypervisor itself – Select this option if you have recovered the original asset to new physical hardware and will not be using the replica VM as a permanent replacement. |
Important! If you are running a live replica as a temporary replacement for an asset that has failed, do not tear down the replica until you have recovered the original asset to new physical hardware. (For details, see Using the live replica as a temporary for the original Windows asset.)
| 1 | Select Recover, then click the Replicas tab. |
| 2 | Select the replica, then click Tear Down. |
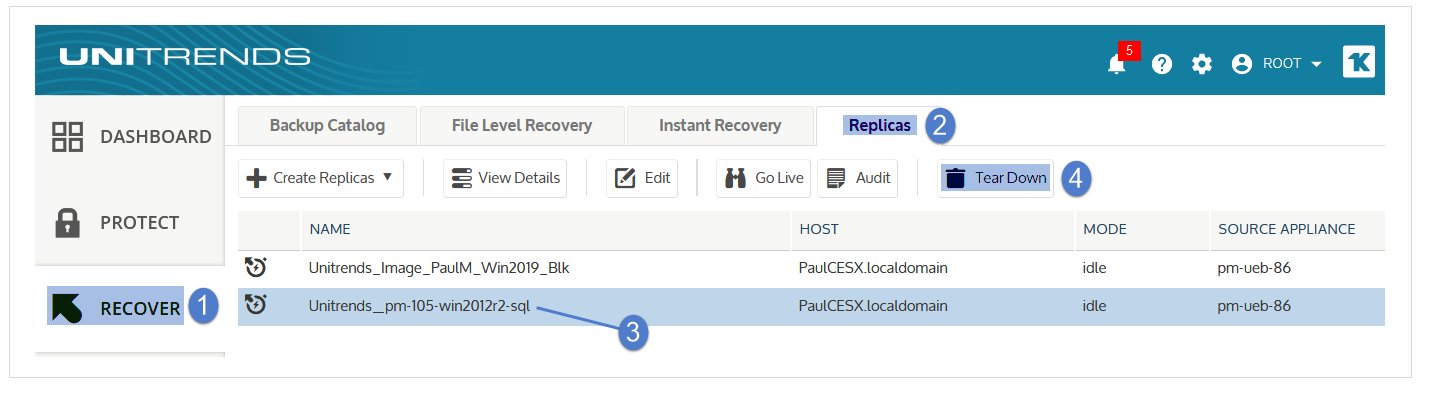
| 3 | Do one of the following (options differ by replica location): |
| • | Replica residing on a Recovery Series or Recovery MAX appliance – Click Delete to delete the replica. |
| • | Replica residing on an external hypervisor – A box displays with options to delete the replica from the appliance only or from both the appliance and the hypervisor. Select the desired option and click Tear Down. |
It can take several minutes for the appliance to purge all information about the replica. If you need to create a new replica for the original asset, you must wait for this information to purge. If it has not yet purged, the original asset does not display in the list of assets for which you can create a replica.
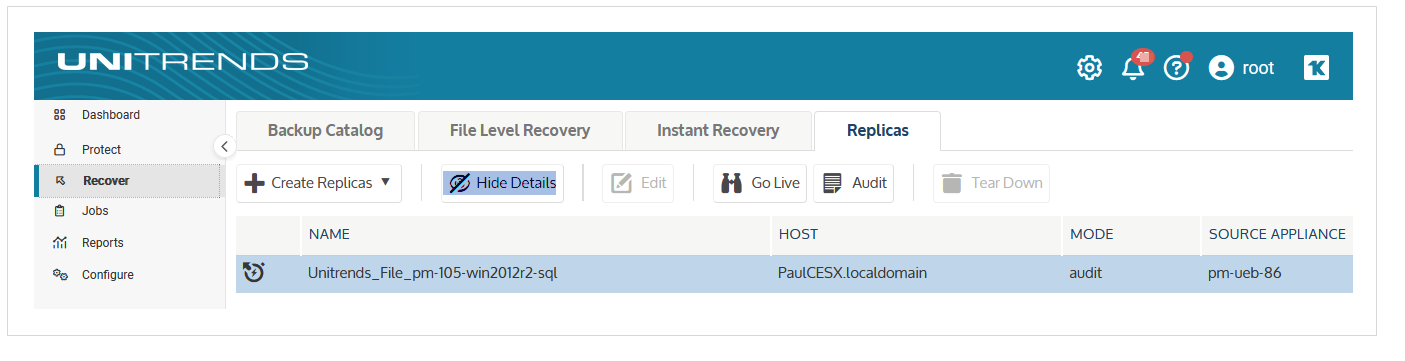
Use these procedures to check the status and details of existing Windows replicas:
| 1 | Select Recover, then click the Replicas tab. |
| 2 | All Windows replicas and VM replicas display in a list on the Replicas tab. |
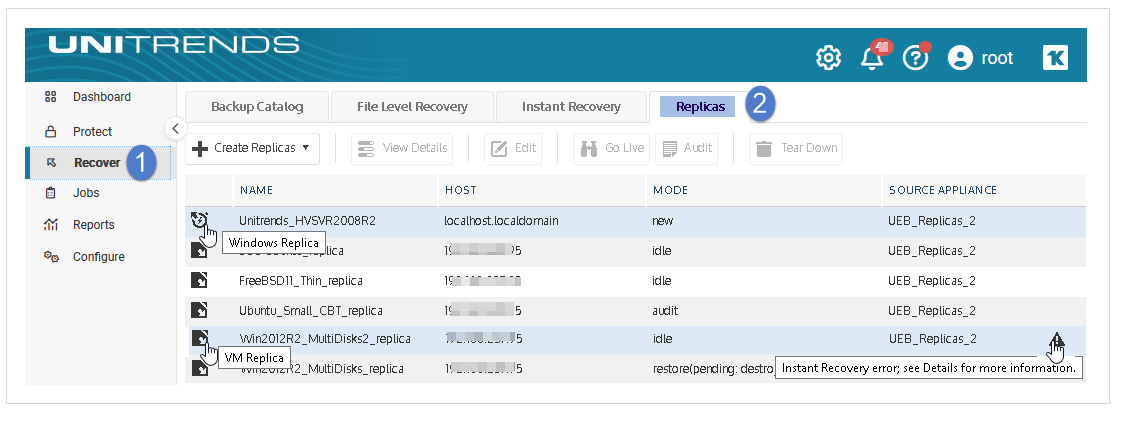
The following information is given for each replica:
|
Column |
Description |
|||||||||
|---|---|---|---|---|---|---|---|---|---|---|
|
Replica type icon |
Indicates the replica type: Windows or VM. |
|||||||||
|
Name |
Replica name. By default, the replica is named Unitrends _<WindowsAssetName>. |
|||||||||
|
Host |
Host where the replica resides:
|
|||||||||
|
Mode |
Replica mode. Examples: new, audit, restore, or idle. See Windows replica modes for additional details. |
|||||||||
|
Source Appliance |
Appliance where the replica was created. |
|||||||||
|
Alert icon |
Indicates that an alert has been generated for the replica. Hover over the icon for details. |
| 1 | Select Recover, then click the Replicas tab. |
| 2 | Select the replica, then click View Details. |
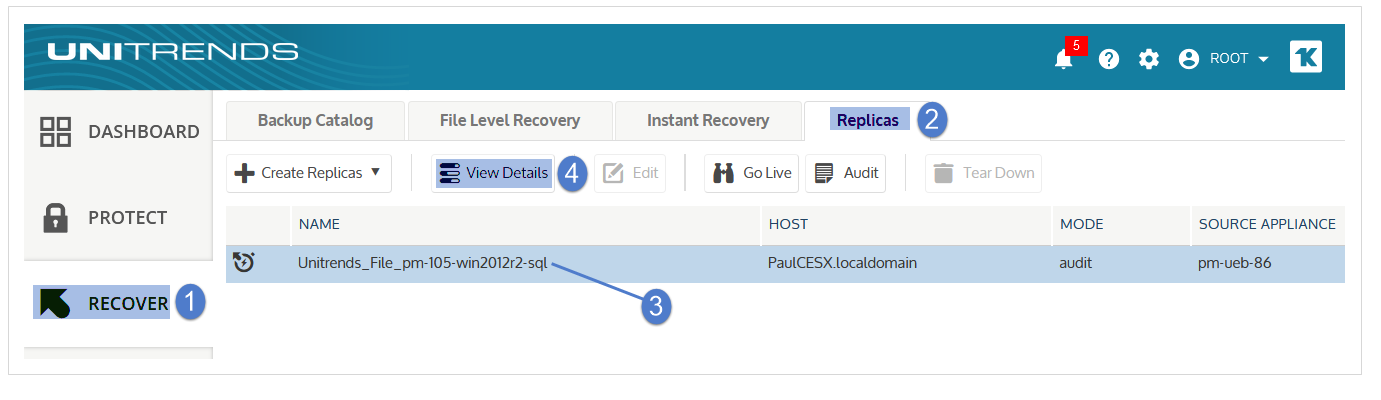
| 3 | Tabs containing replica details display below: |
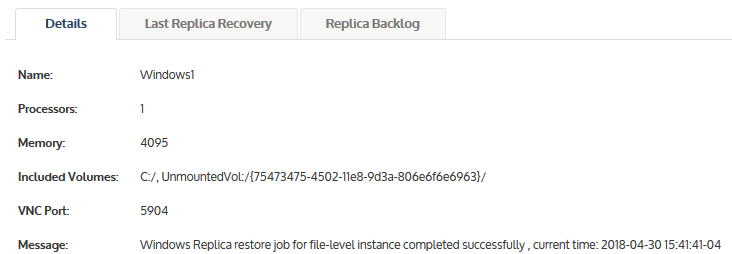
|
Details tab |
Description |
|---|---|
|
Details |
Shows the replica name, IP address (if applicable), number of processors, amount of memory, included volumes, excluded volumes (if any), VNC port (if applicable), and message describing the last replica operation. Example:
|
|
Last Replica Recovery |
Shows the most recent backup that has been applied to the replica. If the replica includes Exchange or SQL databases, the list shows the most recent file-level backup and the most recent application backup for each protected database. Example:
|
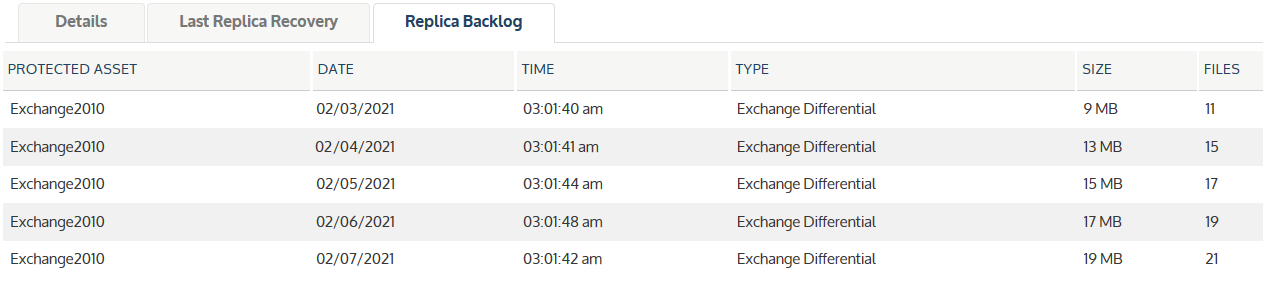
|
Replica Backlog |
List of backups that have not yet been applied to the replica. No backups are listed if the replica is up to date. Example:
|

| 4 | (Optional) Click Hide Details to stop displaying details for the selected replica. |
You can monitor a Windows replica by checking its mode on the Replicas tab. The mode indicates what is currently happening with the replica (for example, whether it is newly created, whether a backup is being applied, or whether it is in audit mode.)
Windows replica modes are described in the following table:
|
Mode |
Description |
||||||
|---|---|---|---|---|---|---|---|
|
New |
The replica is new and no backup has been applied. A replica in new mode cannot be audited or booted into live mode. |
||||||
|
Restore |
A backup has completed, and the appliance is applying it to the replica. The replica remains in restore mode until the restore completes. |
||||||
|
Idle |
At least one backup has been applied to the replica, but currently no action is occurring. |
||||||
|
Halted |
A backup has completed, and the appliance has requested a restore. The replica goes into a halted state if the restore cannot be performed. The following can occur when a replica is in this mode:
|
||||||
|
Audit |
A user is performing a manual audit and the replica has booted in audit mode. For details, see Auditing a Windows replica. |
||||||
|
Verify |
A user has enabled verification reports (automated audits). The appliance has booted the replica in audit mode to take a screenshot of the replica’s login screen. For details about verification reports, see Automated audits for a Windows replica. |
||||||
|
Live |
A user has booted the replica in live mode to replace the original asset. For details, see Working with Windows file-level replicas. Once the replica is live, the only other mode it can enter is off. |
||||||
|
Off |
A user has taken the replica out of live mode. Once the replica is off, the only other mode it can enter is live. |