Appliance Disaster Recovery
This chapter contains information for planning and implementing a disaster recovery (DR) strategy, and provides detailed instructions for recovering your Unitrends appliance. The disaster recovery (DR) procedure restores the configuration settings of the failed appliance. Next, you have the option to import the last backups of each protected asset. This enables you to quickly spin up a new appliance that has the same settings as the original, without having to add assets, set up schedules, and reconfigure settings. See these topics for details:
To ensure fast and successful appliance DR, it is important that you create a strategy and implement your plan long before a failure occurs. See these topics to create your plan and prepare for appliance DR:
Use the following table to record appliance information that will be needed to perform DR. You can find this information in the appliance UI on the Edit Appliance dialog (select Configure > Appliances > Edit and view the General and License tabs).
|
Appliance information for DR |
Value |
|---|---|
|
Appliance Name |
|
|
Appliance IP |
|
|
Asset Tag |
|
|
Feature String |
|
|
License Key |
|
|
Encryption? |
If backups are encrypted, you will need the encryption passphrase to recover last backups.
|
You can recover your appliance and its last backups from a hot or cold backup copy. Choosing which to use will be based on your particular needs, but the most effective disaster recovery strategy requires that these choices have been made well in advance.
Note: Disaster recovery from a tape backup copy is not supported.
Appliance metadata (its system state) is automatically included in each hot and cold backup copy. This metadata contains information such as protected assets, job schedules, storage configuration, and other appliance settings. Recovering this metadata restores an appliance in the event of a disaster. Be sure to run backup copy jobs at regular intervals to ensure you have a recent copy that you can use for appliance DR.
A fresh appliance to recover to must be available. This DR target appliance can be a:
| • | Recovery Series or Recovery MAX appliance — Use a new or re-imaged appliance. If you need to re-image an appliance, see How to reimage a Unitrends appliance for instructions. |
| • | Unitrends Backup virtual appliance — Deploy a new Unitrends Backup appliance. |
If the failed appliance is a Unitrends Backup virtual appliance and its backup storage is still available, you can opt to deploy by using this original backup storage to retain those backups.
The following requirements must be met before you perform appliance DR:
| • | The DR target appliance must be freshly imaged or newly deployed and must be running the latest version of the Unitrends software. |
| • | The DR target appliance must have local network access enabled: |
| – | If you can log in to the appliance UI by entering https://<applianceIPaddress>/ui/ in a browser on the local network, access is enabled. |
| – | If you cannot log in and receive the message Managed by UniView, local network access is disabled. Enable local network access as described in Disable or enable local network access to an appliance. |
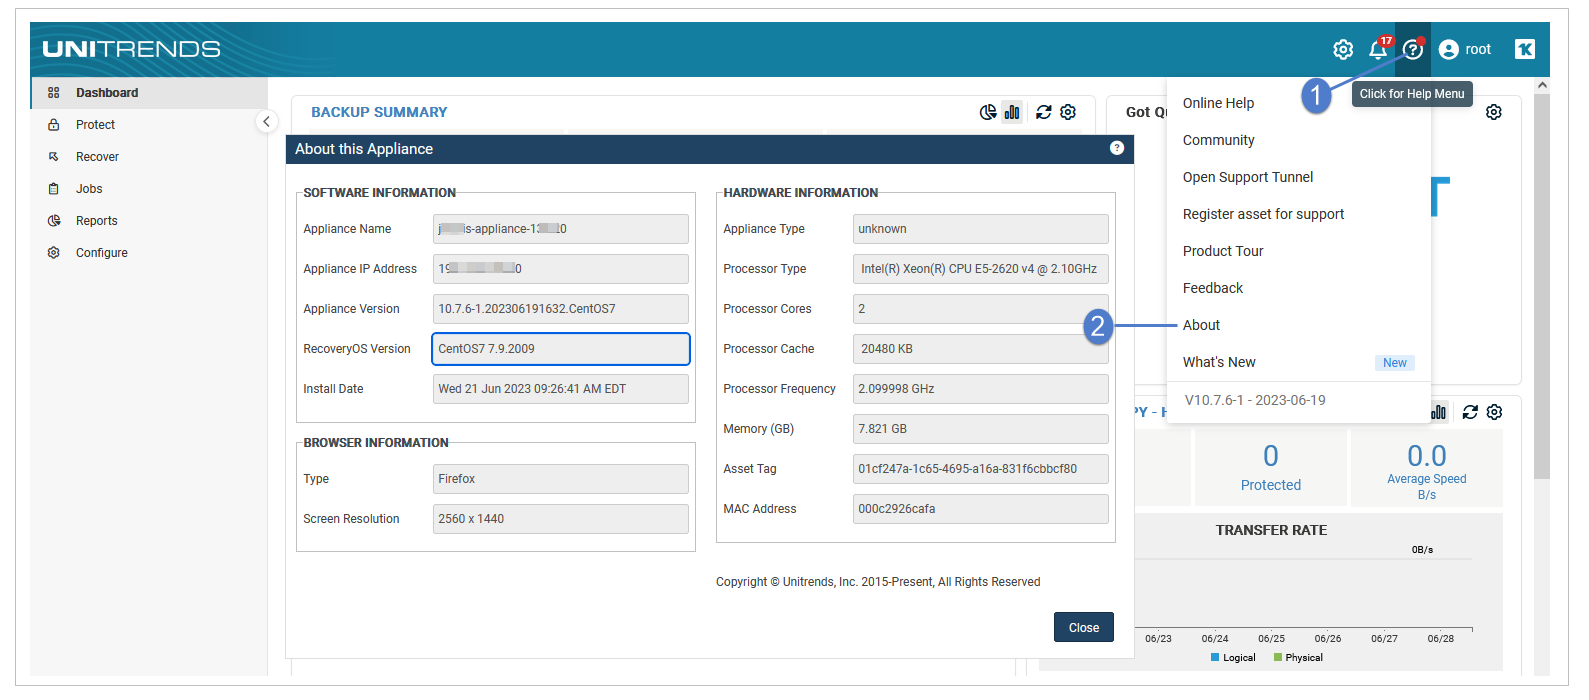
| • | The operating system of the target appliance must be the same version as the original (failed) appliance or a higher version than the original (failed) appliance. For example, you cannot recover a failed CentOS 7 appliance to a CentOS 6 target appliance. To check the appliance OS version, select ? > About in the appliance UI: |
| • | The DR target appliance must be set up and configured onto the network. See the applicable guide below for instructions: |
| – | Quick Start Guide for Gen 10 Recovery Series Appliances |
| – | Quick Start Guide for Unitrends MSP Recovery MAX Appliances |
| – | Quick Start Guide for ION and ION+ Appliances |
| – | Deployment Guide for Unitrends Backup on VMware |
| – | Deployment Guide for Unitrends Backup on Hyper-V |
| – | Deployment Guide for Unitrends Backup on Nutanix AHV |
| – | Deployment Guide for Unitrends Backup on Citrix XenServer |
| – | Deployment Guide for Unitrends Backup in Azure |
| – | Deployment Guide for Unitrends Free on VMware |
| – | Deployment Guide for Unitrends Free on Hyper-V |
| • | The DR target appliance must have a minimum of 200GB of backup storage space available or as much storage as the original appliance, whichever is greater. |
| • | You must have a hot or cold backup copy from which to recover. (DR from tape backup copy is not supported.) |
Additional DR considerations are listed here. You will be asked to make choices during the DR process. It is best to consider your options before you start the DR procedure.
| • | During DR you will choose whether to retain the DR target appliance's storage settings or to recover the storage settings from the original (failed) appliance. For details on each option, see Selecting storage configuration during DR. |
| • | If encryption was configured on the original appliance, you must configure encryption on the DR target appliance before you start the DR procedure. You must configure encryption to use the encryption passphrase of the original appliance. For details, see Encryption. |
| • | During DR you will choose a storage target where backups will be imported: |
| – | For Recovery Series and Recovery MAX physical appliances — Accept the default Internal storage target (this is the only storage target). |
| – | For Unitrends Backup virtual appliances — If you want to import backups to a different storage target, you must add the storage to the target appliance before you start the DR procedure. See About adding backup storage to a Unitrends Backup appliance for details. |
| • | The DR procedure does not recover any Windows replicas or VM replicas. You must create new replicas after running the DR procedure. |
| • | The DR procedure does not recover any SLA policies. Any backup and backup copy schedules created by SLA policies are recovered, but you must recreate SLA policies after running the DR procedure. |
During the DR procedure, you will be asked whether to retain the storage settings on the DR target appliance or to recover storage settings from the original appliance. Differences are described here:
|
Storage |
Description |
||||||
|---|---|---|---|---|---|---|---|
|
DR using storage settings of the new target appliance |
Storage configuration of the target appliance is retained while recovering system metadata. Schedules from the original appliance are updated to use the default backup storage on the new appliance. Example where DR target appliance storage settings are retained during DR:
After DR, the new appliance still contains storage targets Internal and MoreBackups. Since the original NewBackups target does not exist, the schedule for Asset1 is updated so that its backups are written to the default storage, Internal. |
||||||
|
DR using storage settings of the original appliance |
Storage configuration of the original appliance is recovered. Schedules from the original appliance use the original configuration. Example where original appliance storage settings are retained during DR:
After DR, backups for Asset1 continue to be written to the NewBackups target. |
To recover the appliance by using a hot backup copy, verify that the requirements in Preparing for appliance DR from a hot backup copy have been met, then run the To perform appliance DR from a hot backup copy procedure.
Important! This procedure configures the DR target appliance to match the original (failed) appliance. The procedure overwrites the appliance's database and hosts file and removes any existing backups.
These prerequisites must be met before you perform DR from a hot backup copy:
| • | The original (failed) appliance must be running Unitrends version 9.1 or higher. |
| • | The DR target appliance must be set up and configured to meet the general Requirements and considerations for appliance DR. |
| • | The DR target appliance must be given a unique, temporary hostname (this name will be replaced with the hostname of the failed appliance during the DR process). Do not use a hostname that has ever been known to the failed appliance or to the hot backup copy target appliance. |
| • | Add the DR target appliance to the hot backup copy target appliance that houses the copy you will use for the DR. For details, see To add an appliance. |
| • | If recovering encrypted backups, you must configure encryption on the DR target appliance. While configuring encryption, you must enter the encryption passphrase of the original (failed) appliance. For details, see Encryption. |
Use this procedure to recover the original appliance from a hot backup copy. DR is performed using a command line DR tool that you run from the backup copy target appliance (the appliance that received backup copies from the original appliance). You can quit the recovery process within the DR tool at any time by entering E (exit) at the Selection: prompt.
| 1 | Using a terminal emulator, such as PuTTY, connect to the backup copy target appliance using the following: |
| – | Appliance IP address |
| – | Port 22 |
| – | SSH connection type |
| 2 | Log in as user root. |
| 3 | Issue this command to launch the DR tool: |
# /usr/bp/bin/disaster_recovery
| 4 | At the Selection: prompt, enter 1 to recover from a hot backup copy target. |
| 5 | Follow the prompts to perform the DR. See Selection details for a description of each selection. |
| 6 | While copies are being imported to the new appliance, you can exit the DR tool and close the terminal session. To monitor progress of the import, log in to the DR target appliance UI and select Jobs > Active Jobs (or Jobs > Recent Jobs to see completed imports). |
| 7 | (Optional) If you have copied backups of additional assets from the original (failed) appliance to another backup copy target, use these steps to recover those backup copies: |
| • | Using a terminal emulator, such as PuTTY, connect to the second backup copy target appliance using the following: |
| – | Appliance IP address |
| – | Port 22 |
| – | SSH connection type |
| • | Log in as user root. |
| • | Issue this command to launch the asset-only DR tool: |
# /usr/bp/bin/disaster_recovery clientsOnly
| • | Follow the prompts to select the original (failed) appliance that you are recovering, the target (new) appliance where backup copies will be recovered, and the assets whose last backups will be imported to the DR target appliance. |
| • | While copies are being imported to the new appliance, you can exit the DR tool and close the terminal session. To monitor progress of the import, log in to the DR target appliance UI and select Jobs > Active Jobs (or Jobs > Recent Jobs to see completed imports). |
| • | Repeat these steps as needed to import copies from additional target appliances. |
| 8 | License the appliance as described in Licensing the DR target appliance. |
| 9 | Disaster recovery sets the appliance root operating system password to this default value: unitrends1. Change the appliance root password as described in Change the appliance operating system password. |
|
DR tool prompt |
Description |
||||||||||||||||||||||||||||||||||||
|---|---|---|---|---|---|---|---|---|---|---|---|---|---|---|---|---|---|---|---|---|---|---|---|---|---|---|---|---|---|---|---|---|---|---|---|---|---|
|
Select appliance to restore |
Select the original (failed) appliance that you will recover. |
||||||||||||||||||||||||||||||||||||
|
Choose target for recovery |
Select the new appliance where the failed appliance will be recovered. If you do not see your DR target appliance in the list, add its hostname and IP (by entering the number for the Add new host to hosts file option). |
||||||||||||||||||||||||||||||||||||
|
Please go to DRtargetAppliance and run 'disaster_recovery metadata' |
When you see this prompt, leave the DR tool open and running. Open a second terminal emulator session and do these steps:
# /usr/bp/bin/disaster_recovery metadata
|
||||||||||||||||||||||||||||||||||||
|
Select Assets |
Specify the assets whose last backups will be imported to the DR target appliance. This step is optional.
Note: If you deployed a Unitrends Backup appliance by using storage from the original (failed) appliance, all backups on that storage are already present on the DR target appliance. |
||||||||||||||||||||||||||||||||||||
|
Backup copies from the selected assets to the new appliance have started |
Last backups are being imported to the DR target appliance. You can now exit the DR tool and close the terminal session. To monitor progress of the import, log in to the DR target appliance UI and select Jobs > Active Jobs (or Jobs > Recent Jobs to see completed imports). |
To recover the appliance by using a cold backup copy, verify that the requirements in Preparing for appliance DR from a cold backup copy have been met, then run the To perform appliance DR from a cold backup copy procedure.
Important! This procedure configures the DR target appliance to match the original (failed) appliance. The procedure overwrites the appliance's database and hosts file and removes any existing backups.
These prerequisites must be met before you perform DR from a cold backup copy:
| • | The DR target appliance must be set up and configured to meet the general Requirements and considerations for appliance DR. |
| • | If recovering encrypted backups, you must configure encryption on the DR target appliance. While configuring encryption, you must enter the encryption passphrase of the original appliance. For details, see Encryption. |
| • | The DR target appliance must have access to the cold copy you will use for the DR procedure. Do the following to enable access to the cold copy: |
| – | Add the cold backup copy target to the DR target appliance as described in Backup copy targets. |
| – | If the cold copy target is a USB or eSATA device, load the disk(s) containing the cold copy into the device. |
Use this procedure to recover the original appliance from a cold backup copy. DR is performed using a command line tool that you run from the DR target appliance (the appliance to which you will recover the original failed appliance). You can quit the recovery process within the DR tool at any time by entering E (exit) at the Selection: prompt.
| 1 | Using a terminal emulator, such as PuTTY, connect to the DR target appliance using the following: |
| – | Appliance IP address |
| – | Port 22 |
| – | SSH connection type |
| 2 | Log in as user root. |
| 3 | Issue this command to launch the DR tool: |
# /usr/bp/bin/disaster_recovery
| 4 | At the Selection: prompt, enter 2 to recover from a cold backup copy target. |
| 5 | Follow the prompts to perform the DR. See Selection details for a description of each selection. |
| 6 | After you perform the recovery, license the appliance as described in Licensing the DR target appliance. |
| 7 | Disaster recovery sets the appliance root operating system password to this default value: unitrends1. Change the appliance root password as described in Change the appliance operating system password. |
|
DR tool prompt |
Description |
|||||||||
|---|---|---|---|---|---|---|---|---|---|---|
|
Select Target |
Select the cold backup copy target. |
|||||||||
|
Would you like to use the storage configuration of the new or the original appliance? |
Choose a storage configuration by entering one of the following:
|
|||||||||
|
Would you like to restore appliance metadata? |
Enter y to continue. |
|||||||||
|
Encryption is enabled (only displays if the cold copy is encrypted and you have not configured encryption on the DR target appliance) |
If you see this prompt, leave the DR tool open and running. Log in to the DR target appliance UI and configure encryption. Enter the encryption passphrase of the original (failed) appliance. For details, see Encryption. Once you have configured encryption, return to the DR tool and continue with the DR procedure. |
|||||||||
|
Select Assets |
Specify the assets whose last backups will be imported to the DR target appliance. This step is optional.
Note: If you deployed a Unitrends Backup appliance by using storage from the original (failed) appliance, all backups on that storage are already present on the DR target appliance. |
|||||||||
|
Select Storage for DRtargetAppliance |
Select the storage where imported backups will be written. To use the default (Internal) storage, enter 1. If your DR target is a Unitrends Backup appliance and you have added more storage targets, additional options display. |
|||||||||
|
This will overwrite backups. |
Any existing backups stored on the DR target appliance will be overwritten. Enter y to continue. |
|||||||||
|
Beginning recovery, this will take some time. |
Last backups are being imported to the DR target appliance. You can now exit the DR tool and close the terminal session. To monitor progress of the import, log in to the DR target appliance UI and select Jobs > Active Jobs (or Jobs > Recent Jobs to see completed imports). |
After performing DR, use one of the following procedures to license the DR target appliance:
| 1 | Log in to the DR target appliance UI. |
| 2 | On the Configure > Appliances page, select the appliance and click Edit. |
| 3 | On the Edit Appliance dialog, click the License tab. |
| 4 | Click Add License Info and enter the following information from the original (failed) appliance: |
| • | License Key |
| • | Feature String |
| 5 | Click Save to apply the license information. |
Because the newly deployed DR target appliance has a different MAC address, you must apply a new license. Do one of the following:
| • | If you have the email containing the license key of the original (failed) appliance: |
| 1 | From the UI, select Configure > ApplianceName > Edit > License > Upgrade. The registration form displays. |
| 2 | Select I need to activate my purchase. |
| 3 | Enter the email address where you want to receive the license key. |
| 4 | In the Unitrends Backup Registration Center, enter the activation code from the license email and submit the form. |
A new license key will be sent to the email you specified. Once you receive it, apply the license as described in To license a Recovery Series or Recovery MAX appliance above.
| • | If you no longer have the email containing the license key of the original (failed) appliance, contact Untirends Support (as described in Support for Unitrends appliances) to request a new license. |
Once you receive the new license, apply it as described in To license a Recovery Series or Recovery MAX appliance above.