Preparing for instant recovery
Unitrends recommends planning for instant recovery before a VM fails. Following is a summary of the steps needed to set up instant recovery for your virtual machines. Steps include links to detailed instructions for each procedure.
Step 1: Ensure that all requirements have been met. For details, see Prerequisites for VMware instant recovery or Prerequisites for Hyper-V instant recovery.
Step 2: Run host-level backups of the VMs:
● To create a job manually, see To create a VMware backup job or To create a Hyper-V backup job.
● To create a job by using an SLA policy, see To create an SLA policy for VMware assets or To create an SLA policy for Hyper-V assets.
● For a comparison of the manual and SLA policy job creation methods, see About creating backup and backup copy jobs.
Step 3: Reserve space on the appliance for instant recovery. For details, see Allocate storage for instant recovery.
Step 4: Add target virtual hosts to the Unitrends appliance as needed.
While running the IR procedure, you select a virtual host where the recovered VM will be created. You can recover to the host where the original VM resides or to a different location. If needed, add additional virtual hosts to the appliance to make them available for IR. For details, see Adding a virtual host.
NOTE For VMware, a vCenter is required. Add the ESXi hosts and the vCenter managing the hosts.
Step 5: Run IR in audit mode to check the recovered VMs. For details, see Perform instant recovery in audit mode.
The following table describes prerequisites and considerations for VMware instant recovery.
|
Prerequisite or consideration |
Description |
|---|---|
|
vCenter version and license |
To perform instant recovery, the ESXi server used as the instant recovery target must be managed by a vCenter that meets the following requirements: ● Must be running one of the following: vCSA 5, vCenter version 5, or a higher vCenter version listed in the Compatibility and Interoperability Matrix. ● Must have a license that supports Storage vMotion. ● Must be a added to the Unitrends appliance from which you are performing the instant recovery. (Both the vCenter and the ESXi server must be added to the backup appliance as a virtual host asset. For details, see Adding a virtual host.) NOTE You can perform the audit process using a stand-alone ESXi server, but instant recovery mode is not supported. |
|
ESXi server |
The ESXi server used as the instant recovery target must meet the following requirements: ● Must be managed by a vCenter that meets the version and license criteria above. ● Must be running ESXi version 5 or a higher version listed in the Compatibility and Interoperability Matrix. ● Must be added to the Unitrends appliance from which you are performing the instant recovery. (See Adding a virtual host.) ● Must be running the same ESXi version as the original server hosting the virtual machine, or a higher version listed in the Compatibility and Interoperability Matrix. It is highly recommended that you recover to an ESXi version that matches the original. ● Must support the operating system (OS) of the VM you are recovering. (See the VMware documentation for details.) For example, you cannot recover a Windows 2016 VM to ESXi 5.1. ● Must have sufficient space and compute resources for the new VM. |
|
Backup |
You must have a backup to recover a virtual machine. The backup used for the instant recovery must be: ● A successful host-level backup or backup copy of the virtual machine. This can be a full, incremental, or differential backup. (To run a backup, see To create a VMware backup job.) ● A local backup, an imported backup copy, or a hot backup copy (supported if performing IR on the target appliance where the hot copy resides). The backup used for instant recovery cannot contain a 4096 sector disk. 4096 sector disks are not supported for instant recovery. |
|
The following configuration settings apply to the recovered VM: ● The Mac address and network settings of the recovered VM match those of the source VMware backup used for the recovery. ● The recovered VM is configured with the latest hardware version that is supported by the target hypervisor. For example, if a hardware version 8 VM is recovered to an ESXi 5.5 server, the recovered VM is hardware version 10. ● The recovered VM's disks are provisioned as Thick Eager Zeroed. |
The following table describes prerequisites and considerations for Hyper-V instant recovery.
|
Prerequisite or consideration |
Description |
|---|---|
|
Hyper-V server |
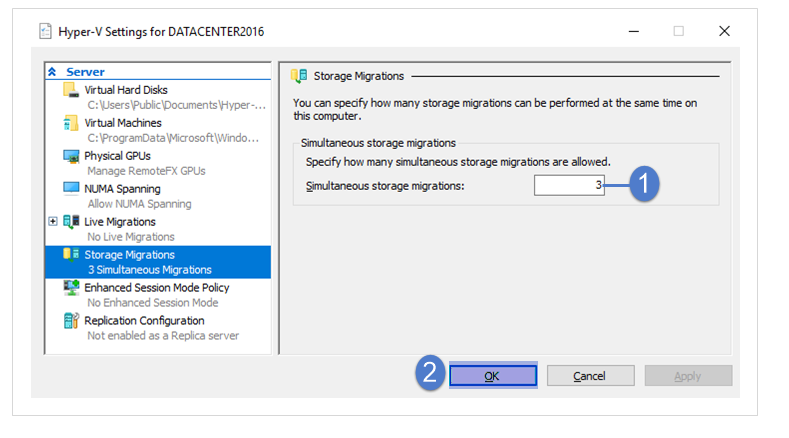
● The Hyper-V server used as the instant recovery target must be one of the following: ● A Windows Server with the Hyper-V role enabled, running Windows 2012 or a higher version listed in the Compatibility and Interoperability Matrix. ● A Hyper-V Server running 2012 or a higher version listed in the Compatibility and Interoperability Matrix. ● The Unitrends Windows agent must be installed on the Hyper-V server hosting the protected VM and on the Hyper-V server used as the recovery target. Unitrends recommends reloading the list of VMs on the appliance after installing the agent on the host Hyper-V servers. To reload the list of VMs, select Options > Inventory Sync. ● The restore target can be the original Hyper-V server or an alternate Hyper-V server. ● The restore target must be running the same version as the Hyper-V server hosting the original VM, or a higher version listed in the Compatibility and Interoperability Matrix. It is recommended that you restore to a Hyper-V server whose version matches that of the original, where possible. NOTE Backups from older versions of Hyper-V can be used for Hyper-V instant recovery as long as the target server is running 2012 or a higher version listed in the Compatibility and Interoperability Matrix. ● The target server must be added to the Unitrends appliance from which you are performing the instant recovery. (See Adding a virtual host.) ● The target server must support the operating system (OS) of the VM you are recovering. (See the Microsoft documentation for details. For Windows, see this Microsoft article: Should I create a generation 1 or 2 virtual machine in Hyper-V?) For example, you cannot recover a Windows 2016 VM to Hyper-V 2008 R2. ● The target server must have sufficient space and compute resources for the new VM. ● The Hyper-V host must be configured for adequate simultaneous storage migrations. The host must be able to run simultaneous storage migrations for all sessions that are currently running in instant recovery mode. (Storage migration is not needed to run IR in audit mode). Inadequate simultaneous storage migrations leads to undesirable results. To modify the number of simultaneous storage migrations, open Hyper-V manager, right-click the host server and select Properties, select Storage Migrations and modify the Simultaneous storage migrations setting:
|
|
Backup |
You must have a backup to recover a virtual machine. The backup used for the instant recovery must be: ● A successful host-level backup or backup copy of the virtual machine. This can be a full or incremental backup. (To run a backup, see To create a Hyper-V backup job.) ● A local backup, an imported backup copy, or a hot backup copy (supported if performing IR on the target appliance where the hot copy resides). ● Hyper-V Instant Recovery is not supported for backups with files or pathnames that contain non-UTF8 characters. ● Hyper-V Instant Recovery is not supported for Host component (AzMan Security Database for Hyper-V) backups of the original VM. |
|
The following VM configuration settings and requirements apply to the recovered VM: ● A recovered VM's disk names match those of the source Hyper-V backup used for the recovery. ● All disks created on the Hyper-V VM must have unique names. ● The network settings of the recovered VM match those of the source Hyper-V backup used for the recovery. ● The recovered VM is configured with the latest hardware generation version that is supported by the target Hyper-V server. ● A recovered VM's configuration version matches that of the source Hyper-V backup used for the recovery. ● Disks excluded during backup, including independent and physical RDM disks, are not restored with instant recovery for Hyper-V. NOTE Not all VM settings are preserved during instant recovery. Review the list of preserved and non-preserved settings to determine if instant recovery is the best approach for your VM. VM settings preserved during instant recovery: ● Firmware type (BIOS or UEFI) ● Processor count ● Memory – Startup memory, minimum memory, maximum memory, and dynamic memory ● Number of network adapters VM settings NOT preserved during instant recovery: ● BIOS startup order (the position of the boot disk is preserved) ● UEFI – ● Boot order (the position of the boot disk is preserved) ● Secure boot if disabled ● Encryption support enable trusted platform module ● Security policy shielding ● Processor resource control ● Network Adapter VLAN ID and Bandwidth Management ● COM ports ● Integration Services Offerred ● Checkpoint File Location ● Smart Paging File Location ● Automatic Start Action ● Automatic Stop Action |
|
|
Cluster requirements |
Hyper-V instant recovery supports clustered and non-clustered virtual machines. The following requirements must be met to recover a clustered VM: ● The target Hyper-V server determines the cluster status of the new VM. To create a clustered VM with instant recovery, you must select a cluster as the target Hyper-V server. If you select an individual member node, the resulting VM is not clustered. ● When creating a clustered VM with instant recovery, you must select the network switch common to all nodes in the cluster. If you do not select this switch, the new VM will lose network connectivity if it fails over to another cluster node. |
Instant recovery can be performed at any time, as long as there are backups or backup copies for your VMs and sufficient backup storage is allocated as instant recovery space. Unitrends strongly recommends reserving space for instant recovery soon after initial deployment and before a VM fails. If necessary, you can allocate instant recovery space later, but doing so may require the appliance to purge local backups to make room for the newly allocated instant recovery space.
Because the disks for a recovered VM reside on the appliance until storage migration completes, you must allocate a portion of your backup storage for instant recovery. You must allocate at least 20 percent of the space used on the VM’s original disks. Once disks have been migrated to the recovered VM, appliance instant recovery storage is no longer needed.
NOTES
● Appliance storage that is allocated to instant recovery can also be used for the Windows replica feature.
● Storage allocated for instant recovery cannot be used for backups.
● Recovery Series and Recovery MAX physical appliances come with a set amount of backup storage. Backup storage allocation can be modified to increase the amount used for instant recovery. Backup storage cannot be added to the appliance.
● Unitrends Backup virtual appliances are deployed as virtual machines. After initial deployment, you can add more backup storage as desired. For details, see About adding backup storage to a Unitrends Backup appliance.
1. On the Configure > Appliances page, select the appliance.
2. On the Storage tab, select the Internal storage and click Edit.
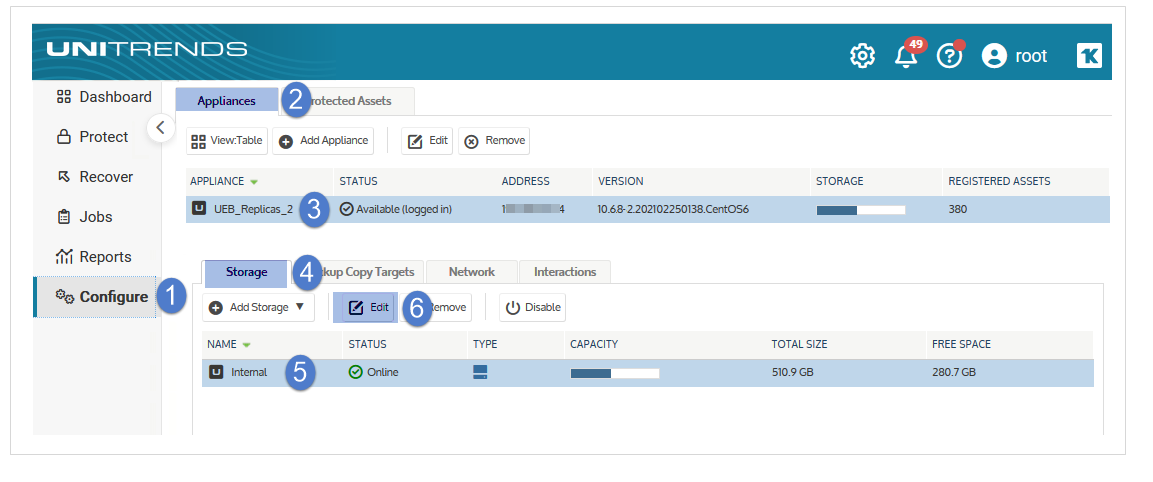
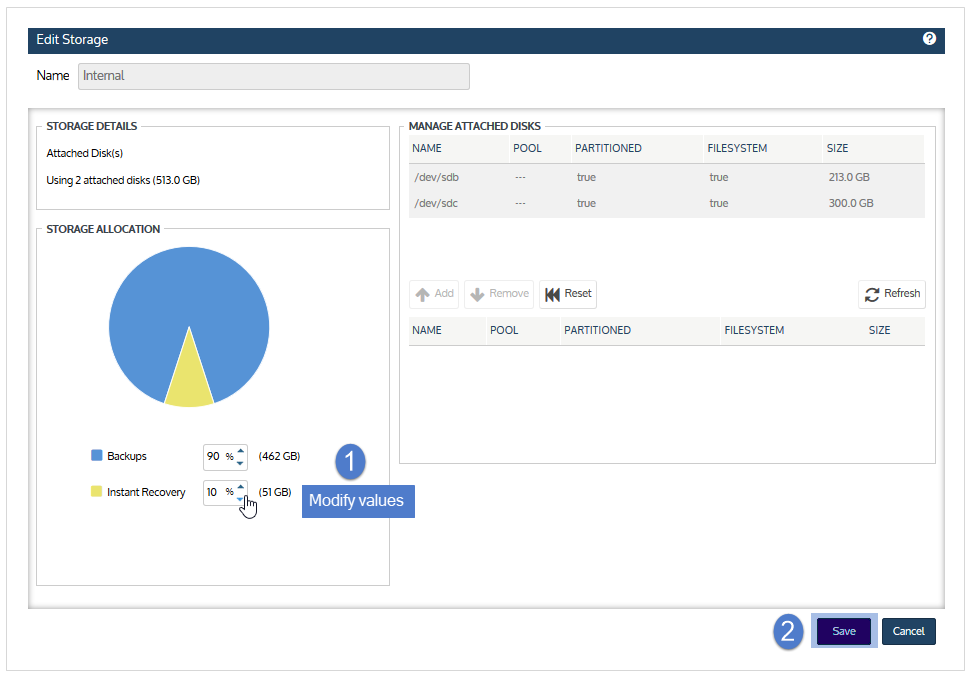
3. Modify the percentages used for backups versus instant recovery, and click Save.
Perform instant recovery in audit mode to verify that backups and backup copies can be used to recover the VM in the event of a disaster. Repeat this procedure as needed to test new backups.
Run this procedure from the backup appliance to recover from a backup or imported backup copy. Run this procedure from the backup copy target appliance to recover from a hot backup copy.
1. Log in to the backup appliance or target appliance (if recovering from a hot backup copy).
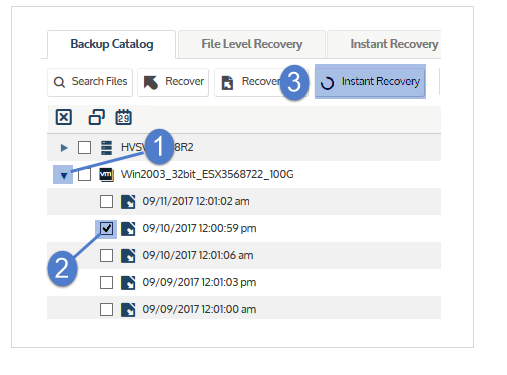
2. Select Recover and click the Backup Catalog tab.
(Optional) Use Filter Backups to the right to customize the backups that display. For details, see Working with custom filters.
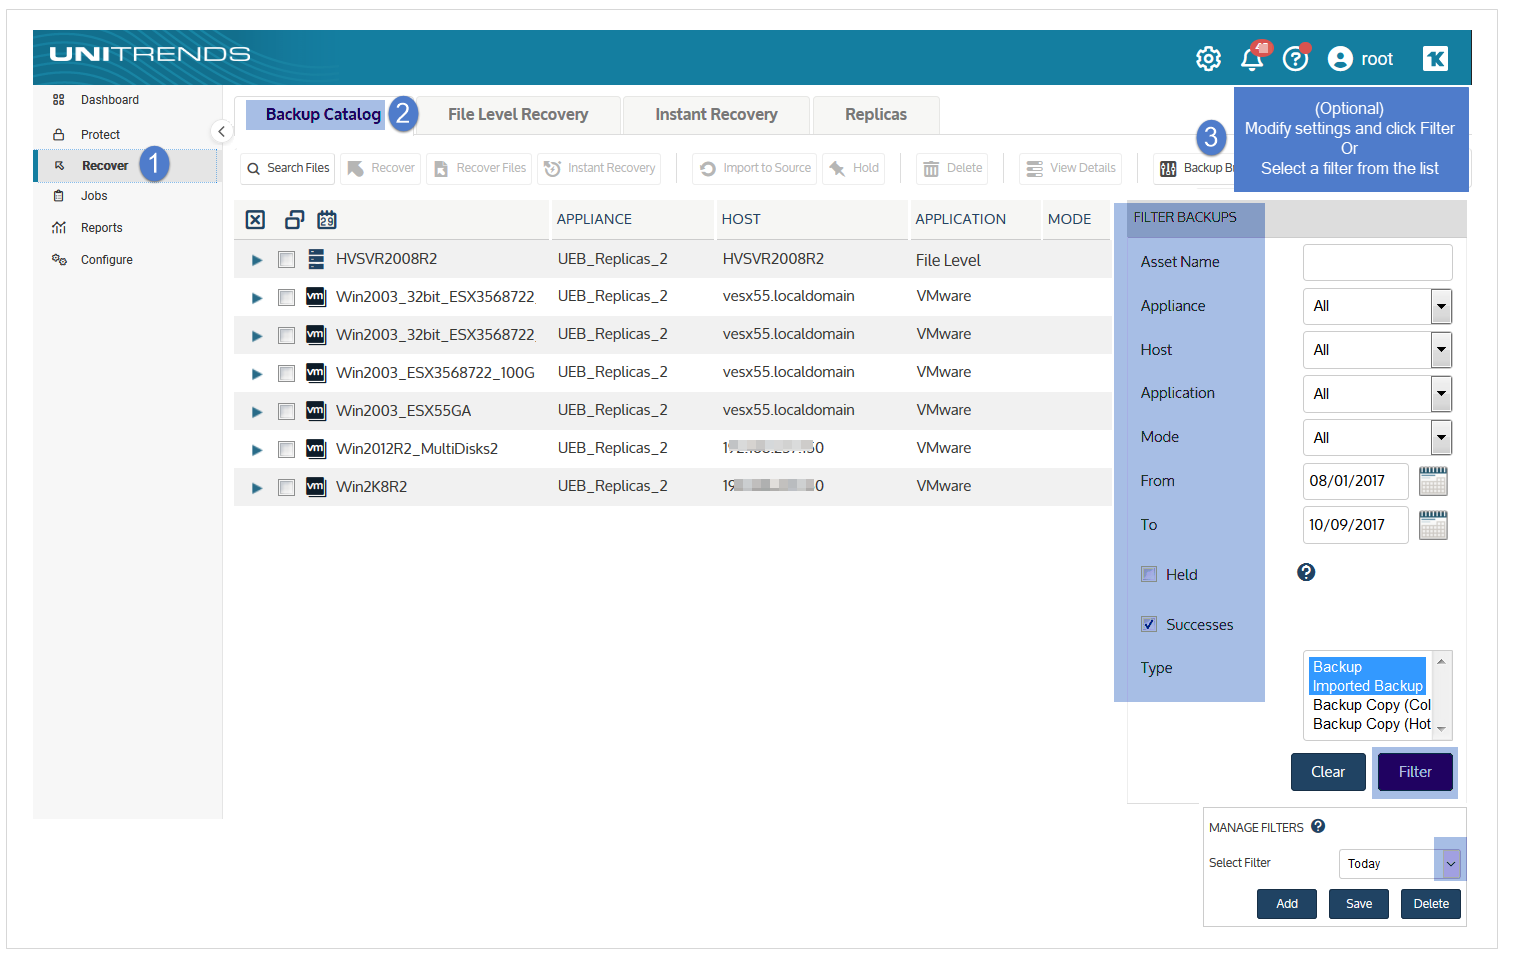
3. Expand the VM asset and select one of the following to use for the recovery:
● A host-level backup.
● An imported host-level backup copy. (To import a backup copy, see To import a cold backup copy or To import a hot backup copy.)
● A hot backup copy (supported if performing IR on the target appliance where the hot copy resides).
4. Click the Instant Recovery button.
5. Check the Recover this VM in Audit Mode box.
6. Select the following Recovery Options:
|
Recovery Options |
Description |
|---|---|
|
Target Location |
Select the host where the VM will be recovered. The list contains hosts that have been added to the appliance and are compatible with the VM being recovered. Incompatible hosts do not display in the list. ● To add a host, see Adding a virtual host. ● For Hyper-V clusters – To create a clustered VM, you must select a cluster as the target Hyper-V host. |
|
Target Resource |
(Optional) Select a resource pool. This field displays only if the Target Location is an ESXi host that has resource pools. |
|
Target Storage |
Select a datastore (ESXi host) or volume (Hyper-V host). |
|
Target Appliance Network |
Select a network adapter on the appliance to use for the recovery. eth0 is selected by default. If your appliance is configured with multiple adapters, you can opt to select a different adapter from the list. The appliance uses the selected adapter for communication with the hypervisor during the storage migration. |
7. Click Next.

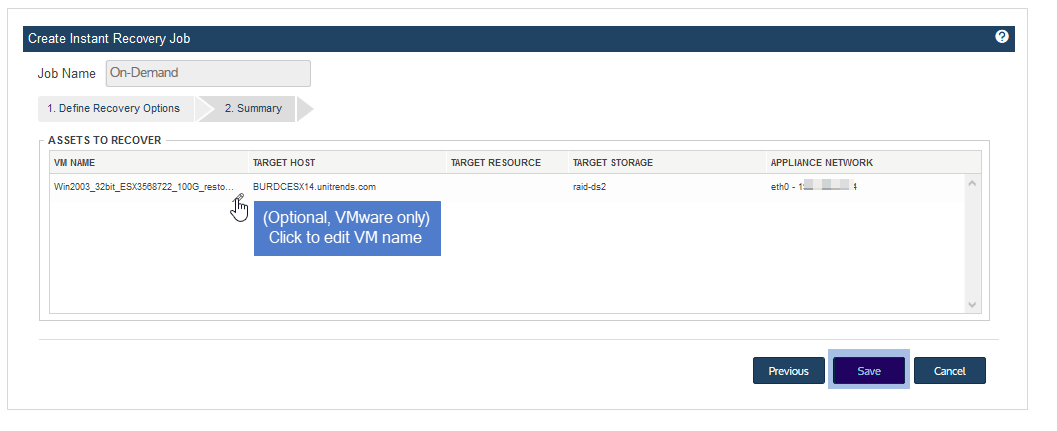
8. Review the recovery settings.
● A recovered VMware VM is created with the following default name: <original_VM_name>_restore. To change this name, click the pencil icon.
● A recovered Hyper-V VM is created with the same name as the original VM and no suffix. Due to Hyper-V limitations, it is not possible to rename the VM during the recovery, and the original VM is overwritten by the recovery operation if it resides on the recovery target.
9. Click Save to start the recovery.
10. Click OK to close the Information message.
The recovered VM is created on the target host. The VM has no network settings.
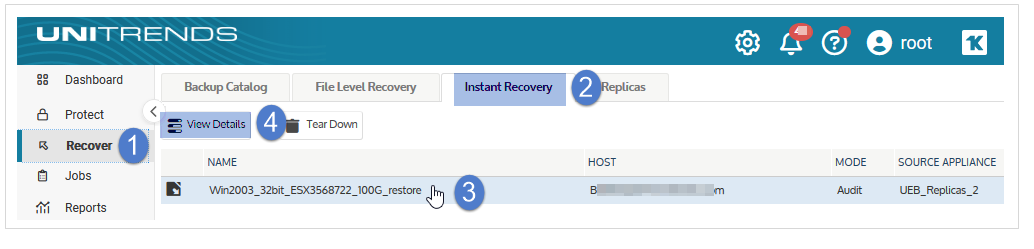
11. Check IR progress by viewing details on the Instant Recovery tab.
NOTE If you are recovering an incremental that has a long chain of dependent incrementals, it can take extra time to create the recovered VM.
● Click the Instant Recovery tab. Active IR sessions display by VM name.
● Click to select the IR session you created.
● Click View Details above.
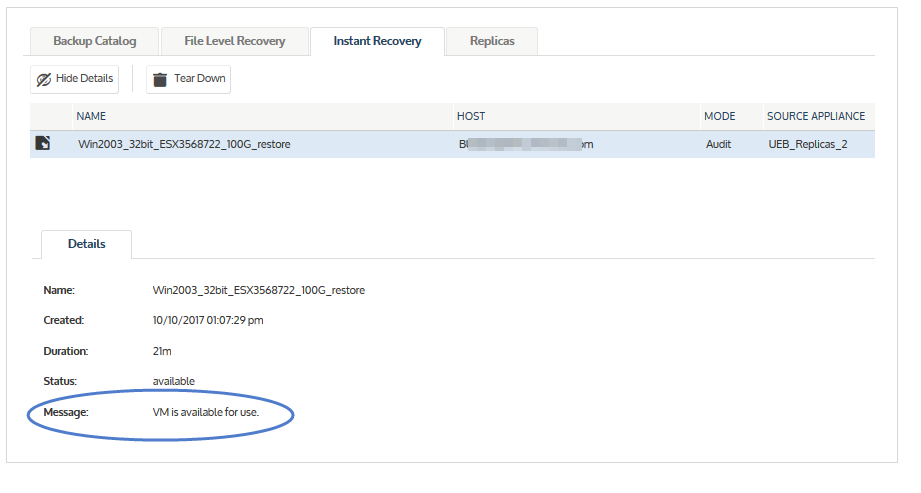
● Status messages display in the Details tab below. IR moves through several phases. The VM can be accessed when you see this message: VM is available for use.
12. Access the VM directly from the target VMware or Hyper-V host. Log in to the VM console and verify that the recovered VM is functioning as expected.
NOTES
● Any features or applications that require network access do not have full functionality in audit mode.
● Any changes made to the recovered VM in audit mode are lost when you tear down the IR session. These changes are not applied to the production VM that you are auditing.
● Windows server VMs - In rare instances, after a restore is performed for a Windows server VM, a disk may be inaccessible because it has been placed in an offline state. To bring disks into an online state, login to the VM, go to Disk Management, right-click on the offline disk, and select Online from the drop-down menu.
● Debian VMs - In some instances, Gnome might not start after a Debian VM is recovered. You can resolve this issue by rebooting the VM or restarting Gnome from the console. To access the console, enter Ctl+Alt+F1 and log in as root. Then run startx.
13. Tear down the IR session:
● On the Instant Recovery tab, click to select the IR session.
● Click Tear Down.
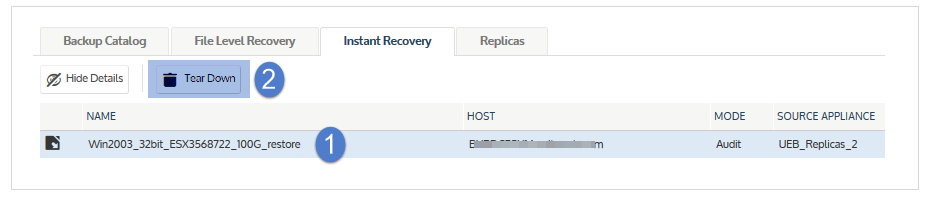
● Click Confirm.
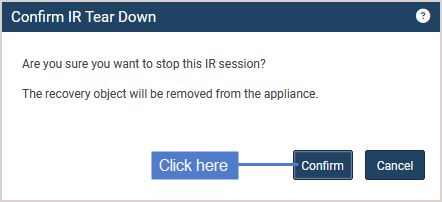
The recovery object is removed from the appliance and the recovered VM is removed from the target host.


